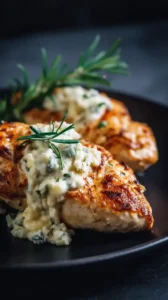
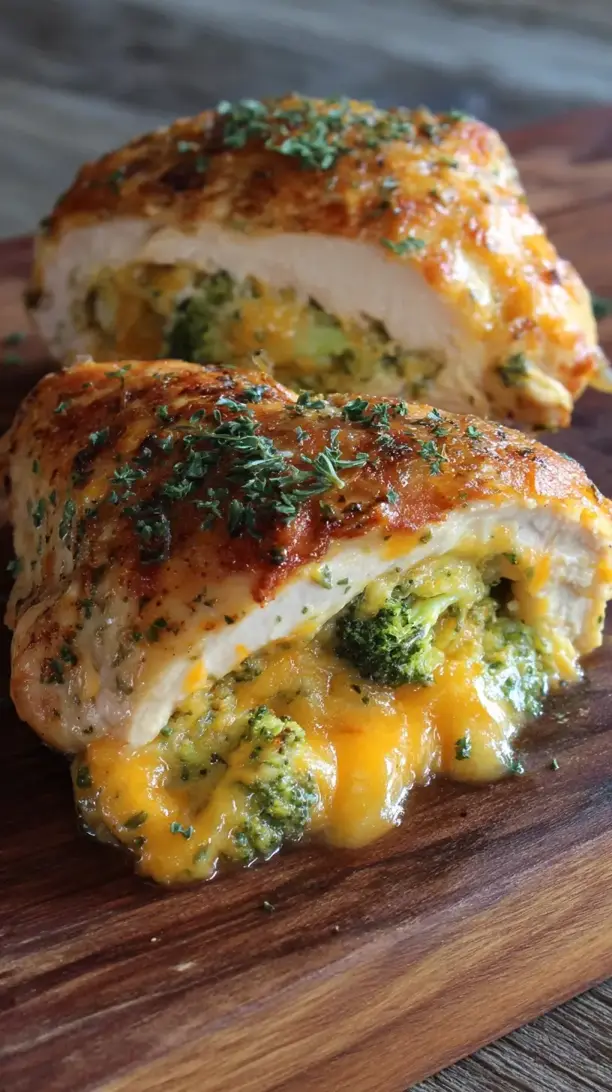
This Broccoli Cheese Stuffed Chicken transforms simple chicken breasts into a show-stopping dinner. Tender chicken is stuffed with a creamy, cheesy broccoli filling and baked until golden. It’s an impressive yet straightforward meal that feels fancy but comes together easily.
If you're looking for the perfect Broccoli Cheese Stuffed Chicken, you're in the right place. Whether you love Chicken Breast Recipes or want to explore our Breakfast & Brunch collection, we've got you covered.

Why You’ll Love This Broccoli Cheese Stuffed Chicken
- Complete impressive meal: Protein and veggies in one delicious package.
- Cheesy creamy filling: Rich, savory center that melts beautifully.
- Surprisingly simple: Easy techniques create a stunning result.
- Fantastic leftovers: Flavors deepen for next-day lunches.
Ingredients & Tools
- 4 boneless, skinless chicken breasts (about 150-180g each)
- 200 g broccoli florets, finely chopped
- 100 g sharp cheddar cheese, grated
- 100 g cream cheese, softened
- 50 g grated Parmesan cheese
- 1 small onion, finely diced
- 2 cloves garlic, minced
- 1 tsp paprika
- 1/2 tsp dried oregano
- 1 tbsp olive oil
- Salt and black pepper to taste
- Optional for topping: 50 g panko breadcrumbs mixed with 1 tbsp melted butter
Tools: A sharp knife, cutting board, mixing bowls, a skillet, and a baking dish.
Notes: Using full-fat cream cheese and a good, sharp cheddar is key here—they provide the rich, melty base for the stuffing. Don’t skip the fresh garlic; its pungent kick cuts through the richness perfectly.
Nutrition (per serving)
| Calories: | 420 kcal |
| Protein: | 38 g |
| Fat: | 25 g |
| Carbs: | 8 g |
| Fiber: | 2 g |
Serves: 4 | Prep Time: 20 minutes | Cook Time: 25 minutes | Total Time: 45 minutes
Before You Start: Tips & Ingredient Notes
- Chicken breast size matters. Try to find breasts that are similar in size and thickness so they cook at the same rate. If they’re very thick on one end, you can gently pound them to an even thickness.
- Don’t overcook the broccoli. You’re just blanching it for a minute to soften it slightly. It will finish cooking inside the chicken, and you don’t want it turning to mush.
- Get your cream cheese soft. Leave it out on the counter for 30 minutes before you start. This makes it much easier to mix into a smooth, cohesive filling.
- Be generous with seasoning. Season the chicken inside the pocket and the filling mixture itself. Chicken and broccoli both need a good amount of salt to truly shine.
How to Make Broccoli Cheese Stuffed Chicken
Step 1: Prepare the Broccoli Filling. Start by bringing a small pot of salted water to a boil. Add your finely chopped broccoli florets and blanch them for just 60 seconds—this brightens their color and makes them tender enough for the filling. Immediately drain and run under cold water to stop the cooking process. In a mixing bowl, combine the softened cream cheese, grated cheddar, Parmesan, the blanched broccoli, dried oregano, and paprika. Mix everything until it’s well combined. You’ll notice the mixture should be thick, creamy, and hold together easily.
Step 2: Prepare the Chicken Breasts. Pat your chicken breasts completely dry with paper towels—this helps with browning later. Using a sharp knife, carefully slice a deep pocket into the side of each chicken breast. Imagine you’re creating a little pouch; be careful not to cut all the way through to the other side. A good trick is to place your hand flat on top of the breast as you slice to steady it. Season the inside of each pocket generously with salt and pepper.
Step 3: Stuff the Chicken. Now, take a generous portion of your broccoli-cheese filling and carefully stuff it into the pocket of each chicken breast. Don’t overfill it, or the filling might burst out during cooking. You want it full but still able to be sealed. Use a couple of toothpicks to securely pin the opening of the pocket shut. This little step is crucial for keeping all that cheesy goodness inside where it belongs.
Step 4: Sear for Flavor and Color. Heat the olive oil in a large, oven-safe skillet over medium-high heat. Once the oil is shimmering, carefully add the stuffed chicken breasts. Sear them for about 2-3 minutes on each side, until you get a beautiful golden-brown crust. You’re not cooking them through here, just building a foundation of flavor and color. If you used the optional panko topping, now is the time to press it gently onto the top of each breast.
Step 5: Bake to Perfection. If your skillet isn’t oven-safe, transfer the seared chicken to a baking dish. Place the skillet or dish into a preheated 200°C (400°F) oven. Bake for 18-22 minutes, or until the chicken is cooked through and the internal temperature reaches 74°C (165°F). The cheese might be bubbling out a little, and that’s a good sign! The top should be golden, and the chicken should feel firm to the touch.
Step 6: Rest and Serve. This is the most important step—don’t skip it! Remove the chicken from the oven and let it rest for at least 5-7 minutes before serving. This allows the juices to redistribute throughout the meat, ensuring every bite is moist and tender. Carefully remove the toothpicks before plating.
Storage & Freshness Guide
- Fridge: Store leftovers in an airtight container for up to 3 days.
- Freezer: Wrap tightly and freeze for up to 2 months. Thaw in fridge before reheating.
- Reviving: Reheat in a 175°C (350°F) oven for 10-15 minutes to maintain texture.
Serving Suggestions
Complementary Dishes
- Garlic Mashed Potatoes — The ultimate comfort food pairing. The creamy potatoes are perfect for soaking up any cheesy sauce that escapes.
- A Simple Arugula Salad — The peppery, fresh greens provide a crisp, bright contrast to the rich, savory chicken.
- Buttered Rice Pilaf — A fluffy, seasoned rice acts as a neutral but delicious base that lets the stuffed chicken be the star.
Drinks
- A Crisp Chardonnay — Its slight oakiness and body can stand up to the rich cheese without overpowering the dish.
- Sparkling Water with Lemon — The bubbles and citrus cut through the richness beautifully, cleansing the palate between bites.
- An Amber Ale — The malty, caramel notes in the beer complement the savory, cheesy flavors wonderfully.
Something Sweet
- Lemon Sorbet — The sharp, clean, citrusy finish is incredibly refreshing after a rich and hearty meal.
- Classic Vanilla Panna Cotta — Its smooth, creamy, and delicate flavor provides a simple, elegant endnote.
- Warm Apple Crumble — The cozy, spiced fruit and buttery topping continue the theme of comfort in the most delicious way.
Top Mistakes to Avoid
- Overstuffing the chicken. It’s tempting to pack in as much filling as possible, but this will almost guarantee a burst seam and a messy bake. A little goes a long way.
- Skipping the sear. Taking the extra few minutes to sear the chicken creates a flavorful crust and helps lock in juices. Baking from raw won’t give you the same depth of flavor or texture.
- Not letting the chicken rest. If you cut into it straight from the oven, all the delicious juices will run out onto the plate, leaving the meat dry. Patience is a virtue here.
- Using frozen broccoli without thawing and drying. Excess water from frozen broccoli will make your filling watery and can steam the chicken instead of letting it roast properly.
Expert Tips
- Tip: Use a thermometer for perfect doneness. Guessing when chicken is cooked can lead to dryness. An instant-read thermometer takes the guesswork out—pull it at 74°C (165°F) for perfectly juicy meat every single time.
- Tip: Customize your cheese blend. Feel free to play with the cheeses! A bit of Gruyère adds a nutty depth, while a spoonful of goat cheese can introduce a lovely tanginess to the filling.
- Tip: Make-ahead is your friend. You can assemble the stuffed chicken breasts up to a day in advance. Keep them covered in the fridge, then simply sear and bake when you’re ready—a huge time-saver for dinner parties.
- Tip: Add a bit of crunch. That optional panko topping isn’t just for looks. It adds a wonderful textural contrast to the tender chicken and creamy filling. You could also mix some crushed nuts into the breadcrumbs.
FAQs
Can I use frozen broccoli?
You can, but you need to handle it correctly. Thaw it completely, then squeeze out as much excess water as you possibly can using a clean kitchen towel. If the broccoli is too wet, it will steam inside the chicken and make the filling runny and the chicken soggy. Honestly, fresh is best for control, but properly dried frozen broccoli will work in a pinch.
How do I know when the chicken is fully cooked?
The most reliable method is to use an instant-read meat thermometer. Insert it into the thickest part of the chicken (avoiding the filling if you can) and look for a temperature of 74°C (165°F). Visually, the juices should run clear, not pink, and the meat should be firm to the touch. The cheese will also be bubbly and golden.
Can I prepare this dish ahead of time?
Absolutely! This is a great make-ahead meal. You can stuff the chicken breasts, secure them with toothpicks, and store them covered in the refrigerator for up to 24 hours before you plan to cook them. Let them sit at room temperature for about 15-20 minutes before searing to take the chill off.
My filling leaked out during baking. What did I do wrong?
This usually happens for one of two reasons: either the pocket was overstuffed, putting too much pressure on the seam, or the opening wasn’t sealed securely enough with toothpicks. Next time, use a little less filling and make sure your toothpicks are firmly in place, closing the opening completely. A little leakage is normal, but a major spill means the seal was compromised.
What’s the best way to reheat leftovers?
To keep the chicken from drying out, avoid the microwave if you can. Reheat it gently in a 175°C (350°F) oven for about 10-15 minutes, or until warmed through. You can cover it loosely with foil to prevent the top from over-browning. This method helps preserve the texture much better.


Broccoli Cheese Stuffed Chicken
Learn how to make delicious Broccoli Cheese Stuffed Chicken with this easy recipe. Perfectly tender chicken with a creamy, cheesy filling. Get the step-by-step guide now!
Ingredients
For the main ingredients:
-
4 boneless, skinless chicken breasts (about 150-180g each)
-
200 g broccoli florets (finely chopped)
-
100 g sharp cheddar cheese (grated)
-
100 g cream cheese (softened)
-
50 g grated Parmesan cheese
-
1 small onion (finely diced)
-
2 cloves garlic (minced)
-
1 tsp paprika
-
0.5 tsp dried oregano
-
1 tbsp olive oil
-
Salt and black pepper (to taste)
-
50 g panko breadcrumbs mixed with 1 tbsp melted butter
Instructions
-
Start by bringing a small pot of salted water to a boil. Add your finely chopped broccoli florets and blanch them for just 60 seconds—this brightens their color and makes them tender enough for the filling. Immediately drain and run under cold water to stop the cooking process. In a mixing bowl, combine the softened cream cheese, grated cheddar, Parmesan, the blanched broccoli, dried oregano, and paprika. Mix everything until it’s well combined. You’ll notice the mixture should be thick, creamy, and hold together easily.01
-
Pat your chicken breasts completely dry with paper towels—this helps with browning later. Using a sharp knife, carefully slice a deep pocket into the side of each chicken breast. Imagine you’re creating a little pouch; be careful not to cut all the way through to the other side. A good trick is to place your hand flat on top of the breast as you slice to steady it. Season the inside of each pocket generously with salt and pepper.02
-
Now, take a generous portion of your broccoli-cheese filling and carefully stuff it into the pocket of each chicken breast. Don’t overfill it, or the filling might burst out during cooking. You want it full but still able to be sealed. Use a couple of toothpicks to securely pin the opening of the pocket shut. This little step is crucial for keeping all that cheesy goodness inside where it belongs.03
-
Heat the olive oil in a large, oven-safe skillet over medium-high heat. Once the oil is shimmering, carefully add the stuffed chicken breasts. Sear them for about 2-3 minutes on each side, until you get a beautiful golden-brown crust. You’re not cooking them through here, just building a foundation of flavor and color. If you used the optional panko topping, now is the time to press it gently onto the top of each breast.04
-
If your skillet isn’t oven-safe, transfer the seared chicken to a baking dish. Place the skillet or dish into a preheated 200°C (400°F) oven. Bake for 18-22 minutes, or until the chicken is cooked through and the internal temperature reaches 74°C (165°F). The cheese might be bubbling out a little, and that’s a good sign! The top should be golden, and the chicken should feel firm to the touch.05
-
This is the most important step—don’t skip it! Remove the chicken from the oven and let it rest for at least 5-7 minutes before serving. This allows the juices to redistribute throughout the meat, ensuring every bite is moist and tender. Carefully remove the toothpicks before plating.06
Not what you're looking for?


