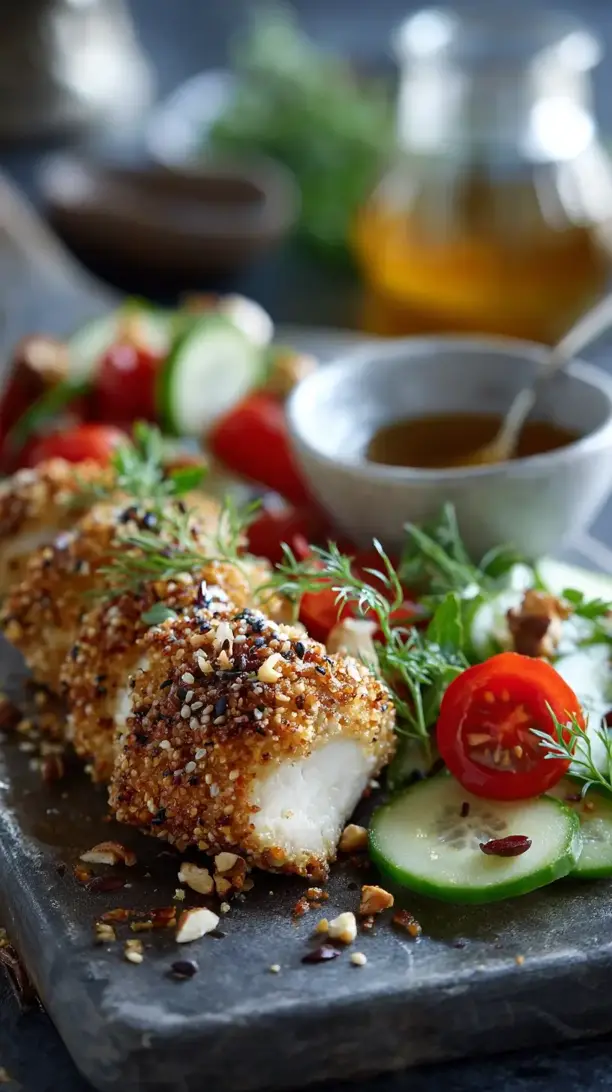
This Dukkah Crusted Chicken transforms simple chicken breasts into a spectacular weeknight meal. The Egyptian nut and spice blend creates a fragrant, crunchy crust with incredible texture. You’ll love how this dukkah crusted chicken feels fancy yet is straightforward enough for any busy evening.
Craving a delicious Dukkah Crusted Chicken? You've come to the right spot! From Chicken Breast Recipes favorites to amazing Dessert Recipes recipes, there's something here for everyone.


Why You’ll Love This Dukkah Crusted Chicken
Textural contrast: Crunchy nut crust meets tender, juicy chicken.
Complex flavors: Warm, earthy spices feel sophisticated yet simple.
Versatile blend: Extra dukkah elevates veggies, salads, and more.
Fast & impressive: Ready in 30 minutes with rustic, golden appeal.
Ingredients & Tools
- 2 large boneless, skinless chicken breasts (about 450-500 g total)
- 3 tbsp olive oil, divided
- 1/2 cup (60 g) hazelnuts
- 1/4 cup (35 g) sesame seeds
- 2 tbsp (20 g) coriander seeds
- 1 tbsp (15 g) cumin seeds
- 2 tsp fennel seeds
- 1/2 tsp flaky sea salt, plus more for seasoning
- 1/2 tsp black peppercorns
- 1/4 tsp chili flakes (optional, for a little heat)
- 2 tbsp all-purpose flour
- 1 large egg
Tools: A large oven-safe skillet, a spice grinder or small food processor, a meat mallet or rolling pin, and three shallow bowls for your breading station.
Notes: Dukkah is forgiving—don’t worry if you’re missing a seed. Toasting nuts and seeds properly unlocks their deepest, most aromatic flavors.
Nutrition (per serving)
| Calories: | 415 kcal |
| Protein: | 35 g |
| Fat: | 26 g |
| Carbs: | 11 g |
| Fiber: | 4 g |
Serves: 2 | Prep Time: 15 minutes | Cook Time: 20 minutes | Total Time: 35 minutes
Before You Start: Tips & Ingredient Notes
- Don’t skip the toasting step. This is non-negotiable for the best dukkah. Toasting the nuts and seeds separately ensures they each reach their perfect level of golden-brown fragrance without any of them burning.
- Pounding the chicken is a game-changer. It might seem like an extra step, but it ensures the chicken cooks evenly and quickly. No more dry, overcooked edges with a raw center! It also gives you more surface area for that delicious crust.
- What if I can’t find hazelnuts? No problem! Almonds or pistachios make a wonderful substitute. Just make sure they’re raw and unsalted so you can control the seasoning.
- Is a spice grinder essential? It’s the easiest tool for the job, but if you don’t have one, a mortar and pestle will work beautifully (and feel very authentic). A small, powerful food processor also does the trick.
How to Make Dukkah Crusted Chicken
Step 1: Toast the Nuts and Seeds. Start by preheating your oven to 400°F (200°C). Place the hazelnuts on a small baking sheet and toast them for 8-10 minutes, until fragrant and their skins are blistered. Wrap them in a clean kitchen towel and let them steam for a minute, then rub vigorously to remove most of the skins—don’t worry about getting every last bit. In a dry skillet over medium heat, toast the sesame seeds for 1-2 minutes until golden, shaking the pan often. Remove them to a plate. In the same skillet, toast the coriander, cumin, and fennel seeds for 2-3 minutes until they smell incredibly aromatic. You’ll know they’re ready when you can crush a coriander seed easily between your fingers.
Step 2: Make the Dukkah. Combine the peeled hazelnuts, toasted seeds, salt, peppercorns, and optional chili flakes in your spice grinder or small food processor. Pulse until the mixture is coarsely ground. You’re aiming for a texture with fine bits and some larger, crunchy pieces—this is what gives the crust its fantastic texture. Be careful not to over-process it into a paste. Set aside about half a cup of the dukkah for the chicken crust and store the rest in a jar for future use.
Step 3: Prepare the Chicken. Place the chicken breasts between two pieces of plastic wrap or in a large zip-top bag. Using a meat mallet or the bottom of a heavy pan, gently pound them to an even ½-inch (about 1.25 cm) thickness. This is the secret to juicy, evenly cooked chicken. Pat the chicken dry with a paper towel and season both sides generously with salt.
Step 4: Set Up Your Breading Station. This is where we build the layers for that perfect crust. You’ll need three shallow bowls. In the first, place the flour. In the second, whisk the egg with one tablespoon of the olive oil. In the third, place your reserved half-cup of dukkah. Having this assembly line ready makes the process smooth and mess-free.
Step 5: Bread the Chicken. Working with one piece at a time, dredge the chicken in the flour, shaking off any excess. Next, dip it into the egg mixture, letting the excess drip off. Finally, press the chicken firmly into the dukkah, making sure to coat every bit of the surface. You want a nice, thick, even layer. Place the breaded chicken on a clean plate.
Step 6: Cook to Perfection. Heat the remaining two tablespoons of olive oil in your large oven-safe skillet over medium-high heat. Once the oil is shimmering, carefully add the chicken. Cook for 3-4 minutes, without moving it, until the crust is deeply golden brown and releases easily from the pan. Flip the chicken and immediately transfer the entire skillet to the preheated oven. Roast for 10-12 minutes, until the chicken is cooked through and registers 165°F (74°C) on an instant-read thermometer. The crust should be dark golden and incredibly fragrant.
Step 7: Rest and Serve. Remove the chicken from the oven and transfer it to a cutting board. Let it rest for at least 5 minutes. This is a crucial step—it allows the juices to redistribute throughout the meat, ensuring every single slice is moist and tender. Then, slice and serve immediately.
Storage & Freshness Guide
- Fridge: Store leftovers in an airtight container for up to 3 days.
- Freezer: Freeze uncooked breaded chicken on a parchment-lined sheet, then transfer to a freezer bag for up to 1 month.
- Reviving: Reheat in an air fryer or oven at 375°F (190°C) for 5–8 minutes to restore crispness.
Serving Suggestions
Complementary Dishes
- A simple couscous salad with herbs and lemon — The light, fluffy texture of couscous soaks up any pan juices beautifully, and the bright lemon cuts through the richness of the nuts.
- Roasted carrots with a drizzle of honey — The natural sweetness of the carrots becomes caramelized and pairs wonderfully with the earthy, savory dukkah crust.
- Garlicky sautéed spinach or kale — This adds a vibrant, green element and a bit of freshness that balances the dish perfectly.
Drinks
- A crisp, citrus-forward Sauvignon Blanc — The wine’s acidity and notes of grapefruit and lime will cleanse your palate and highlight the herbal notes in the dukkah.
- A light-bodied, malty lager — The beer won’t overpower the chicken and its carbonation will help cut through the nutty richness of the crust.
Something Sweet
- Orange and almond cake — The citrus and nut flavors are a natural extension of the flavors in your main course, creating a beautifully cohesive meal from start to finish.
- Honey and Greek yogurt with pistachios — It’s a simple, light dessert that feels refreshing and continues the Middle Eastern theme in a subtle, delightful way.
Top Mistakes to Avoid
- Mistake: Not pounding the chicken evenly. If your chicken is thick in the middle and thin on the edges, the thin parts will be overcooked and dry by the time the thick center is done. An even thickness is the key to perfect doneness.
- Mistake: Burning the nuts or seeds. They go from perfectly toasted to acrid and burnt in seconds. Keep a close eye on them and shake the pan constantly. If you smell them, they’re usually done!
- Mistake: Skipping the rest after cooking. I know it’s tempting to dig right in, but if you slice the chicken immediately, all those precious juices will run out onto the cutting board, leaving you with drier meat. Patience is a virtue here.
- Mistake: Over-processing the dukkah. You want a rustic, textured blend, not a fine powder or, worse, a nut butter. Use the pulse function on your processor and stop while there are still small, identifiable pieces.
Expert Tips
- Tip: Make a big batch of dukkah. Double or triple the nut and seed mixture and store it in an airtight jar in a cool, dark place. It will keep for a few weeks and you can use it to elevate roasted veggies, sprinkle over soups, or mix with olive oil for a incredible bread dip.
- Tip: Use one hand for wet, one for dry. When breading, use one hand to handle the chicken in the flour and dukkah (dry ingredients), and the other hand for the egg wash (wet ingredient). This prevents your fingers from becoming a clumpy, breaded mess.
- Tip: Check the temperature. An instant-read thermometer is your best friend in the kitchen. It takes the guesswork out of cooking chicken. Pull it from the oven at 165°F (74°C) for perfectly safe and juicy results every single time.
- Tip: Reheat with care. To maintain the crisp crust on leftovers, reheat in an air fryer or a conventional oven at 375°F (190°C) for 5-8 minutes. The microwave will make the crust soft and soggy.
FAQs
Can I use chicken thighs instead of breasts?
Absolutely! Bone-in, skin-on thighs would be fantastic. You’ll follow the same breading process but will need to increase the cooking time in the oven, probably to around 20-25 minutes, until the internal temperature reaches 165°F (74°C). The higher fat content in thighs makes them incredibly forgiving and juicy.
How long does homemade dukkah last?
Stored in an airtight container in a cool, dark pantry, your homemade dukkah will stay fresh and flavorful for about 3-4 weeks. The oils in the nuts can eventually go rancid, so if you want to keep it longer, I’d recommend storing it in the freezer where it will last for up to 3 months.
My dukkah isn’t sticking to the chicken well. What did I do wrong?
This usually happens if you don’t shake off the excess flour or let the excess egg drip off. You want a thin, even layer of each component. Also, make sure you’re pressing the chicken firmly into the dukkah mixture to help it adhere. A good, firm press is the trick.
Is there a way to make this gluten-free?
Easily! Just substitute the all-purpose flour with your favorite gluten-free flour blend, or even almond flour. The breading process remains exactly the same, and you’ll end up with a delicious, gluten-free version that’s just as crispy and flavorful.
Can I pan-fry the chicken the whole way instead of finishing it in the oven?
You can, but it’s trickier. The thick crust can burn by the time the center of the chicken cooks through on the stovetop. The oven method is more foolproof because it provides gentle, ambient heat that cooks the chicken evenly without further browning the crust. If you must do it stovetop-only, reduce the heat to medium-low after flipping and cover the skillet to help the heat penetrate.


Dukkah Crusted Chicken
Make this easy Dukkah Crusted Chicken with a crunchy Egyptian spice blend. Ready in 35 minutes for a flavorful weeknight meal. Get the recipe now!
Ingredients
For the Ingredients
-
2 large boneless, skinless chicken breasts (about 450-500 g total)
-
3 tbsp olive oil (divided)
-
1/2 cup hazelnuts (60 g)
-
1/4 cup sesame seeds (35 g)
-
2 tbsp coriander seeds (20 g)
-
1 tbsp cumin seeds (15 g)
-
2 tsp fennel seeds
-
1/2 tsp flaky sea salt (plus more for seasoning)
-
1/2 tsp black peppercorns
-
1/4 tsp chili flakes (optional, for a little heat)
-
2 tbsp all-purpose flour
-
1 large egg
Instructions
-
Toast the Nuts and Seeds. Start by preheating your oven to 400°F (200°C). Place the hazelnuts on a small baking sheet and toast them for 8-10 minutes, until fragrant and their skins are blistered. Wrap them in a clean kitchen towel and let them steam for a minute, then rub vigorously to remove most of the skins—don't worry about getting every last bit. In a dry skillet over medium heat, toast the sesame seeds for 1-2 minutes until golden, shaking the pan often. Remove them to a plate. In the same skillet, toast the coriander, cumin, and fennel seeds for 2-3 minutes until they smell incredibly aromatic. You’ll know they’re ready when you can crush a coriander seed easily between your fingers.01
-
Make the Dukkah. Combine the peeled hazelnuts, toasted seeds, salt, peppercorns, and optional chili flakes in your spice grinder or small food processor. Pulse until the mixture is coarsely ground. You’re aiming for a texture with fine bits and some larger, crunchy pieces—this is what gives the crust its fantastic texture. Be careful not to over-process it into a paste. Set aside about half a cup of the dukkah for the chicken crust and store the rest in a jar for future use.02
-
Prepare the Chicken. Place the chicken breasts between two pieces of plastic wrap or in a large zip-top bag. Using a meat mallet or the bottom of a heavy pan, gently pound them to an even ½-inch (about 1.25 cm) thickness. This is the secret to juicy, evenly cooked chicken. Pat the chicken dry with a paper towel and season both sides generously with salt.03
-
Set Up Your Breading Station. This is where we build the layers for that perfect crust. You’ll need three shallow bowls. In the first, place the flour. In the second, whisk the egg with one tablespoon of the olive oil. In the third, place your reserved half-cup of dukkah. Having this assembly line ready makes the process smooth and mess-free.04
-
Bread the Chicken. Working with one piece at a time, dredge the chicken in the flour, shaking off any excess. Next, dip it into the egg mixture, letting the excess drip off. Finally, press the chicken firmly into the dukkah, making sure to coat every bit of the surface. You want a nice, thick, even layer. Place the breaded chicken on a clean plate.05
-
Cook to Perfection. Heat the remaining two tablespoons of olive oil in your large oven-safe skillet over medium-high heat. Once the oil is shimmering, carefully add the chicken. Cook for 3-4 minutes, without moving it, until the crust is deeply golden brown and releases easily from the pan. Flip the chicken and immediately transfer the entire skillet to the preheated oven. Roast for 10-12 minutes, until the chicken is cooked through and registers 165°F (74°C) on an instant-read thermometer. The crust should be dark golden and incredibly fragrant.06
-
Rest and Serve. Remove the chicken from the oven and transfer it to a cutting board. Let it rest for at least 5 minutes. This is a crucial step—it allows the juices to redistribute throughout the meat, ensuring every single slice is moist and tender. Then, slice and serve immediately.07
Not what you're looking for?


