Looking for Instant Pot Chicken Breast inspiration? You'll love what we have! Explore more Chicken Breast Recipes recipes or discover our Chicken Thigh Recipes favorites.


Why You’ll Love This Instant Pot Chicken Breast
- Never dry: Pressurized steam locks in juices for incredibly tender results.
- Hands-off cooking: Set it and forget it—no babysitting required.
- Meal-prep friendly: A versatile protein base for salads, tacos, sandwiches, and more.
- Deep flavor: Simple pantry staples create a savory, satisfying broth.
Ingredients & Tools
- 1 to 1.5 lbs boneless, skinless chicken breasts
- 1 cup chicken broth (low-sodium recommended)
- 2 tbsp olive oil or avocado oil
- 1 tsp garlic powder
- 1 tsp onion powder
- 1/2 tsp smoked paprika (for a subtle smoky depth)
- 1 tsp dried Italian seasoning
- 1/2 tsp salt, or to taste
- 1/4 tsp black pepper
Tools: Your 6 or 8-quart Instant Pot or other electric pressure cooker, and a pair of tongs.
Notes: The chicken broth creates steam and a flavorful cooking liquid—quality matters. Don’t skip the oil; it helps seasonings stick and adds richness.
Nutrition (per serving)
| Calories: | 196 kcal |
| Protein: | 31 g |
| Fat: | 7 g |
| Carbs: | 2 g |
| Fiber: | 0 g |
Serves: 4 | Prep Time: 5 minutes | Cook Time: 10 minutes (plus pressure build/release) | Total Time: 25 minutes
Before You Start: Tips & Ingredient Notes
- What if my chicken breasts are huge or uneven? For the most even cooking, try to buy chicken breasts that are similar in size and thickness. If you have one really thick one, you can gently pound the thicker end with a rolling pin or pan to even it out—just don’t make it too thin.
- Can I use frozen chicken? You can, but you’ll need to adjust the time. For frozen breasts, increase the high-pressure cooking time to 12-15 minutes. Just be aware they might release more liquid, which can dilute the seasoning slightly.
- Is the type of broth important? Honestly, yes. Since there are so few ingredients, the quality of your broth shines through. A low-sodium broth gives you control over the final salt level, and a good, rich homemade or store-bought broth will impart a much nicer flavor than a watery, overly salty one.
- Why the mix of dried spices? This particular blend of garlic, onion, paprika, and Italian seasoning creates a well-rounded, savory base that isn’t overpowering. It lets the chicken be the star while still being delicious enough to eat on its own.
How to Make Instant Pot Chicken Breast
Step 1: Season the Chicken. Pat your chicken breasts completely dry with paper towels—this is a crucial step for getting a good sear and helping the seasoning stick. In a small bowl, mix together the garlic powder, onion powder, smoked paprika, Italian seasoning, salt, and pepper. Drizzle the olive oil over the chicken breasts, then rub the spice mixture evenly over all sides. You’ll notice the chicken will look nicely coated and smell fantastic already.
Step 2: Sauté for Flavor. Place your Instant Pot liner in the base and press the “Sauté” function. Let it heat up for a minute, then carefully place the seasoned chicken breasts in the pot. You should hear a gentle sizzle. Sear them for about 2-3 minutes per side, just until they develop a golden-brown crust. You’re not cooking them through here, just building a foundation of flavor and color. The aroma at this stage is just… incredible.
Step 3: Deglaze and Pressurize. Hit “Cancel” to turn off the sauté function. Now, quickly pour in the one cup of chicken broth. Use a wooden spoon or spatula to scrape up any browned bits stuck to the bottom of the pot—this is called deglazing, and it’s where a ton of flavor lives. Those little bits will dissolve into the broth, making it even more delicious. Place the lid on the Instant Pot, set the valve to “Sealing,” and select the “Manual” or “Pressure Cook” function on High pressure. Set the timer for 6 minutes for average-sized breasts (around 6-8 oz each).
Step 4: The All-Important Natural Release. When the cooking time is up, the pot will beep. Now, do not immediately turn the valve to “Venting” for a quick release! This is the secret to juicy chicken. Let the pressure come down naturally for 10 minutes. You’ll see the float valve drop. This gentle release allows the chicken to finish cooking gradually without seizing up and pushing out all its moisture.
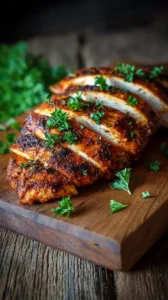
Step 5: Check and Rest. After 10 minutes, if any pressure remains, you can carefully turn the valve to “Venting” to release the rest. Open the lid away from you. The chicken should look plump and be sitting in a lovely, seasoned broth. Use an instant-read thermometer to check that the thickest part of the breast has reached 165°F (74°C). Immediately remove the chicken to a cutting board or plate and let it rest for 5 minutes before slicing or shredding. This resting period lets the juices redistribute throughout the meat.
Storage & Freshness Guide
- Fridge: Cool completely, store in an airtight container for up to 4 days.
- Freezer: Shred or slice, freeze in cooking liquid for up to 3 months.
- Reviving: Gently reheat in a skillet with broth or steam to retain moisture.
Serving Suggestions
Complementary Dishes
- Fluffy White Rice or Quinoa — The cooking liquid from the pot is a seasoned goldmine; spoon it over the grains for an instant flavor boost.
- A Simple Green Salad with a Zesty Vinaigrette — The fresh, crisp greens and acidic dressing cut through the richness of the chicken beautifully.
- Roasted Broccoli or Asparagus — The caramelized, slightly charred edges of the veggies provide a wonderful textural and flavor contrast to the tender chicken.
Drinks
- A Crisp Sauvignon Blanc — Its bright acidity and citrus notes complement the simple, savory flavors of the chicken without overwhelming them.
- Sparkling Water with Lemon — A non-alcoholic option that cleanses the palate and keeps everything feeling light and fresh.
- A Light Lager or Pilsner — The effervescence and mild bitterness of the beer make it a refreshing partner for this easy-going meal.
Something Sweet
- Lemon Sorbet — Its sharp, clean citrus flavor is the perfect palate-cleansing finish after a savory dinner.
- Fresh Berry Parfait — Layers of yogurt, honey, and mixed berries offer a light, sweet, and creamy endnote.
- Dark Chocolate Squares with Sea Salt — Just a small piece of rich, bittersweet chocolate provides a sophisticated and satisfying conclusion.
Top Mistakes to Avoid
- Mistake: Skipping the sear. I know it’s tempting to just throw everything in and pressure cook, but those two minutes per side add a crucial layer of flavor through the Maillard reaction. It’s the difference between tasty chicken and truly great chicken.
- Mistake: Using a quick pressure release. This is probably the number one reason for tough, dry chicken from the Instant Pot. The sudden pressure drop causes the muscle fibers to contract violently, squeezing out all the precious juices. The 10-minute natural release is non-negotiable for tenderness.
- Mistake: Overcooking. For standard-sized breasts, 6 minutes under high pressure is all you need. Overestimating the time “to be safe” is a surefire path to rubbery chicken. Trust the timer and the natural release.
- Mistake: Skipping the rest. Cutting into the chicken immediately after cooking lets all the juices run out onto the cutting board instead of staying in the meat. Letting it rest for just five minutes makes a world of difference in juiciness.
Expert Tips
- Tip: Use the “Poultry” setting as a guide, not a rule. Many newer Instant Pots have a “Poultry” button, but it often defaults to a longer cooking time. For breasts, manual high pressure for 6 minutes is more reliable. The poultry setting is better for whole chickens or thighs.
- Tip: Don’t overcrowd the pot. If you’re doubling the recipe, make sure the chicken breasts are in a single layer and not stacked on top of each other. Stacking can lead to uneven cooking, with some pieces being overdone and others under.
- Tip: Save that liquid! The broth left in the pot is lightly seasoned and full of chicken flavor. It’s fantastic for cooking rice, thinning out a sauce, or as a base for a quick soup. Strain it and keep it in the fridge for up to 3 days.
- Tip: Shred directly in the pot. For pulled chicken, after resting, you can return the chicken to the pot and use two forks to shred it. Toss it in the remaining cooking liquid to keep it super moist and flavorful.
FAQs
Can I cook chicken breasts from frozen?
Yes, you absolutely can, which is a huge lifesaver. You’ll want to increase the high-pressure cooking time to 12-15 minutes, followed by the same 10-minute natural release. The trick is to not add any extra liquid, as the frozen chicken will release plenty as it thaws and cooks. The seasoning might not stick as well to the frozen surface, so you can add a pinch more salt and pepper to the broth itself.
Why is my chicken still pink inside?
If you find a pink tinge or pink liquid, it’s usually not a sign of being undercooked if the temperature has reached 165°F. This can sometimes happen due to the chicken’s age, diet, or a condition called “woody breast.” As long as your thermometer reads 165°F in the thickest part, the chicken is safe to eat. If it’s below that, simply seal the lid and cook for another 1-2 minutes under pressure.
How should I store and reheat the leftovers?
Let the chicken cool completely before storing it in an airtight container in the refrigerator for up to 4 days. For reheating, the best way to retain moisture is not in the microwave. Instead, gently warm slices in a skillet with a splash of the reserved cooking liquid or broth, or eat it cold in salads. For shredded chicken, you can steam it briefly.
Can I use this method for chicken thighs?
You can, but the timing will be different. Boneless, skinless thighs are more forgiving and can handle a slightly longer cook time. I’d recommend 8-10 minutes of high pressure with a 10-minute natural release. They’ll be fall-apart tender and incredibly juicy.
My chicken is a bit bland. How can I add more flavor?
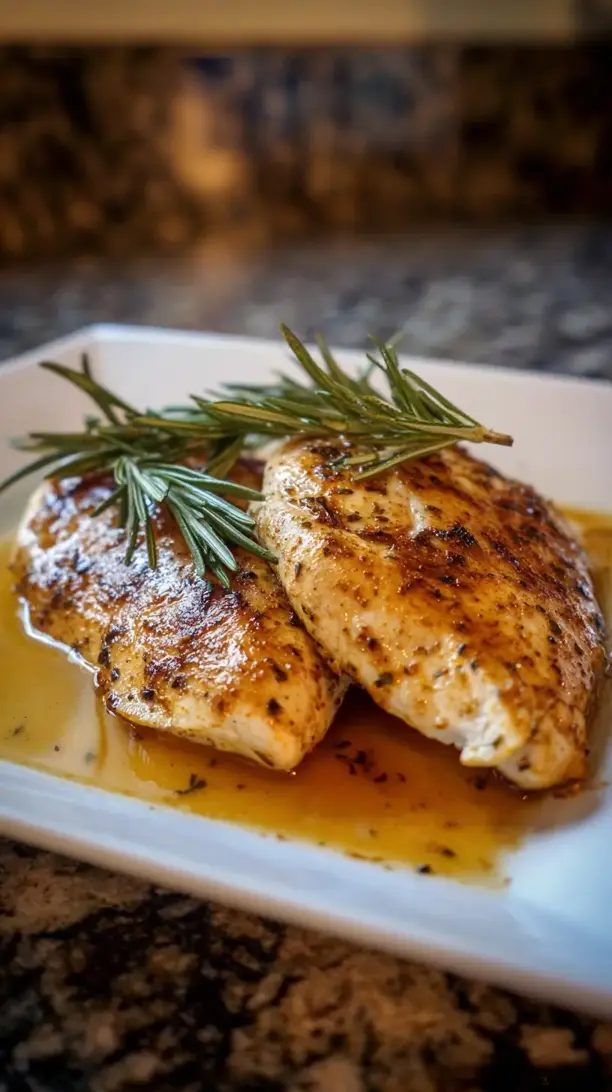
There are a few easy fixes! First, be generous with the salt in the rub. Second, you can add flavor boosters directly to the pot with the broth—a halved lemon, a few sprigs of fresh herbs like thyme or rosemary, or a tablespoon of soy sauce or Worcestershire sauce can work wonders. Finally, don’t forget to season the chicken again lightly after cooking if it needs it.


Instant Pot Chicken Breast
Learn how to make perfectly juicy Instant Pot Chicken Breast in under 30 minutes. This easy, foolproof recipe is a game-changer for weeknight dinners. Get the recipe now!
Ingredients
For the Ingredients & Tools
-
1 to 1.5 lbs boneless, skinless chicken breasts
-
1 cup chicken broth (low-sodium recommended)
-
2 tbsp olive oil or avocado oil
-
1 tsp garlic powder
-
1 tsp onion powder
-
0.5 tsp smoked paprika (for a subtle smoky depth)
-
1 tsp dried Italian seasoning
-
0.5 tsp salt (or to taste)
-
0.25 tsp black pepper
Instructions
-
Pat your chicken breasts completely dry with paper towels—this is a crucial step for getting a good sear and helping the seasoning stick. In a small bowl, mix together the garlic powder, onion powder, smoked paprika, Italian seasoning, salt, and pepper. Drizzle the olive oil over the chicken breasts, then rub the spice mixture evenly over all sides. You’ll notice the chicken will look nicely coated and smell fantastic already.01
-
Place your Instant Pot liner in the base and press the "Sauté" function. Let it heat up for a minute, then carefully place the seasoned chicken breasts in the pot. You should hear a gentle sizzle. Sear them for about 2–3 minutes per side, just until they develop a golden-brown crust. You’re not cooking them through here, just building a foundation of flavor and color. The aroma at this stage is just… incredible.02
-
Hit "Cancel" to turn off the sauté function. Now, quickly pour in the one cup of chicken broth. Use a wooden spoon or spatula to scrape up any browned bits stuck to the bottom of the pot—this is called deglazing, and it’s where a ton of flavor lives. Those little bits will dissolve into the broth, making it even more delicious. Place the lid on the Instant Pot, set the valve to "Sealing," and select the "Manual" or "Pressure Cook" function on High pressure. Set the timer for 6 minutes for average-sized breasts (around 6–8 oz each).03
-
When the cooking time is up, the pot will beep. Now, do not immediately turn the valve to "Venting" for a quick release! This is the secret to juicy chicken. Let the pressure come down naturally for 10 minutes. You’ll see the float valve drop. This gentle release allows the chicken to finish cooking gradually without seizing up and pushing out all its moisture.04
-
After 10 minutes, if any pressure remains, you can carefully turn the valve to "Venting" to release the rest. Open the lid away from you. The chicken should look plump and be sitting in a lovely, seasoned broth. Use an instant-read thermometer to check that the thickest part of the breast has reached 165°F (74°C). Immediately remove the chicken to a cutting board or plate and let it rest for 5 minutes before slicing or shredding. This resting period lets the juices redistribute throughout the meat.05
Not what you're looking for?


