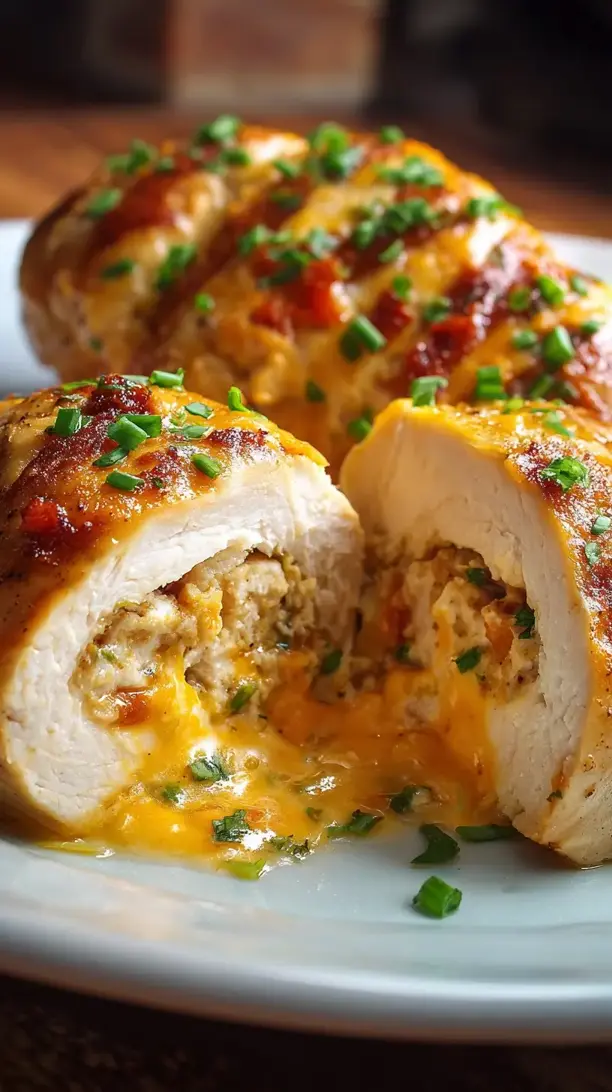
If you’re tired of boring chicken breasts, this Taco Stuffed Chicken is the perfect solution. It transforms simple chicken into a juicy, flavor-packed main event with a zesty, cheesy filling. This impressive yet easy recipe delivers all the fun of taco night in one neat package.
Nothing beats a great Taco Stuffed Chicken. Whether you're a fan of Chicken Breast Recipes or want to try something from our Appetizers & Snacks selection, keep scrolling!


Why You’ll Love This Taco Stuffed Chicken
- Flavor explosion: Savory chicken, melty cheese, and zesty lime create an unforgettable bite.
- Impressive & easy: Simple butterflying and stuffing technique delivers a wow factor.
- Versatile canvas: Easily customize the filling with different cheeses or veggies.
- Great leftovers: Sliced cold on salads or reheated in wraps for next-day meals.
Ingredients & Tools
- 4 boneless, skinless chicken breasts (about 150-180g each)
- 1 tbsp olive oil
- 1 tsp smoked paprika
- 1/2 tsp garlic powder
- 1/2 tsp onion powder
- 1/4 tsp cumin
- 1/4 tsp chili powder (adjust to your heat preference)
- 100 g cream cheese, softened
- 80 g sharp cheddar cheese, freshly grated
- 2 tbsp fresh cilantro, finely chopped
- 1 lime, zested and juiced
- 1/2 tsp kosher salt, plus more for seasoning
- 1/4 tsp freshly ground black pepper
Tools: A sharp chef’s knife, cutting board, meat mallet or rolling pin, toothpicks, a large oven-safe skillet, and a small mixing bowl.
Notes: Freshly grated cheddar melts more smoothly than pre-shredded. Lime zest adds a bright, aromatic punch to the filling.
Nutrition (per serving)
| Calories: | 385 kcal |
| Protein: | 42 g |
| Fat: | 22 g |
| Carbs: | 4 g |
| Fiber: | 1 g |
Serves: 4 | Prep Time: 20 minutes | Cook Time: 20 minutes | Total Time: 40 minutes
Before You Start: Tips & Ingredient Notes
- Get your cream cheese to room temperature. This is non-negotiable for a smooth, spreadable filling. If it’s cold, it’ll be lumpy and difficult to work with, and you might tear the delicate chicken. Take it out of the fridge about 30-60 minutes before you start cooking.
- Why grate your own cheese? Pre-shredded bagged cheese is coated with potato starch or cellulose to prevent clumping. This also prevents it from melting into that beautiful, gooey stringiness we all love. A minute with a box grater is totally worth it for the superior texture.
- Pound with purpose, not aggression. You’re not trying to pulverize the chicken, just even it out. Place the butterflied breast between two pieces of plastic wrap or in a large zip-top bag. This contains the mess and prevents any tearing. Use the flat side of the mallet and gentle, even pressure.
- Don’t skip the sear. That initial blast of heat in a hot skillet is what creates a gorgeous, flavorful crust and locks in the juices. It also gives the toothpicks a chance to set, so the filling is less likely to escape during the oven phase.
How to Make Taco Stuffed Chicken
Step 1: Prepare the Chicken. Start by patting your chicken breasts completely dry with paper towels—this is the secret to getting a good sear. Place one breast on your cutting board. Using a sharp knife, carefully slice horizontally through the thickest part of the breast, but stop about 1 cm from the opposite edge, so it opens up like a book. Place it between two sheets of plastic wrap and gently pound it with a meat mallet or rolling pin until it’s an even 1/2-inch thickness. Repeat with the remaining breasts. You’ll notice they become much larger and more pliable, which is exactly what you want for stuffing.
Step 2: Make the Flavorful Filling. In your small mixing bowl, combine the softened cream cheese, grated cheddar, chopped cilantro, lime zest, 1 tablespoon of the lime juice, smoked paprika, garlic powder, onion powder, cumin, chili powder, salt, and pepper. Mix everything together with a fork or spatula until it’s well-combined and smooth. Give it a little taste—it should be zesty, cheesy, and perfectly spiced. Adjust the salt or lime if you feel it needs it.
Step 3: Stuff and Secure. Lay your pounded chicken breasts flat on the board. Divide the filling evenly among them, placing a good dollop (about 2-3 tablespoons) in the center of each. Now, carefully fold the chicken over the filling, like you’re closing a book. Use 3-4 toothpicks to securely “stitch” the edges closed. Don’t be shy here—you want to make sure that delicious filling stays put. It might look a little messy now, but it will tidy up beautifully in the pan.
Step 4: Sear to Perfection. Preheat your oven to 200°C (400°F). Heat the olive oil in your large, oven-safe skillet over medium-high heat. While it heats, season the outside of each stuffed chicken breast generously with a pinch of salt and pepper. Once the oil is shimmering, carefully place the chicken in the pan. You should hear a satisfying sizzle. Sear for 3-4 minutes, without moving them, until a deep golden-brown crust forms on the bottom. Using tongs, carefully flip each breast. The underside should look gorgeous and browned.
Step 5: Finish in the Oven. Immediately transfer the entire skillet to the preheated oven. Bake for 15-18 minutes, or until the chicken is cooked through. The best way to check is with an instant-read thermometer inserted into the thickest part of the chicken (not just the filling)—it should read 74°C (165°F). The outside will be firm to the touch, and you might see a little cheesy goodness bubbling out the sides, which is a very good sign.
Step 6: Rest and Serve. Carefully remove the skillet from the oven (remember, the handle is hot!). Transfer the stuffed chicken to a clean cutting board and let it rest for a full 5 minutes. This is a crucial step—it allows the juices to redistribute throughout the meat, ensuring every single bite is moist and tender. Then, gently remove the toothpicks, slice each breast crosswise, and watch that glorious, cheesy filling spill out.
Storage & Freshness Guide
- Fridge: Store sliced leftovers in an airtight container for up to 3 days.
- Freezer: Wrap whole cooked breasts tightly and freeze for up to 2 months.
- Reviving: Reheat gently in a covered oven-proof dish at 175°C (350°F) until warm.
Serving Suggestions
Complementary Dishes
- Cilantro-Lime Rice — The fresh, zesty notes in the rice mirror the flavors inside the chicken, creating a harmonious and satisfying base for the meal.
- A Simple Black Bean and Corn Salad — This adds a wonderful textural contrast and a sweet, earthy element that complements the spiced chicken perfectly.
- Charred Street Corn (Esquites) — A little smoky, a little creamy, this side dish leans all the way into the fiesta vibe and is always a crowd-pleaser.
Drinks
- A Classic Margarita (on the rocks!) — The bright, sharp acidity from the lime and tequila cuts through the richness of the cheese and chicken beautifully. It’s a match made in heaven.
- A Crisp Mexican Lager — Sometimes you just can’t beat a cold, clean beer with spicy, cheesy food. It’s refreshing and effervescent, washing the palate clean between bites.
- Sparkling Water with Lime — For a non-alcoholic option, the bubbles are incredibly refreshing and the lime wedge ties everything back to the main dish.
Something Sweet
- Churros with Chocolate Dipping Sauce — Go all out with a classic finish. The warm, cinnamony crunch of a churro after a savory meal is pure joy.
- Mango Sorbet — This is a lighter, brighter option that cleanses the palate and provides a tropical, sweet ending that doesn’t feel too heavy.
- Tres Leches Cake — If you’re celebrating, this moist, milky cake is the ultimate decadent finale. It’s cool, sweet, and impossibly indulgent.
Top Mistakes to Avoid
- Mistake: Overstuffing the chicken. It’s tempting to pack in as much filling as possible, but this will almost guarantee a blow-out during cooking. A moderate amount in the center is all you need—it will spread as the chicken contracts.
- Mistake: Not using an oven-safe skillet. If you start the chicken in a regular pan, you’ll have to awkwardly transfer the delicate, stuffed breasts to a baking dish for the oven, which increases the risk of them falling apart. Using one pan from start to finish is the way to go.
- Mistake: Skipping the rest time. I know it’s hard to wait when something smells this good, but slicing into the chicken immediately will cause all those precious juices to run straight out onto the cutting board, leaving you with drier meat. Patience is a virtue here.
- Mistake: Using cold filling. If your cream cheese is straight from the fridge, it will be stiff and difficult to spread, and the cold mass can increase the chicken’s cooking time, leading to potential dryness.
Expert Tips
- Tip: Create a “flavor barrier.” After you’ve mixed your filling, spread it in a thin, even layer across the entire surface of the pounded chicken, leaving a 1 cm border. Then, when you roll it, you get flavor in every single bite, not just a pocket in the middle.
- Tip: Use a thermometer for perfect doneness. Guessing when chicken is done is a recipe for either food safety anxiety or dry, overcooked meat. An instant-read thermometer is the single best investment for a home cook—it takes the guesswork out completely.
- Tip: Add a crunchy topping. For a little extra texture, mix 2 tablespoons of panko breadcrumbs with 1 tablespoon of melted butter and a pinch of the taco seasoning. After you flip the chicken in the skillet, press this mixture onto the seared top before it goes in the oven.
- Tip: Prep ahead for easy weeknights. You can assemble the stuffed chicken breasts completely, keep them on a plate covered in the fridge for up to 8 hours, and then just cook them when you’re ready. It makes dinner feel effortless.
FAQs
Can I make this with chicken thighs instead?
Absolutely! Boneless, skinless chicken thighs are actually more forgiving because they have a higher fat content, so they stay incredibly juicy. You’ll just lay them flat, place the filling in the center, and roll them up tightly before securing with toothpicks. The cooking time will be roughly the same, but always trust your thermometer to be sure.
My filling leaked out everywhere! What did I do wrong?
Don’t worry, it happens to the best of us! The most common culprits are overstuffing, not securing the edges well enough with enough toothpicks, or the skillet not being hot enough during the initial sear. The quick sear is meant to “seal” the outside. Even if a little leaks, it’s still delicious—just think of it as extra cheesy sauce in the pan!
Can I prepare these ahead of time?
You sure can. You can assemble the stuffed chicken breasts completely, keep them on a plate covered tightly with plastic wrap in the refrigerator for up to 8 hours before cooking. Let them sit at room temperature for about 15-20 minutes before you sear them so they cook evenly.
How should I store and reheat leftovers?
Store any leftover sliced chicken in an airtight container in the fridge for up to 3 days. To reheat, I recommend gently warming it in a covered oven-proof dish at 175°C (350°F) for about 10-15 minutes, or until heated through. The microwave can work in a pinch, but it might make the texture of the chicken a bit rubbery.
Is there a way to make this spicier?
Of course! There are a few easy ways to turn up the heat. You could add a finely minced jalapeño (seeds and all) to the filling, use a hot chili powder, swap the cheddar for pepper jack cheese, or even add a dash of your favorite hot sauce to the cream cheese mixture. Adjust to your own comfort level!


Taco Stuffed Chicken
Make juicy Taco Stuffed Chicken with a zesty, cheesy filling. This easy recipe transforms dinner into a flavor fiesta. Get the step-by-step guide now!
Ingredients
For the chicken and seasoning:
-
4 boneless, skinless chicken breasts (about 150-180g each)
-
1 tbsp olive oil
-
1 tsp smoked paprika
-
1/2 tsp garlic powder
-
1/2 tsp onion powder
-
1/4 tsp cumin
-
1/4 tsp chili powder (adjust to your heat preference)
-
1/2 tsp kosher salt (plus more for seasoning)
-
1/4 tsp freshly ground black pepper
For the filling:
-
100 g cream cheese (softened)
-
80 g sharp cheddar cheese (freshly grated)
-
2 tbsp fresh cilantro (finely chopped)
-
1 lime (zested and juiced)
Instructions
-
Start by patting your chicken breasts completely dry with paper towels—this is the secret to getting a good sear. Place one breast on your cutting board. Using a sharp knife, carefully slice horizontally through the thickest part of the breast, but stop about 1 cm from the opposite edge, so it opens up like a book. Place it between two sheets of plastic wrap and gently pound it with a meat mallet or rolling pin until it’s an even 1/2-inch thickness. Repeat with the remaining breasts.01
-
In your small mixing bowl, combine the softened cream cheese, grated cheddar, chopped cilantro, lime zest, 1 tablespoon of the lime juice, smoked paprika, garlic powder, onion powder, cumin, chili powder, salt, and pepper. Mix everything together with a fork or spatula until it’s well-combined and smooth.02
-
Lay your pounded chicken breasts flat on the board. Divide the filling evenly among them, placing a good dollop (about 2-3 tablespoons) in the center of each. Now, carefully fold the chicken over the filling, like you’re closing a book. Use 3-4 toothpicks to securely “stitch” the edges closed.03
-
Preheat your oven to 200°C (400°F). Heat the olive oil in your large, oven-safe skillet over medium-high heat. While it heats, season the outside of each stuffed chicken breast generously with a pinch of salt and pepper. Once the oil is shimmering, carefully place the chicken in the pan. Sear for 3-4 minutes, without moving them, until a deep golden-brown crust forms on the bottom. Using tongs, carefully flip each breast.04
-
Immediately transfer the entire skillet to the preheated oven. Bake for 15-18 minutes, or until the chicken is cooked through. The best way to check is with an instant-read thermometer inserted into the thickest part of the chicken (not just the filling)—it should read 74°C (165°F).05
-
Carefully remove the skillet from the oven (remember, the handle is hot!). Transfer the stuffed chicken to a clean cutting board and let it rest for a full 5 minutes. Then, gently remove the toothpicks, slice each breast crosswise, and watch that glorious, cheesy filling spill out.06
Not what you're looking for?


