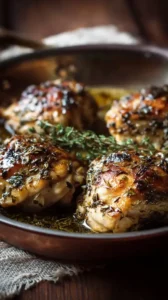
Thai Peanut Chicken delivers a perfect balance of creamy, savory, sweet, and spicy flavors in a quick weeknight meal. The secret is layering flavors and toasting peanuts for incredible aroma. This dish makes everyone ask for seconds.
Craving a delicious Thai Peanut Chicken? You've come to the right spot! From Chicken Recipes favorites to amazing Dessert Recipes recipes, there's something here for everyone.


Why You’ll Love This Thai Peanut Chicken
- Restaurant-quality flavor: Enjoy classic takeout taste with controlled spice and ingredients.
- Incredibly versatile: Easily swap proteins or add extra vegetables.
- Quick sauce: Whisk together in minutes while the chicken cooks.
- Meal prep friendly: Reheats beautifully, with flavors improving overnight.
Ingredients & Tools
- 500 g boneless, skinless chicken breast or thighs, cut into bite-sized pieces
- 3 tbsp soy sauce (or tamari for gluten-free)
- 1 tbsp fish sauce
- 2 tbsp lime juice, freshly squeezed
- 1 tbsp honey or maple syrup
- 2 tsp sriracha or chili garlic sauce (adjust to taste)
- 3 cloves garlic, minced
- 1 tbsp fresh ginger, grated
- 120 g smooth, natural peanut butter
- 180 ml canned coconut milk (full-fat for best texture)
- 1 red bell pepper, thinly sliced
- 4 spring onions, sliced
- 50 g unsalted peanuts, roughly chopped
- 1 tbsp vegetable or coconut oil
- For serving: cooked jasmine rice and fresh coriander
Tools: A large skillet or wok, a medium mixing bowl or large measuring cup for the sauce, a microplane or fine grater for the ginger.
Notes: Use natural, unsweetened peanut butter for pure nutty flavor and control over sweetness.
Nutrition (per serving)
| Calories: | 485 kcal |
| Protein: | 35 g |
| Fat: | 28 g |
| Carbs: | 22 g |
| Fiber: | 4 g |
Serves: 4 | Prep Time: 15 minutes | Cook Time: 15 minutes | Total Time: 30 minutes
Before You Start: Tips & Ingredient Notes
- Chicken cut matters. Slice your chicken into evenly-sized pieces, about 1-inch chunks. This ensures everything cooks at the same rate and stays juicy, rather than some pieces being done while others are still raw in the middle.
- Don’t skip toasting the peanuts. It takes an extra two minutes, but toasting the chopped peanuts in a dry pan before you start brings out an incredible, deep nutty aroma that will infuse the entire dish.
- Fresh ginger and garlic are non-negotiable. I know it’s tempting to reach for the jarred stuff, but the bright, pungent kick you get from fresh aromatics is what forms the flavor foundation of this sauce. Trust me on this one.
- Have all your ingredients prepped and ready. Stir-frying is a fast process. Once you start cooking, things move quickly, so having your sauce whisked, veggies sliced, and chicken cubed and waiting is the secret to a stress-free experience.
How to Make Thai Peanut Chicken
Step 1: Start by preparing your chicken and the aromatic base. Pat your cubed chicken dry with a paper towel—this helps it get a nice sear instead of steaming. In a small, dry skillet over medium heat, toast your chopped peanuts for 2-3 minutes, shaking the pan often, until they’re fragrant and lightly golden. Set them aside. Then, in a medium bowl or large measuring cup, whisk together the peanut butter, coconut milk, soy sauce, fish sauce, lime juice, honey, and sriracha until you have a smooth, creamy sauce.
Step 2: Now, it’s time to cook the chicken. Heat the oil in your large skillet or wok over medium-high heat. Once the oil is shimmering, add the chicken in a single layer. Let it cook undisturbed for 2-3 minutes to get a good sear on one side before stirring. You’re looking for a golden-brown color on the outside, and the chicken should be nearly cooked through, which will take about 5-6 minutes total. Transfer the chicken to a clean plate.
Step 3: In the same skillet, you’ll build the sauce. There should be some delicious browned bits left from the chicken. Add a tiny bit more oil if the pan is dry, then toss in the minced garlic and grated ginger. Stir constantly for just 30-60 seconds—you’ll notice an incredible fragrance, but you don’t want the garlic to burn, or it will turn bitter.
Step 4: Add your sliced bell pepper to the skillet and stir-fry for about 2 minutes until it just begins to soften but still has a nice crunch. You want that vibrant color and texture to remain. Now, return the cooked chicken to the pan, pouring in any accumulated juices as well.
Step 5: Here comes the magic. Pour the peanut sauce you whisked together earlier over the chicken and peppers. Stir everything to coat, and bring the sauce to a gentle simmer. Let it bubble away for 2-3 minutes. You’ll see the sauce thicken beautifully and cling to every piece of chicken. If it gets too thick, you can thin it with a tablespoon or two of water or more coconut milk.
Step 6: Turn off the heat and stir in most of your sliced spring onions and the toasted peanuts, saving a little of each for garnish. Give it one final stir, and you’re done! The residual heat will wilt the spring onions perfectly. Taste and adjust the seasoning if needed—maybe a squeeze more lime for acidity or a dash more sriracha for heat.
Storage & Freshness Guide
- Fridge: Store in an airtight container for 3–4 days.
- Freezer: Freeze without garnishes for up to 2 months; sauce texture may change slightly.
- Reviving: Reheat gently with a splash of water to loosen sauce.
Serving Suggestions
Complementary Dishes
- Jasmine Rice — The classic, fluffy, and slightly sticky rice is the perfect neutral base to soak up all that glorious peanut sauce.
- Simple Cucumber Salad — Thinly sliced cucumbers with a quick dressing of rice vinegar, a pinch of sugar, and red chili flakes provides a cool, crisp, and acidic contrast to the rich chicken.
- Steamed Bok Choy or Broccoli — A side of simple steamed greens adds freshness and makes the meal feel balanced and complete.
Drinks
- A Crisp Lager — The clean, effervescent bubbles of a light beer cut through the richness of the peanut sauce and cleanse the palate beautifully between bites.
- Thai Iced Tea — For a non-alcoholic option, the sweet, creamy, and spiced flavors of this iconic drink are a match made in heaven with the savory-spicy notes of the dish.
- Riesling or Gewürztraminer — A slightly off-dry white wine with floral and stone fruit notes complements the sweet and spicy elements in the sauce without overpowering them.
Something Sweet
- Mango with Sticky Rice — You can’t go wrong with this traditional Thai dessert. The sweet, creamy mango and coconut-infused sticky rice are the ideal finale.
- Coconut Ice Cream — A simple scoop of rich coconut ice cream is a refreshing and effortless way to end the meal on a cool, creamy note.
- Pineapple Friand — A little tropical twist on a classic friand, the bright acidity of the pineapple provides a lovely, light finish.
Top Mistakes to Avoid
- Mistake: Overcooking the chicken. Because the chicken is cut into small pieces, it cooks very quickly. If you leave it in the pan for too long, it will become tough and rubbery. Cook it just until it’s no longer pink in the center.
- Mistake: Burning the garlic and ginger. These aromatics cook in under a minute. If you walk away or let them sizzle for too long, they’ll burn and introduce a bitter flavor that will ruin the entire sauce. I’ve messed this up before too, so stay vigilant!
- Mistake: Using the wrong peanut butter. Avoid conventional peanut butter with added sugar and hydrogenated oils. They make the sauce overly sweet and can prevent it from achieving a smooth, cohesive texture. Natural peanut butter is the way to go.
- Mistake: Adding the sauce to a cold pan. Make sure your pan is still nice and hot after cooking the vegetables before you pour in the sauce. This helps it come to a simmer quickly and thicken properly, coating the chicken perfectly.
Expert Tips
- Tip: Velvet your chicken for supreme tenderness. For an extra-pro, restaurant-style texture, marinate your raw chicken pieces in 1 tablespoon of soy sauce and 1 teaspoon of cornflour for 15-20 minutes before cooking. This “velveting” technique creates a protective layer that keeps the chicken incredibly juicy.
- Tip: Bloom your spice. If you want a deeper, more integrated heat, add a teaspoon of red pepper flakes to the oil with the garlic and ginger for just 15 seconds before adding the other ingredients. This toasts the spices and infuses the oil.
- Tip: Make it ahead. You can whisk the peanut sauce up to 3 days in advance and store it in the fridge. Just give it a good whisk before using, as it may separate slightly. This turns a 30-minute meal into a 15-minute one.
- Tip: Use the sauce for more than chicken. This peanut sauce is fantastic as a dressing for cold noodle salads, a dip for spring rolls, or drizzled over grilled vegetables. Don’t limit its potential!
FAQs
Can I make this dish vegetarian or vegan?
Absolutely! For a vegetarian version, swap the chicken for firm tofu or tempeh. Press the tofu well to remove excess water, then cube and pan-fry until golden before proceeding. To make it vegan, ensure you use maple syrup instead of honey and check that your fish sauce is a vegan alternative (or just use a bit more soy sauce). The coconut milk and peanut butter make the sauce naturally creamy and rich without any dairy.
My sauce is too thick. How can I thin it out?
No problem, this happens! The sauce continues to thicken as it sits. Simply thin it out by stirring in a little warm water, one tablespoon at a time, until it reaches your desired consistency. You could also use a bit more coconut milk or even some chicken or vegetable broth for extra flavor.
How long do leftovers last in the fridge?
Stored in an airtight container, your Thai Peanut Chicken will keep beautifully for 3-4 days. The flavors actually meld and deepen, making the leftovers something to look forward to. Reheat gently in the microwave or in a skillet over low heat, adding a splash of water if needed to loosen the sauce.
Can I freeze this?
You can, but with a slight caveat. The texture of the coconut milk-based sauce can sometimes separate or become a bit grainy upon thawing. It will still taste great, but the creamy texture might not be exactly the same. For best results, freeze without any fresh garnishes and consume within 2 months. Thaw overnight in the fridge before reheating.
Is this recipe spicy? How can I adjust the heat level?
The spice level as written is mild to medium. You have complete control! To make it milder, simply omit the sriracha entirely. To turn up the heat, add more sriracha, use a hotter chili garlic sauce, or even add some fresh, thinly sliced red chilies when you cook the bell peppers. It’s all about tailoring it to your palate.


Thai Peanut Chicken
Make easy Thai Peanut Chicken with creamy coconut-peanut sauce in just 30 minutes. A perfect weeknight dinner with restaurant-quality flavor. Get the recipe now!
Ingredients
For the main ingredients:
-
500 g boneless, skinless chicken breast or thighs (cut into bite-sized pieces)
-
3 tbsp soy sauce (or tamari for gluten-free)
-
1 tbsp fish sauce
-
2 tbsp lime juice (freshly squeezed)
-
1 tbsp honey or maple syrup
-
2 tsp sriracha or chili garlic sauce (adjust to taste)
-
3 cloves garlic (minced)
-
1 tbsp fresh ginger (grated)
-
120 g smooth, natural peanut butter
-
180 ml canned coconut milk (full-fat for best texture)
-
1 red bell pepper (thinly sliced)
-
4 spring onions (sliced)
-
50 g unsalted peanuts (roughly chopped)
-
1 tbsp vegetable or coconut oil
-
cooked jasmine rice and fresh coriander
Instructions
-
Start by preparing your chicken and the aromatic base. Pat your cubed chicken dry with a paper towel—this helps it get a nice sear instead of steaming. In a small, dry skillet over medium heat, toast your chopped peanuts for 2-3 minutes, shaking the pan often, until they’re fragrant and lightly golden. Set them aside. Then, in a medium bowl or large measuring cup, whisk together the peanut butter, coconut milk, soy sauce, fish sauce, lime juice, honey, and sriracha until you have a smooth, creamy sauce.01
-
Now, it’s time to cook the chicken. Heat the oil in your large skillet or wok over medium-high heat. Once the oil is shimmering, add the chicken in a single layer. Let it cook undisturbed for 2-3 minutes to get a good sear on one side before stirring. You’re looking for a golden-brown color on the outside, and the chicken should be nearly cooked through, which will take about 5-6 minutes total. Transfer the chicken to a clean plate.02
-
In the same skillet, you’ll build the sauce. There should be some delicious browned bits left from the chicken. Add a tiny bit more oil if the pan is dry, then toss in the minced garlic and grated ginger. Stir constantly for just 30-60 seconds—you’ll notice an incredible fragrance, but you don’t want the garlic to burn, or it will turn bitter.03
-
Add your sliced bell pepper to the skillet and stir-fry for about 2 minutes until it just begins to soften but still has a nice crunch. You want that vibrant color and texture to remain. Now, return the cooked chicken to the pan, pouring in any accumulated juices as well.04
-
Pour the peanut sauce you whisked together earlier over the chicken and peppers. Stir everything to coat, and bring the sauce to a gentle simmer. Let it bubble away for 2-3 minutes. You’ll see the sauce thicken beautifully and cling to every piece of chicken. If it gets too thick, you can thin it with a tablespoon or two of water or more coconut milk.05
-
Turn off the heat and stir in most of your sliced spring onions and the toasted peanuts, saving a little of each for garnish. Give it one final stir, and you’re done! The residual heat will wilt the spring onions perfectly. Taste and adjust the seasoning if needed—maybe a squeeze more lime for acidity or a dash more sriracha for heat.06
Not what you're looking for?


