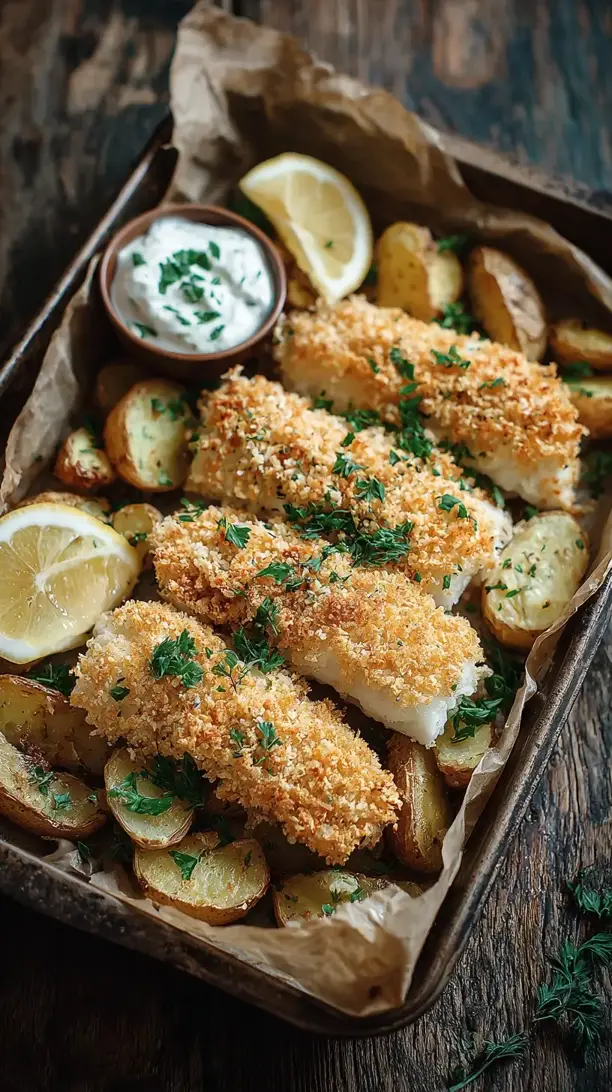
This Baked Fish and Chips recipe delivers all the crispy, golden comfort of the classic without deep-frying. You get flaky fish with a crunchy panko crust and perfectly roasted potato chips. It’s a healthier, simpler weeknight-friendly version that feels like a treat.
If you're looking for the perfect Baked Fish and Chips, you're in the right place. Whether you love Dinner Ideas or want to explore our Breakfast & Brunch collection, we've got you covered.


Why You’ll Love This Baked Fish and Chips
- Lighter & Healthier: Baking cuts oil and calories while keeping everything crispy.
- Perfect Texture: Crunchy crust on tender fish, fluffy-centered crispy chips.
- Simple & Mess-Free: Uses just baking sheets for easy cleanup.
- Versatile Base: Adapt with different fish or seasonings.
Ingredients & Tools
- 600 g Maris Piper or Russet potatoes
- 4 skinless, firm white fish fillets (like cod or haddock), about 150g each
- 3 tbsp olive oil, divided
- 1 tsp smoked paprika
- 1 tsp garlic powder
- 75 g plain flour
- 2 large eggs, beaten
- 150 g panko breadcrumbs
- 1 tsp dried dill (or 1 tbsp fresh, finely chopped)
- 1 lemon, cut into wedges
- Salt and black pepper to taste
Tools: Two large baking sheets, parchment paper, three shallow bowls for breading, a large pot for boiling.
Notes: The quality of your fish is key here—look for firm, bright fillets with a fresh, sea-air smell. And don’t skip the panko breadcrumbs; their light, flaky texture is what gives the fish that incredible, shatteringly crisp crust you’re after.
Nutrition (per serving)
| Calories: | 485 kcal |
| Protein: | 35 g |
| Fat: | 14 g |
| Carbs: | 55 g |
| Fiber: | 5 g |
Serves: 4 | Prep Time: 25 minutes | Cook Time: 30 minutes | Total Time: 55 minutes
Before You Start: Tips & Ingredient Notes
- Pat your fish completely dry. This is the golden rule for a crispy coating. Any excess moisture on the fish will steam instead of allowing the crust to crisp up beautifully in the oven. Use kitchen paper and really press down.
- Why parboil the potatoes? It might seem like an extra step, but briefly boiling the potato wedges before roasting is the secret to that fluffy interior. It also roughs up the edges, creating more surface area for maximum crispiness.
- Don’t skip preheating the baking sheet. Placing your potatoes onto a hot, oiled baking sheet gives them an instant sear, mimicking the effect of a deep fryer and ensuring they don’t stick. It’s a little trick that makes a huge difference.
- Use a wire rack for the fish. If you have one, placing a wire rack on the second baking sheet and putting the fish on that will allow hot air to circulate all around, preventing a soggy bottom and giving you an all-over perfect crunch.
How to Make Baked Fish and Chips
Step 1: Start by preheating your oven to 220°C (200°C Fan)/425°F. Place one of your empty baking sheets into the oven to heat up. This is our first crispy-potato hack. Meanwhile, scrub your potatoes clean—you can peel them if you prefer, but leaving the skin on adds great texture and nutrients. Cut them into chunky chips, about 1-1.5 cm thick.
Step 2: Bring a large pot of salted water to a rolling boil. Add your potato chips and parboil them for exactly 6-7 minutes. You’re not cooking them through, just tenderizing the outside. They should be just starting to soften but still firm in the center. Drain them really well in a colander, then give them a good shake. You’ll notice the edges have become a little fuzzy—this is exactly what you want for extra crispiness!
Step 3: Carefully remove the hot baking sheet from the oven. Drizzle it with 2 tablespoons of the olive oil—it might sizzle a little, which is fine. Tip the drained potatoes onto the hot tray. Sprinkle them with the smoked paprika, garlic powder, and a generous amount of salt and pepper. Toss everything together until the chips are evenly coated in the oil and spices. Spread them out in a single layer and pop the tray back into the oven to roast for 15 minutes.
Step 4: While the potatoes are roasting, set up your breading station. You’ll need three shallow bowls. In the first, place the plain flour seasoned with a pinch of salt and pepper. In the second, place the beaten eggs. In the third, mix the panko breadcrumbs with the dried dill, a little more salt, and pepper. The trick is to keep one hand for dry ingredients and one for wet to avoid clumpy fingers.
Step 5: Pat your fish fillets completely dry with kitchen paper. Take one fillet and dredge it in the flour, shaking off any excess. Next, dip it into the beaten egg, letting the excess drip off. Finally, press it firmly into the panko mixture, ensuring an even, generous coating on all sides. Place the breaded fillet on your second baking sheet (lined with parchment or a wire rack). Repeat with the remaining fillets.
Step 6: After the potatoes have had their initial 15 minutes, remove the tray from the oven and give them a good flip or shuffle around. This ensures even browning. Now, place the tray of breaded fish into the oven alongside the potatoes. Bake everything for another 12-15 minutes. The fish is done when the coating is deep golden brown and the flesh is opaque and flakes easily with a fork.
Step 7: For a final blast of heat and color, you can switch the oven to a high grill/broil setting for the last 1-2 minutes. Keep a very close eye on it to prevent burning! The chips should be gorgeously golden and crisp, and the fish should have an irresistible, crunchy-looking crust.
Step 8: Remove both trays from the oven. Let the fish rest for a minute—this helps the coating set. Serve immediately with the crispy chips, a generous wedge of lemon for squeezing over, and your favorite condiments. The sound of that first crunch is pure music.
Storage & Freshness Guide
- Fridge: Store leftovers in airtight containers for up to 2 days.
- Freezer: Freeze baked fish and chips separately for up to 1 month.
- Reviving: Reheat in a 400°F oven for 10 minutes to restore crispiness.
Serving Suggestions
Complementary Dishes
- Mushy Peas — A British classic for a reason. Their soft, savory flavor and vibrant green color are the perfect creamy contrast to the crispy fish and chips.
- A Zingy Coleslaw — A sharp, vinegar-based slaw cuts through the richness beautifully. The crunch of fresh cabbage and carrot adds another lovely textural element to the plate.
- Pickled Onions — Their sharp, tangy bite provides a fantastic palate cleanser between mouthfuls of the rich, savory fish and potatoes.
Drinks
- A Crisp Lager — The cold, bubbly effervescence and slight bitterness are the ultimate partner for fried (or in this case, baked) foods. It’s a refreshing match made in heaven.
- Sparkling Water with Lemon — For a non-alcoholic option, the bubbles and citrus notes perform a similar function, cleansing the palate and enhancing the meal’s freshness.
Something Sweet
- Sticky Toffee Pudding — Lean into the British theme with a decadent, warm dessert. The rich, date-filled sponge and sweet toffee sauce are the ultimate comfort-food finale.
- Lemon Sorbet — A light, bright, and palate-cleansing option. Its sharp citrus flavor is incredibly refreshing after the savory main course.
Top Mistakes to Avoid
- Mistake: Crowding the baking sheets. If the potatoes or fish are too close together, they’ll steam instead of roast. You need space for the hot air to circulate and work its crisping magic, so use two trays if necessary.
- Mistake: Skipping the parboiling step for the potatoes. I’ve been tempted to skip it for speed, but it always results in chips that are hard in the middle. That quick boil is non-negotiable for the perfect fluffy interior.
- Mistake: Not pressing the breadcrumbs on firmly. A gentle dusting won’t give you that substantial, crunchy crust. Really press the fish into the panko to ensure a good, even layer that adheres properly.
- Mistake: Using soggy fish. Any moisture on the surface of the fillet is the enemy of crispiness. Take that extra minute to pat it bone-dry—you’ll thank yourself later.
Expert Tips
- Tip: Add a little cornstarch to the flour. For an even crispier coating on your fish, replace a tablespoon of the plain flour with cornstarch. It creates a lighter, crunchier texture that holds up wonderfully in the oven.
- Tip: Season every layer. Don’t be shy with salt and pepper. Season the flour, season the breadcrumbs, and season the potatoes. Building layers of seasoning is what gives the final dish a deep, well-rounded flavor.
- Tip: Grate a little Parmesan into the breadcrumbs. This is a little cheat’s tip for an extra layer of savory, umami flavor and a slightly deeper golden color. It’s completely optional, but honestly, it’s a game-changer.
- Tip: Let the coated fish rest. After you’ve breaded the fillets, let them sit on the tray for 5-10 minutes before baking. This helps the coating set and adhere better, preventing it from falling off during cooking.
FAQs
Can I use a different type of fish?
Absolutely! Any firm, white fish will work beautifully here. Cod and haddock are the classics, but you could also use pollock, hake, or halibut. Just make sure the fillets are of a similar thickness so they cook evenly in the same amount of time. The key is that the fish needs to be sturdy enough to hold up to the breading and baking process without falling apart.
My breadcrumbs aren’t turning golden brown. What’s wrong?
This usually means your oven isn’t hot enough, or the fish was placed on a cold tray. Ensure your oven is fully preheated and that you’re baking in the upper third of the oven, where the heat is most intense. If you’re still having issues, a light spray of cooking oil on the breaded fish before it goes in can encourage browning.
Can I make this recipe gluten-free?
You sure can! Simply swap the plain flour for a gluten-free all-purpose blend and use certified gluten-free panko breadcrumbs (or make your own from gluten-free bread). The method remains exactly the same, and you’ll still achieve a wonderfully crispy result that everyone can enjoy.
How do I store and reheat leftovers?
Store any leftover fish and chips in separate airtight containers in the fridge for up to 2 days. To reheat, the oven is your best friend. Spread the components on a baking sheet and warm at 200°C/400°F for about 10 minutes. This will help recrisp the exterior far better than a microwave, which will make everything soft and soggy.
Can I prepare any part of this ahead of time?
You can get a head start on the potatoes. You can parboil them, drain them, and let them cool completely up to a day in advance. Keep them stored in the fridge, then toss them with oil and seasoning just before roasting. I don’t recommend breading the fish too far ahead, as the coating can become soggy.


Baked Fish And Chips
Make crispy, golden Baked Fish and Chips at home with this easy recipe. A healthier, mess-free version of the classic. Get the recipe and cook tonight!
Ingredients
For the Chips:
-
600 g Maris Piper or Russet potatoes
-
2 tbsp olive oil
-
1 tsp smoked paprika
-
1 tsp garlic powder
-
Salt and black pepper (to taste)
For the Fish:
-
4 skinless, firm white fish fillets (like cod or haddock, about 150g each)
-
75 g plain flour
-
2 large eggs (beaten)
-
150 g panko breadcrumbs
-
1 tsp dried dill (or 1 tbsp fresh, finely chopped)
-
Salt and black pepper (to taste)
For Serving:
-
1 lemon (cut into wedges)
Instructions
-
Start by preheating your oven to 220°C (200°C Fan)/425°F. Place one of your empty baking sheets into the oven to heat up. Meanwhile, scrub your potatoes clean—you can peel them if you prefer, but leaving the skin on adds great texture and nutrients. Cut them into chunky chips, about 1-1.5 cm thick.01
-
Bring a large pot of salted water to a rolling boil. Add your potato chips and parboil them for exactly 6-7 minutes. You’re not cooking them through, just tenderizing the outside. They should be just starting to soften but still firm in the center. Drain them really well in a colander, then give them a good shake. You’ll notice the edges have become a little fuzzy—this is exactly what you want for extra crispiness!02
-
Carefully remove the hot baking sheet from the oven. Drizzle it with 2 tablespoons of the olive oil—it might sizzle a little, which is fine. Tip the drained potatoes onto the hot tray. Sprinkle them with the smoked paprika, garlic powder, and a generous amount of salt and pepper. Toss everything together until the chips are evenly coated in the oil and spices. Spread them out in a single layer and pop the tray back into the oven to roast for 15 minutes.03
-
While the potatoes are roasting, set up your breading station. You’ll need three shallow bowls. In the first, place the plain flour seasoned with a pinch of salt and pepper. In the second, place the beaten eggs. In the third, mix the panko breadcrumbs with the dried dill, a little more salt, and pepper. The trick is to keep one hand for dry ingredients and one for wet to avoid clumpy fingers.04
-
Pat your fish fillets completely dry with kitchen paper. Take one fillet and dredge it in the flour, shaking off any excess. Next, dip it into the beaten egg, letting the excess drip off. Finally, press it firmly into the panko mixture, ensuring an even, generous coating on all sides. Place the breaded fillet on your second baking sheet (lined with parchment or a wire rack). Repeat with the remaining fillets.05
-
After the potatoes have had their initial 15 minutes, remove the tray from the oven and give them a good flip or shuffle around. This ensures even browning. Now, place the tray of breaded fish into the oven alongside the potatoes. Bake everything for another 12-15 minutes. The fish is done when the coating is deep golden brown and the flesh is opaque and flakes easily with a fork.06
-
For a final blast of heat and color, you can switch the oven to a high grill/broil setting for the last 1-2 minutes. Keep a very close eye on it to prevent burning! The chips should be gorgeously golden and crisp, and the fish should have an irresistible, crunchy-looking crust.07
-
Remove both trays from the oven. Let the fish rest for a minute—this helps the coating set. Serve immediately with the crispy chips, a generous wedge of lemon for squeezing over, and your favorite condiments. The sound of that first crunch is pure music.08
Not what you're looking for?


