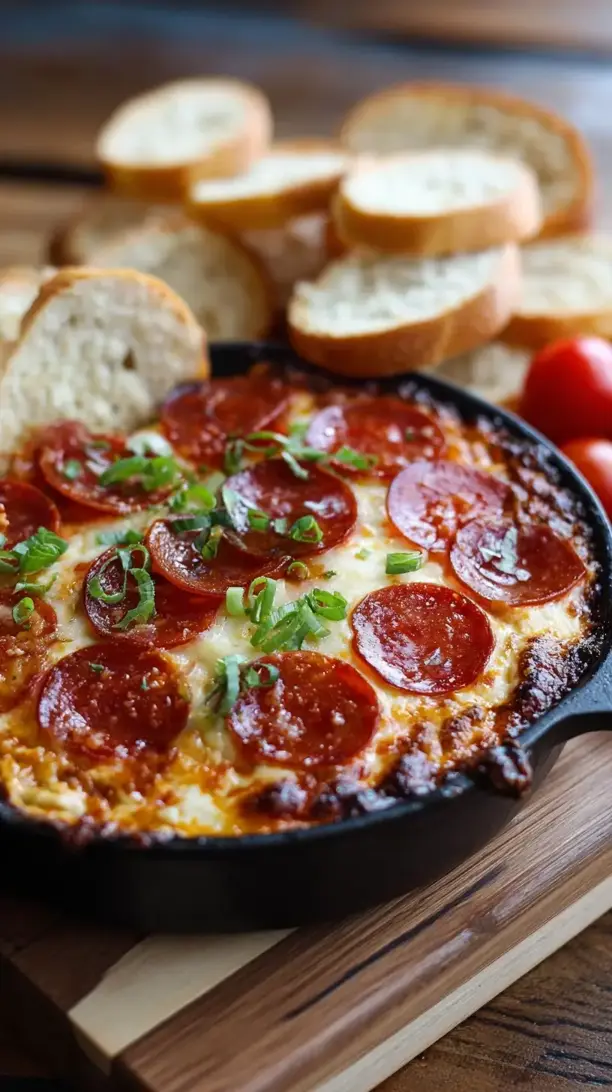
This Loaded Pizza Dip is the ultimate crowd-pleaser for game nights or cozy evenings. Imagine all your favorite pizza toppings—savory pepperoni, melty mozzarella, and tangy sauce—baked together until bubbly and golden. It’s rich, comforting, and disappears fast.
If you're looking for the perfect Loaded Pizza Dip, you're in the right place. Whether you love Savory Snacks or want to explore our Breakfast & Brunch collection, we've got you covered.


Why You’ll Love This Loaded Pizza Dip
- Easy to make: Just layer ingredients and bake—no fancy techniques.
- Pizza flavor in every bite: Savory pepperoni, gooey cheese, and herby sauce deliver that classic taste.
- Totally versatile: Swap in your favorite toppings like sausage, olives, or mushrooms.
- Crowd favorite: Always a hit at potlucks, game days, and gatherings.
Ingredients & Tools
- 1 (8 oz / 225 g) block cream cheese, softened
- 1 cup sour cream
- 1 tsp dried oregano
- 1/2 tsp garlic powder
- 1/4 tsp black pepper
- 1 1/2 cups pizza sauce or marinara sauce
- 2 cups shredded mozzarella cheese, divided
- 1/2 cup grated Parmesan cheese
- 1 cup sliced pepperoni, plus extra for garnish
- 1/4 cup sliced black olives (optional)
- 2 tbsp sliced pickled jalapeños (optional)
- 1/4 tsp red pepper flakes (optional)
- 2 tbsp chopped fresh basil or parsley for garnish
Tools: 9-inch oven-safe baking dish or pie plate, mixing bowl, spatula
Notes: Full-fat cream cheese and sour cream create a luxuriously creamy base. Let cream cheese soften for easier mixing.
Nutrition (per serving)
| Calories: | 320 kcal |
| Protein: | 12 g |
| Fat: | 26 g |
| Carbs: | 8 g |
| Fiber: | 1 g |
Serves: 6 | Prep Time: 15 minutes | Cook Time: 20 minutes | Total Time: 35 minutes
Before You Start: Tips & Ingredient Notes
- Let your cream cheese truly soften. Take it out of the fridge at least an hour before you begin. If you’re in a hurry, you can microwave it for 15-20 seconds, but be careful—you don’t want it melted, just soft enough to mix easily.
- Choose a good-quality pizza sauce. Since the sauce layer is prominent, using a sauce you genuinely enjoy makes a big difference. Look for one with a nice balance of herbs and a touch of sweetness.
- Shred your own mozzarella if you can. Pre-shredded cheese often contains anti-caking agents that can make it less melty. Freshly shredded mozzarella will give you that dreamy, stretchy cheese pull we all love.
- Customize your toppings freely. This recipe is wonderfully adaptable. Not a fan of pepperoni? Try cooked Italian sausage, diced bell peppers, or even some artichoke hearts. Make it your own!
How to Make Loaded Pizza Dip
Step 1: Preheat your oven to 375°F (190°C). Grab your baking dish—a 9-inch pie plate or similar-sized oven-safe dish works perfectly here. You’ll want to give it a very light coating of non-stick spray or a quick brush of oil, just to make cleanup easier later. While the oven heats up, let’s get that creamy base ready.
Step 2: In a medium mixing bowl, combine the softened cream cheese, sour cream, dried oregano, garlic powder, and black pepper. Use a spatula to mix everything until it’s completely smooth and well-blended. You’ll notice the mixture should be creamy and spreadable, with no lumps of cream cheese remaining. This creamy layer is the foundation of the dip, providing a rich contrast to the tangy pizza sauce.
Step 3: Spread the cream cheese mixture evenly into the bottom of your prepared baking dish. Use the back of a spoon or your spatula to smooth it into a nice, uniform layer. Try to get it as even as possible—this ensures every scoop gets a bit of that creamy goodness.
Step 4: Carefully spoon the pizza sauce over the cream cheese layer. Spread it gently to cover the cream cheese completely. The trick here is to be gentle so the two layers don’t mix together too much—you want those distinct strata of flavor. The sauce should look vibrant and cover the white layer beneath it.
Step 5: Now for the cheesy part! Sprinkle about 1 ½ cups of the shredded mozzarella evenly over the pizza sauce. Follow with all of the grated Parmesan cheese. You’ll see the colors starting to build—the red sauce peeking through the snowy mozzarella is just so inviting.
Step 6: Time for the toppings. Scatter the sliced pepperoni, black olives (if using), and jalapeños (if using) over the cheese layer. Try to distribute them fairly evenly so every serving gets a good mix. If you love a little heat, now’s the time to sprinkle those red pepper flakes over the top.
Step 7: Finish with the remaining ½ cup of mozzarella cheese. This final cheese layer will melt and become beautifully golden, helping to hold all the toppings in place. For an extra touch, I like to arrange a few whole pepperoni slices on top—it makes for a lovely presentation once baked.
Step 8: Bake for 18-22 minutes, or until the dip is hot and bubbly all the way through and the cheese on top is melted and lightly spotted with golden brown. You might see little bubbles forming around the edges—that’s exactly what you want! If you’d like more color on top, you can pop it under the broiler for the last minute or two, but watch it closely.
Step 9: Carefully remove the dip from the oven—remember, the dish will be very hot! Let it sit for about 5 minutes before serving. This brief rest allows the layers to set just enough so it’s scoopable but not runny. Garnish with chopped fresh basil or parsley right before serving for a pop of color and freshness.
Storage & Freshness Guide
- Fridge: Store leftovers in an airtight container for up to 3 days.
- Freezer: Freeze unbaked assembled dip for up to 1 month; thaw overnight before baking.
- Reviving: Reheat in oven or toaster oven to maintain texture and prevent oiliness.
Serving Suggestions
Complementary Dishes
- A simple green salad with a sharp vinaigrette — The crisp, acidic greens cut through the richness of the dip beautifully, balancing out the meal.
- Garlic bread knots or cheesy breadsticks — Because you can never have too much cheesy, bready goodness, and they’re perfect for dipping alongside your main vessels.
- Roasted vegetable platter — Things like zucchini, bell peppers, and cauliflower florets offer a lighter, veggie-forward dipping option that still feels substantial.
Drinks
- A cold, crisp lager or pilsner — The effervescence and slight bitterness of the beer cleanse the palate between each rich, cheesy bite.
- Chilled Italian red wine like a Chianti — Its bright acidity and cherry notes are a classic pairing for tomato-based dishes and stand up well to the savory flavors.
- Sparkling water with lemon — For a non-alcoholic option, the bubbles and citrus help reset your taste buds, making you ready for the next delicious scoop.
Something Sweet
- Mini cannoli — The sweet, creamy filling and crisp shell provide the perfect Italian-inspired finale to your pizza-themed spread.
- Lemon sorbet — Its bright, clean, and refreshing flavor is a wonderful palate cleanser after the savory, cheesy dip.
- Dark chocolate almond biscotti — They’re not too sweet, have a satisfying crunch, and are just right for nibbling on with a final cup of coffee.
Top Mistakes to Avoid
- Mistake: Using cold cream cheese straight from the fridge. This will result in a lumpy base layer that’s difficult to spread and won’t blend smoothly with the other ingredients.
- Mistake: Overbaking the dip. You want it bubbly and hot, but if you leave it in too long, the oils can start to separate from the cheese, making it greasy. I’ve messed this up before too—it’s a fine line!
- Mistake: Skipping the rest time after baking. If you dig in immediately, the dip will be too runny and dangerously hot. Letting it sit for five minutes allows it to set up just enough for the perfect scooping consistency.
- Mistake: Using a baking dish that’s too large. If the layers are spread too thin, they’ll bake unevenly and you won’t get that wonderful, deep layering of flavors in every bite.
Expert Tips
- Tip: For a crispier top, use the broiler for the final minute or two of cooking. Just keep a very close eye on it—it can go from golden to burnt in seconds! This gives you those lovely, crispy cheese edges.
- Tip: Make individual servings in small ramekins for a fun, portion-controlled appetizer. They look adorable and everyone gets their own personal dish of bubbly goodness.
- Tip: Prepare the dip up to a day ahead. Simply assemble it in the baking dish, cover tightly with plastic wrap, and refrigerate. When you’re ready, just bake it straight from the fridge, adding a few extra minutes to the baking time.
- Tip: If you have leftovers (a rare occurrence!), reheat them in the oven or a toaster oven instead of the microwave. This helps maintain the texture and prevents the dip from becoming oily or separating.
FAQs
Can I make this Loaded Pizza Dip ahead of time?
Absolutely! You can assemble the entire dip, cover it tightly, and refrigerate it for up to 24 hours before baking. When you’re ready, just pop it in the oven—you might need to add 3-5 extra minutes to the baking time since it will be going in cold. This makes it a fantastic option for stress-free entertaining.
What can I use instead of pepperoni?
The possibilities are endless! Cooked and crumbled Italian sausage is a fantastic substitute. For a vegetarian version, try sautéed mushrooms, bell peppers, onions, or even meatless crumbles. You could also use diced ham, cooked bacon, or sliced salami. The recipe is very forgiving, so use your favorite pizza toppings.
My dip turned out a bit watery. What happened?
This can happen if your pizza sauce was particularly watery or if you used low-fat dairy products, which can release more moisture. Next time, you can try draining any excess liquid from your jarred sauce or letting your sour cream and cream cheese sit at room temperature a bit longer to stabilize. Also, make sure you’re not overbaking it.
Can I freeze Loaded Pizza Dip?
I don’t recommend freezing the assembled and baked dip, as the dairy-based layers can separate and become grainy upon thawing and reheating. It’s truly best enjoyed fresh. However, you can freeze the unbaked assembled dip for up to a month. Thaw it in the refrigerator overnight before baking as directed.
What are the best things to serve with this dip?
Classic toasted baguette slices are my top pick—they’re sturdy and perfect for scooping. But don’t stop there! Tortilla chips, pita chips, breadsticks, pretzel rods, or even sturdy raw vegetables like bell pepper strips and carrot sticks all work wonderfully. Offer a variety for a great dipping experience.


Loaded Pizza Dip
Make the ultimate Loaded Pizza Dip with this easy recipe! Layers of cheese, pepperoni, and sauce bake into a bubbly, crowd-pleasing appetizer. Get the recipe now!
Ingredients
For the Ingredients
-
1 block cream cheese (softened, 8 oz / 225 g)
-
1 cup sour cream
-
1 tsp dried oregano
-
1/2 tsp garlic powder
-
1/4 tsp black pepper
-
1 1/2 cups pizza sauce or marinara sauce
-
2 cups shredded mozzarella cheese (divided)
-
1/2 cup grated Parmesan cheese
-
1 cup sliced pepperoni (plus extra for garnish)
-
1/4 cup sliced black olives (optional)
-
2 tbsp sliced pickled jalapeños (optional)
-
1/4 tsp red pepper flakes (optional)
-
2 tbsp chopped fresh basil or parsley (for garnish)
Instructions
-
Preheat your oven to 375°F (190°C). Grab your baking dish—a 9-inch pie plate or similar-sized oven-safe dish works perfectly here. You’ll want to give it a very light coating of non-stick spray or a quick brush of oil, just to make cleanup easier later. While the oven heats up, let’s get that creamy base ready.01
-
In a medium mixing bowl, combine the softened cream cheese, sour cream, dried oregano, garlic powder, and black pepper. Use a spatula to mix everything until it’s completely smooth and well-blended. You’ll notice the mixture should be creamy and spreadable, with no lumps of cream cheese remaining. This creamy layer is the foundation of the dip, providing a rich contrast to the tangy pizza sauce.02
-
Spread the cream cheese mixture evenly into the bottom of your prepared baking dish. Use the back of a spoon or your spatula to smooth it into a nice, uniform layer. Try to get it as even as possible—this ensures every scoop gets a bit of that creamy goodness.03
-
Carefully spoon the pizza sauce over the cream cheese layer. Spread it gently to cover the cream cheese completely. The trick here is to be gentle so the two layers don’t mix together too much—you want those distinct strata of flavor. The sauce should look vibrant and cover the white layer beneath it.04
-
Now for the cheesy part! Sprinkle about 1 ½ cups of the shredded mozzarella evenly over the pizza sauce. Follow with all of the grated Parmesan cheese. You’ll see the colors starting to build—the red sauce peeking through the snowy mozzarella is just so inviting.05
-
Time for the toppings. Scatter the sliced pepperoni, black olives (if using), and jalapeños (if using) over the cheese layer. Try to distribute them fairly evenly so every serving gets a good mix. If you love a little heat, now’s the time to sprinkle those red pepper flakes over the top.06
-
Finish with the remaining ½ cup of mozzarella cheese. This final cheese layer will melt and become beautifully golden, helping to hold all the toppings in place. For an extra touch, I like to arrange a few whole pepperoni slices on top—it makes for a lovely presentation once baked.07
-
Bake for 18-22 minutes, or until the dip is hot and bubbly all the way through and the cheese on top is melted and lightly spotted with golden brown. You might see little bubbles forming around the edges—that’s exactly what you want! If you’d like more color on top, you can pop it under the broiler for the last minute or two, but watch it closely.08
-
Carefully remove the dip from the oven—remember, the dish will be very hot! Let it sit for about 5 minutes before serving. This brief rest allows the layers to set just enough so it’s scoopable but not runny. Garnish with chopped fresh basil or parsley right before serving for a pop of color and freshness.09
Not what you're looking for?


