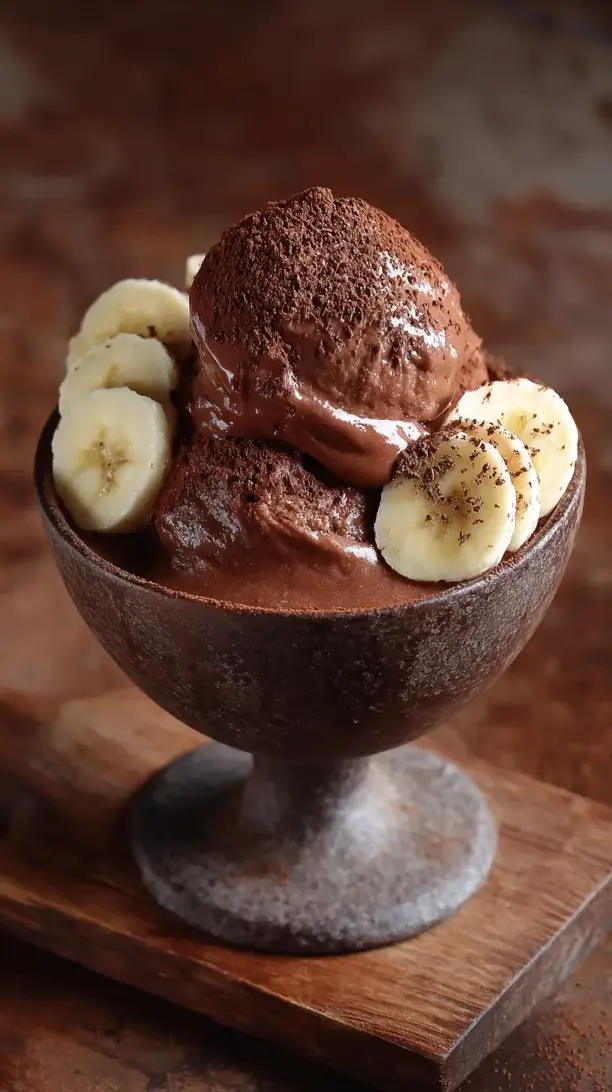
When a chocolate craving hits but you want a guilt-free treat, this Chocolate Banana Nice Cream is your perfect solution. It transforms overripe bananas into a magically creamy, dairy-free dessert in minutes. You’ll love how rich and satisfying this simple frozen delight tastes.
If you're looking for the perfect Chocolate Banana Nice Cream, you're in the right place. Whether you love Snacks or want to explore our Chicken Breast Recipes collection, we've got you covered.


Why You’ll Love This Chocolate Banana Nice Cream
- Creamy Without Cream: Frozen bananas blend into a luxuriously smooth, dairy-free texture.
- Pantry Hero: Incredibly adaptable—use what you have for mix-ins or sweeteners.
- Ready in 10 Minutes: No ice cream maker or long waits needed.
- Treat That Feels Healthy: Satisfies dessert cravings without the sugar crash.
Ingredients & Tools
- 4 medium ripe bananas (spotty peel is perfect!)
- 3 tablespoons unsweetened cocoa powder
- 2–3 tablespoons milk of choice (dairy, almond, oat)
- 1 teaspoon pure vanilla extract
- 1 tiny pinch of salt
- Optional: 1–2 tablespoons maple syrup or honey, if you like it sweeter
Notes: The bananas are the star—brown spots mean natural sweetness. A tiny pinch of salt makes the chocolate taste more like chocolate.
Tools: A high-speed blender or a heavy-duty food processor is essential.
Nutrition (per serving)
| Calories: | 150 kcal |
| Protein: | 3 g |
| Fat: | 2 g |
| Carbs: | 35 g |
| Fiber: | 5 g |
Serves: 2 | Prep Time: 10 mins | Cook Time: 0 mins | Total Time: 10 mins
Before You Start: Tips & Ingredient Notes
- Banana Ripeness is Everything. Don’t use green or just-yellow bananas. You need them to be speckled with brown spots. This is when their starch has converted to sugar, giving you maximum sweetness and that classic banana flavor without needing loads of added sweetener.
- Slice Before You Freeze. This is the golden rule. Trying to blend a whole frozen banana is a great way to burn out your blender’s motor. Peel your ripe bananas, slice them into 1-inch chunks, and freeze them solid on a parchment-lined tray for at least 4-6 hours, or overnight.
- Your Blender is Your Best Friend. A high-powered blender makes this process incredibly smooth (pun intended). If you’re using a less powerful machine, be patient. Let the banana chunks sit out for 5-10 minutes to take the rock-hard edge off, and use the tamper to help move things along.
- Taste as You Go. Before you declare it done, give it a taste. Depending on your bananas’ sweetness and your cocoa powder’s bitterness, you might want to add that optional maple syrup. This is your nice cream—customize it!
How to Make Chocolate Banana Nice Cream
Step 1: Get your frozen banana slices ready. You’ll hear them clunking around in the blender—that’s how you know they’re properly frozen. Add them to your blender or food processor first. Then, add the cocoa powder, vanilla, and that all-important pinch of salt. Hold off on the milk for just a moment.
Step 2: Start blending on low speed. At first, it’s going to sound… rough. You’ll hear a lot of crunching and see a crumbly, almost gravel-like texture form. This is normal! Don’t panic and don’t add liquid yet. The trick is to let the friction and the blades start to break down the frozen fruit. Use the tamper if you have one to push the mixture down towards the blades.
Step 3: Now, here’s where the magic happens. After a minute or so of blending, the mixture will suddenly change. It will go from crumbly to a thick, sticky ball that whips around the blender. It might even look a bit like a dense dough. This is a great sign—you’re almost there! Stop the blender and scrape down the sides.
Step 4: This is when you add your milk, one tablespoon at a time. Start with two tablespoons, then blend again. The liquid will help the thick ball loosen up into a smooth, soft-serve consistency. You’ll notice the sound change from a labored grunt to a smooth, creamy whirl. If it’s still too thick, add the third tablespoon.
Step 5: Blend for another 30-60 seconds until it’s completely smooth, glossy, and holds its shape. You shouldn’t see any flecks of unblended banana. At this point, you can eat it immediately as a glorious soft-serve. It will be the creamiest, dreamiest thing you’ve ever made from bananas, I promise.
Step 6: For a firmer, scoopable ice cream texture, you have an option. Transfer the nice cream to a loaf pan or a freezer-safe container, smooth the top, and freeze it for 1-2 hours. Just don’t forget about it for too long, or it will freeze solid and be difficult to scoop. If that happens, let it sit on the counter for 10-15 minutes to soften.
Storage & Freshness Guide
- Fridge: Not recommended—enjoy immediately or store in freezer.
- Freezer: Store in airtight container up to 2 weeks; press parchment on surface to prevent ice crystals.
- Reviving: If frozen solid, thaw 10–15 minutes on counter before scooping.
Serving Suggestions
Complementary Dishes
- A warm, gooey Brownie — The contrast of warm, rich chocolate brownie with the cold, creamy nice cream is a textural masterpiece. It creates its own fudgy sauce.
- Fresh Berry Compote — The bright, tart acidity of raspberries or strawberries cuts through the sweetness beautifully and adds a gorgeous pop of color.
- Toasted Coconut Flakes — They add a wonderful nutty flavor and a delightful crunch that makes each bite a little more interesting.
Drinks
- A cold glass of Oat Milk — It continues the creamy, plant-based theme and acts as a neutral, refreshing palate cleanser between spoonfuls.
- Dark Roast Coffee — The bitterness of a good, strong coffee complements the chocolate notes in the nice cream perfectly, making it feel like a sophisticated affogato.
- Peppermint Tea — A caffeine-free option that brings a cool, refreshing note that pairs surprisingly well with the chocolate-banana combo.
Something Sweet
- Chocolate-Dipped Pretzels — Use them as edible spoons! The salty-sweet-crunchy combination is absolutely addictive and so much fun.
- Chopped Roasted Hazelnuts — They bring a Nutella-like sophistication and a fantastic toasty crunch that elevates the whole bowl.
- Homemade Salted Caramel Sauce — A drizzle of salty-sweet caramel takes this from a simple treat to a restaurant-level dessert. A little goes a long way.
Top Mistakes to Avoid
- Mistake: Using underripe bananas. This is the number one reason for a bland, starchy nice cream. The ripe spots are your friends—they provide all the natural sweetness you need.
- Mistake: Adding liquid too early. If you pour in the milk at the beginning, you’ll end up with a slushy instead of a creamy dessert. You have to let the bananas break down into a paste first; the liquid is just there to loosen it up at the end.
- Mistake: Over-blending after adding mix-ins. If you’re adding chocolate chips or nuts, pulse them in at the very end. If you blend them, you’ll just end up with a uniformly colored nice cream and lose all those lovely textural bits.
- Mistake: Letting it freeze into a solid brick.


Chocolate Banana Nice Cream
Craving ice cream? Try this easy Chocolate Banana Nice Cream recipe! It's dairy-free, ready in 10 minutes, and tastes incredibly rich. Make your healthy dessert today!
Ingredients
For the Ingredients
-
4 medium ripe bananas
-
3 tablespoons unsweetened cocoa powder
-
2–3 tablespoons milk of choice
-
1 teaspoon pure vanilla extract
-
1 tiny pinch salt
-
1–2 tablespoons maple syrup or honey
Instructions
-
Get your frozen banana slices ready. You’ll hear them clunking around in the blender—that’s how you know they’re properly frozen. Add them to your blender or food processor first. Then, add the cocoa powder, vanilla, and that all-important pinch of salt. Hold off on the milk for just a moment.01
-
Start blending on low speed. At first, it’s going to sound… rough. You’ll hear a lot of crunching and see a crumbly, almost gravel-like texture form. This is normal! Don’t panic and don’t add liquid yet. The trick is to let the friction and the blades start to break down the frozen fruit. Use the tamper if you have one to push the mixture down towards the blades.02
-
Now, here’s where the magic happens. After a minute or so of blending, the mixture will suddenly change. It will go from crumbly to a thick, sticky ball that whips around the blender. It might even look a bit like a dense dough. This is a great sign—you’re almost there! Stop the blender and scrape down the sides.03
-
This is when you add your milk, one tablespoon at a time. Start with two tablespoons, then blend again. The liquid will help the thick ball loosen up into a smooth, soft-serve consistency. You’ll notice the sound change from a labored grunt to a smooth, creamy whirl. If it’s still too thick, add the third tablespoon.04
-
Blend for another 30-60 seconds until it’s completely smooth, glossy, and holds its shape. You shouldn’t see any flecks of unblended banana. At this point, you can eat it immediately as a glorious soft-serve. It will be the creamiest, dreamiest thing you’ve ever made from bananas, I promise.05
-
For a firmer, scoopable ice cream texture, you have an option. Transfer the nice cream to a loaf pan or a freezer-safe container, smooth the top, and freeze it for 1-2 hours. Just don't forget about it for too long, or it will freeze solid and be difficult to scoop. If that happens, let it sit on the counter for 10-15 minutes to soften.06
Not what you're looking for?


