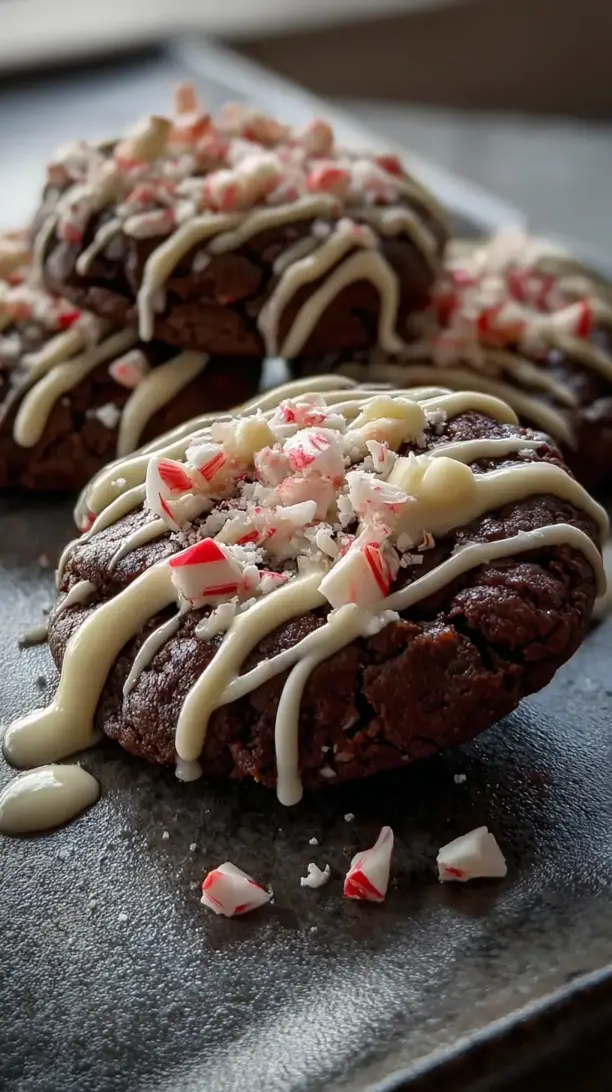
There’s something truly special about the scent of cookies baking during the holidays, isn’t there? For me, pulling a pan of these Chocolate Peppermint Bark Cookies from the oven is pure joy. They’re soft, chewy, and packed with rich dark chocolate and cool peppermint—like a festive celebration in every bite. If you’re searching for the ultimate comfort food recipe that feels like holiday magic, you’ve found it.
I love having a go-to batch of Christmas sweets that feels both classic and special. That’s why this peppermint bark cookie recipe is a star in my collection of Christmas cookies recipes. It’s a wonderful project for your holiday baking, resulting in unique Christmas cookies that always earn compliments. They’re the perfect holiday treats to share, and honestly, some of my favorite Christmas dessert ideas start right here.
Whether you’re planning a cookie swap or just want to fill your kitchen with warmth, these cookies are a must-try. They’re ideal for anyone brainstorming Christmas baking ideas, offering a delicious and memorable addition to your spread of Christmas cookies recipes. So, roll up your sleeves—this batch of holiday baking is about to make your season even sweeter.
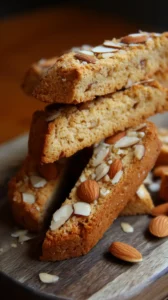
Looking for Chocolate Peppermint Bark Cookies inspiration? You'll love what we have! Explore more Christmas Cookie recipes or discover our Chicken Recipes favorites.


Why You’ll Love This Chocolate Peppermint Bark Cookies
- Festive & joyful: They look as joyful as they taste with red and white swirls.
- Dreamy texture: Crisp outside, wonderfully soft and chewy inside.
- Incredibly easy: A straightforward, no-fuss dough that bakes beautifully.
- Cozy aroma: The smell of chocolate and peppermint baking is pure magic.
Ingredients & Tools
- 225 g (1 cup) unsalted butter, softened
- 200 g (1 cup) light brown sugar, packed
- 100 g (½ cup) granulated sugar
- 2 large eggs, at room temperature
- 2 tsp pure vanilla extract
- 315 g (2 ½ cups) all-purpose flour
- 1 tsp baking soda
- ½ tsp baking powder
- 1 tsp cornstarch
- ½ tsp fine sea salt
- 170 g (1 cup) dark chocolate chunks or chips
- 170 g (1 cup) white chocolate chunks or chips
- 75 g (½ cup) crushed candy canes or peppermints, plus more for topping
Tools: A stand mixer or electric hand mixer, two baking sheets, parchment paper, a medium bowl, and a cooling rack.
Notes: Using room temperature eggs and properly softened butter is key here—it helps the ingredients emulsify perfectly, creating a smoother, more cohesive dough that bakes up with that ideal texture. Don’t skip the cornstarch; it’s our little secret for an extra-soft, bakery-style cookie that stays chewy for days.
Nutrition (per serving)
| Calories: | 280 kcal |
| Protein: | 3 g |
| Fat: | 13 g |
| Carbs: | 39 g |
| Fiber: | 1 g |
Serves: 24 | Prep Time: 15 minutes | Cook Time: 10-12 minutes | Total Time: 27 minutes (plus chilling)
Storage & Freshness Guide
- Fridge: Not recommended; store at room temperature for best texture.
- Freezer: Freeze baked cookies up to 3 months or dough balls up to 3 months.
- Reviving: Warm in microwave 5-10 seconds or oven at 300°F for 2-3 minutes.
Serving Suggestions
Complementary Dishes
- A simple cheese board — The salty, savory notes of a sharp cheddar or creamy brie provide a wonderful contrast to the sweet, minty cookies and cleanse the palate.
- A warm bowl of tomato soup — It might sound unusual, but the acidity and warmth of the soup is a fantastic prelude to the rich, chocolatey dessert that follows.
Drinks
- A tall glass of cold milk — It’s a classic for a reason. The creaminess of the milk is the perfect partner to the rich chocolate and cuts through the sweetness beautifully.
- Peppermint hot chocolate — Double down on the cozy flavors! A warm mug of cocoa amplifies the minty chocolate experience and makes for the ultimate winter treat.
Something Sweet
- Vanilla bean ice cream — Sandwich a scoop between two slightly warm cookies for an epic ice cream sandwich. The vanilla provides a neutral, creamy base that lets the peppermint bark flavor shine.
- A simple fruit compote — A tart raspberry or cherry compote served on the side adds a fruity brightness that balances the decadent cookies perfectly.
Before You Start: Tips & Ingredient Notes
- Don’t skip chilling the dough. I know it’s tempting to bake them right away, but chilling the dough for at least 30 minutes is non-negotiable. It prevents the cookies from spreading too much and allows the flavors to meld, resulting in a much thicker, chewier cookie.
- How to properly soften butter. Your butter should be cool to the touch but leave a slight indent when you press it. If it’s melty or greasy, your cookies will spread. The trick is to take it out of the fridge about an hour before you start baking.
- Crushing the candy canes. Place the candy canes in a sealed zip-top bag and use a rolling pin to crush them. You want a mix of fine powder and small chunks for the best texture and visual appeal. A little goes a long way!
- Weigh your flour for accuracy. The most common mistake in cookie baking is using too much flour. If you don’t have a scale, fluff your flour with a spoon, spoon it into your measuring cup, and level it off. Don’t scoop directly from the bag!
How to Make Chocolate Peppermint Bark Cookies
Step 1: Start by preheating your oven to 350°F (175°C) and lining your baking sheets with parchment paper. In the bowl of your stand mixer fitted with the paddle attachment, cream together the softened butter, brown sugar, and granulated sugar. You’ll want to mix on medium-high speed for about 2-3 minutes, until the mixture is light, pale, and fluffy. Scrape down the sides of the bowl to make sure everything is incorporated.
Step 2: Add the room-temperature eggs one at a time, mixing well after each addition until fully combined. Then, mix in the vanilla extract. The mixture might look a little curdled at this point—that’s perfectly normal and will come together once you add the dry ingredients.
Step 3: In a separate medium bowl, whisk together the flour, baking soda, baking powder, cornstarch, and salt. This ensures the leavening agents are evenly distributed throughout the flour. With the mixer on low speed, gradually add the dry ingredients to the wet ingredients. Mix just until the flour streaks disappear—you really don’t want to overmix at this stage.
Step 4: Now for the fun part! Switch to a sturdy spatula and gently fold in the dark chocolate chunks, white chocolate chunks, and the ½ cup of crushed candy canes. You’ll notice the dough will be quite thick and studded with all the delicious mix-ins. Make sure they are evenly distributed without overworking the dough.
Step 5: Using a cookie scoop or two spoons, portion the dough into balls of about 2 tablespoons each. Place them on the prepared baking sheets, leaving about 2 inches between each one as they will spread. For an extra festive look, press a few extra white chocolate chunks and a pinch of crushed candy canes onto the top of each dough ball.
Step 6: This is the crucial chilling step. Pop the entire baking sheet into the refrigerator for at least 30 minutes. If you’re in a rush, the freezer for 15 minutes will do in a pinch. This solidifies the butter, which is the secret to a cookie that doesn’t bake flat.
Step 7: Bake the cookies, one sheet at a time, for 10-12 minutes. The cookies are done when the edges are set and lightly golden, but the centers still look soft and slightly underbaked. They will continue to cook on the hot baking sheet after you take them out. You might see the candy canes start to melt and create little colorful pools—that’s exactly what you want!
Step 8: As soon as you remove the baking sheet from the oven, give it a firm tap on the counter. This helps deflate the cookies slightly and creates those lovely, wrinkled tops. Let the cookies cool on the baking sheet for 5-10 minutes before transferring them to a wire rack to cool completely. This allows them to set up properly so they don’t fall apart.
Top Mistakes to Avoid
- Mistake: Using melted butter. This is the number one reason cookies spread into thin, greasy puddles. Softened butter creams with the sugar to create air pockets, which gives the cookie its structure. Melted butter skips this crucial step.
- Mistake: Overmixing the dough after adding the flour. This develops the gluten in the flour, leading to a tough, cakey cookie instead of a soft and tender one. Mix just until you no longer see dry streaks of flour.
- Mistake: Baking on a hot baking sheet. Always allow your baking sheets to cool completely before adding a new batch of dough. A hot pan will cause the butter to melt instantly, making the cookies spread before they have a chance to rise.
- Mistake: Overbaking. I’ve messed this up before too… it’s so tempting to wait for a golden-brown center. But trust me, pull them out when the centers still look soft. They will set up as they cool, guaranteeing that dreamy, chewy center.
Expert Tips
- Tip: Brown your butter for a nutty twist. Gently cook the butter until it turns a golden amber color and smells nutty. Let it solidify again in the fridge before using. It adds an incredible depth of flavor that pairs wonderfully with the chocolate and mint.
- Tip: Use a mix of chocolate chip sizes. Instead of just chips, chop up a chocolate bar into uneven chunks. This creates a variety of melted chocolate pockets, from tiny streaks to big, gooey pools, for a more professional bakery-style result.
- Tip: Add a pinch of espresso powder. You won’t taste the coffee, honestly. It just deepens and enhances the chocolate flavor, making it taste even more rich and complex without any coffee aftertaste.
- Tip: Make the dough ahead of time. You can portion the dough balls and freeze them on a baking sheet before transferring to a zip-top bag. Then, you can bake frozen cookies anytime a craving strikes, adding just a minute or two to the bake time.
FAQs
Can I make these cookies without a stand mixer?
Absolutely! An electric hand mixer will work just fine. You can even mix them by hand with a sturdy wooden spoon and a bit of elbow grease—just make sure you really cream the butter and sugars together until the mixture is light and fluffy. This step is crucial for incorporating air into the dough.
How should I store these cookies, and how long do they last?
Once completely cooled, store them in an airtight container at room temperature. They’ll stay soft and delicious for up to 5 days. If you want to keep them longer, you can freeze the baked cookies for up to 3 months. Just thaw at room temperature when you’re ready to enjoy them.
My candy canes melted completely and disappeared. What happened?
This usually means the candy canes were crushed too finely. You want a variety of sizes, including some small chunks, so they don’t just dissolve into sugar syrup in the oven. Also, pressing a few extra pieces on top right before baking ensures you get that beautiful red and white speckled look.
Can I use mint extract instead of candy canes?
You can, but it will change the texture and look of the cookie. If you do, I’d recommend adding ¼ to ½ teaspoon of peppermint extract to the dough along with the vanilla, and still using the white and dark chocolate chunks. The candy canes provide both flavor and a festive crunch, so you’ll be missing that element.
Why did my cookies come out cakey and puffy?
This is often caused by using too much flour or overmixing the dough. Remember to measure your flour accurately by weight or using the spoon-and-level method. Also, check your baking powder and soda to make sure they haven’t expired, as fresh leavening agents are key to the right amount of spread and rise.


Chocolate Peppermint Bark Cookies: Easy Holiday Treat
Whip up a batch of Chocolate Peppermint Bark Cookies with this easy peppermint bark cookie recipe. These soft, chewy holiday treats are the perfect festive dessert for your Christmas baking.
Ingredients
For the Ingredients
-
225 g unsalted butter (softened)
-
200 g light brown sugar (packed)
-
100 g granulated sugar
-
2 large eggs (at room temperature)
-
2 tsp pure vanilla extract
-
315 g all-purpose flour
-
1 tsp baking soda
-
0.5 tsp baking powder
-
1 tsp cornstarch
-
0.5 tsp fine sea salt
-
170 g dark chocolate chunks or chips
-
170 g white chocolate chunks or chips
-
75 g crushed candy canes or peppermints (plus more for topping)
Instructions
-
Start by preheating your oven to 350°F (175°C) and lining your baking sheets with parchment paper. In the bowl of your stand mixer fitted with the paddle attachment, cream together the softened butter, brown sugar, and granulated sugar. You’ll want to mix on medium-high speed for about 2-3 minutes, until the mixture is light, pale, and fluffy. Scrape down the sides of the bowl to make sure everything is incorporated.01
-
Add the room-temperature eggs one at a time, mixing well after each addition until fully combined. Then, mix in the vanilla extract. The mixture might look a little curdled at this point—that’s perfectly normal and will come together once you add the dry ingredients.02
-
In a separate medium bowl, whisk together the flour, baking soda, baking powder, cornstarch, and salt. This ensures the leavening agents are evenly distributed throughout the flour. With the mixer on low speed, gradually add the dry ingredients to the wet ingredients. Mix just until the flour streaks disappear—you really don't want to overmix at this stage.03
-
Now for the fun part! Switch to a sturdy spatula and gently fold in the dark chocolate chunks, white chocolate chunks, and the ½ cup of crushed candy canes. You’ll notice the dough will be quite thick and studded with all the delicious mix-ins. Make sure they are evenly distributed without overworking the dough.04
-
Using a cookie scoop or two spoons, portion the dough into balls of about 2 tablespoons each. Place them on the prepared baking sheets, leaving about 2 inches between each one as they will spread. For an extra festive look, press a few extra white chocolate chunks and a pinch of crushed candy canes onto the top of each dough ball.05
-
This is the crucial chilling step. Pop the entire baking sheet into the refrigerator for at least 30 minutes. If you’re in a rush, the freezer for 15 minutes will do in a pinch. This solidifies the butter, which is the secret to a cookie that doesn’t bake flat.06
-
Bake the cookies, one sheet at a time, for 10-12 minutes. The cookies are done when the edges are set and lightly golden, but the centers still look soft and slightly underbaked. They will continue to cook on the hot baking sheet after you take them out. You might see the candy canes start to melt and create little colorful pools—that’s exactly what you want!07
-
As soon as you remove the baking sheet from the oven, give it a firm tap on the counter. This helps deflate the cookies slightly and creates those lovely, wrinkled tops. Let the cookies cool on the baking sheet for 5-10 minutes before transferring them to a wire rack to cool completely. This allows them to set up properly so they don’t fall apart.08
Not what you're looking for?


