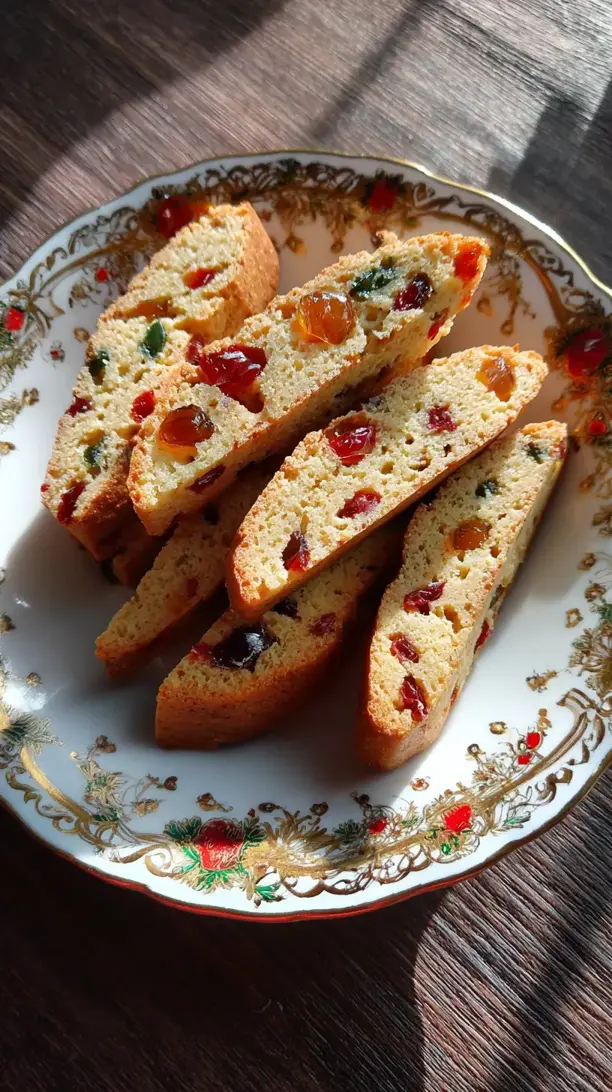
There’s a certain magic that happens in the kitchen during the holidays, isn’t there? For me, it’s perfectly captured in a batch of these Christmas Biscotti With Candied Fruit. The moment they go into the oven, a warm, nostalgic aroma begins to weave through the house, turning any ordinary afternoon into a festive occasion. I consider these twice-baked delights a cornerstone of my holiday baking—they’re not just cookies, but edible joy. If you’re searching for standout Christmas dessert ideas, look no further. Each slice offers a satisfying crunch and little bursts of sweet, jewel-toned fruit, making them some of the most unique Christmas cookies you’ll make this year.
I love that this recipe creates wonderful holiday treats that are as perfect for gifting as they are for enjoying at home with a cup of coffee. When I’m brainstorming my Christmas baking ideas, these biscotti are always on the list because they’re wonderfully make-ahead and always received with delight. They are, without a doubt, classic Christmas sweets that bring genuine comfort.
So if you’re looking to fill your kitchen with the spirit of the season, I can’t recommend this comfort food recipe enough. It’s a simple, rewarding project that results in a delicious celebration of holiday flavor, meant to be shared.
Craving a delicious Christmas Biscotti with Candied Fruit? You've come to the right spot! From Christmas Cookie favorites to amazing Dessert Recipes recipes, there's something here for everyone.


Why You’ll Love This Christmas Biscotti with Candied Fruit
- Make-Ahead Magic: Bake weeks ahead—they stay crisp and delicious.
- Perfect Texture: Crunchy outside with a slight crumbly give inside.
- Gift-Ready & Sturdy: Pack and ship beautifully for heartfelt presents.
- Nostalgic Flavor: Vanilla, almond, spice, and candied fruit evoke the holidays.
Ingredients & Tools
- 280 g all-purpose flour
- 1 tsp baking powder
- 1/4 tsp salt
- 1 tsp ground cinnamon
- 1/4 tsp ground nutmeg
- 115 g unsalted butter, softened
- 150 g granulated sugar
- 2 large eggs
- 1 tsp vanilla extract
- 1/2 tsp almond extract
- 150 g mixed candied fruit
- 50 g raw sugar, for sprinkling (optional)
Tools: A stand mixer or hand mixer, two baking sheets, parchment paper, a sharp serrated knife, and a cooling rack.
Notes: Use vibrant candied fruit (cherries, pineapple, citrus) and don’t skip the almond extract for depth.
Nutrition (per serving)
| Calories: | 120 kcal |
| Protein: | 2 g |
| Fat: | 4 g |
| Carbs: | 20 g |
| Fiber: | 0.5 g |
Serves: 24 biscotti | Prep Time: 20 minutes | Cook Time: 50 minutes | Total Time: 1 hour 10 minutes (plus cooling)
Before You Start: Tips & Ingredient Notes
- Why is my dough so sticky? Biscotti dough is meant to be a little soft and sticky, but if it’s unmanageable, don’t be afraid to add a tablespoon or two more of flour. The goal is a dough that holds its shape but isn’t dry.
- Can I use different extracts? Absolutely! While vanilla and almond are the classic pair, an orange extract would be fantastic with the candied fruit. Just stick to the same total volume of liquid extract.
- What’s the deal with candied fruit? You can find pre-mixed bags in the baking aisle, or you can create your own blend. If you’re not a fan of the super-sweet glace cherries, consider chopping up high-quality candied orange or lemon peel instead.
- Why a serrated knife? A sharp serrated knife is non-negotiable for slicing the baked logs cleanly without crumbling. A straight-edged knife will likely crush the delicate, fruit-studded interior.
- Butter temperature is key. Your butter should be softened to room temperature so it creams beautifully with the sugar. If it’s too cold, your dough will be stiff; if it’s melted, the biscotti will spread too much.
How to Make Christmas Biscotti with Candied Fruit
Step 1: Preheat your oven to 350°F (175°C) and line two baking sheets with parchment paper. In a medium bowl, whisk together the flour, baking powder, salt, cinnamon, and nutmeg. This ensures the leavening and spices are evenly distributed throughout the dough, so you don’t get a bitter bite of baking powder in one cookie. Give it a good whisk until the mixture is one uniform color.
Step 2: In the bowl of a stand mixer fitted with the paddle attachment (or using a hand mixer), cream the softened butter and granulated sugar together on medium-high speed for 2-3 minutes. You’re looking for the mixture to become pale, fluffy, and well-combined. This step is crucial for creating a light texture in the final biscotti. Scrape down the sides of the bowl with a spatula to make sure everything is incorporated.
Step 3: Add the eggs one at a time, beating well after each addition until fully incorporated. Then, mix in the vanilla and almond extracts. The dough might look a little curdled at this point—that’s perfectly normal, so don’t worry. The extracts will fill your kitchen with the most wonderful aroma, a little preview of the holiday flavor to come.
Step 4: Reduce the mixer speed to low and gradually add the dry ingredients to the wet ingredients. Mix just until the flour streaks disappear and a soft dough begins to form. Be careful not to overmix! Overworking the dough can lead to tough biscotti. You’ll notice the dough pulling away from the sides of the bowl.
Step 5: Turn off the mixer and add the candied fruit. Use a spatula or your hands to fold the fruit into the dough until it’s evenly distributed. This is often easier to do by hand to prevent the mixer from breaking up the fruit pieces. The dough will be soft and a bit sticky, which is exactly what you want.
Step 6: Divide the dough in half. On one of the prepared baking sheets, shape each portion into a log that’s about 12 inches long and 3 inches wide. The logs will be roughly 3/4-inch tall. Use your hands to smooth the tops and sides. If you like, sprinkle the tops with a little raw sugar for a sparkly, crunchy finish.
Step 7: Bake the logs for 25-30 minutes, or until they are golden brown, firm to the touch, and a cake tester inserted into the center comes out clean. Rotate the baking sheet halfway through baking for even color. Remove the baking sheet from the oven and place it on a cooling rack. Let the logs cool completely on the pan—this is important and will take about 30-45 minutes. Slicing them while warm is a recipe for crumbles.
Step 8: Once the logs are completely cool, reduce your oven temperature to 325°F (160°C). Transfer one log to a cutting board. Using a sharp serrated knife, slice the log on a slight diagonal into 1/2-inch to 3/4-inch thick slices. A gentle sawing motion works best here; don’t press down. You should get about 12 slices per log.
Step 9: Arrange the slices, cut-side down, on the two baking sheets. They can be placed close together but shouldn’t be touching. Bake for 8-10 minutes, then flip each biscotti over and bake for another 8-10 minutes. The goal is to dry them out until they are lightly golden and crisp around the edges.
Step 10: Transfer the biscotti to a wire rack to cool completely. They will continue to harden as they cool. Once fully cooled, you’ll have the perfect, crunchy, dippable cookie. Listen for that satisfying snap when you break one in half—that’s how you know you’ve done it right.
Storage & Freshness Guide
- Fridge: Not recommended—store at room temperature to maintain crispness.
- Freezer: Keep in an airtight container or freezer bag for up to 3 months.
- Reviving: If they soften, re-crisp in a 300°F oven for 5–7 minutes.
Serving Suggestions
Complementary Dishes
- A simple cheese board — The salty, creamy tang of a sharp cheddar or a nutty Gruyère creates a fantastic contrast with the sweet, spiced biscotti. It’s an unexpected but brilliant pairing for a holiday party.
- Citrus and pomegranate salad — A light salad with segments of orange and a scattering of pomegranate arils cuts through the richness of the biscotti and refreshes the palate between bites.
- Spiced nut mix — A bowl of warm, roasted nuts with rosemary and a touch of cayenne offers a savory, spicy counterpoint that makes the sweet biscotti taste even more delightful.
Drinks
- Vin Santo or a dessert wine — This is the classic Italian pairing for a reason. The sweet, rich wine is meant for dipping, and its flavors meld magically with the almond and fruit in the biscotti.
- Strong espresso or coffee — You really can’t go wrong here. The bitter intensity of a good espresso is the perfect partner for the sugary, crunchy cookie. It’s the ultimate afternoon pick-me-up.
- Spiced hot chocolate — For a non-alcoholic option, a rich hot chocolate with a pinch of cinnamon and chili powder turns biscotti-dipping into a decadent, cozy winter ritual.
Something Sweet
- Dark chocolate ganache for dipping — Melt some high-quality dark chocolate with a splash of cream for a luxurious, DIY dipping situation that takes these biscotti to the next level.
- Lemon sorbet — The bright, tart cleanness of a lemon sorbet is a wonderful palate cleanser that complements the candied fruit without competing with it.
- Vanilla bean panna cotta — The soft, creamy texture of panna cotta is a dream alongside the hard crunch of the biscotti, creating a dessert duo that’s all about contrast.
Top Mistakes to Avoid
- Slicing the logs while they’re still warm. I’ve messed this up before too, and it leads to a crumbly, sad mess. The structure of the log needs time to set as it cools. Patience is your best friend here.
- Overmixing the dough after adding the flour. This develops the gluten and makes the biscotti tough instead of crisp and crumbly. Mix just until you no longer see streaks of flour.
- Baking the second time at too high a temperature. The goal of the second bake is to dry the biscotti out, not to brown them further. A lower temperature for a longer time is the trick to achieving that perfect snap without burning.
- Using a dull knife to slice. A blunt knife will press down on the log and shatter it, rather than slicing cleanly through the fruit and crumb. A sharp serrated knife is a must.
Expert Tips
- Tip: For super-neat slices, pop the completely cooled logs into the freezer for 20-30 minutes before slicing. This firms them up just enough to allow your serrated knife to glide through cleanly without dragging any fruit pieces.
- Tip: If your candied fruit is very sticky or in large chunks, toss it with a tablespoon of the measured flour before folding it in. This light coating helps prevent the fruit from sinking to the bottom of the dough during baking.
- Tip: Don’t throw away ends! The end pieces from the logs might be a bit irregular, but they are the cook’s treat. Crumble them over vanilla ice cream or use them as a topping for a fruit crisp.
- Tip: For a deeper, more complex spice flavor, toast your cinnamon and nutmeg in a dry pan over low heat for a minute before adding them to the flour mixture. It really wakes up the essential oils.
- Tip: To ensure even baking during the second stage, rotate your baking sheets from top to bottom rack and flip the biscotti halfway through. Ovens often have hot spots, and this guarantees uniform crispness.
FAQs
How long do these biscotti keep, and what’s the best way to store them?
Honestly, these are champions of longevity. Once completely cooled, store them in an airtight container at room temperature. They’ll stay perfectly crisp for up to 3 weeks! You can also freeze them for up to 3 months. The low moisture content is what gives them such an impressive shelf life, making them ideal for gifting or getting a head start on your holiday baking.
Can I make these biscotti without a stand mixer?
Absolutely, you can. A hand mixer works just fine for creaming the butter and sugar. For the final stages of mixing in the flour and fruit, a sturdy wooden spoon and some good old-fashioned elbow grease will do the trick. The dough is stiff but manageable. Just be sure not to overwork it once the flour is added.
My biscotti are still a little soft in the middle after the second bake. What should I do?
No problem at all! This usually means they just need a little more time. Simply return them to the 325°F oven for another 3-5 minutes per side. Keep a close eye on them, as they can go from perfectly crisp to over-browned quickly. Remember, they will continue to harden significantly as they cool on the wire rack.
Can I substitute the candied fruit with something else?
Of course! Dried fruit is a fantastic alternative. Try a mix of chopped dried cranberries, apricots, and cherries. You could also use chocolate chips or chopped nuts like pistachios or almonds. Just keep the total volume of add-ins roughly the same (about 150g) so the dough structure isn’t affected.
Why did my biscotti spread so much during the first bake?
This is usually a temperature issue. If your butter was too soft or partially melted, it can cause spreading. Another culprit could be an oven that runs cool, not setting the structure of the dough quickly enough. Next time, make sure your butter is just softened (you can leave a slight indent when pressed) and not greasy, and consider checking your oven temperature with a thermometer.


Christmas Biscotti With Candied Fruit: An Easy Holiday Cookie
Christmas Biscotti With Candied Fruit is an easy biscotti recipe that fills your home with holiday cheer. These crunchy, festive holiday treats are perfect for gifting or enjoying with coffee.
Ingredients
For the biscotti:
-
280 g all-purpose flour
-
1 tsp baking powder
-
1/4 tsp salt
-
1 tsp ground cinnamon
-
1/4 tsp ground nutmeg
-
115 g unsalted butter (softened)
-
150 g granulated sugar
-
2 large eggs
-
1 tsp vanilla extract
-
1/2 tsp almond extract
-
150 g mixed candied fruit
-
50 g raw sugar (for sprinkling (optional))
Instructions
-
Preheat your oven to 350°F (175°C) and line two baking sheets with parchment paper. In a medium bowl, whisk together the flour, baking powder, salt, cinnamon, and nutmeg. This ensures the leavening and spices are evenly distributed throughout the dough, so you don’t get a bitter bite of baking powder in one cookie. Give it a good whisk until the mixture is one uniform color.01
-
In the bowl of a stand mixer fitted with the paddle attachment (or using a hand mixer), cream the softened butter and granulated sugar together on medium-high speed for 2-3 minutes. You’re looking for the mixture to become pale, fluffy, and well-combined. This step is crucial for creating a light texture in the final biscotti. Scrape down the sides of the bowl with a spatula to make sure everything is incorporated.02
-
Add the eggs one at a time, beating well after each addition until fully incorporated. Then, mix in the vanilla and almond extracts. The dough might look a little curdled at this point—that’s perfectly normal, so don’t worry. The extracts will fill your kitchen with the most wonderful aroma, a little preview of the holiday flavor to come.03
-
Reduce the mixer speed to low and gradually add the dry ingredients to the wet ingredients. Mix just until the flour streaks disappear and a soft dough begins to form. Be careful not to overmix! Overworking the dough can lead to tough biscotti. You’ll notice the dough pulling away from the sides of the bowl.04
-
Turn off the mixer and add the candied fruit. Use a spatula or your hands to fold the fruit into the dough until it’s evenly distributed. This is often easier to do by hand to prevent the mixer from breaking up the fruit pieces. The dough will be soft and a bit sticky, which is exactly what you want.05
-
Divide the dough in half. On one of the prepared baking sheets, shape each portion into a log that’s about 12 inches long and 3 inches wide. The logs will be roughly 3/4-inch tall. Use your hands to smooth the tops and sides. If you like, sprinkle the tops with a little raw sugar for a sparkly, crunchy finish.06
-
Bake the logs for 25-30 minutes, or until they are golden brown, firm to the touch, and a cake tester inserted into the center comes out clean. Rotate the baking sheet halfway through baking for even color. Remove the baking sheet from the oven and place it on a cooling rack. Let the logs cool completely on the pan—this is important and will take about 30-45 minutes. Slicing them while warm is a recipe for crumbles.07
-
Once the logs are completely cool, reduce your oven temperature to 325°F (160°C). Transfer one log to a cutting board. Using a sharp serrated knife, slice the log on a slight diagonal into 1/2-inch to 3/4-inch thick slices. A gentle sawing motion works best here; don't press down. You should get about 12 slices per log.08
-
Arrange the slices, cut-side down, on the two baking sheets. They can be placed close together but shouldn’t be touching. Bake for 8-10 minutes, then flip each biscotti over and bake for another 8-10 minutes. The goal is to dry them out until they are lightly golden and crisp around the edges.09
-
Transfer the biscotti to a wire rack to cool completely. They will continue to harden as they cool. Once fully cooled, you’ll have the perfect, crunchy, dippable cookie. Listen for that satisfying snap when you break one in half—that’s how you know you’ve done it right.10
Not what you're looking for?


