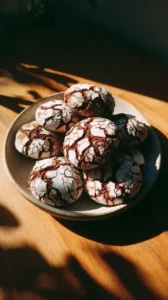
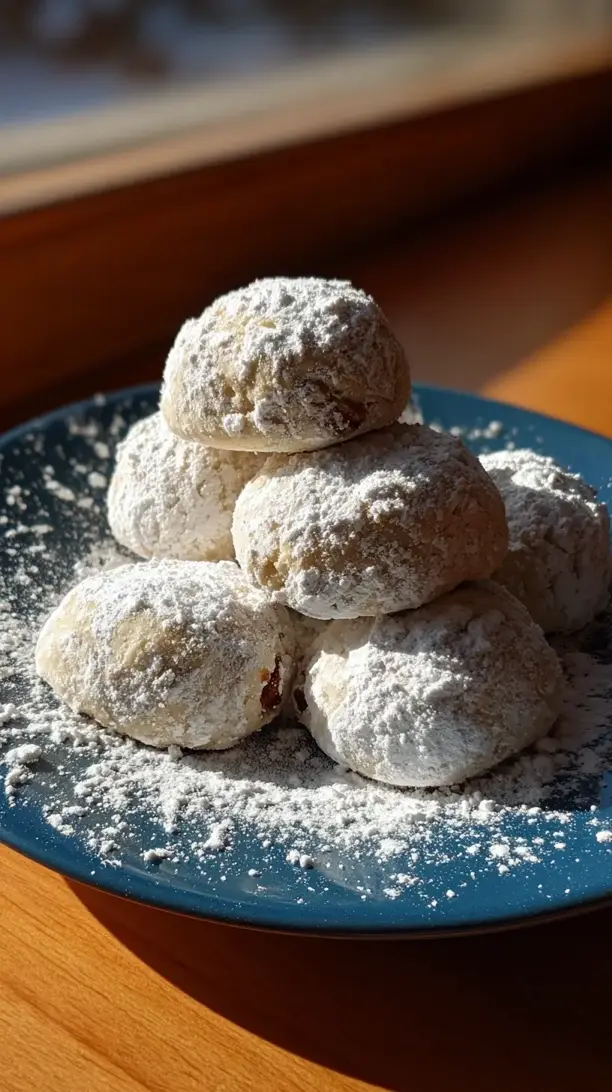
There’s something truly magical about pulling a pan of these Classic Mexican Wedding Cookies from the oven. As they cool, I love watching that first drift of powdered sugar settle over each warm, golden mound—transforming them into little bites of pure, buttery joy that dissolve into a sweet, nutty cloud in your mouth. For me, this easy recipe is a cherished part of holiday baking and a non-negotiable entry in my collection of christmas cookies recipes. They’re the kind of treat that makes the whole house smell like celebration.
Whether you’ve always known them as Galletas Navideñas or Galletas Navidad, these powdered sugar-dusted gems are, in my opinion, the perfect holiday cookies the Christmas season calls for. They are quintessential christmas sweets, simple to make yet deeply elegant. If you’re searching for heartfelt christmas baking ideas that feel special without being fussy, you’ve found your answer. This recipe turns any afternoon in the kitchen into a warm, comforting ritual.
Really, this classic mexican wedding cookies recipe is more than a dessert; it’s edible comfort. It’s the make-ahead comfort food recipe I rely on to bring a sense of sweet, nostalgic magic to any holiday table or cozy winter gathering.
Nothing beats a great Classic Mexican Wedding Cookies. Whether you're a fan of Christmas Cookie or want to try something from our Appetizers & Snacks selection, keep scrolling!


Why You’ll Love This Classic Mexican Wedding Cookies
- Impossibly tender: They dissolve in your mouth with a soft, sandy crumble.
- Simple yet profound: Toasted nuts and quality butter shine through.
- Deceptively easy: No chilling, no decorating—quick and simple.
- Elegant and special: Snow-dusted look perfect for gifting or guests.
Ingredients & Tools
- 225 g (1 cup) unsalted butter, softened at room temperature
- 60 g (1/2 cup) powdered sugar, plus much more for rolling
- 1 tsp pure vanilla extract
- 1/4 tsp fine sea salt
- 250 g (2 cups) all-purpose flour
- 120 g (1 cup) very finely chopped pecans or walnuts
Tools: A stand mixer or electric hand mixer, baking sheets, parchment paper, a medium bowl for powdered sugar rolling.
Notes: The quality of your butter and nuts really makes a difference here. Since there are so few ingredients, each one carries a lot of weight. Using a good European-style butter with a higher fat content will give you an even richer, more melt-in-your-mouth result. And toasting the nuts beforehand? It’s a game-changer for depth of flavor.
Nutrition (per serving)
| Calories: | 150 kcal |
| Protein: | 2 g |
| Fat: | 11 g |
| Carbs: | 12 g |
| Fiber: | 1 g |
Serves: 24 cookies | Prep Time: 20 minutes | Cook Time: 15 minutes | Total Time: 35 minutes
Before You Start: Tips & Ingredient Notes
- Butter temperature is everything. Your butter should be softened so that it yields to gentle pressure, but it shouldn’t be shiny or greasy. If it’s too cold, your dough will be crumbly; if it’s melted, your cookies will spread too much.
- Toast those nuts! I can’t stress this enough. Spread your chopped pecans or walnuts on a baking sheet and toast at 175°C (350°F) for 6-8 minutes until fragrant. This deepens their flavor immensely and is the secret to a truly next-level cookie.
- Measure your flour correctly. For the most accurate results, spoon your flour into the measuring cup and level it off. Scooping directly from the bag can pack in too much flour, leading to a dry dough.
- Have a powdered sugar station ready. You’ll be rolling the warm cookies in powdered sugar twice. Get a medium bowl filled with about a cup of powdered sugar ready before the first batch comes out of the oven—you’ll need to move quickly.
How to Make Classic Mexican Wedding Cookies
Step 1: First, preheat your oven to 175°C (350°F) and line your baking sheets with parchment paper. Now, let’s cream the butter. In the bowl of your stand mixer fitted with the paddle attachment, beat the softened butter on medium speed for about 1-2 minutes until it’s smooth and pale. You’ll notice it becomes wonderfully creamy. Scrape down the sides of the bowl to make sure everything is incorporated evenly.
Step 2: Add the 60 grams (1/2 cup) of powdered sugar, vanilla extract, and salt to the creamed butter. Mix on low speed at first to avoid a sugar cloud, then increase to medium until the mixture is light and fluffy. This should take another 2-3 minutes. The goal here is to get some air into the butter and sugar, which contributes to that delicate texture.
Step 3: It’s time for the dry ingredients. With the mixer on low, gradually add the flour. Mix just until the flour disappears—you don’t want to overwork the dough. Finally, add your finely chopped, toasted nuts and mix on low for just a few seconds until they’re evenly distributed. The dough will be somewhat soft but should hold together when you squeeze it.
Step 4: Now for the fun part—shaping! Scoop up about a tablespoon of dough (I like using a #60 cookie scoop for uniformity) and roll it between your palms into a smooth, compact 2.5 cm (1-inch) ball. Place the balls about 2.5 cm (1 inch) apart on your prepared baking sheets. They won’t spread much, so you can fit a fair number on one sheet.
Step 5: Bake for 12-15 minutes, rotating the sheet halfway through. The cookies are done when the bottoms are just lightly golden and the tops are still pale. They shouldn’t brown on top. You’ll notice a beautiful, nutty aroma filling your kitchen—that’s your signal they’re almost ready. Let them cool on the baking sheet for exactly 5 minutes. They are too fragile to move right out of the oven but need to be warm for the first sugar coating.
Step 6: While the cookies are still quite warm (but not hot enough to burn you), gently roll each one in the bowl of powdered sugar. Coat them thoroughly and place them on a wire rack to cool completely. Be gentle, as they are delicate at this stage. You’ll see the first layer of sugar might look a little damp or spotty—that’s perfectly normal.
Step 7: Once the cookies are completely cool to the touch, it’s time for the second roll. This is what gives them that classic, snowy, finished look. Roll each cookie in the powdered sugar again, and this time, the coating will be pristine and white. And there you have it—perfect, melt-in-your-mouth Classic Mexican Wedding Cookies.
Storage & Freshness Guide
- Fridge: Not recommended; store at room temperature in an airtight container.
- Freezer: Freeze baked cookies in a single layer for up to 3 months; thaw and re-dust with powdered sugar.
- Reviving: If cookies soften, briefly warm in a 300°F oven for 3–5 minutes, then re-roll in powdered sugar after cooling.
Serving Suggestions
Complementary Dishes
- A simple cheese platter — The rich, salty notes of a sharp cheddar or creamy brie provide a wonderful savory contrast to the sweet, buttery cookies.
- Spiced fruit compote — A warm compote of apples or pears with cinnamon and a hint of orange zest cuts through the richness and feels very festive.
Drinks
- Dark roast coffee or espresso — The bitterness of a strong coffee is the perfect companion to balance the intense sweetness and fat of the cookies.
- Spiced chai tea — The warm spices in chai—cinnamon, cardamom, cloves—echo the toasty, nutty flavors in the cookie beautifully.
Something Sweet
- Dark chocolate-dipped orange segments — The bright, citrusy burst of orange and the deep, bitter chocolate create a lovely flavor bridge and cleanse the palate.
- Vanilla bean ice cream — For a truly decadent treat, sandwich a small scoop of high-quality vanilla ice cream between two cookies for an incredible ice cream sandwich.
Top Mistakes to Avoid
- Mistake: Using melted or too-warm butter. This is the number one reason these cookies spread and lose their shape. You want a soft, pliable butter that still holds its structure, not an oily one.
- Mistake: Over-baking the cookies. We’re looking for a pale cookie with a lightly golden bottom. If the tops get any color, they’ve gone too far and will be dry and crumbly instead of tender and melting.
- Mistake: Skipping the second sugar roll. The first coat of sugar on the warm cookie sort of melts into a glaze. The second coat, on the cool cookie, is what gives you that beautiful, snowy, classic finish. Don’t miss this step!
- Mistake: Not chopping the nuts finely enough. Large chunks of nuts can prevent the dough from holding together properly and can make the texture unpleasantly gritty instead of finely crumbly.
Expert Tips
- Tip: Brown your butter for a nutty explosion. Gently cook your butter until the milk solids turn a toasty brown and it smells nutty. Let it solidify again in the fridge before using. This adds an incredible depth of flavor that pairs perfectly with the pecans.
- Tip: Add a pinch of spice. A tiny pinch of cinnamon or a scrape of nutmeg added with the flour can add a wonderful, warm background note that makes the cookies feel even more special and aromatic.
- Tip: Use a sifter for the final sugar coating. Instead of rolling for the second coat, place the cooled cookies on a rack and use a fine-mesh sieve to sift a generous layer of powdered sugar over them. This gives you the most even, professional-looking, snowy finish.
- Tip: Make them ahead and freeze. You can freeze the shaped, unbaked dough balls on a tray, then transfer to a bag. Bake directly from frozen, adding 1-2 minutes to the baking time. You can also freeze the fully baked and coated cookies in a single layer.
FAQs
Can I use a different type of nut?
Absolutely! While pecans and walnuts are traditional, you can experiment with others. Almonds, especially toasted and skinned ones, work beautifully and give a slightly different, milder flavor. Hazelnuts are another fantastic option—their rich, almost chocolatey note is a wonderful pairing. Just make sure whatever nut you choose is very finely chopped so it integrates well into the dough and doesn’t create large, hard pieces.
Why did my cookies turn out dry and crumbly?
This is almost always due to one of two things: too much flour or over-baking. If you scoop your flour directly from the bag, you can easily pack in an extra 20-30 grams, which absorbs too much moisture. Always spoon and level! Also, keep a close eye on the oven. These cookies continue to cook on the hot baking sheet, so taking them out when they are just set is crucial for that melt-in-your-mouth texture.
Can I make these cookies gluten-free?
You can, with a few adjustments. Use a 1:1 gluten-free all-purpose flour blend that contains xanthan gum. The texture will be slightly more sandy, but still very delicious. Be extra careful not to over-mix the dough once the flour is added, as GF blends can sometimes lead to a denser result if overworked. The double sugar roll works exactly the same way!
My powdered sugar coating melted and looks messy after the first roll. What happened?
Don’t worry, this is supposed to happen! The cookies are still warm and contain a good amount of butter, so the first layer of sugar will partially dissolve and create a thin, slightly sticky glaze. This initial layer acts as a “primer” that helps the second, final layer of powdered sugar stick perfectly and create that iconic, snowy white, non-greasy finish once the cookies are completely cool.
How should I store these, and how long do they keep?
Store them in a single layer, or layered between parchment paper, in an airtight container at room temperature. They will keep beautifully for up to a week. If you need to store them longer, you can freeze them for up to three months. Just be aware that the powdered sugar coating might absorb a little moisture in the freezer, so you might want to give them a fresh dusting after they thaw.


Classic Mexican Wedding Cookies: An Easy Holiday Dessert
Learn how to make Classic Mexican Wedding Cookies with this easy recipe. These buttery, melt-in-your-mouth treats are perfect for holiday baking and Christmas cookie platters.
Ingredients
For the Ingredients
-
225 g unsalted butter (softened at room temperature)
-
1 cup unsalted butter (softened at room temperature)
-
60 g powdered sugar (plus much more for rolling)
-
1/2 cup powdered sugar (plus much more for rolling)
-
1 tsp pure vanilla extract
-
1/4 tsp fine sea salt
-
250 g all-purpose flour
-
2 cups all-purpose flour
-
120 g very finely chopped pecans or walnuts
-
1 cup very finely chopped pecans or walnuts
Instructions
-
First, preheat your oven to 175°C (350°F) and line your baking sheets with parchment paper. Now, let's cream the butter. In the bowl of your stand mixer fitted with the paddle attachment, beat the softened butter on medium speed for about 1-2 minutes until it’s smooth and pale. You’ll notice it becomes wonderfully creamy. Scrape down the sides of the bowl to make sure everything is incorporated evenly.01
-
Add the 60 grams (1/2 cup) of powdered sugar, vanilla extract, and salt to the creamed butter. Mix on low speed at first to avoid a sugar cloud, then increase to medium until the mixture is light and fluffy. This should take another 2-3 minutes. The goal here is to get some air into the butter and sugar, which contributes to that delicate texture.02
-
It’s time for the dry ingredients. With the mixer on low, gradually add the flour. Mix just until the flour disappears—you don’t want to overwork the dough. Finally, add your finely chopped, toasted nuts and mix on low for just a few seconds until they’re evenly distributed. The dough will be somewhat soft but should hold together when you squeeze it.03
-
Now for the fun part—shaping! Scoop up about a tablespoon of dough (I like using a #60 cookie scoop for uniformity) and roll it between your palms into a smooth, compact 2.5 cm (1-inch) ball. Place the balls about 2.5 cm (1 inch) apart on your prepared baking sheets. They won’t spread much, so you can fit a fair number on one sheet.04
-
Bake for 12-15 minutes, rotating the sheet halfway through. The cookies are done when the bottoms are just lightly golden and the tops are still pale. They shouldn’t brown on top. You’ll notice a beautiful, nutty aroma filling your kitchen—that’s your signal they’re almost ready. Let them cool on the baking sheet for exactly 5 minutes. They are too fragile to move right out of the oven but need to be warm for the first sugar coating.05
-
While the cookies are still quite warm (but not hot enough to burn you), gently roll each one in the bowl of powdered sugar. Coat them thoroughly and place them on a wire rack to cool completely. Be gentle, as they are delicate at this stage. You’ll see the first layer of sugar might look a little damp or spotty—that’s perfectly normal.06
-
Once the cookies are completely cool to the touch, it’s time for the second roll. This is what gives them that classic, snowy, finished look. Roll each cookie in the powdered sugar again, and this time, the coating will be pristine and white. And there you have it—perfect, melt-in-your-mouth Classic Mexican Wedding Cookies.07
Not what you're looking for?


