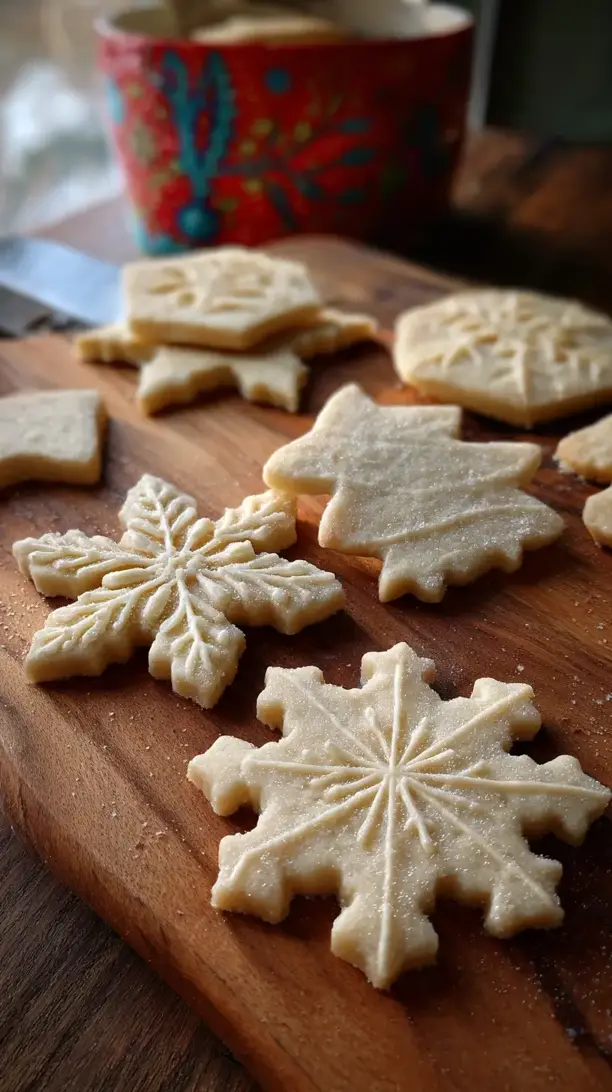
There’s something magical about rolling out cookie dough on a chilly afternoon—it just feels like pure warmth and nostalgia. That’s exactly why I perfected these Gluten-Free Sugar Cookie Cutouts. They’re tender, buttery, and hold their shape beautifully, making them the perfect start for all your Christmas cookies recipes. For me, this recipe is all about bringing everyone together for holiday baking, filling the kitchen with laughter and the sweet scent of memories.
Whether you’re looking for charming Christmas baking ideas or simply need a batch of easy Christmas treats for friends, this dough is your reliable go-to. Imagine turning them into a merry herd of reindeer sugar cookies or a cheerful squad of elf sugar cookies—it’s all possible. As a beloved staple for holiday cookies Christmas, these cutouts prove that gluten-free baking can be just as joyful and delicious.
So, preheat your oven and lay out the sprinkles. Consider this your invitation to share in the sweet, comforting spirit of the season, creating edible masterpieces everyone can enjoy. Let’s make this holiday deliciously inclusive.
Craving a delicious Gluten-Free Sugar Cookie Cutouts? You've come to the right spot! From Christmas Cookie favorites to amazing Burgers recipes, there's something here for everyone.


Why You’ll Love This Gluten-Free Sugar Cookie Cutouts
- Sturdy for decorating: They hold crisp edges on snowflakes, stars, and reindeer.
- Tender, buttery bite: Delicate crumb with a rich, melt-in-your-mouth quality.
- Simple ingredients: Uses a trusted store-bought gluten-free flour blend.
- Dream dough: Rolls smoothly, doesn’t crack, and transfers without falling apart.
Ingredients & Tools
- 280 g (about 2 cups + 2 tbsp) 1:1 gluten-free all-purpose flour blend (like Bob’s Red Mill or King Arthur)
- 1/4 tsp xanthan gum (omit if your blend already contains it)
- 1/2 tsp baking powder
- 1/4 tsp salt
- 115 g (1/2 cup) unsalted butter, softened to room temperature
- 100 g (1/2 cup) granulated sugar
- 1 large egg, at room temperature
- 1 tsp pure vanilla extract
- 1/4 tsp almond extract (optional, but highly recommended for flavor depth)
Tools: Stand mixer or hand mixer, rolling pin, parchment paper, assorted cookie cutters, a thin spatula, and cooling racks.
Notes: Room-temperature butter and egg emulsify better for a cohesive dough. Almond extract adds bakery-style flavor.
Nutrition (per serving)
| Calories: | 120 kcal |
| Protein: | 1 g |
| Fat: | 6 g |
| Carbs: | 16 g |
| Fiber: | 1 g |
Serves: 24 cookies | Prep Time: 20 minutes | Cook Time: 8-10 minutes | Total Time: 1 hour (includes chilling)
Before You Start: Tips & Ingredient Notes
- Your Flour Blend Matters. Not all gluten-free flours are created equal for cut-out cookies. You need a blend that contains binders like rice flour and tapioca starch. A “1:1” or “measure-for-measure” blend is specifically formulated to act like wheat flour and will give you the best results.
- Don’t Skip the Chill Time. I know, I know—you want cookies now. But chilling the dough is non-negotiable for cut-outs. It solidifies the butter, which prevents spreading in the oven and ensures your cookie shapes stay sharp and defined.
- Room Temperature is Key. Using butter and eggs straight from the fridge is a common culprit for a crumbly, difficult-to-roll dough. Let them sit out for about 30-60 minutes until the butter is soft to the touch but not greasy or melted.
- Embrace the Parchment Paper. Rolling your dough directly between two sheets of parchment paper is a game-changer. It prevents sticking without adding excess flour, which can dry out your cookies and make them tough.
How to Make Gluten-Free Sugar Cookie Cutouts
Step 1: In a medium bowl, whisk together your gluten-free flour blend, xanthan gum (if using), baking powder, and salt. Whisking for a good 30 seconds helps to aerate the dry ingredients and ensures everything is evenly distributed—this is your first step toward a uniform texture. You’ll notice the mixture looks light and fluffy.
Step 2: In the bowl of a stand mixer fitted with the paddle attachment (or using a hand mixer), cream the softened butter and granulated sugar together on medium-high speed for about 2-3 minutes. The trick is to keep going until the mixture is pale yellow and noticeably fluffier. This step incorporates air, which contributes to a lighter cookie.
Step 3: Scrape down the sides of the bowl with a spatula. Add the room-temperature egg, vanilla extract, and almond extract. Mix on medium speed until just combined. The mixture might look a little curdled at first—that’s okay! It will come together once you add the dry ingredients.
Step 4: With the mixer on low speed, gradually add the dry ingredient mixture to the wet ingredients. Mix only until the flour streaks disappear and a soft dough forms. Be careful not to overmix, as this can develop the starches and lead to a tougher cookie.
Step 5: Divide the dough in half. Place each half onto a piece of parchment paper, shape it into a disc, and then place another sheet of parchment on top. Use your rolling pin to roll the dough out to about a 1/4-inch thickness. The parchment paper method is honestly foolproof and makes cleanup a breeze.
Step 6: Now, the most important part: chilling. Stack the two parchment-covered dough sheets on a baking sheet and slide them into the refrigerator. You need to chill for at least 30 minutes, but an hour is even better. The dough should be firm to the touch. This step is what guarantees your cookies won’t spread.
Step 7: Preheat your oven to 350°F (175°C) and line baking sheets with fresh parchment paper. Remove one disc of dough from the fridge. Peel off the top layer of parchment, dip your cookie cutters in a little extra gluten-free flour, and press them firmly into the dough. Try to place them as close together as possible to minimize re-rolling.
Step 8: Use a thin spatula to carefully transfer the cut-out shapes to your prepared baking sheet, leaving about an inch between them. If the dough gets too soft and warm while you’re working, just pop the whole sheet back into the fridge for 5-10 minutes to firm up again. Gather the scraps, re-roll between parchment, and chill again before cutting more.
Step 9: Bake for 8-10 minutes. You’re looking for cookies that are set and perhaps just barely starting to turn golden around the very bottom edges. The tops should still look pale. They will continue to firm up as they cool, so pulling them out at this stage ensures a tender, not crunchy, result.
Step 10: Let the cookies cool on the baking sheet for 5 minutes before gently transferring them to a wire rack to cool completely. This initial rest on the hot pan helps them set, making them less fragile to move. They must be completely cool before you even think about decorating!
Storage & Freshness Guide
- Fridge: Store undecorated cookies in an airtight container for up to 1 week.
- Freezer: Freeze baked cookies (undecorated) in a single layer, then transfer to a freezer bag for up to 3 months.
- Reviving: If cookies soften, warm in a 300°F oven for 3–5 minutes to crisp slightly.
Serving Suggestions
Complementary Dishes
- A Charcuterie Board with Fruit and Cheese — The salty, savory elements provide a wonderful contrast to the sweet cookies, making for a lovely afternoon spread.
- Spiced Mulled Wine or Cider — The warm, aromatic spices in the drink echo the cozy, festive feeling you get from decorating and eating these classic cookies.
- A Simple Vanilla Bean Ice Cream — For a next-level dessert, sandwich a small scoop between two cookies. The creamy, cold ice cream with the crisp, buttery cookie is divine.
Drinks
- A Cold Glass of Milk — It’s a timeless pairing for a reason. The creaminess of the milk perfectly complements the sweet, delicate crumb of the cookie.
- Earl Grey Tea with a Splash of Milk — The bergamot in the tea adds a lovely citrusy, floral note that cuts through the richness of the butter and sugar beautifully.
- Hot Chocolate with Whipped Cream — This is the ultimate cozy combo, especially after a chilly afternoon of holiday decorating.
Something Sweet
- Dark Chocolate-Dipped Orange Slices — The intense, bitter chocolate and bright, zesty orange provide a sophisticated and refreshing counterpoint to the simple sweetness of the cookies.
- Mini Lemon Tarts — The sharp, tangy lemon curd is a fantastic palate cleanser that will have you reaching for another sugar cookie right after.
- Candied Ginger — A little piece of spicy, chewy ginger offers a surprising and delightful flavor burst that plays wonderfully with the vanilla and almond notes.
Top Mistakes to Avoid
- Mistake: Using melted or too-soft butter. This is the number one reason for cookie spread. Your butter should be soft enough to leave an indent when pressed, but not oily or shiny. If it’s melted, the cookies will lose their shape completely in the oven.
- Mistake: Skipping or shortening the chill time. I’ve messed this up before too, thinking 15 minutes would be enough. It’s not. The dough needs time for the butter to re-solidify. Rushing this step leads to puddles, not reindeer.
- Mistake: Adding too much flour when rolling. If you’re not using the parchment paper method and are dusting your surface, use a very light hand. Excess flour gets worked into the dough, making it dry and crumbly after baking.
- Mistake: Overbaking. Gluten-free baked goods can go from perfectly tender to unpleasantly hard and dry in just a minute or two. Trust the pale color and take them out when the edges are just set.
Expert Tips
- Tip: Weigh your flour. Using a kitchen scale is the single best way to ensure accuracy in gluten-free baking. Cup measurements can vary wildly, but 280 grams is always 280 grams, guaranteeing perfect dough consistency every time.
- Tip: Re-chill your dough scraps. When you gather the scraps to re-roll, the dough will have warmed up from your hands. Always chill it again before rolling it out for the second time to maintain those sharp edges.
- Tip: Use a thicker rolling guide. If you struggle with rolling dough to an even thickness, try using two wooden dowels or even two rulers of the same thickness placed on either side of your dough. Roll the pin over them for a perfectly uniform sheet of dough.
- Tip: For extra sparkle, sprinkle before baking. If you’re not planning to use royal icing, a light brush of water or an egg wash and a sprinkle of coarse or sanding sugar before baking gives you a beautifully sparkly, crunchy top.
FAQs
Can I make this dough ahead of time?
Absolutely, you can! The dough discs, wrapped tightly in their parchment paper and then in plastic wrap, can be refrigerated for up to 2 days. You can also freeze them for up to 3 months. Just let the frozen dough thaw in the refrigerator overnight before you attempt to roll and cut it. This make-ahead option is perfect for getting a head start on holiday baking without the stress.
Why are my cookies crumbly?
Crumbly cookies are usually a sign of either over-measuring the flour (again, a scale helps!) or overmixing the dough. Once the flour is incorporated, stop mixing. Another cause could be not enough fat or binding agent, so double-check that you’re using a good 1:1 flour blend and that your butter was properly measured and at the right temperature.
Can I omit the almond extract?
Of course! If you have a nut allergy or simply don’t like the flavor, you can replace it with an additional 1/4 teaspoon of vanilla extract. The cookies will still be delicious, with a pure, classic vanilla sugar cookie flavor. You could also experiment with other extracts like lemon or orange for a different twist.
How do I store decorated cookies?
Once your cookies are decorated and the icing has set completely, store them in a single layer in an airtight container at room temperature. If you need to stack them, place a sheet of parchment paper between the layers to prevent sticking and smudging. They’ll keep beautifully for about a week.
My dough is too sticky to handle. What should I do?
Don’t panic and don’t add a ton of extra flour! The dough is often quite soft right after mixing. The first step is always to chill it. After its initial chill, if it’s still a bit sticky when you go to roll it, just make sure you’re using the parchment paper method. A very light dusting of gluten-free flour on the parchment can help, but the chilling usually solves 95% of stickiness issues.


Gluten-Free Sugar Cookie Cutouts: Easy Holiday Baking
Gluten-Free Sugar Cookie Cutouts are the perfect holiday baking project. These tender, buttery cookies hold their shape beautifully for easy Christmas treats everyone can enjoy.
Ingredients
For the Ingredients
-
280 g 1:1 gluten-free all-purpose flour blend (like Bob's Red Mill or King Arthur)
-
1/4 tsp xanthan gum (omit if your blend already contains it)
-
1/2 tsp baking powder
-
1/4 tsp salt
-
115 g unsalted butter (softened to room temperature)
-
100 g granulated sugar
-
1 large egg (at room temperature)
-
1 tsp pure vanilla extract
-
1/4 tsp almond extract (optional, but highly recommended for flavor depth)
Instructions
-
In a medium bowl, whisk together your gluten-free flour blend, xanthan gum (if using), baking powder, and salt.01
-
In the bowl of a stand mixer fitted with the paddle attachment (or using a hand mixer), cream the softened butter and granulated sugar together on medium-high speed for about 2-3 minutes.02
-
Scrape down the sides of the bowl with a spatula. Add the room-temperature egg, vanilla extract, and almond extract. Mix on medium speed until just combined.03
-
With the mixer on low speed, gradually add the dry ingredient mixture to the wet ingredients. Mix only until the flour streaks disappear and a soft dough forms.04
-
Divide the dough in half. Place each half onto a piece of parchment paper, shape it into a disc, and then place another sheet of parchment on top. Use your rolling pin to roll the dough out to about a 1/4-inch thickness.05
-
Stack the two parchment-covered dough sheets on a baking sheet and slide them into the refrigerator. You need to chill for at least 30 minutes, but an hour is even better.06
-
Preheat your oven to 350°F (175°C) and line baking sheets with fresh parchment paper. Remove one disc of dough from the fridge. Peel off the top layer of parchment, dip your cookie cutters in a little extra gluten-free flour, and press them firmly into the dough.07
-
Use a thin spatula to carefully transfer the cut-out shapes to your prepared baking sheet, leaving about an inch between them. Gather the scraps, re-roll between parchment, and chill again before cutting more.08
-
Bake for 8-10 minutes.09
-
Let the cookies cool on the baking sheet for 5 minutes before gently transferring them to a wire rack to cool completely.10
Not what you're looking for?


