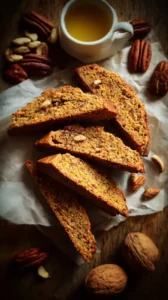
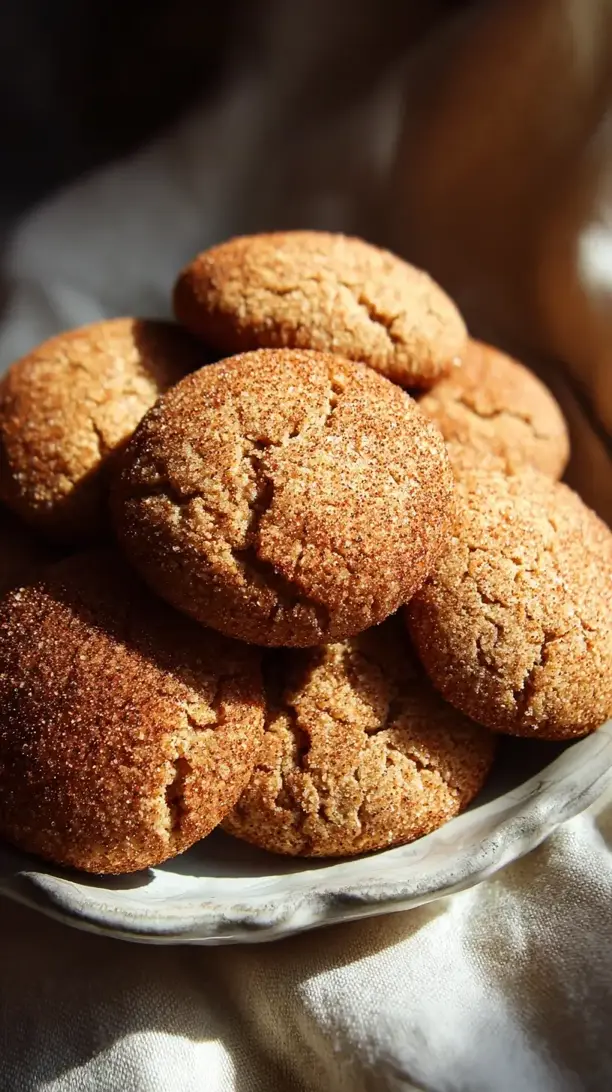
There’s something about the smell of cinnamon sugar that feels like a hug, isn’t there? That’s exactly why I turn to these healthy vegan snickerdoodles whenever I need a little cozy comfort. They have that perfect soft, chewy center and a delightfully crackly top, all made from simple, wholesome ingredients. To me, they’re more than just delicious dairy free cookies and egg free cookies—they’re a little moment of peace.
This recipe truly shines during the festive season. It’s become my go-to for holiday baking, effortlessly fitting into my collection of Christmas cookies recipes. Whether you need impressive unique Christmas cookies for a cookie swap or simple easy Christmas treats to whip up with little helpers, these snickerdoodles deliver. They’re absolutely one of my favorite holiday treats.
So, if you’re curating your Christmas dessert ideas or looking through your list of Christmas baking ideas, I hope you’ll give these a try. They prove that the best comfort food can be both indulgent and good for you—a holiday recipe you’ll be proud to share.
Looking for Healthy Vegan Snickerdoodles inspiration? You'll love what we have! Explore more Christmas Cookie recipes or discover our Breakfast & Brunch favorites.


Why You’ll Love This Healthy Vegan Snickerdoodles
- Secretly wholesome: Made with whole-grain flour and unrefined sugar.
- Perfect texture: Crisp edge, soft center, and crackly cinnamon-sugar crust.
- One-bowl easy: Mix, roll, and bake in under 15 minutes.
- Heavenly aroma: Your kitchen will smell like cinnamon and comfort.
Ingredients & Tools
- 120 ml melted coconut oil (not hot)
- 100 g coconut sugar
- 60 ml pure maple syrup
- 1 tsp vanilla extract
- 60 ml unsweetened almond milk (or any plant milk)
- 210 g white whole wheat flour (or spelt flour)
- 1/2 tsp baking soda
- 1/2 tsp cream of tartar (this is key for the classic tang!)
- 1/4 tsp fine sea salt
- For the Cinnamon-Sugar Coating:
- 2 tbsp coconut sugar
- 1 tsp ground cinnamon
Tools: 1 large mixing bowl, a whisk, a spatula, a medium cookie scoop (about 1.5 tbsp), a baking sheet, and parchment paper.
Notes: The magic of this recipe lies in the ingredients working together. The coconut oil and maple syrup create a rich, caramel-like base, while the cream of tartar teams up with the baking soda to give these cookies their classic lift and slight tang. Don’t skip it—it’s what makes a snickerdoodle a snickerdoodle!
Nutrition (per serving)
| Calories: | 112 kcal |
| Protein: | 1.5 g |
| Fat: | 5 g |
| Carbs: | 16 g |
| Fiber: | 1 g |
Serves: 16 cookies | Prep Time: 12 minutes | Cook Time: 10 minutes | Total Time: 22 minutes
Before You Start: Tips & Ingredient Notes
- Your coconut oil temperature matters. Make sure your melted coconut oil has cooled to room temperature. If it’s too hot, it will melt the coconut sugar and make the dough greasy and difficult to handle. You want it liquid, but not warm.
- Don’t have white whole wheat flour? No problem! Spelt flour works beautifully here and yields a slightly more tender cookie. You can also use a 50/50 blend of all-purpose and regular whole wheat flour if that’s what you have on hand.
- The cream of tartar is non-negotiable. I know it’s a bit of a specialty ingredient, but it’s essential for that authentic snickerdoodle flavor and texture. It provides the signature tang and helps activate the baking soda for the perfect rise. You’ll find it in the spice aisle.
- Chilling the dough is your secret weapon. I know, I know—you want cookies now. But trust me, a quick 15-minute chill firms up the dough, prevents overspreading, and results in a much thicker, chewier cookie. It’s worth the wait!
How to Make Healthy Vegan Snickerdoodles
Step 1: First, preheat your oven to 350°F (175°C) and line a baking sheet with parchment paper. In a small, shallow bowl, whisk together the 2 tablespoons of coconut sugar and 1 teaspoon of cinnamon for the coating. Set this aside—you’ll be glad it’s ready to go when your dough is.
Step 2: Now, for the main event: the cookie dough. In a large mixing bowl, combine the melted (but cooled) coconut oil, 100g of coconut sugar, maple syrup, and vanilla extract. Whisk it vigorously for a good 30-45 seconds. You’re looking for it to become smooth, slightly thickened, and well-emulsified. It should look like a thin caramel sauce.
Step 3: Pour in the almond milk and whisk again until everything is fully incorporated. The mixture might look a little grainy from the coconut sugar, and that’s perfectly fine. Next, it’s time for the dry ingredients. Place a sieve over the bowl and add the white whole wheat flour, baking soda, cream of tartar, and salt. Sift them directly into the wet ingredients. This ensures no lumps of baking soda ruin your perfect cookie.
Step 4: Switch to a spatula and gently fold the dry ingredients into the wet. Mix just until no streaks of flour remain. Be careful not to overmix! The dough will be relatively soft and a bit sticky—this is exactly what you want for a chewy cookie. At this point, if the dough feels too soft to handle, pop the entire bowl into the refrigerator for 15 minutes. This brief chill makes rolling so much easier.
Step 5: Using a medium cookie scoop or a tablespoon, portion out the dough, rolling it between your palms to form smooth, round balls. You should get about 16 balls. Take each ball and roll it generously in the cinnamon-sugar mixture you prepared earlier, ensuring it’s coated on all sides. This creates that iconic, sparkly, crackly top.
Step 6: Place the coated dough balls on your prepared baking sheet, leaving about 2 inches between each one as they will spread a little. Now, for a pro-move: gently press down on each ball just slightly to flatten the top ever so subtly. This encourages an even spread and a perfect round shape.
Step 7: Bake for 9-11 minutes. The trick is to pull them out when the edges look set and the centers still appear a little soft and puffy. They will not look fully done, and that’s the point! They continue to cook on the hot baking sheet out of the oven, which gives you that dreamy, soft center. You’ll notice the beautiful cracks forming on top as they bake.
Step 8: This is the hardest part: let the cookies cool on the baking sheet for a full 10 minutes before you even think about moving them. They are extremely fragile when hot. After 10 minutes, you can transfer them to a wire rack to cool completely—or, let’s be real, grab one immediately and enjoy it warm and melty.
Storage & Freshness Guide
- Fridge: Not recommended; store at room temperature.
- Freezer: Freeze baked cookies or dough balls for up to 3 months.
- Reviving: Warm in microwave for 10 seconds or thaw at room temperature.
Serving Suggestions
Complementary Dishes
- A bowl of vanilla bean coconut ice cream — sandwich a warm cookie around a scoop for the ultimate vegan ice cream sandwich. The contrast of temperatures and textures is simply divine.
- A warm mug of chai tea — the spices in the chai echo the cinnamon in the cookies, creating a wonderfully cozy and aromatic pairing that feels like a warm blanket on a chilly day.
- A fresh fruit platter with apple slices and berries — the bright, juicy fruit provides a lovely, refreshing counterpoint to the sweet, spiced cookies, making the whole spread feel balanced.
Drinks
- Oat milk latte — the creamy, slightly sweet coffee is a perfect companion to the cinnamon-sugar cookie, making for a sophisticated and satisfying afternoon break.
- Cold glass of almond milk — it’s a classic for a reason! Dunking one of these soft cookies into a cold glass of plant milk is a nostalgic joy that never gets old.
- Spiced hot apple cider — this is autumn in a cup. The warm, mulled spices in the cider make the cinnamon in the cookies pop even more.
Something Sweet
- A small square of dark chocolate — enjoy a piece of high-quality, bitter-sweet chocolate alongside your cookie. The deep cocoa flavor provides a sophisticated contrast to the cookie’s warm sweetness.
- A dollop of coconut whipped cream — for an extra-indulgent treat, top a cookie with a fluffy cloud of whipped coconut cream. It’s like a mini, deconstructed dessert.
- A handful of fresh raspberries — their tartness cuts through the sweetness of the cookie beautifully, and the red color looks stunning next to the golden-brown treat.
Top Mistakes to Avoid
- Mistake: Using hot, melted coconut oil. This is the number one reason for greasy, flat cookies. The hot oil will essentially “cook” the flour and sugar, resulting in a dough that’s impossible to roll and spreads way too much in the oven. Always let it cool to room temperature.
- Mistake: Overmixing the dough. Once you add the flour, mix just until combined. Overworking the dough develops the gluten in the whole wheat flour, which can lead to tough, dense cookies instead of the soft, tender crumb we’re after.
- Mistake: Overbaking the cookies. I’ve messed this up before too—it’s so tempting to leave them in until they look fully firm. But snickerdoodles are meant to be soft! They will firm up as they cool. Taking them out when the centers look slightly underdone is the key to perfection.
- Mistake: Skipping the cream of tartar. You might be tempted to substitute it with more baking soda or just leave it out, but please don’t. You’ll lose the classic tangy flavor and the chemical reaction that gives these cookies their perfect lift and texture.
Expert Tips
- Tip: Weigh your flour for accuracy. If you have a kitchen scale, use it! Cup measurements can vary wildly. 210 grams of flour is the sweet spot for the perfect dough consistency. If you must use cups, fluff your flour, spoon it into the cup, and level it off—don’t scoop directly from the bag.
- Tip: Make the dough ahead of time. You can prepare the dough, roll it into balls, and freeze them on a baking sheet. Once solid, transfer to a zip-top bag. Then, you can bake frozen dough balls anytime, just adding 1-2 minutes to the baking time. Fresh cookies on demand!
- Tip: Add a flavor twist with orange zest. For a bright, festive variation, add the finely grated zest of one small orange to the wet ingredients. The citrus aroma paired with the cinnamon is unexpectedly amazing.
- Tip: Create a sugar cookie variation. If you want a plain sugar cookie, simply omit the cinnamon from the coating and use all coconut sugar. You’ll get a beautifully simple, vanilla-forward cookie that’s just as delightful.
FAQs
Can I make these cookies gluten-free?
Absolutely! You can substitute the white whole wheat flour with a 1:1 gluten-free all-purpose flour blend. Look for one that contains xanthan gum, as this helps bind the dough and replicate the texture that gluten would normally provide. The results are fantastic—just be sure not to overmix the dough once you add the GF flour, as it can sometimes become gummy if worked too much.
Why are my cookies spreading too much?
This usually comes down to two things: the temperature of your dough or your oven. If your dough was too warm when it went in, the fat melts before the structure sets. Always do that quick 15-minute chill. Also, make sure your oven is fully preheated. An oven that’s too cool will cause the cookies to spread before they begin to bake properly. Using an oven thermometer can help you check for accuracy.
Can I use a different liquid sweetener instead of maple syrup?
You can! Agave nectar will work in a direct 1:1 swap. If you’re not strictly vegan, you could also use honey, though the flavor will be more distinct. The maple syrup adds a subtle depth and moisture, so if you use a different syrup, just know the final flavor profile will shift slightly, but the texture should remain lovely.
How should I store these cookies, and do they freeze well?
Once completely cool, store them in an airtight container at room temperature for up to 5 days. They also freeze beautifully for up to 3 months. Place them in a single layer in a freezer-safe bag or container, with parchment paper between layers to prevent sticking. Let them thaw at room temperature for an hour or so, or pop a frozen cookie in the microwave for 10 seconds for a warm, fresh-from-the-oven experience.
My dough is really sticky—is that normal?
Yes, it’s meant to be a bit sticky! This is what gives you that super soft and chewy texture. If it’s unmanageably sticky, that’s your cue to chill it. The 15 minutes in the fridge will firm up the coconut oil just enough to make the dough easy to roll into neat balls. You can also lightly dampen your hands with water to prevent sticking while you roll.


Healthy Vegan Snickerdoodles: An Easy Vegan Dessert
Healthy Vegan Snickerdoodles are the perfect easy Christmas treat. This cozy vegan cookie recipe yields soft, chewy cookies with a crackly cinnamon-sugar top.
Ingredients
For the cookie dough:
-
120 ml melted coconut oil (not hot)
-
100 g coconut sugar
-
60 ml pure maple syrup
-
1 tsp vanilla extract
-
60 ml unsweetened almond milk (or any plant milk)
-
210 g white whole wheat flour (or spelt flour)
-
1/2 tsp baking soda
-
1/2 tsp cream of tartar (this is key for the classic tang!)
-
1/4 tsp fine sea salt
For the Cinnamon-Sugar Coating:
-
2 tbsp coconut sugar
-
1 tsp ground cinnamon
Instructions
-
First, preheat your oven to 350°F (175°C) and line a baking sheet with parchment paper. In a small, shallow bowl, whisk together the 2 tablespoons of coconut sugar and 1 teaspoon of cinnamon for the coating. Set this aside—you’ll be glad it’s ready to go when your dough is.01
-
Now, for the main event: the cookie dough. In a large mixing bowl, combine the melted (but cooled) coconut oil, 100g of coconut sugar, maple syrup, and vanilla extract. Whisk it vigorously for a good 30-45 seconds. You’re looking for it to become smooth, slightly thickened, and well-emulsified. It should look like a thin caramel sauce.02
-
Pour in the almond milk and whisk again until everything is fully incorporated. The mixture might look a little grainy from the coconut sugar, and that’s perfectly fine. Next, it’s time for the dry ingredients. Place a sieve over the bowl and add the white whole wheat flour, baking soda, cream of tartar, and salt. Sift them directly into the wet ingredients. This ensures no lumps of baking soda ruin your perfect cookie.03
-
Switch to a spatula and gently fold the dry ingredients into the wet. Mix just until no streaks of flour remain. Be careful not to overmix! The dough will be relatively soft and a bit sticky—this is exactly what you want for a chewy cookie. At this point, if the dough feels too soft to handle, pop the entire bowl into the refrigerator for 15 minutes. This brief chill makes rolling so much easier.04
-
Using a medium cookie scoop or a tablespoon, portion out the dough, rolling it between your palms to form smooth, round balls. You should get about 16 balls. Take each ball and roll it generously in the cinnamon-sugar mixture you prepared earlier, ensuring it’s coated on all sides. This creates that iconic, sparkly, crackly top.05
-
Place the coated dough balls on your prepared baking sheet, leaving about 2 inches between each one as they will spread a little. Now, for a pro-move: gently press down on each ball just slightly to flatten the top ever so subtly. This encourages an even spread and a perfect round shape.06
-
Bake for 9-11 minutes. The trick is to pull them out when the edges look set and the centers still appear a little soft and puffy. They will not look fully done, and that’s the point! They continue to cook on the hot baking sheet out of the oven, which gives you that dreamy, soft center. You’ll notice the beautiful cracks forming on top as they bake.07
-
This is the hardest part: let the cookies cool on the baking sheet for a full 10 minutes before you even think about moving them. They are extremely fragile when hot. After 10 minutes, you can transfer them to a wire rack to cool completely—or, let's be real, grab one immediately and enjoy it warm and melty.08
Not what you're looking for?


