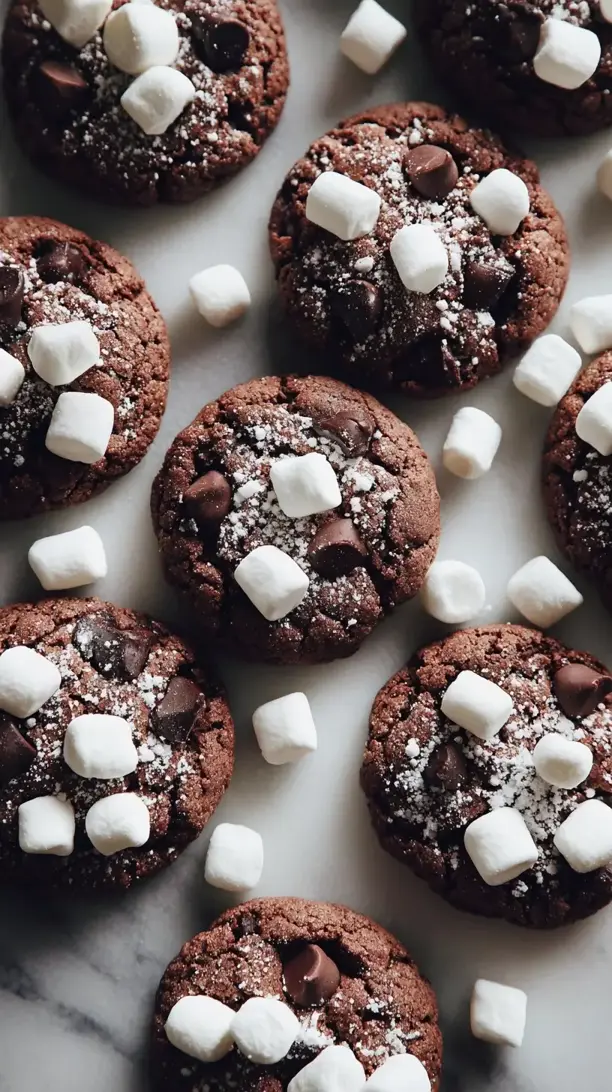
There’s something magical about that first mug of hot cocoa on a chilly day—it feels like a deep, chocolatey hug from the inside. I wanted to capture that cozy feeling in a cookie you could hold, and that’s exactly how these Hot Cocoa Cookies were born. Picture a fudgy, rich center packed with melty chocolate chips, all topped with a perfectly toasted marshmallow. They really are a warm, chocolatey hug in dessert form and my ultimate comfort food recipe.
For me, holiday baking is all about creating edible memories, and these cookies have become a star in my collection of Christmas cookies recipes. They offer a wonderfully unique twist, making them a perfect choice for anyone searching for unique Christmas cookies or fresh Christmas dessert ideas. Whether you’re diving into your seasonal holiday baking or simply need the best holiday treats to share with loved ones, this recipe is a joy to make.
I believe they stand out for good reason, offering a delightful change of pace from the usual Christmas sweets. If you’re looking for inspired Christmas baking ideas to make your gift-giving and gatherings even sweeter, these fudgy chocolate cookies are your answer.
If you're looking for the perfect Hot Cocoa Cookies, you're in the right place. Whether you love Christmas Cookie or want to explore our Appetizers & Snacks collection, we've got you covered.


Why You’ll Love This Hot Cocoa Cookies
Cozy hug taste: Deep chocolate and gooey marshmallow replicate sipping hot cocoa by the fire.
Dreamy texture: Crisp exterior, fudgy center, melty chips, and a toasted marshmallow cloud.
Fun to make: Pressing and toasting marshmallows feels like kitchen magic.
Chocolate satisfaction: Intensely chocolatey with cocoa and two types of chips.
Ingredients & Tools
- 115 g unsalted butter, softened
- 100 g granulated sugar
- 110 g light brown sugar, packed
- 1 large egg, at room temperature
- 1 tsp pure vanilla extract
- 125 g all-purpose flour
- 35 g Dutch-processed cocoa powder
- 1/2 tsp baking soda
- 1/4 tsp salt
- 120 g semi-sweet chocolate chips
- 12-15 large marshmallows, halved crosswise
Tools: Stand mixer or hand mixer, baking sheets, parchment paper, a small cookie scoop (about 1.5 tbsp), a sifter or fine-mesh sieve.
Notes: Dutch-processed cocoa gives a deeper, less acidic chocolate flavor. Halving marshmallows ensures perfect ratio and even melting.
Nutrition (per serving)
| Calories: | 185 kcal |
| Protein: | 2 g |
| Fat: | 9 g |
| Carbs: | 26 g |
| Fiber: | 1 g |
Serves: 15 | Prep Time: 15 mins | Cook Time: 10 mins | Total Time: 25 mins
Before You Start: Tips & Ingredient Notes
- Your butter temperature is key. Softened butter should be cool to the touch but leave a slight indent when you press it. If it’s melty and greasy, your cookies will spread too much. If it’s too cold, they won’t cream properly with the sugar.
- Don’t skip the sifting. Cocoa powder is notoriously clumpy. Sifting it with the flour ensures your cookie dough is smooth and lump-free, which gives you that perfect, fudgy texture.
- Why Dutch-process cocoa? It’s treated with an alkali, which neutralizes its natural acidity. This results in a richer, darker chocolate flavor that’s less bitter, making it ideal for these intensely chocolatey cookies.
- Room temperature egg matters. A cold egg can cause the creamed butter and sugar to seize up and look curdled. A room temp egg incorporates seamlessly, creating a smoother, more emulsified dough.
How to Make Hot Cocoa Cookies
Step 1: Preheat your oven to 350°F (175°C) and line your baking sheets with parchment paper. In a medium bowl, whisk together the flour, Dutch-process cocoa powder, baking soda, and salt. You’ll want to sift the cocoa powder to avoid any pesky lumps—this is a non-negotiable step for that super fudgy texture. Set this dry mixture aside.
Step 2: In the bowl of a stand mixer fitted with the paddle attachment (or using a hand mixer), cream the softened butter with both the granulated and brown sugars on medium speed for about 2-3 minutes. The mixture should become light, pale, and fluffy. You’ll notice the texture change and it will look almost like a thick frosting. Scrape down the sides of the bowl to make sure everything is incorporated.
Step 3: Add the room temperature egg and vanilla extract to the creamed butter and sugar. Mix on medium speed until everything is fully combined, scraping down the bowl once more. The mixture might look a little slick, but that’s perfectly normal. The vanilla adds that warm, underlying note that makes the chocolate flavor pop even more.
Step 4: With the mixer on low speed, gradually add the dry ingredients to the wet ingredients. Mix only until the flour streaks have just disappeared—be careful not to overmix at this stage! Overmixing develops gluten and can lead to tougher cookies. The dough will be quite thick and fudgy.
Step 5: Now, switch to a spatula and fold in the semi-sweet chocolate chips by hand. This ensures they’re evenly distributed without overworking the dough. You’ll have a very rich, dark, and sticky dough that smells amazing already.
Step 6: Using a small cookie scoop (about 1.5 tablespoons), portion the dough onto your prepared baking sheets, spacing them about 2 inches apart. These cookies do spread a bit. You can gently roll them into balls if you want a more uniform shape, but I just slightly press the scooped mounds down with my fingers.
Step 7: Bake for 8-10 minutes. The trick is to pull them out when the edges look set but the centers still appear soft, puffy, and slightly underdone. They will continue to cook on the hot baking sheet as they cool, which is the secret to that wonderfully chewy center.
Step 8: As soon as the cookies come out of the oven, immediately press two halves of a marshmallow (sticky-side down) onto the center of each hot cookie. The residual heat will start to melt them beautifully. Work quickly but carefully!
Step 9: Turn your oven to a low broil setting. Place the cookie sheet back into the oven, watching very closely, for 30-60 seconds, just until the marshmallows are toasted to a light golden brown. This happens fast, so don’t walk away! The aroma of toasting marshmallow is your cue to take them out.
Step 10: Let the cookies cool on the baking sheet for at least 10 minutes before transferring them to a wire rack. This allows them to set up properly. They are best enjoyed slightly warm, when the chocolate is still a little melty.
Storage & Freshness Guide
- Fridge: Not recommended—cookies become firm. Store at room temperature.
- Freezer: Freeze baked cookies (without marshmallow) in an airtight container up to 1 month. Re-toast marshmallow when serving.
- Reviving: Warm in a 300°F oven for 3–5 minutes to refresh crispness and melt chocolate.
Serving Suggestions
Complementary Dishes
- A scoop of vanilla bean ice cream — The cold, creamy vanilla is a classic partner that cuts through the rich chocolate and makes it feel like a decadent dessert.
- A small cup of freshly brewed coffee — The bitterness of the coffee provides a fantastic contrast to the sweetness of the cookie and marshmallow, elevating the whole experience.
- A small bowl of fresh berries like raspberries — Their bright, tart acidity can help balance the richness and cleanse the palate between bites.
Drinks
- A cold glass of milk — It’s a timeless combination for a reason. The milk complements the chocolate and soothes the sweetness perfectly.
- A mug of peppermint tea — The cool, refreshing mint notes dance beautifully with the deep chocolate, creating a festive and cozy flavor pairing.
- A rich hot chocolate — Go for the ultimate chocolate experience! A dark, sipping hot cocoa turns this into a truly indulgent moment.
Something Sweet
- A simple citrus sorbet — A scoop of lemon or orange sorbet on the side provides a refreshing, palate-cleansing finish that keeps the chocolate from feeling too heavy.
- A small piece of salted caramel chocolate — For the true chocoholic, this doubles down on the decadence and the salt enhances all the other flavors.
- Candied orange peel — The chewy, bittersweet citrus notes are a sophisticated and delicious way to end a meal featuring these cookies.
Top Mistakes to Avoid
- Mistake: Using melted butter. This is the number one reason cookies spread into thin, greasy puddles. Creaming softened butter with sugar incorporates air, which helps the cookies rise and gives them structure.
- Mistake: Overbaking the cookies. If you wait for the centers to look fully cooked in the oven, you’ll end up with dry, cakey cookies. Pull them out when they still look soft in the middle for that perfect fudgy chew.
- Mistake: Walking away during the broiling step. I’ve learned this the hard way—marshmallows go from perfectly toasted to a charred, smoky mess in a matter of seconds. Watch them like a hawk!
- Mistake: Adding the marshmallows before baking. If you bake the marshmallows with the dough, they will melt completely, create a sticky mess, and likely burn. They must be added after the cookies are baked.
Expert Tips
- Tip: Chill your dough if your kitchen is warm. If you find your dough is too soft after mixing, pop it in the fridge for 15-20 minutes. This prevents excessive spreading and results in a thicker, chewier cookie.
- Tip: Use a kitchen scale for flour. Scooping flour directly from the bag can pack it down, leading to over-measuring and dry, crumbly cookies. Weighing your ingredients is the most accurate way to ensure perfect results every time.
- Tip: Experiment with different chocolates. Try using dark chocolate chips for a more intense, less sweet cookie, or even milk chocolate for a nostalgic twist. A mix of chips and chunks also gives a fantastic texture.
- Tip: Make them ahead. You can scoop the dough onto a baking sheet, freeze solid, and then transfer the dough balls to a freezer bag. Bake straight from frozen, adding a minute or two to the baking time.
FAQs
Can I use natural cocoa powder instead of Dutch-processed?
You can, but the flavor and texture will be different. Natural cocoa is more acidic and will react with the baking soda, potentially making the cookies rise more and have a cakier, slightly more bitter chocolate flavor. Dutch-processed gives that deep, fudgy quality we’re after. If you must substitute, it’s a 1:1 swap, but just know the result won’t be identical.
My cookies spread too much. What happened?
This is almost always a butter or dough temperature issue. Was your butter too soft or melted? Was your baking sheet still warm from a previous batch? Both can cause spreading. Make sure your butter is just softened, not greasy, and always use a cool baking sheet. Chilling the dough for a bit can also be a great rescue remedy.
Can I use mini marshmallows instead of large ones?
Absolutely! You’ll just need to adjust the quantity. Instead of halving large marshmallows, you can press 3-4 mini marshmallows into the top of each warm cookie. They’ll melt together into a lovely, gooey layer when you broil them.
How should I store these cookies?
Store them in a single layer in an airtight container at room temperature for up to 3 days. If you stack them, the marshmallows will make them stick together. For longer storage, you can freeze the baked cookies (without the marshmallow topping) and then re-toast a marshmallow on top when you’re ready to serve.
Why did my marshmallow melt completely and disappear?
This usually means the cookies were too hot when you placed the marshmallow on top, or you broiled them for too long. The marshmallow should be placed on cookies that are hot from the oven, but the quick broil is just to toast the top, not melt it entirely. If this happens, try broiling for a shorter time, like 20-30 seconds.


Hot Cocoa Cookies: An Easy Holiday Baking Recipe
Hot Cocoa Cookies are the ultimate chocolate marshmallow cookies, perfect for your holiday baking. They're a fudgy, cozy treat that brings all the magic of winter into a single bite.
Ingredients
For the Ingredients
-
115 g unsalted butter (softened)
-
100 g granulated sugar
-
110 g light brown sugar (packed)
-
1 large egg (at room temperature)
-
1 tsp pure vanilla extract
-
125 g all-purpose flour
-
35 g Dutch-processed cocoa powder
-
0.5 tsp baking soda
-
0.25 tsp salt
-
120 g semi-sweet chocolate chips
-
12-15 large marshmallows (halved crosswise)
Instructions
-
Preheat your oven to 350°F (175°C) and line your baking sheets with parchment paper. In a medium bowl, whisk together the flour, Dutch-process cocoa powder, baking soda, and salt. You’ll want to sift the cocoa powder to avoid any pesky lumps—this is a non-negotiable step for that super fudgy texture. Set this dry mixture aside.01
-
In the bowl of a stand mixer fitted with the paddle attachment (or using a hand mixer), cream the softened butter with both the granulated and brown sugars on medium speed for about 2-3 minutes. The mixture should become light, pale, and fluffy. You’ll notice the texture change and it will look almost like a thick frosting. Scrape down the sides of the bowl to make sure everything is incorporated.02
-
Add the room temperature egg and vanilla extract to the creamed butter and sugar. Mix on medium speed until everything is fully combined, scraping down the bowl once more. The mixture might look a little slick, but that’s perfectly normal. The vanilla adds that warm, underlying note that makes the chocolate flavor pop even more.03
-
With the mixer on low speed, gradually add the dry ingredients to the wet ingredients. Mix only until the flour streaks have just disappeared—be careful not to overmix at this stage! Overmixing develops gluten and can lead to tougher cookies. The dough will be quite thick and fudgy.04
-
Now, switch to a spatula and fold in the semi-sweet chocolate chips by hand. This ensures they’re evenly distributed without overworking the dough. You’ll have a very rich, dark, and sticky dough that smells amazing already.05
-
Using a small cookie scoop (about 1.5 tablespoons), portion the dough onto your prepared baking sheets, spacing them about 2 inches apart. These cookies do spread a bit. You can gently roll them into balls if you want a more uniform shape, but I just slightly press the scooped mounds down with my fingers.06
-
Bake for 8-10 minutes. The trick is to pull them out when the edges look set but the centers still appear soft, puffy, and slightly underdone. They will continue to cook on the hot baking sheet as they cool, which is the secret to that wonderfully chewy center.07
-
As soon as the cookies come out of the oven, immediately press two halves of a marshmallow (sticky-side down) onto the center of each hot cookie. The residual heat will start to melt them beautifully. Work quickly but carefully!08
-
Turn your oven to a low broil setting. Place the cookie sheet back into the oven, watching very closely, for 30-60 seconds, just until the marshmallows are toasted to a light golden brown. This happens fast, so don’t walk away! The aroma of toasting marshmallow is your cue to take them out.09
-
Let the cookies cool on the baking sheet for at least 10 minutes before transferring them to a wire rack. This allows them to set up properly. They are best enjoyed slightly warm, when the chocolate is still a little melty.10
Not what you're looking for?


