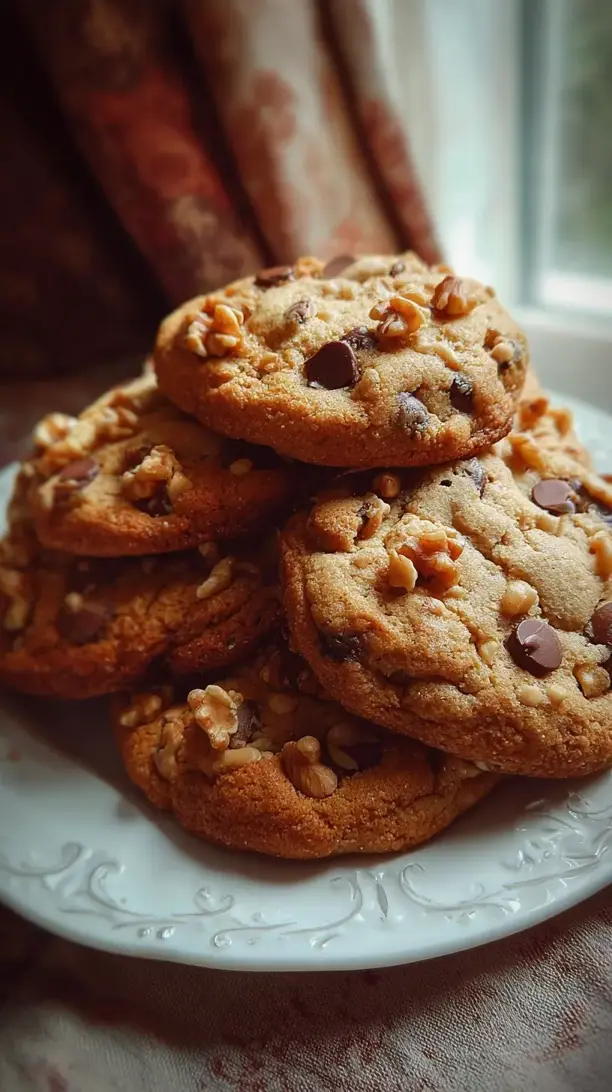
I have such fond memories of baking these Nutty Chocolate Chip Cookies for the first time. My kitchen filled with that incredible, warm scent, and I knew this comfort food recipe was something truly special—like a delicious, edible hug. With its toasted nuts, this chocolate chip cookie recipe delivers the perfect trio: crisp edges, wonderfully chewy centers, and a satisfying crunch. It’s a standout choice for your holiday baking and creates the most delightful Christmas sweets.
If you’re like me and love brainstorming Christmas dessert ideas, these walnut-studded cookies are a must-add to your list. They fit beautifully into any assortment of holiday treats, feeling both familiar and uniquely special. When you’re searching for Christmas baking ideas that are reliably delicious and joyfully simple, this is the cozy project you need.
Honestly, these have become my absolute go-to for easy Christmas treats that never fail to impress. Letting the cookie dough chill is the only little secret to their perfect texture. For anyone seeking unique Christmas cookies that are packed with flavor and simple to make, this chewy recipe is your happy answer. You’ll end up with a plate of irresistible holiday baking ready to share, and I promise, you won’t be able to eat just one.
Looking for Nutty Chocolate Chip Cookies inspiration? You'll love what we have! Explore more Christmas Cookie recipes or discover our Appetizer Recipes favorites.


Why You’ll Love This Nutty Chocolate Chip Cookies
- Perfect Texture Trio: Crisp edges, chewy center, and crunchy nuts in every bite.
- Deep Toasty Flavor: Toasted nuts add a rich, butterscotch-like depth.
- Stays Soft: Higher brown sugar and slight under-baking keep them chewy for days.
- Incredibly Versatile: Swap nuts or chocolate, or add sea salt for a gourmet touch.
Ingredients & Tools
- 225 g unsalted butter, softened
- 200 g light brown sugar
- 100 g granulated sugar
- 2 large eggs, at room temperature
- 2 tsp pure vanilla extract
- 320 g all-purpose flour
- 1 tsp baking soda
- 1 tsp cornstarch
- ½ tsp fine sea salt
- 200 g dark chocolate chips or chunks
- 150 g walnuts or pecans, toasted and roughly chopped
Tools: Stand mixer or electric hand mixer, baking sheets, parchment paper, mixing bowls, a small skillet for toasting nuts.
Notes: Use room temperature eggs and properly softened butter for perfect creaming. Cornstarch is the secret for an extra soft, thick cookie. Don’t skip toasting the nuts—it makes all the difference.
Nutrition (per serving)
| Calories: | 280 kcal |
| Protein: | 4 g |
| Fat: | 16 g |
| Carbs: | 32 g |
| Fiber: | 2 g |
Serves: 18 | Prep Time: 20 minutes | Cook Time: 12 minutes | Total Time: 32 minutes
Before You Start: Tips & Ingredient Notes
- What does “softened butter” really mean? It should be cool to the touch but yield easily when you press it. If it’s melty and greasy, it’s too warm and will cause your cookies to spread too much. Leave it on the counter for about 45-60 minutes before you start.
- Why toast the nuts? Toasting is a flavor amplifier. It brings out the natural oils and gives the nuts a deeper, richer taste that permeates the whole cookie. An untoasted nut can taste a bit bland and woody in comparison.
- Can I use a different type of nut? Absolutely! Pecans are a fantastic alternative to walnuts. You could also use hazelnuts or even macadamia nuts for a different flavor profile. Just make sure to toast them first.
- Why both baking soda and cornstarch? The baking soda helps the cookies spread and rise, while the cornstarch is our trick for a soft, thick, and bakery-style texture. It prevents the cookies from becoming too cakey or thin and crispy.
How to Make Nutty Chocolate Chip Cookies
Step 1: Toast Your Nuts. Preheat your oven to 175°C (350°F). Spread the walnuts or pecans in a single layer on a dry baking sheet. Toast them for 8-10 minutes, until they’re fragrant and slightly darkened. You’ll know they’re ready when you can smell that wonderful, nutty aroma. Let them cool completely before roughly chopping them. This step is crucial for maximizing flavor.
Step 2: Cream the Butter and Sugars. In the bowl of your stand mixer fitted with the paddle attachment, add the softened butter, brown sugar, and granulated sugar. Beat on medium-high speed for a full 2-3 minutes. You’re looking for a mixture that is light, pale, and fluffy. This process incorporates air, which is key for the perfect cookie texture. Don’t rush this step!
Step 3: Add Eggs and Vanilla. Scrape down the sides of the bowl with a spatula to ensure everything is incorporated. Add the room-temperature eggs one at a time, beating well after each addition until fully combined. Then, mix in the vanilla extract. The mixture might look a little curdled at this point—that’s perfectly normal and will come together once you add the dry ingredients.
Step 4: Combine Dry Ingredients. In a separate medium bowl, whisk together the flour, baking soda, cornstarch, and salt. Whisking ensures the leavening and salt are evenly distributed throughout the flour, preventing any bitter pockets in your finished cookies.
Step 5: Bring the Dough Together. With the mixer on low speed, gradually add the dry ingredients to the wet ingredients. Mix only until the last streaks of flour disappear. You absolutely do not want to overmix at this stage. Now, switch to a sturdy spatula and gently fold in the chocolate chips and your cooled, toasted nuts until they’re evenly distributed.
Step 6: Chill the Dough (The Secret Step!). Cover the bowl with plastic wrap and chill the dough for at least 30 minutes, or up to 48 hours. This rest period allows the flour to fully hydrate and the flavors to meld. It also prevents the cookies from spreading too thin in the oven, giving you that perfect thick and chewy texture.
Step 7: Scoop and Bake. Preheat your oven to 180°C (350°F). Line baking sheets with parchment paper. Using a medium cookie scoop (about 1.5 tablespoons), portion the dough onto the prepared sheets, leaving about 2 inches between each for spreading. Bake for 10-12 minutes. The edges should be set and lightly golden, but the centers will still look soft and slightly underdone.
Step 8: The Cool Down. This is the hardest part! Let the cookies cool on the baking sheet for 10 full minutes. They will continue to cook and set during this time. Then, transfer them to a wire rack to cool completely. This patience rewards you with the ideal chewy texture.
Storage & Freshness Guide
- Fridge: Not recommended; store in an airtight container at room temperature.
- Freezer: Freeze baked cookies or scooped dough balls for up to 3 months in a sealed bag.
- Reviving: Warm cookies in a 300°F oven for 3–5 minutes or microwave for 10 seconds.
Serving Suggestions
Complementary Dishes
- A scoop of vanilla bean ice cream — The classic warm cookie and cold ice cream combo is unbeatable. The vanilla provides a creamy, simple backdrop that lets the nutty, chocolatey cookie shine.
- A small bowl of fresh berries — The bright, tart acidity of raspberries or strawberries cuts through the richness of the cookie beautifully, making the whole experience feel a little more balanced.
- A sharp cheddar cheese plate — Don’t knock it ‘til you try it! The salty, sharp flavor of a good aged cheddar creates an unexpectedly delicious contrast with the sweet, nutty cookie.
Drinks
- A tall glass of cold milk — It’s a timeless pairing for a reason. The cold, creamy milk is the perfect partner to wash down each rich, satisfying bite.
- A rich cup of coffee — The bitterness of a dark roast coffee complements the sweetness of the chocolate and the toasty notes of the nuts, elevating your coffee break into something special.
- Earl Grey tea with a hint of lemon — The bergamot in the tea has a lovely citrusy, floral note that pairs surprisingly well with the deep flavors of the cookie, creating a very sophisticated snack.
Something Sweet
- A simple fruit sorbet — A light, refreshing lemon or mango sorbet is a fantastic palate cleanser after indulging in a couple of these rich, decadent cookies.
- A dollop of whipped cream with cinnamon — For an extra-indulgent treat, top a warm cookie with freshly whipped cream and a dusting of cinnamon. It’s like a deconstructed, portable dessert.
- Dark chocolate-dipped orange segments — The combination of dark chocolate and orange echoes the flavors in the cookie, while the fresh fruit provides a clean, bright finish.
Top Mistakes to Avoid
- Mistake: Using melted butter. This is the number one reason for flat, greasy cookies. Melted butter causes the dough to spread excessively before it has a chance to set, resulting in a thin, crispy cookie instead of a soft, chewy one.
- Mistake: Skipping the chill time. I know it’s tempting to bake them right away, but chilled dough bakes up thicker and chewier. Warm dough spreads rapidly, leading to thin cookies. That 30-minute wait is a game-changer for texture.
- Mistake: Over-baking. The cookies are done when the edges are golden but the centers still look soft and slightly underdone. They will continue to cook on the hot baking sheet. If you wait for the centers to look fully set, you’ll end up with a dry, crunchy cookie.
- Mistake: Over-mixing the flour. Once you add the flour, mix only until it’s just combined. Over-mixing develops the gluten in the flour, which can lead to a tough, cakey cookie instead of a tender, chewy one.
Expert Tips
- Tip: Weigh your ingredients. For truly consistent results every single time, use a kitchen scale. Cup measurements can vary wildly, but grams are precise. This is especially important for the flour—too much flour is a common culprit for dry, cakey cookies.
- Tip: Make a “flavor-developed” dough. For the absolute best flavor, let the dough chill overnight, covered, in the refrigerator. This rest period allows the flavors to deepen and meld together, resulting in a much more complex and delicious cookie.
- Tip: Create a bakery-style look. After you’ve scooped your dough balls, tear a few in half and press them back together with the rough, torn sides facing up. This creates craggy, textured tops that look professionally made.
- Tip: Add a sprinkle of sea salt. Right when the cookies come out of the oven, gently press a few extra chocolate chips into the top and finish with a tiny sprinkle of flaky sea salt. It enhances every single flavor in the most incredible way.
FAQs
Can I freeze the cookie dough?
Absolutely, and I highly recommend it for fresh-baked cookies on demand! Simply scoop the dough balls onto a parchment-lined tray and freeze them solid. Once frozen, transfer them to a zip-top freezer bag. They’ll keep for up to 3 months. When you’re ready to bake, just place the frozen dough balls on a baking sheet—you might need to add 1-2 extra minutes to the baking time. No need to thaw!
My cookies came out flat. What happened?
Flat cookies are usually due to butter that was too warm or melted. Another common culprit is not chilling the dough long enough. The warmth of your hands can also soften the dough as you scoop it. Next time, ensure your butter is just softened (not melty), chill the dough thoroughly, and try using a cookie scoop to minimize handling. An old or expired baking soda can also be the issue.
Can I use milk chocolate instead of dark?
Of course! The beauty of this recipe is its versatility. Milk chocolate will make for a sweeter, creamier cookie. You could even use a mix of white and dark chocolate chips. Just try to use a good quality chocolate, as it really makes a difference in the final taste and meltiness.
Why are my cookies cakey and puffy?
A cakey texture usually points to too much flour or over-mixing. Did you spoon and level your flour, or scoop directly from the bag? Scooping packs the flour in, leading to an excess. Always spoon your flour into the measuring cup and level it off, or better yet, use a scale. Over-mixing after adding the flour develops gluten, which also leads to a cake-like structure.
How do I store these cookies to keep them soft?
The key to soft cookies is an airtight container. Once the cookies are completely cool, place them in a container with a tight-fitting lid. For extra insurance, you can add a piece of bread to the container. The cookies will absorb moisture from the bread, staying soft for days (the bread will get hard, but your cookies will be perfect!).


Nutty Chocolate Chip Cookies: An Easy, Chewy Holiday Treat
Whip up a batch of Nutty Chocolate Chip Cookies with this easy chocolate chip cookie recipe. They're the perfect, unique Christmas cookie with crisp edges and a chewy center.
Ingredients
For the Ingredients
-
225 g unsalted butter (softened)
-
200 g light brown sugar
-
100 g granulated sugar
-
2 large eggs (at room temperature)
-
2 tsp pure vanilla extract
-
320 g all-purpose flour
-
1 tsp baking soda
-
1 tsp cornstarch
-
0.5 tsp fine sea salt
-
200 g dark chocolate chips or chunks
-
150 g walnuts or pecans (toasted and roughly chopped)
Instructions
-
Preheat your oven to 175°C (350°F). Spread the walnuts or pecans in a single layer on a dry baking sheet. Toast them for 8-10 minutes, until they’re fragrant and slightly darkened. You’ll know they’re ready when you can smell that wonderful, nutty aroma. Let them cool completely before roughly chopping them. This step is crucial for maximizing flavor.01
-
In the bowl of your stand mixer fitted with the paddle attachment, add the softened butter, brown sugar, and granulated sugar. Beat on medium-high speed for a full 2-3 minutes. You’re looking for a mixture that is light, pale, and fluffy. This process incorporates air, which is key for the perfect cookie texture. Don’t rush this step!02
-
Scrape down the sides of the bowl with a spatula to ensure everything is incorporated. Add the room-temperature eggs one at a time, beating well after each addition until fully combined. Then, mix in the vanilla extract. The mixture might look a little curdled at this point—that’s perfectly normal and will come together once you add the dry ingredients.03
-
In a separate medium bowl, whisk together the flour, baking soda, cornstarch, and salt. Whisking ensures the leavening and salt are evenly distributed throughout the flour, preventing any bitter pockets in your finished cookies.04
-
With the mixer on low speed, gradually add the dry ingredients to the wet ingredients. Mix only until the last streaks of flour disappear. You absolutely do not want to overmix at this stage. Now, switch to a sturdy spatula and gently fold in the chocolate chips and your cooled, toasted nuts until they’re evenly distributed.05
-
Cover the bowl with plastic wrap and chill the dough for at least 30 minutes, or up to 48 hours. This rest period allows the flour to fully hydrate and the flavors to meld. It also prevents the cookies from spreading too thin in the oven, giving you that perfect thick and chewy texture.06
-
Preheat your oven to 180°C (350°F). Line baking sheets with parchment paper. Using a medium cookie scoop (about 1.5 tablespoons), portion the dough onto the prepared sheets, leaving about 2 inches between each for spreading. Bake for 10-12 minutes. The edges should be set and lightly golden, but the centers will still look soft and slightly underdone.07
-
Let the cookies cool on the baking sheet for 10 full minutes. They will continue to cook and set during this time. Then, transfer them to a wire rack to cool completely. This patience rewards you with the ideal chewy texture.08
Not what you're looking for?


