Picture this: you take a bite, and suddenly you’re standing in a sun-drenched herb garden. That’s the magic of the Green Goddess Sandwich. It’s not just food—it’s an experience. The creamy avocado hugs crisp veggies, while that tangy herb spread dances on your tongue. I first fell in love with this sandwich during a picnic in Golden Gate Park, where the original Green Goddess dressing was invented nearly a century ago. Now, I make it at least once a week because it’s that good.
Nothing beats a great Green Goddess Sandwich. Whether you're a fan of Sandwiches or want to try something from our Christmas Cookie selection, keep scrolling!


Why This Recipe Works
- Flavor explosion: Imagine basil, parsley, and chives throwing a party in your mouth
- Textural heaven: Creamy avocado meets crunchy cukes and radishes
- Health in every bite: Packed with good fats, fiber, and enough vitamins to make your doctor proud
- 15-minute miracle: Faster than waiting in line at your local sandwich shop
Essential Ingredients & Tools
For the Spread That’ll Change Your Life
- ½ cup Greek yogurt (or vegan mayo for dairy-free)
- ¼ cup fresh basil (the sweet soul)
- ¼ cup parsley (the fresh kick)
- 2 tbsp chives (or green onions if chives aren’t available)
- 1 tbsp lemon juice (bottled works in a pinch)
- 1 garlic clove (or ¼ tsp garlic powder)
- ½ tsp salt
- ¼ tsp black pepper
The Sandwich Builders
- 2 slices Crusty Bread (sourdough’s my MVP, but any bread works)
- ½ ripe avocado (nature’s butter)
- ¼ cup cucumber (the crisp factor)
- ¼ cup baby spinach (or any leafy greens you have)
- 2 tbsp radishes (optional for extra crunch)
- 1 tbsp olive oil (or butter for grilling)
Tools You’ll Need
- Mixing bowl (any medium-sized bowl works)
- Knife and cutting board
- Toaster or skillet (a regular pan works fine)
Makes 1 sandwich that’ll make you wish you’d made two | 10 minutes prep | 5 minutes optional cooking | 15 minutes total
How to Make Green Goddess Sandwich
Step 1: The Spread That Steals the Show
In your bowl, combine ½ cup Greek yogurt, ¼ cup fresh basil, ¼ cup parsley, 2 tbsp chives, 1 tbsp lemon juice, 1 garlic clove, ½ tsp salt, and ¼ tsp black pepper. Mix until it’s smoother than a jazz saxophonist. Here’s why this matters: the lemon juice doesn’t just add flavor—its acidity helps preserve the bright green color of the herbs and slows down avocado browning. If you want restaurant-quality smoothness, pulse it in a blender or food processor. This breaks down tough herb stems for a velvety texture.
Step 2: Bread Alchemy
Toast 2 slices of bread until it’s golden like a California sunset. Want to prevent a soggy sandwich? Toast it about 30 seconds longer than usual to create what chefs call a “structural toast”—this slightly darker toast forms a protective crust that resists moisture from the fillings. For extra insurance, lightly brush the toasted side with 1 tbsp olive oil—it creates a hydrophobic layer that repels moisture.
Step 3: The Art of Layering
This is where sandwich science meets sandwich art:
- Slather that herby goodness edge-to-edge—this creates a moisture barrier that protects the bread.
- Gently press ½ ripe avocado slices in a fan pattern—the natural stickiness helps anchor other ingredients.
- Pat ¼ cup cucumber and 2 tbsp radishes dry with a paper towel before adding—this removes excess water that could make the bread soggy.
- Tuck ¼ cup baby spinach in the middle—placing delicate greens between sturdier ingredients prevents them from slipping out.
Step 4: The Grand Finale
Slice diagonally (because triangles taste better—it’s science) and devour immediately. If packing for later, wrap tightly in parchment paper—unlike plastic wrap, parchment allows the sandwich to breathe while keeping it fresh.
Pro Technique
The Toast That Could Survive a Rainstorm
I once made the mistake of under-toasting bread for a picnic. Lesson learned. Now I toast until it’s the color of a well-worn leather journal—that extra 30 seconds makes all the difference. The science behind this? Extended toasting causes more starch gelatinization, creating a crispier surface that resists moisture absorption. For bonus points, lightly oil the toasted side—the fat molecules create a water-repellent barrier.
The Architecture of an Unshakable Sandwich
Think of building your sandwich like constructing a tiny edible skyscraper:
- Spread = foundation (applying it edge-to-edge seals the bread)
- Avocado = the sticky mortar (its natural fats help other ingredients adhere)
- Veggies = the sturdy framework (pat them dry to prevent structural collapse)
- Greens = the decorative crown (tucked safely in the middle)
Press each layer gently like you’re tucking in a child—firm but loving. This compaction prevents fillings from shifting while eating.
Chef’s Wisdom
Defeating the Soggy Sandwich Monster
After one too many sad, mushy lunches, I developed a system:
- Always pat veggies dry—cucumbers are 96% water!
- Store components separately if prepping ahead—assembly is a 2-minute job
- Use lettuce as a moisture barrier—its waxy leaves naturally repel water
The Lemon Juice Lifesaver
That tablespoon of lemon juice does triple duty:
- Brightens flavors by balancing the richness
- Keeps herbs vibrant by slowing oxidation
- Slows avocado browning by inhibiting polyphenol oxidase enzymes
If your herbs look tired, give them an ice bath. Five minutes in cold water rehydrates their cell walls, making them crisp again.
Storage & Freshness Guide
Spread Storage Secrets
Store the spread with plastic wrap pressed directly on the surface—this minimizes air exposure that causes discoloration. An extra squeeze of lemon helps it stay fresh for up to 3 days by lowering the pH.
Assembled Sandwich Survival Guide
If you must prep ahead:
- Wrap in parchment, not plastic (plastic traps steam which softens bread)
- Tuck in a paper towel to absorb excess moisture
- Toast your bread extra crispy—it’ll soften slightly but remain intact
Veggie Prep Like a Pro
Pre-slice everything except the avocado. Store veggies with a damp paper towel—the moisture prevents wilting without making them soggy. For avocado, brush cut sides with oil (it blocks oxygen) and wrap tighter than your jeans after Thanksgiving.
Nutrition Profile
This isn’t just a sandwich—it’s a nutrient delivery system:
- 420 calories of pure deliciousness
- 12g protein to keep you going
- 10g fiber for happy digestion
- 22g good fats for that satisfied feeling
Ingredient Variations and Their Impact
For Protein Lovers
- Add some smoked salmon or turkey. Marinate your protein in lemon and herbs first—the acid helps tenderize while the flavors harmonize.
Plant-Powered Version
- Swap in coconut yogurt and vegan mayo. Add nutritional yeast for that “is there cheese in here?” umami depth.
Spice It Up
- Throw in some jalapeños or capers. Drizzle with chili crisp if you like living dangerously—the heat cuts through the richness beautifully.
Bread Alternatives
- Gluten-free? No problem—choose a sturdy GF bread. Lettuce wraps? Go for it (just double the spread to help everything stick together).
Cheese Please
- Add feta for a salty punch or mozzarella for melty goodness. Broil it briefly for that irresistible cheese pull effect.
Perfect Pairings
Complementary Dishes
- Arugula Salad with Lemon Vinaigrette: The peppery bite plays off the creamy sandwich perfectly. Toss with a simple dressing of lemon juice, olive oil, and a pinch of salt.
- Roasted Cherry Tomatoes: Their concentrated sweetness balances the herbal notes. Toss with olive oil and roast at 400°F until bursting.
Drinks
- Sparkling Water with Citrus: The bubbles cleanse the palate between bites. Add a slice of lemon or lime for extra zing.
- Iced Herbal Tea: Brew mint or chamomile tea and chill—the floral notes complement the sandwich without overpowering.
Something Sweet
- Dark Chocolate Almonds: A few pieces satisfy sweet cravings while providing crunch. The bitterness contrasts the sandwich’s creaminess.
- Honey-Yogurt with Berries: Continue the yogurt theme with this light dessert. Drizzle honey over Greek yogurt and top with Fresh Berries.
FAQs
- Can I use dried herbs? In emergencies, yes (1 tsp dried = ¼ cup fresh), but fresh is like comparing a live concert to a recording—the flavor difference is significant.
- How do I stop avocado browning? Lemon juice is your avocado’s best friend. Spread it on the bread first—the citric acid creates an anti-browning shield.
- Best way to pack this? Parchment paper is your picnic BFF. Better yet, pack components separately and assemble at work for maximum freshness.
- Cheese options? Feta, goat, mozzarella—it’s all good. Broil for that melty magic if eating immediately.
- Kid-friendly? Absolutely! Cut into quarters and watch them devour the green stuff without complaints—call it “Superhero Sandwich” for extra appeal.


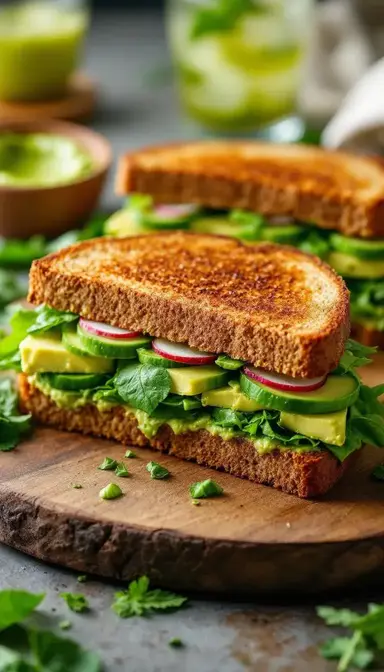
Green Goddess Sandwich
Make the ultimate Green Goddess Sandwich with creamy avocado, crisp veggies, and a tangy herb spread. Ready in 15 minutes! Get the easy recipe now.
Ingredients
For the Spread
-
½ cup Greek yogurt
-
¼ cup fresh basil
-
¼ cup fresh parsley
-
2 tbsp chives
-
1 tbsp lemon juice
-
1 clove garlic
-
½ tsp salt
-
¼ tsp black pepper
For the Sandwich
-
2 slices whole-grain bread
-
½ ripe avocado
-
¼ cup cucumber
-
¼ cup baby spinach
-
2 tbsp radishes
-
1 tbsp olive oil
Instructions
-
In a bowl, mix ½ cup Greek yogurt, ¼ cup fresh basil, ¼ cup parsley, 2 tbsp chives, 1 tbsp lemon juice, 1 garlic clove, ½ tsp salt, and ¼ tsp black pepper until smooth.01
-
Toast 2 slices bread until golden, about 2-3 minutes per side.02
-
Spread herbed yogurt on one slice of bread.03
-
Layer ½ ripe avocado, ¼ cup cucumber, 2 tbsp radishes, and ¼ cup baby spinach.04
-
Top with second bread slice and press gently.05
-
Slice diagonally and serve immediately.06
Not what you're looking for?