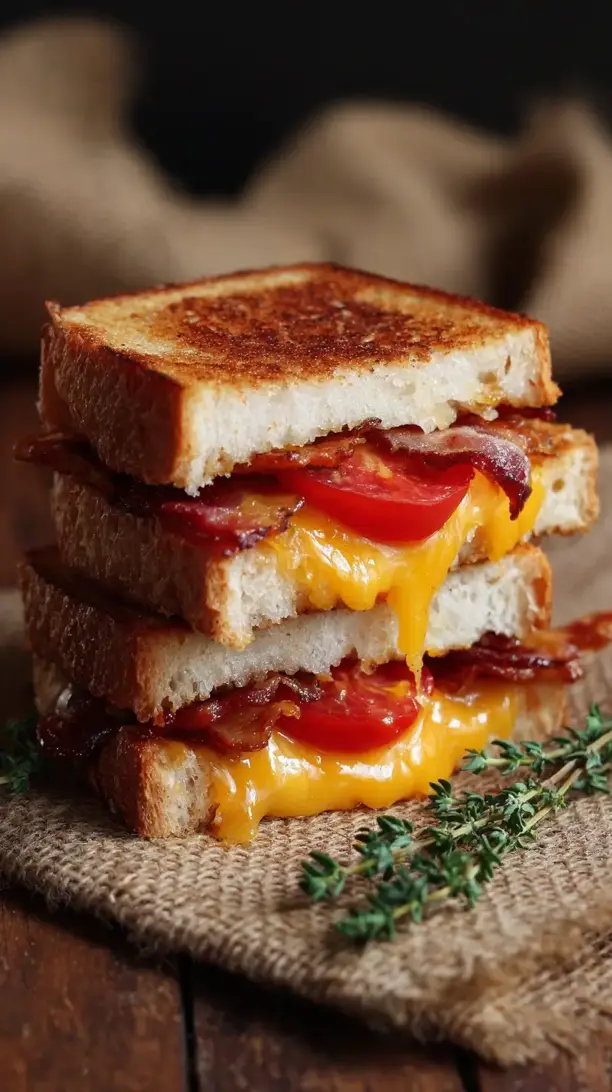
There’s something deeply comforting about a grilled cheese sandwich. This bacon and tomato grilled cheese elevates the classic with crispy bacon, juicy tomato, and a perfect golden crust. It’s a satisfying, customizable meal ready in minutes.
Love Bacon and Tomato Grilled Cheese? So do we! If you're into Savory Combo Recipes or curious about Chicken Breast Recipes, you'll find plenty of inspiration below.


Why You’ll Love This Bacon and Tomato Grilled Cheese
- Perfect texture trio: Crisp bread, gooey cheese, crunchy bacon, and juicy tomato.
- Surprisingly customizable: Swap cheeses or add pesto or hot honey.
- Comfort food elevated: Feels fancy without being fussy.
- Faster than takeout: Ready in about 15 minutes.
Ingredients & Tools
- 4 slices of thick-cut sourdough or country white bread
- 6 slices of sharp cheddar cheese
- 4 slices of provolone or Gruyère cheese
- 6 slices of thick-cut bacon, cooked until crisp
- 1 large ripe tomato, sliced into ¼-inch thick rounds
- 2 tablespoons unsalted butter, softened
- 1 tablespoon mayonnaise
- ½ teaspoon garlic powder (optional)
- Pinch of flaky sea salt
- Freshly cracked black pepper, to taste
Tools: A large cast-iron or heavy-bottomed skillet, spatula
Notes: Don’t skip the two-cheese blend—cheddar adds tang, provolone/Gruyère adds meltiness. The butter-mayo mix ensures an evenly golden crust.
Nutrition (per serving)
| Calories: | 620 kcal |
| Protein: | 28 g |
| Fat: | 42 g |
| Carbs: | 35 g |
| Fiber: | 2 g |
Serves: 2 | Prep Time: 5 minutes | Cook Time: 10 minutes | Total Time: 15 minutes
Before You Start: Tips & Ingredient Notes
- Bread is your foundation. A sturdy, thick-sliced bread like sourdough is non-negotiable. It holds up to the juicy tomato and generous cheese filling without getting soggy or falling apart.
- Get your bacon really crisp. It might seem counterintuitive, but you want your bacon cooked until quite crisp. As it sits in the hot sandwich, it will soften slightly, and if it starts out limp, it’ll become unpleasantly chewy.
- Tomato prep is key. Slice your tomato and then lay the slices on a paper towel. Sprinkle them with a tiny pinch of salt and let them sit for a few minutes. This draws out excess moisture, which is the enemy of a crisp grilled cheese.
- Room temperature is your friend. Make sure your butter is softened, not melted, for easy spreading. And your cheese should be out of the fridge for 10-15 minutes—cold cheese takes longer to melt.
How to Make Bacon and Tomato Grilled Cheese
Step 1: First, let’s prep our spreads and fillings. In a small bowl, mix the softened butter and mayonnaise together until they’re completely combined. This might feel a little strange, but trust me—the mayo adds emulsifiers that help the bread brown incredibly evenly and adds a subtle tang. Now, pat your tomato slices dry with a fresh paper towel to remove any lingering surface moisture.
Step 2: It’s assembly time! Lay out your four slices of bread. Spread the butter-mayo mixture evenly on one side of each slice—this will be the outside that hits the pan. Flip two slices over so the un-buttered side is facing up. Now, layer your cheeses. Start with a slice of cheddar, then a slice of provolone. This creates a melty barrier.
Step 3: Now for the star players. Arrange three slices of crispy bacon on top of the cheese on each sandwich. You can break them to fit if needed. Next, add your well-dried tomato slices in a single layer. Season the tomatoes generously with black pepper and just a whisper of flaky sea salt. Top with the remaining cheese slices.
Step 4: Carefully place the remaining bread slices on top, buttered-mayo side facing out. Press down gently to compact the sandwich a little. This helps everything stick together once the cheese starts to melt.
Step 5: Time to cook! Place your heavy skillet over medium-low heat. Yes, medium-low—we’re going for low and slow to ensure the cheese is utterly molten by the time the bread is a perfect golden brown. Let the pan heat up for a full minute.
Step 6: Gently place your assembled sandwiches in the dry skillet—no extra butter or oil needed. Cook for about 3-4 minutes, until the bottom is a deep, golden brown and beautifully crisp. You can press down lightly with your spatula occasionally to encourage even contact.
Step 7: Here’s the tricky part: the flip. Carefully slide your spatula fully under the sandwich and flip it with confidence. It should feel sturdy. Cook the second side for another 3-4 minutes, again until deeply golden. If you notice the bread browning too quickly, just reduce the heat a touch.
Step 8: The final test for doneness. Press lightly on the top of the sandwich with your spatula. You should see a little cheese ooze out the sides, and the whole thing should feel soft and yielding in the middle. If it still feels firm, give it another 30-60 seconds per side.
Step 9: Transfer the sandwiches to a cutting board. This is crucial—let them rest for exactly one minute before cutting. This allows the molten cheese to set just slightly, so when you cut in, you get a clean slice and don’t lose all the glorious filling.
Step 10: Slice diagonally (it just tastes better, I swear), serve immediately, and prepare for the best, cheesiest, most satisfying pull you’ve ever experienced.
Storage & Freshness Guide
- Fridge: Store leftovers wrapped in foil or in an airtight container for up to 2 days.
- Freezer: Wrap tightly in plastic wrap and foil, freeze for up to 1 month.
- Reviving: Reheat in a skillet over low heat or in a toaster oven until warm and crisp.
Serving Suggestions
Complementary Dishes
- A simple green salad with a sharp vinaigrette — The acidity and freshness cut through the rich, fatty goodness of the sandwich perfectly, balancing the whole meal.
- Creamy tomato soup — It’s a classic for a reason. Dunking each cheesy, crispy corner into a velvety bowl of soup is a timeless comfort ritual.
- Dill pickle spears — That briny, crunchy punch is the perfect palate cleanser between bites and adds a lovely textural contrast.
Drinks
- A crisp, cold lager — The carbonation and mild bitterness of a good lager work wonders to cut through the richness and refresh your palate.
- An off-dry hard cider — The slight sweetness and apple notes are a fantastic companion to the salty bacon and sharp cheddar.
- Iced black tea with lemon — For a non-alcoholic option, the tannins and citrus provide a clean, refreshing counterpoint to all that cheesy indulgence.
Something Sweet
- Warm chocolate chip cookies — You can’t go wrong. The contrast of a warm, melty, sweet cookie after a savory sandwich is pure happiness.
- A simple fruit sorbet — A scoop of lemon or raspberry sorbet is light, bright, and cleanses the palate beautifully, ending the meal on a fresh note.
- Rice Krispie treats — It’s a nostalgic, fun, and easy finish that’s just sweet enough without being overly heavy.
Top Mistakes to Avoid
- Mistake: Using a high heat. Impatience leads to a burnt exterior and cold, unmelted cheese in the center. Low and slow is the only way to achieve nirvana here.
- Mistake: Skipping the tomato-drying step. That extra moisture will steam your bread from the inside out, resulting in a sad, soggy sandwich instead of a crisp one.
- Mistake: Overstuffing the sandwich. It’s tempting to add more bacon and cheese, but too much filling prevents even heating and makes the sandwich difficult to flip and eat neatly.
- Mistake: Cutting immediately. I know it’s hard to wait, but slicing into a molten grilled cheese right out of the pan causes a cheese avalanche. That one-minute rest makes all the difference.
Expert Tips
- Tip: Grate your own cheese. Pre-shredded cheese is coated with anti-caking agents like potato starch, which can prevent it from melting as smoothly and seamlessly as a block you grate yourself.
- Tip: Use a lid for the last minute. If your cheese isn’t *quite* melting to your liking, place a lid over the skillet for the last 60-90 seconds of cooking. This traps steam and helps melt the cheese faster without over-browning the bread.
- Tip: Add a flavor boost. Before adding the cheese, spread a very thin layer of whole-grain mustard or a tablespoon of caramelized onions on the bread. It adds a hidden layer of complexity that will have people wondering what your secret is.
- Tip: The press. If you have a cast-iron bacon press or even just a smaller, heavy skillet, you can place it on top of the sandwiches as they cook. This ensures maximum surface contact for an impeccably even, crisp crust.
FAQs
Can I make this ahead of time?
You can prep the components ahead, but I don’t recommend assembling the sandwiches until you’re ready to cook. Cook your bacon, slice and dry your tomatoes, and grate your cheese, storing them separately in the fridge. When the craving hits, assembly is a 2-minute job. A fully assembled, uncooked sandwich will get soggy if left to sit.
What’s the best cheese to use besides cheddar and provolone?
Oh, the possibilities! Fontina is wonderfully melty, Monterey Jack is super creamy, and a little bit of smoked Gouda adds a fantastic bacony flavor. The key is to use a blend—one for flavor (like sharp cheddar) and one for meltiness (like provolone, Gruyère, or Fontina). Avoid very hard, dry cheeses like Parmesan for the main melt.
My cheese isn’t melting but my bread is burning. Help!
This is almost always a heat issue. Your pan is too hot! Immediately reduce the heat to low. For the next round, start with a medium-low heat from the beginning. You can also tent a piece of foil loosely over the sandwich in the pan to reflect heat back down and help the cheese melt.
Can I use turkey bacon or a vegetarian alternative?
Absolutely. The method remains the same. Just be sure to cook your alternative until it’s nice and crisp so it provides that essential textural contrast. For a veggie version, a smoky tempeh bacon or even thinly sliced and pan-fried halloumi can work wonders.
Why add mayonnaise to the butter?
It’s a game-changer, honestly. Mayonnaise contains oil and emulsifiers (like egg and lecithin) that promote a more consistent and deeper golden browning than butter alone. It also has a higher smoke point, which reduces the risk of burning, and adds a subtle, tangy flavor that complements the cheese beautifully.


Bacon And Tomato Grilled Cheese
Make the ultimate Bacon and Tomato Grilled Cheese with crispy bacon, juicy tomato, and melty cheese on golden bread. Ready in 15 minutes! Get the recipe now.
Ingredients
For the Ingredients & Tools
-
4 slices thick-cut sourdough or country white bread
-
6 slices sharp cheddar cheese
-
4 slices provolone or Gruyère cheese
-
6 slices thick-cut bacon (cooked until crisp)
-
1 large ripe tomato (sliced into ¼-inch thick rounds)
-
2 tablespoons unsalted butter (softened)
-
1 tablespoon mayonnaise
-
½ teaspoon garlic powder (optional)
-
1 pinch flaky sea salt
-
freshly cracked black pepper (to taste)
Instructions
-
First, let's prep our spreads and fillings. In a small bowl, mix the softened butter and mayonnaise together until they’re completely combined. This might feel a little strange, but trust me—the mayo adds emulsifiers that help the bread brown incredibly evenly and adds a subtle tang. Now, pat your tomato slices dry with a fresh paper towel to remove any lingering surface moisture.01
-
It’s assembly time! Lay out your four slices of bread. Spread the butter-mayo mixture evenly on one side of each slice—this will be the outside that hits the pan. Flip two slices over so the un-buttered side is facing up. Now, layer your cheeses. Start with a slice of cheddar, then a slice of provolone. This creates a melty barrier.02
-
Now for the star players. Arrange three slices of crispy bacon on top of the cheese on each sandwich. You can break them to fit if needed. Next, add your well-dried tomato slices in a single layer. Season the tomatoes generously with black pepper and just a whisper of flaky sea salt. Top with the remaining cheese slices.03
-
Carefully place the remaining bread slices on top, buttered-mayo side facing out. Press down gently to compact the sandwich a little. This helps everything stick together once the cheese starts to melt.04
-
Time to cook! Place your heavy skillet over medium-low heat. Yes, medium-low—we’re going for low and slow to ensure the cheese is utterly molten by the time the bread is a perfect golden brown. Let the pan heat up for a full minute.05
-
Gently place your assembled sandwiches in the dry skillet—no extra butter or oil needed. Cook for about 3-4 minutes, until the bottom is a deep, golden brown and beautifully crisp. You can press down lightly with your spatula occasionally to encourage even contact.06
-
Here’s the tricky part: the flip. Carefully slide your spatula fully under the sandwich and flip it with confidence. It should feel sturdy. Cook the second side for another 3-4 minutes, again until deeply golden. If you notice the bread browning too quickly, just reduce the heat a touch.07
-
The final test for doneness. Press lightly on the top of the sandwich with your spatula. You should see a little cheese ooze out the sides, and the whole thing should feel soft and yielding in the middle. If it still feels firm, give it another 30-60 seconds per side.08
-
Transfer the sandwiches to a cutting board. This is crucial—let them rest for exactly one minute before cutting. This allows the molten cheese to set just slightly, so when you cut in, you get a clean slice and don't lose all the glorious filling.09
-
Slice diagonally (it just tastes better, I swear), serve immediately, and prepare for the best, cheesiest, most satisfying pull you’ve ever experienced.10
Not what you're looking for?