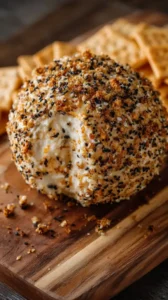
This Bacon Cheddar Cheese Ball is a savory, smoky crowd-pleaser that’s incredibly easy to make. With sharp cheddar, crispy bacon, and a crunchy pecan coating, it’s perfect for parties or a fancy snack. You can prepare it ahead for effortless entertaining.
Love Bacon Cheddar Cheese Ball? So do we! If you're into Savory Snacks or curious about Appetizers & Snacks, you'll find plenty of inspiration below.


Why You’ll Love This Bacon Cheddar Cheese Ball
- Crowd-pleasing flavor: The bacon-cheddar combo is universally loved.
- Make-ahead magic: Prepare up to two days ahead for deeper flavor.
- Endlessly customizable: Easily adapt with jalapeños, different nuts, or hot sauce.
- Simple to make: No baking or fancy techniques required.
Ingredients & Tools
- 16 oz cream cheese, softened to room temperature
- 2 cups sharp cheddar cheese, freshly grated
- 8 slices bacon, cooked until crisp and finely crumbled
- 1/4 cup green onions, thinly sliced
- 1 tsp Worcestershire sauce
- 1/2 tsp garlic powder
- 1/4 tsp smoked paprika
- 1/4 tsp black pepper, freshly ground
- 1/2 cup pecans, finely chopped (for the coating)
- 2 tbsp fresh parsley, finely chopped (for the coating)
Tools: A stand mixer or a sturdy bowl with a hand mixer, rubber spatula, plastic wrap, and a serving plate.
Notes: Use freshly grated cheddar for better texture and flavor, and thick-cut bacon for more crunch and smokiness.
Nutrition (per serving)
| Calories: | 220 kcal |
| Protein: | 8 g |
| Fat: | 19 g |
| Carbs: | 3 g |
| Fiber: | 1 g |
Serves: 12 | Prep Time: 20 minutes | Chill Time: 2 hours | Total Time: 2 hours 20 minutes
Before You Start: Tips & Ingredient Notes
- Soften that cream cheese properly. This is the single most important step for a smooth, lump-free cheese ball. Leave it on the counter for a good 1-2 hours until it’s very soft to the touch. Microwaving can create hot spots and alter the texture.
- Grate your own cheddar. I know it’s an extra step, but it’s a game-changer. Pre-shredded cheese is coated to prevent clumping, which also prevents it from melding seamlessly into the cream cheese. A block of extra-sharp cheddar grated by hand will give you a far superior, creamier result.
- Don’t skip the Worcestershire sauce. It might seem like a small amount, but it adds a crucial depth of flavor—a little umami, a little tang—that balances the richness of the cheese and bacon perfectly. It’s the secret ingredient that makes people ask, “What is *in* this?”
- Reserve some bacon for the coating. When you’re prepping your ingredients, set aside a tablespoon or two of the crumbled bacon to mix with the nuts for the outer layer. It adds extra visual appeal and a concentrated burst of bacon flavor in every bite.
How to Make Bacon Cheddar Cheese Ball
Step 1: Combine the Base Ingredients. In the bowl of a stand mixer fitted with the paddle attachment, or in a large bowl using a hand mixer, combine the softened cream cheese, grated cheddar cheese, most of the crumbled bacon (remember to save a bit for the coating!), green onions, Worcestershire sauce, garlic powder, smoked paprika, and black pepper. Start mixing on low speed until the ingredients just begin to incorporate—this prevents a cheese cloud from exploding out of your bowl. Then, increase the speed to medium and beat for 1-2 minutes, just until everything is completely combined and the mixture is smooth. You’ll notice it starts to pull away from the sides of the bowl. Be careful not to overmix, as this can make the cheese ball a bit tough.
Step 2: Shape the Ball. Lay a large piece of plastic wrap on your counter. Transfer the entire cheese mixture onto the center of the plastic. Now, this is the fun part. Use the plastic wrap to help you shape the mixture. Bring the edges of the plastic up and over the cheese, twisting the top to form a tight bundle. Use your hands to gently press and mold the cheese through the plastic into a neat, round ball. Don’t stress about it being a perfect sphere—a rustic, hand-formed look is part of its charm. The plastic wrap makes this process clean and easy.
Step 3: The Initial Chill. Once shaped, place the plastic-wrapped cheese ball directly on a plate and refrigerate it for at least 2 hours, or ideally overnight. This chilling time is non-negotiable. It allows the flavors to marry and, most importantly, it firms up the ball so it’s easy to handle for the next step. If you try to coat it now, it’ll be a sticky, messy disaster. Patience is key here.
Step 4: Prepare the Coating. While the cheese ball is chilling, prepare your coating mixture. On a small plate or in a shallow bowl, combine the finely chopped pecans, the reserved crumbled bacon, and the fresh parsley. Mix them with a fork until they are evenly distributed. This nutty, herby, bacony crust is what takes the cheese ball from great to extraordinary, providing a wonderful contrast in texture.
Step 5: Apply the Coating. After the chilling time is up, remove the cheese ball from the fridge and unwrap it. Roll the ball gently in the coating mixture, pressing lightly to help the nuts and bacon adhere. You’ll want to cover the entire surface. Don’t be afraid to pick up the coating and pat it onto any bare spots. Once it’s fully covered, your Bacon Cheddar Cheese Ball is ready to serve, or you can wrap it up again and keep it chilled until your guests arrive.
Storage & Freshness Guide
- Fridge: Wrap tightly in plastic wrap; store up to 5 days.
- Freezer: Freeze uncoated ball tightly wrapped up to 1 month; thaw in fridge before coating.
- Reviving: Let sit at room temperature 20–30 minutes before serving for easy spreading.
Serving Suggestions
Complementary Dishes
- A vibrant crudité platter — The fresh, crisp vegetables like carrot sticks, bell pepper strips, and cucumber slices provide a refreshing counterpoint to the rich, creamy cheese ball.
- Spicy pepper jelly crostini — The sweet heat of a pepper jelly spread on a thin, crispy baguette slice is an incredible flavor pairing that will elevate your entire appetizer spread.
- A simple, green salad with a tangy vinaigrette — Serving a light salad alongside helps balance the meal and cleanses the palate between those irresistibly rich bites.
Drinks
- A crisp, hoppy IPA — The bitterness of the beer cuts beautifully through the fat of the cheese and bacon, creating a really satisfying contrast.
- A dry Riesling or Sauvignon Blanc — For wine lovers, a wine with bright acidity and citrus notes acts in a similar way, refreshing your palate and complementing the savory flavors.
- Sparkling water with lemon — A non-alcoholic option that provides the necessary bubbles and acidity to reset your taste buds, making each bite of the cheese ball taste like the first.
Something Sweet
- Dark chocolate-covered pretzels — The combination of salty, sweet, and bitter is a classic for a reason, and it’s the perfect way to end a savory-focused snack session.
- Mini apple hand pies — The warm, spiced apple filling offers a lovely, comforting sweetness that feels like a natural progression after the smoky, cheesy appetizer.
- A simple bowl of fresh berries — Sometimes, the simplest option is the best. The natural sweetness and juiciness of strawberries or raspberries are a light and perfect finish.
Top Mistakes to Avoid
- Mistake: Using cold cream cheese. If your cream cheese isn’t properly softened, you’ll end up with a lumpy, difficult-to-mix base. Your mixer will struggle, and you’ll be left with pockets of unmixed cream cheese. I’ve messed this up before too, and it’s a real texture killer.
- Mistake: Skipping the chill time. Trying to shape or coat the cheese ball before it’s firm is a recipe for a sticky, frustrating mess. The initial chill is what gives the ball its structure, so don’t rush it.
- Mistake> Overmixing the cheese. Once the ingredients are combined, stop mixing. Over-beating can incorporate too much air and cause the fats to break down, leading to a gummy, less creamy texture.
- Mistake: Using only the nut coating. While nuts are great, incorporating the bacon and parsley into the coating is crucial. It creates a more complex flavor profile and a much more visually appealing final product.
Expert Tips
- Tip: Make two smaller balls. For a party, consider dividing the mixture in half and making two smaller cheese balls. This not only looks elegant but also allows you to set up two different serving stations, preventing a crowd from forming around one platter.
- Tip: Get creative with the shape. Who says it has to be a ball? For the holidays, you can shape the mixture into a log, a wreath, or even a festive tree shape. The coating will still stick beautifully, and it makes for a great conversation starter.
- Tip: Toast your nuts. For maximum flavor, spread your pecans on a baking sheet and toast them in a 350°F (175°C) oven for 5-7 minutes before chopping. You’ll be amazed at how much more aromatic and flavorful they become.
- Tip: Add a surprise inside. For a real “wow” factor, you can create a pocket in the center of the cheese ball and fill it with a soft cheese like goat cheese or a dollop of pepper jelly before sealing it up and coating the outside. When someone cuts into it, the reveal is spectacular.
FAQs
Can I make this cheese ball ahead of time?
Absolutely, and I highly recommend it! You can prepare the entire cheese ball, including the coating, up to 2 days in advance. Just wrap it tightly in fresh plastic wrap after coating and store it in the refrigerator. The flavors have more time to develop, making it even tastier. Let it sit at room temperature for about 20-30 minutes before serving to soften up for easy spreading.
What can I use instead of pecans for the coating?
Pecans are classic, but you have plenty of options. Walnuts or almonds would work wonderfully. For a nut-free version, try using toasted sunflower seeds, everything bagel seasoning, or even a mixture of extra bacon bits and chopped fresh herbs. The goal is just to have something with a bit of crunch and flavor to contrast the creamy interior.
My cheese ball is too soft. What happened?
This usually boils down to two things: the cream cheese wasn’t cold enough when you went to coat it, or the fat content in your cheddar was too low. Full-fat cheeses will yield a firmer result. If it’s too soft, just pop it back in the fridge for another hour. If you’re in a real pinch, you can even give it a very brief 15-minute visit to the freezer to firm up quickly.
Can I freeze a cheese ball?
You can, but with a caveat. The texture of the cream cheese can become slightly grainy upon thawing. If you must freeze it, do so without the nut coating. Wrap the uncoated ball very tightly in multiple layers of plastic wrap and foil, and freeze for up to 1 month. Thaw it slowly in the refrigerator overnight, then roll it in the coating just before serving.
What are the best crackers to serve with it?
You want something sturdy that can scoop without breaking. My top picks are buttery crackers like Ritz, sturdy water crackers, or thinly sliced and toasted baguette. Avoid very delicate or overly salted crackers, as they can compete with or be overwhelmed by the powerful flavors of the cheese ball itself.


Bacon Cheddar Cheese Ball
Make this easy Bacon Cheddar Cheese Ball for your next gathering! A savory, crowd-pleasing appetizer with a crunchy pecan coating. Get the simple recipe here!
Ingredients
For the cheese ball:
-
16 oz cream cheese (softened to room temperature)
-
2 cups sharp cheddar cheese (freshly grated)
-
8 slices bacon (cooked until crisp and finely crumbled)
-
1/4 cup green onions (thinly sliced)
-
1 tsp Worcestershire sauce
-
1/2 tsp garlic powder
-
1/4 tsp smoked paprika
-
1/4 tsp black pepper (freshly ground)
For the coating:
-
1/2 cup pecans (finely chopped)
-
2 tbsp fresh parsley (finely chopped)
Instructions
-
In the bowl of a stand mixer fitted with the paddle attachment, or in a large bowl using a hand mixer, combine the softened cream cheese, grated cheddar cheese, most of the crumbled bacon (remember to save a bit for the coating!), green onions, Worcestershire sauce, garlic powder, smoked paprika, and black pepper. Start mixing on low speed until the ingredients just begin to incorporate—this prevents a cheese cloud from exploding out of your bowl. Then, increase the speed to medium and beat for 1-2 minutes, just until everything is completely combined and the mixture is smooth. You’ll notice it starts to pull away from the sides of the bowl. Be careful not to overmix, as this can make the cheese ball a bit tough.01
-
Lay a large piece of plastic wrap on your counter. Transfer the entire cheese mixture onto the center of the plastic. Use the plastic wrap to help you shape the mixture. Bring the edges of the plastic up and over the cheese, twisting the top to form a tight bundle. Use your hands to gently press and mold the cheese through the plastic into a neat, round ball. Don’t stress about it being a perfect sphere—a rustic, hand-formed look is part of its charm. The plastic wrap makes this process clean and easy.02
-
Once shaped, place the plastic-wrapped cheese ball directly on a plate and refrigerate it for at least 2 hours, or ideally overnight. This chilling time is non-negotiable. It allows the flavors to marry and, most importantly, it firms up the ball so it’s easy to handle for the next step. If you try to coat it now, it’ll be a sticky, messy disaster. Patience is key here.03
-
While the cheese ball is chilling, prepare your coating mixture. On a small plate or in a shallow bowl, combine the finely chopped pecans, the reserved crumbled bacon, and the fresh parsley. Mix them with a fork until they are evenly distributed. This nutty, herby, bacony crust is what takes the cheese ball from great to extraordinary, providing a wonderful contrast in texture.04
-
After the chilling time is up, remove the cheese ball from the fridge and unwrap it. Roll the ball gently in the coating mixture, pressing lightly to help the nuts and bacon adhere. You’ll want to cover the entire surface. Don’t be afraid to pick up the coating and pat it onto any bare spots. Once it’s fully covered, your Bacon Cheddar Cheese Ball is ready to serve, or you can wrap it up again and keep it chilled until your guests arrive.05
Not what you're looking for?


