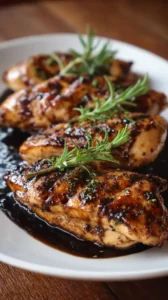
This Balsamic Honey Glazed Chicken transforms simple ingredients into a show-stopping meal. The sticky-sweet reduction of balsamic vinegar and honey creates a glossy, caramelized glaze that’s irresistible. It’s fancy enough for a dinner party but easy enough for a busy weeknight.
Craving a delicious Balsamic Honey Glazed Chicken? You've come to the right spot! From Dinner Ideas favorites to amazing Chicken Recipes recipes, there's something here for everyone.


Why You’ll Love This Balsamic Honey Glazed Chicken
- Minimal effort: Short ingredient list delivers complex, restaurant-quality flavor.
- Crowd-pleasing versatility: Works for any occasion and adapts easily to preferences.
- Meal prep friendly: Reheats beautifully, with flavors improving over time.
Ingredients & Tools
- 4 bone-in, skin-on chicken thighs (about 1.5 lbs / 680 g)
- 1 tbsp olive oil
- 1/2 tsp salt
- 1/2 tsp black pepper
- 1 tsp garlic powder
- 1/2 cup balsamic vinegar
- 1/4 cup honey
- 2 cloves garlic, minced
- 1 tbsp butter
- Fresh thyme or rosemary for garnish (optional)
Tools: A large, oven-safe skillet is essential here.
Notes: Bone-in, skin-on thighs stay juicier and crispier. Don’t skip the butter—it creates a rich, glossy sauce.
You’ll notice the ingredient list is pretty simple, but each one plays a crucial role. Using bone-in, skin-on chicken thighs is my top tip—they stay incredibly juicy and the skin gets fantastically crispy, creating the perfect base for that sticky glaze. And don’t be tempted to skip the butter at the end; it’s the secret to a rich, glossy sauce that clings to every nook and cranny.
Nutrition (per serving)
| Calories: | 420 kcal |
| Protein: | 28 g |
| Fat: | 22 g |
| Carbs: | 24 g |
| Fiber: | 0 g |
Serves: 4 | Prep Time: 10 minutes | Cook Time: 30 minutes | Total Time: 40 minutes
Before You Start: Tips & Ingredient Notes
- Chicken Thighs vs. Breasts. I really recommend thighs for this recipe. They have more fat, which means they’re much more forgiving and won’t dry out during the reduction process. If you must use breasts, opt for bone-in and reduce the cooking time slightly.
- The Right Balsamic. You don’t need a crazy expensive aged balsamic, but do avoid the super cheap, watery stuff. A decent, moderately-priced balsamic will have a better flavor and body, which is key for a thick, luscious glaze.
- Pat Your Chicken Dry. This is a simple step, but it makes a world of difference. Use a paper towel to thoroughly dry the chicken skin before seasoning. This is the secret to getting that perfectly crisp, golden-brown sear instead of steamed, rubbery skin.
- Don’t Rush the Reduction. The glaze needs a few minutes of gentle simmering to thicken properly. If you crank the heat, you risk burning the sugars. A little patience here pays off with a beautifully syrupy consistency.
How to Make Balsamic Honey Glazed Chicken
Step 1: Preheat your oven to 375°F (190°C). While it’s heating up, take your chicken thighs and pat them completely dry with paper towels. This is non-negotiable for crispy skin! Season both sides generously with the salt, black pepper, and garlic powder. Let them sit for a minute so the seasoning can adhere.
Step 2: Place your large, oven-safe skillet over medium-high heat and add the olive oil. Once the oil is shimmering, carefully place the chicken thighs in the pan, skin-side down. You should hear a satisfying sizzle. Resist the urge to move them! Let them cook for 6-8 minutes until the skin is deeply golden and crispy. Flip them over and cook for another 2 minutes on the other side just to sear. Remove the chicken from the skillet and set it aside on a plate.
Step 3: Reduce the heat to medium. In the same skillet, you’ll see all those delicious browned bits from the chicken—that’s pure flavor! Add the minced garlic and sauté for about 30 seconds until it becomes fragrant. Be careful not to burn it.
Step 4: Now, pour in the balsamic vinegar and honey. Use a wooden spoon or whisk to scrape up all those flavorful bits from the bottom of the pan. This is called deglazing, and it’s the secret to building a deep, complex sauce. Bring the mixture to a gentle simmer.
Step 5: Let the sauce simmer for 3-5 minutes, stirring occasionally. You’ll notice it will start to bubble and thicken slightly. It’s ready when it can coat the back of a spoon. The aroma will be intense and wonderfully tangy-sweet.
Step 6: Turn off the heat and stir in the tablespoon of butter until it’s fully melted and incorporated. This final step gives the glaze a beautiful sheen and a richer, rounder flavor. Taste the sauce and adjust seasoning if needed—sometimes a tiny pinch more salt can really make the flavors pop.
Step 7: Return the seared chicken thighs to the skillet, skin-side up, nestling them into the glaze. Spoon some of the sauce over the top of each piece. Transfer the entire skillet to the preheated oven.
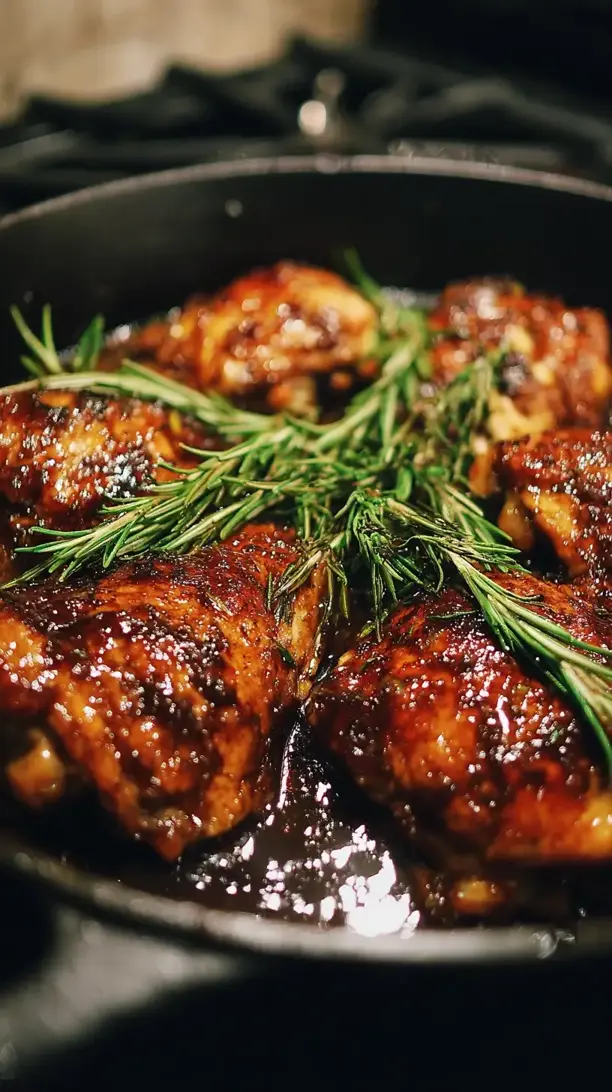
Step 8: Bake for 15-20 minutes, or until the chicken is cooked through and registers an internal temperature of 165°F (74°C) when pierced with a meat thermometer. The glaze will have thickened further and caramelized beautifully onto the chicken.
Step 9: Carefully remove the skillet from the oven—remember, the handle will be extremely hot! Let the chicken rest in the pan for about 5 minutes. This allows the juices to redistribute, ensuring every bite is moist and tender. Garnish with fresh thyme or rosemary if you’re using it.
Storage & Freshness Guide
- Fridge: Store in an airtight container for up to 3 days.
- Freezer: Freeze in a sealed container for up to 2 months.
- Reviving: Reheat in oven at 350°F (175°C) for 10-15 minutes to maintain crispness.
Serving Suggestions
Complementary Dishes
- Creamy Parmesan Cauliflower Mash — The rich, creamy texture is a dreamy contrast to the tangy glaze and soaks up the extra sauce perfectly.
- Simple Roasted Asparagus — Tossed with a little olive oil and salt, the earthy flavor of asparagus balances the sweetness of the dish beautifully.
- A Crisp Arugula Salad — A salad with a light lemon vinaigrette and some shaved Parmesan adds a fresh, peppery bite that cuts through the richness.
Drinks
- A Glass of Pinot Noir — The light-bodied, fruity notes of a Pinot Noir complement the sweet and savory elements without overpowering the chicken.
- Sparkling Water with Lemon — The effervescence and citrus are incredibly refreshing and help cleanse the palate between bites of the rich glaze.
- Iced Herbal Tea — A slightly sweetened peach or mint tea offers a cool, non-alcoholic pairing that highlights the honey in the recipe.
Something Sweet
- Dark Chocolate Avocado Mousse — Its rich, creamy, and slightly bitter flavor is a sophisticated and low-carb way to end the meal on a high note.
- Mixed Berry Compote — Gently warmed berries with a hint of vanilla create a simple, tart dessert that echoes the fruity notes in the balsamic.
- Vanilla Chia Seed Pudding — A cool, creamy pudding provides a light and satisfying finish that feels indulgent without being too heavy.
Top Mistakes to Avoid
- Moving the chicken too soon. When you first place the chicken in the hot skillet, let it sear undisturbed. If you try to move it early, the skin will tear and stick, and you won’t get that perfect, crispy crust.
- Using a non-oven-safe skillet. This is a crucial one! If your skillet has a plastic handle, you can’t put it in the oven. Transferring everything to a baking dish is messy and you lose all those delicious pan juices.
- Boiling the glaze. Keep the heat at a gentle simmer when reducing the balsamic and honey. A rolling boil can cause the sugars to burn quickly, leaving you with a bitter, unpleasant taste.
- Skipping the butter. I know it’s just one tablespoon, but it truly makes the sauce. It emulsifies the glaze, giving it a velvety texture and a richer flavor that you just can’t get without it.
Expert Tips
- Tip: Let the chicken come to room temperature. Taking the chicken out of the fridge 20-30 minutes before cooking helps it cook more evenly. A cold chicken thigh going into a hot pan will seize up and can lead to a tough exterior and an undercooked interior.
- Tip: Use a meat thermometer. This is the single best way to guarantee perfectly cooked chicken every single time. Pull it from the oven when it hits 165°F (74°C) at the thickest part, and you’ll never have to guess again.
- Tip: Make a double batch of the glaze. The balsamic honey reduction is so good you’ll want extra. Double the vinegar, honey, and garlic, then set half aside before adding the butter. You can use it as a marinade or drizzle over roasted vegetables later in the week.
- Tip: Add a splash of broth. If you find your glaze is reducing too much and becoming too thick in the oven, just add a tablespoon or two of chicken broth to thin it out to a perfect saucy consistency.
FAQs
Can I make this with boneless, skinless chicken breasts?
You absolutely can, but you’ll need to adjust the method. Boneless breasts cook much faster. I’d recommend searing them quickly on both sides, then removing them from the pan to make the glaze. Return them to the skillet just to coat in the sauce and warm through, skipping the oven step entirely to prevent them from drying out. The cooking time will be significantly shorter, so keep a close eye on them.
My glaze is too thin. How can I thicken it?
If your glaze hasn’t thickened enough after simmering, the most likely culprit is that it just needs more time. Continue to simmer it over medium-low heat, stirring frequently, until it reduces further. Alternatively, you can create a quick slurry by mixing a teaspoon of arrowroot powder with a tablespoon of cold water and whisking it into the simmering glaze. It will thicken up almost instantly.
Can I prepare this dish ahead of time?
For the best texture, I’d recommend serving it fresh. However, you can do some prep to make things faster. You can make the glaze a day or two in advance and store it in the fridge. You can also season the chicken and keep it covered in the fridge. When ready to cook, just sear the chicken and reheat the glaze in the skillet before combining everything for the bake.
Is there a substitute for honey?
Yes, if you need to avoid honey, you can use a sugar-free maple syrup for a similar sweetness and viscosity. Another great option is a monk fruit sweetener that is formulated to be a 1:1 honey substitute. The flavor profile will be slightly different, but you’ll still get that lovely sweet and tangy balance.
How should I store and reheat leftovers?
Store any leftover chicken in an airtight container in the refrigerator for up to 3 days. To reheat, I find the oven or a toaster oven is best to keep the skin from getting soggy. Place it on a baking sheet at 350°F (175°C) for about 10-15 minutes, until warmed through. You can also use a microwave, but the skin will lose its crispness.


Balsamic Honey Glazed Chicken
Make this easy Balsamic Honey Glazed Chicken for a sweet, tangy, and impressive dinner. Ready in 40 minutes! Get the simple, foolproof recipe here.
Ingredients
For the Ingredients
-
4 bone-in, skin-on chicken thighs (about 1.5 lbs / 680 g)
-
1 tbsp olive oil
-
1/2 tsp salt
-
1/2 tsp black pepper
-
1 tsp garlic powder
-
1/2 cup balsamic vinegar
-
1/4 cup honey
-
2 cloves garlic (minced)
-
1 tbsp butter
-
Fresh thyme or rosemary (for garnish (optional))
Instructions
-
Preheat your oven to 375°F (190°C). While it’s heating up, take your chicken thighs and pat them completely dry with paper towels. Season both sides generously with the salt, black pepper, and garlic powder. Let them sit for a minute so the seasoning can adhere.01
-
Place your large, oven-safe skillet over medium-high heat and add the olive oil. Once the oil is shimmering, carefully place the chicken thighs in the pan, skin-side down. Let them cook for 6-8 minutes until the skin is deeply golden and crispy. Flip them over and cook for another 2 minutes on the other side just to sear. Remove the chicken from the skillet and set it aside on a plate.02
-
Reduce the heat to medium. In the same skillet, add the minced garlic and sauté for about 30 seconds until it becomes fragrant.03
-
Pour in the balsamic vinegar and honey. Use a wooden spoon or whisk to scrape up all those flavorful bits from the bottom of the pan. Bring the mixture to a gentle simmer.04
-
Let the sauce simmer for 3-5 minutes, stirring occasionally. It’s ready when it can coat the back of a spoon.05
-
Turn off the heat and stir in the tablespoon of butter until it’s fully melted and incorporated. Taste the sauce and adjust seasoning if needed.06
-
Return the seared chicken thighs to the skillet, skin-side up, nestling them into the glaze. Spoon some of the sauce over the top of each piece. Transfer the entire skillet to the preheated oven.07
-
Bake for 15-20 minutes, or until the chicken is cooked through and registers an internal temperature of 165°F (74°C) when pierced with a meat thermometer.08
-
Carefully remove the skillet from the oven—remember, the handle will be extremely hot! Let the chicken rest in the pan for about 5 minutes. Garnish with fresh thyme or rosemary if you’re using it.09
Not what you're looking for?


