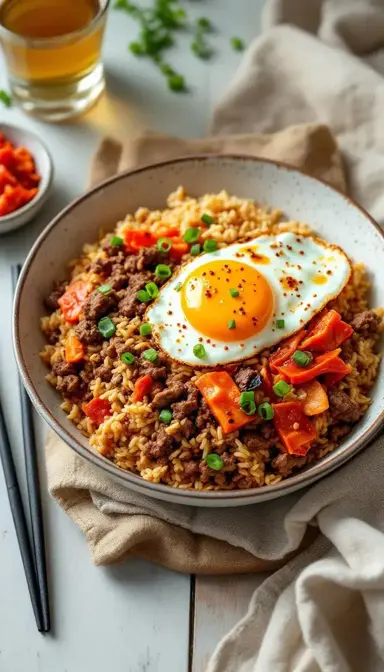
There’s something magical about the sizzle of beef hitting a hot pan, the pungent tang of kimchi filling the air, and the comforting sight of fluffy rice soaking up all those bold flavors. This Beef and Kimchi Fried Rice isn’t just a meal—it’s a weeknight savior, a fridge-cleaner, and a flavor explosion all in one.
Picture this: tender ground beef, caramelized with just the right amount of fat, mingling with spicy, fermented kimchi and crispy-edged rice. Every bite is a little adventure—savory, tangy, and with just enough heat to keep things interesting. And the best part? It comes together faster than you can decide what to watch on TV.
Why This Recipe Works
- Pantry Powerhouse – Kimchi, rice, and ground beef are staples you likely already have. No fancy ingredients, just big flavor.
- Gut-Friendly Goodness – That kimchi isn’t just for taste—it’s packed with probiotics to keep your digestion happy.
- Customizable Heat – Love spice? Pile on the gochujang. Prefer mild? Dial it back. This dish bends to your taste.
- Leftover Love – Stale rice? Wilted veggies? This recipe gives them new life.
The Story Behind the Sauce
This dish is a beautiful mash-up of Korean kimchi bokkeumbap (kimchi fried rice) and the hearty, meaty satisfaction of a Western-style stir-fry. Kimchi has been a Korean staple for centuries—fermented to last through harsh winters—while fried rice was born as a clever way to use up leftovers. Throw in some ground beef, and you’ve got a modern, global twist on tradition.
Essential Ingredients & Tools
Ingredients for the Main Dish
- 1 lb (450g) ground beef (80/20 fat ratio for juiciness, or 90/10 for leaner results)
- 2 cups cooked white rice (day-old preferred for ideal texture)
- 1 cup chopped kimchi (plus 2 tbsp kimchi juice for amplified tang)
- 3 cloves garlic, minced (or 1 tbsp pre-minced for convenience)
- 1 small onion, diced (yellow for sweetness or white for sharper flavor)
- 2 tbsp soy sauce (or tamari for gluten-free, or coconut aminos for soy-free)
- 1 tbsp gochujang (Korean chili paste; reduce to 1 tsp for milder heat)
- 1 tsp sesame oil (toasted for deeper aroma)
- 2 green onions, sliced (reserve greens for garnish)
- 1 tbsp vegetable oil (or avocado oil for high-heat cooking)
- 2 eggs (optional, for topping; soft yolk adds richness)
Tools You’ll Need
- Large skillet or wok (12-inch preferred for even cooking; a regular frying pan works too)
- Wooden spoon or spatula (metal utensils may scratch nonstick pans)
- Measuring spoons (for precise seasoning balance)
- Mixing bowl (to reserve kimchi juice separately)
Serves: 4 | Prep time: 10 mins | Cook time: 15 mins | Total time: 25 mins
How to Make Beef and Kimchi Fried Rice
- Prep Like a Pro
Dice the 1 small onion into uniform ¼-inch pieces—this ensures even cooking. Mince the 3 cloves garlic finely to distribute its flavor without overpowering the dish. For the 1 cup kimchi, chop it into ½-inch pieces, then squeeze out excess liquid (reserving 2 tbsp of the juice). This step is critical: it prevents sogginess while concentrating the kimchi’s tangy, fermented flavor. The reserved juice is packed with probiotics and will be added later for a flavor boost.
- Brown the Beef
Heat 1 tbsp vegetable oil in a skillet over medium-high heat until shimmering—test the oil’s readiness by adding a small piece of onion; it should sizzle immediately. Add the 1 lb ground beef, breaking it into crumbles with a wooden spoon. Cook for 5–6 minutes until browned. For a crispier texture, let the beef sit undisturbed for 1–2 minutes before stirring to develop a flavorful crust. If using lean beef (90/10), add an extra teaspoon of oil to prevent dryness. Drain excess fat if desired, but leaving 1 tbsp enhances richness.
- Sauté the Aromatics
Push the beef to one side of the pan. Add the diced 1 small onion and 3 cloves minced garlic to the empty space, sautéing until fragrant (2 minutes). Stir occasionally to prevent burning—the onions should turn translucent but not brown. For deeper flavor, add a pinch of sugar to help caramelize the onions. This step builds the dish’s foundational umami.
- Bring in the Kimchi & Rice
Stir in the 1 cup chopped kimchi, reserved 2 tbsp juice, 1 tbsp gochujang, and 2 tbsp soy sauce. The kimchi should sizzle when it hits the pan—this develops its complex fermented flavors. Add the 2 cups cooked rice, breaking up clumps with the back of a spoon. Press the rice into the pan for 3–4 minutes until crispy in spots. For extra crunch, increase the heat to high for the last minute and listen for the satisfying crackle of rice crisping against the hot pan.
- Finish with Flair
Drizzle 1 tsp sesame oil around the pan’s edge so it sizzles into the dish—this technique, called “blooming,” intensifies the oil’s nutty aroma. Toss in most of the 2 sliced green onions (save some for garnish), letting the residual heat soften their bite while preserving their vibrant color. For eggs, fry the 2 eggs separately sunny-side-up and place on top just before serving. The runny yolk creates a luxurious sauce when broken over the rice.
Chef’s Wisdom
Chef’s Trick: For a hint of sweetness, grate in half an apple (squeezed dry) while cooking the beef. It’s a subtle nod to bulgogi marinades.
Pro Technique
Bloom Your Gochujang
Don’t just stir it in—push the aromatics aside and let the 1 tbsp gochujang hit the hot pan for 30 seconds. It’ll darken slightly, unlocking deeper, more complex flavors.
Crispy Rice Mastery
Press the 2 cups rice firmly into the pan and leave it alone for a minute or two. That crackling sound? That’s the sound of perfection. If you’re using fresh rice, spread it on a tray to dry out a bit first.
Storage & Freshness Guide
Fridge: Store in an airtight container for up to 3 days. A damp paper towel on top keeps the rice from drying out.
Reheating: Skillet is best—toss in a splash of water to revive the texture. Microwave works too, but cover with a damp towel to prevent rubbery rice.
Freezing? Skip it. Kimchi gets mushy, and rice turns grainy.
Nutrition Profile
- Calories: 420
- Protein: 22g
- Carbs: 35g
- Fat: 20g
- Fiber: 3g
Using cauliflower rice? Carbs drop to 15g.
Ingredient Variations and Their Impact
- Turkey or Chicken: Leaner, but add extra oil or a splash of fish sauce for depth.
- Cauliflower Rice: Sauté it separately to avoid sogginess.
- Pork Belly: For the decadent version—crisp it up like bacon.
- Vegan: Use tofu and fish sauce-free kimchi.
Perfect Pairings
Complementary Dishes
- Light Cucumber Salad: Toss thinly sliced cucumbers with rice vinegar, sesame seeds, and salt for a refreshing contrast. The crisp acidity cuts through the dish’s richness.
- Miso Soup: Enhances umami with its savory broth. White miso offers a milder flavor, while wakame seaweed adds oceanic notes.
Drinks
- Korean Barley Tea (*Boricha*): A nutty, caffeine-free beverage that aids digestion. Serve chilled or warm for year-round enjoyment.
- Crisp Lager: The carbonation and mild bitterness cleanse the palate between spicy bites.
Something Sweet
- Honey-Drizzled Asian Pear: Slices of cool, juicy pear with honey balance the heat.
- Matcha Ice Cream: The earthy sweetness contrasts the dish’s savory-spicy profile.
FAQs
Can I use fresh rice instead of day-old?
Yes, but spread freshly cooked rice in a thin layer on a baking sheet for 10–15 mins to evaporate excess moisture. Alternatively, rinse rice under cold water and drain well to remove surface starch—this mimics day-old rice’s texture. For best results, use slightly undercooked rice (reduce water by 10% when cooking).
How do I reduce the spiciness?
- Rinse kimchi briefly under cold water before chopping—this removes surface chili paste.
- Substitute gochujang with 1 tbsp ketchup + ½ tsp paprika for mild sweetness. The tomato base provides similar umami without heat.
- Add ¼ cup shredded mozzarella at the end—its creaminess mellows heat. Let it melt slightly before serving for a Korean-Mexican fusion effect.
Is this dish gluten-free?
Use tamari instead of soy sauce and verify kimchi labels (some brands contain wheat-based additives). Opt for certified gluten-free gochujang or substitute with 1 tsp red miso paste + ½ tsp chili flakes. Many Korean markets now carry gluten-free kimchi options.
Can I add other veggies?
Absolutely! Stir-fry bell peppers or carrots with the onions for crunch. For leafy greens (spinach, kale), add in the last 2 mins to wilt. Frozen peas or corn require no prep—toss them in straight from the freezer. Mushrooms (shiitake or oyster) add meaty texture when sautéed first.
Why squeeze the kimchi juice?
Reserving the liquid prevents the rice from becoming soggy while allowing you to control the dish’s tanginess. The juice also contains concentrated probiotics from fermentation. For maximum gut health benefits, stir in the reserved juice after cooking to preserve live cultures.
Beef and Kimchi Fried Rice: A Flavor Bomb Waiting to Happen
Try my Beef and Kimchi Fried Rice for a bold, easy weeknight meal. Packed with savory beef, spicy kimchi, and crispy rice—ready in 25 minutes!
Ingredients
Main
-
1 lb ground beef (80/20 fat ratio)
-
2 cups cooked white rice (day-old preferred)
-
1 cup chopped kimchi (plus 2 tbsp kimchi juice)
-
3 cloves garlic (minced)
-
1 small onion (diced)
-
2 tbsp soy sauce
-
1 tbsp gochujang
-
1 tsp sesame oil
-
2 green onions (sliced)
-
1 tbsp vegetable oil
-
2 eggs (optional)
Instructions
-
Dice 1 small onion, mince 3 cloves garlic, and chop 1 cup kimchi, reserving 2 tbsp juice.01
-
Heat 1 tbsp vegetable oil in skillet over medium-high. Brown 1 lb ground beef for 5–6 minutes.02
-
Push beef aside; sauté diced 1 small onion and 3 cloves minced garlic for 2 minutes.03
-
Stir in 1 cup chopped kimchi, 2 tbsp juice, 1 tbsp gochujang, and 2 tbsp soy sauce. Add 2 cups cooked rice, pressing to crisp.04
-
Drizzle 1 tsp sesame oil, toss in 2 sliced green onions, and top with 2 fried eggs if desired.05