Bourbon chicken thighs deliver a sticky, glossy, savory experience that feels fancy but is surprisingly simple. The sauce balances sweet, smoky, and savory notes with a complex warmth from bourbon. This recipe uses juicy, forgiving chicken thighs for a reliably delicious meal.
Craving a delicious Bourbon Chicken Thighs? You've come to the right spot! From Chicken Thigh Recipes favorites to amazing Desserts recipes, there's something here for everyone.


Why You’ll Love This Bourbon Chicken Thighs
- Forgiving & juicy: Chicken thighs stay moist and tender even if slightly overcooked.
- Next-level sauce: A sticky, complex blend of bourbon, soy, brown sugar, and aromatics.
- Fancy yet simple: Impressive enough for guests with straightforward, stress-free steps.
- Meal prep friendly: Flavors deepen overnight, making it perfect for make-ahead meals.
Ingredients & Tools
- 8 bone-in, skin-on chicken thighs (about 1.5–2 lbs)
- 1 tbsp olive oil
- 1 tsp kosher salt
- 1/2 tsp freshly ground black pepper
- 1/2 cup bourbon
- 1/3 cup low-sodium soy sauce
- 1/4 cup brown sugar, packed
- 2 tbsp apple cider vinegar
- 1 tbsp Worcestershire sauce
- 3 cloves garlic, minced
- 1 tsp fresh ginger, grated
- 1/2 tsp smoked paprika
- 2 tbsp unsalted butter, cold
- 2 green onions, thinly sliced (for garnish)
Tools: A large, oven-safe skillet is essential, along with a whisk and measuring cups/spoons.
Notes: Don’t use chicken breasts—thighs have more fat for flavor and a forgiving texture. Use a bourbon you enjoy drinking; quality shines in the sauce.
Nutrition (per serving)
| Calories: | 480 kcal |
| Protein: | 35 g |
| Fat: | 28 g |
| Carbs: | 12 g |
| Fiber: | 0.5 g |
Serves: 4 | Prep Time: 10 minutes | Cook Time: 35 minutes | Total Time: 45 minutes
Before You Start: Tips & Ingredient Notes
- Bone-in, skin-on is non-negotiable. The bone keeps the meat incredibly juicy during cooking, and the skin gets wonderfully crispy, providing texture and protecting the flesh. You can remove the skin after cooking if you prefer, but starting with it is key.
- Choose your bourbon wisely. You don’t need a top-shelf bottle, but a decent, smooth bourbon will make a noticeable difference. The harsh alcohol flavor cooks off, leaving behind a lovely, oaky warmth.
- Pat your chicken completely dry. This is the secret to achieving that perfect, golden-brown, crispy skin. Any moisture on the surface will steam the skin instead of searing it, so take a minute with some paper towels.
- Have all your sauce ingredients measured and ready. Once you start deglazing the pan, things move quickly. Having everything prepped and within arm’s reach—the “mise en place”—makes the process smooth and stress-free.
How to Make Bourbon Chicken Thighs
Step 1: Preheat your oven to 375°F (190°C). While it’s heating, take your chicken thighs and pat them aggressively dry with paper towels. This is the single most important step for crispy skin. Season both sides generously with the salt and pepper, making sure to get the seasoning under the skin as well.
Step 2: Place your large, oven-safe skillet over medium-high heat and add the olive oil. Once the oil is shimmering, carefully add the chicken thighs, skin-side down. You should hear a satisfying sizzle. Resist the urge to move them! Let them cook for 6-8 minutes, until the skin is deeply golden brown and crispy. Flip them and cook for another 2-3 minutes on the other side just to sear. Transfer the chicken to a clean plate; it won’t be cooked through yet.
Step 3: Reduce the heat to medium. It’s time to make the magic sauce. Carefully pour the bourbon into the hot skillet—it will sizzle and steam dramatically. Use your whisk to scrape up all the delicious browned bits from the bottom of the pan. Let the bourbon simmer and reduce for about a minute, cooking off the raw alcohol edge.
Step 4: Whisk in the soy sauce, brown sugar, apple cider vinegar, Worcestershire sauce, minced garlic, grated ginger, and smoked paprika. Keep whisking until the brown sugar has completely dissolved and the sauce is smooth. Let it simmer for 2-3 minutes until it thickens slightly and becomes fragrant. You’ll notice the sauce darkening and smelling incredible.
Step 5: Return the chicken thighs to the skillet, skin-side up, nestling them into the sauce. Spoon some of the sauce over the top of each piece. Carefully transfer the entire skillet to the preheated oven.
Step 6: Bake for 20-25 minutes, or until the chicken is cooked through and registers 165°F (74°C) on an instant-read thermometer inserted into the thickest part, avoiding the bone. The sauce should be bubbling around the edges and look glossy and thickened.
Step 7: Using oven mitts, remove the skillet from the oven. Transfer the chicken to a serving platter. Place the skillet back on the stovetop over low heat. Whisk the cold butter into the sauce, one tablespoon at a time, until it’s fully melted and incorporated. This final step makes the sauce incredibly rich, silky, and cohesive.
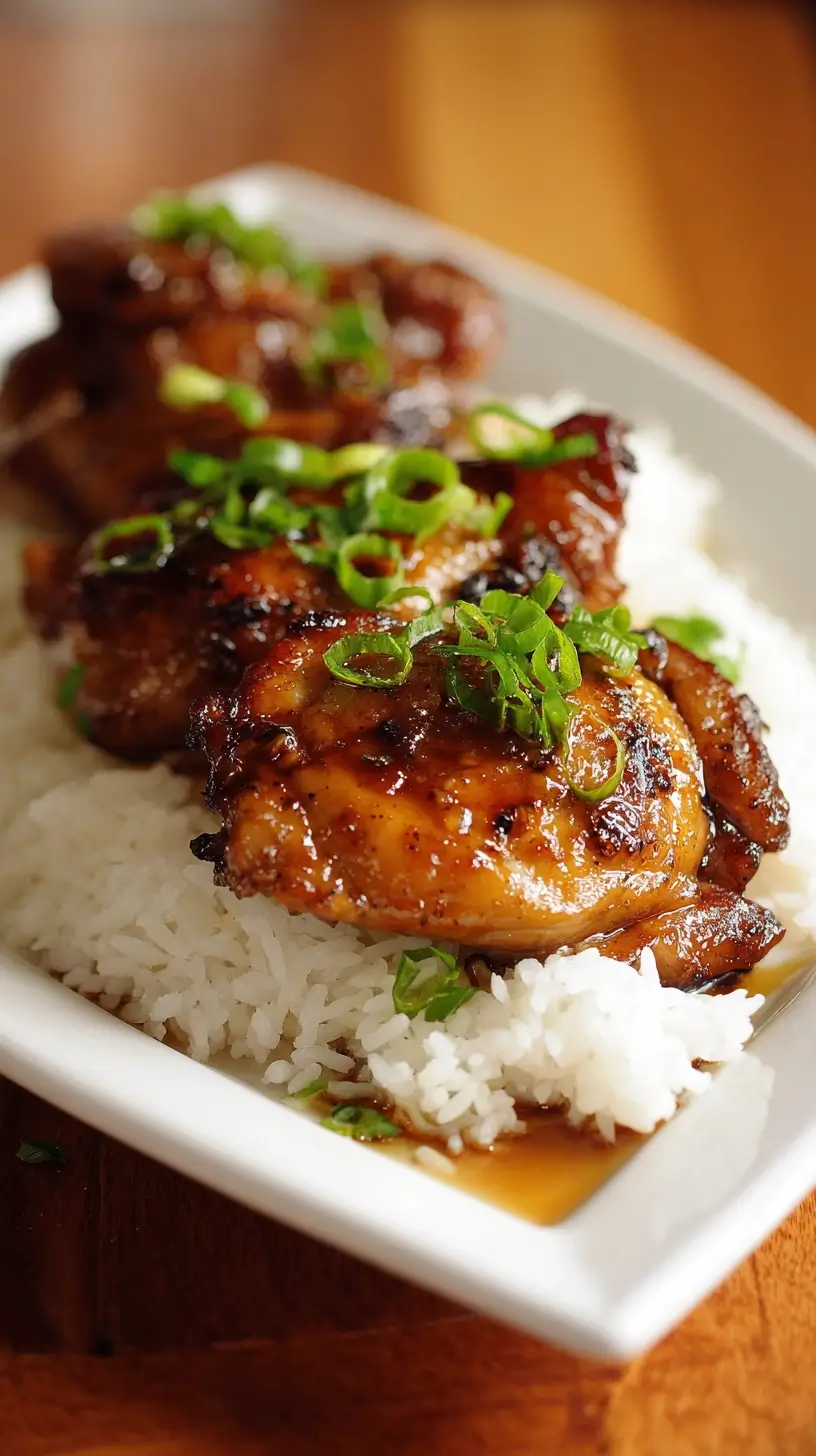
Step 8: Pour the finished sauce over the plated chicken thighs and garnish generously with the sliced green onions. Serve immediately while it’s hot and glorious.
Storage & Freshness Guide
- Fridge: Store in an airtight container for up to 4 days.
- Freezer: Freeze in a sealed container for up to 3 months.
- Reviving: Reheat gently in a skillet or microwave, adding a splash of water if needed.
Serving Suggestions
Complementary Dishes
- Fluffy Jasmine Rice — The perfect neutral canvas to soak up every last drop of that incredible bourbon sauce. Its slight stickiness is ideal.
- Garlic Mashed Potatoes — Creamy, buttery potatoes provide a comforting and rich base that pairs beautifully with the savory-sweet chicken.
- Sautéed Green Beans with Almonds — A simple, crisp-tender vegetable side adds a fresh, textural contrast to the rich main dish.
Drinks
- A Classic Old Fashioned — It’s a match made in heaven, continuing the bourbon theme and complementing the deep, caramelized flavors in the dish.
- Dry Hard Cider — The crisp, apple-y acidity cuts through the richness of the sauce and cleanses the palate beautifully between bites.
Something Sweet
- Warm Apple Crumble — The cozy, spiced apple and oat topping feels like a natural, comforting follow-up to the hearty, savory chicken.
- Dark Chocolate Pots de Crème — A rich, silky, and not-too-sweet chocolate dessert provides a sophisticated and decadent ending.
Top Mistakes to Avoid
- Moving the chicken too soon. When you’re searing the skin, you have to let it sit undisturbed to form that perfect, crispy crust. If you peek or shift it too early, the skin will tear and stick.
- Using a non-oven-safe skillet. If your skillet has a plastic handle, it’s not safe for the oven. Transferring everything to a baking dish is possible but messy and can cool the food down, affecting the cooking time.
- Skipping the butter at the end. That final swirl of cold butter, called “monter au beurre,” isn’t just for show. It emulsifies the sauce, giving it a restaurant-quality gloss and velvety texture that you’ll really miss if you skip it.
- Pouring out the chicken fat. After searing, you’ll have rendered chicken fat in the pan. This is liquid gold for flavor! It’s the base for your sauce, so don’t drain it—those browned bits are pure flavor.
Expert Tips
- Tip: For an extra layer of flavor, marinate the chicken thighs in the sauce (minus the bourbon and butter) for up to 4 hours in the fridge before you start cooking. This deepens the savory penetration beautifully.
- Tip: If your sauce isn’t thickening enough after baking, remove the chicken and simmer the sauce on the stovetop for a few extra minutes. It will reduce and cling to the back of a spoon when it’s ready.
- Tip: Grate your ginger while it’s frozen. It’s much easier to handle, you don’t have to peel it, and it creates a fine pulp that disperses its flavor evenly throughout the sauce.
- Tip: Let the chicken rest for 5 minutes after it comes out of the oven before serving. This allows the juices to redistribute throughout the meat, ensuring every single bite is moist and tender.
FAQs
Can I make this recipe with chicken breasts?
You can, but I really don’t recommend it. Chicken breasts are much leaner and will easily dry out with this cooking method. If you must, use boneless, skinless breasts and reduce the oven time significantly, checking for doneness at the 15-minute mark. The result will be less juicy and lack the crispy skin element that makes this dish so special.
Is the alcohol content still there after cooking?
Most of the alcohol cooks off during the reduction and baking process, leaving behind the distinct, warm flavor of the bourbon without the boozy kick. The longer you simmer the sauce, the less alcohol remains. By the end, it’s primarily for flavor, making it family-friendly.
Can I make this dish ahead of time?
Absolutely! You can sear the chicken and make the sauce a day ahead. Store them separately in the fridge. When ready to serve, bring both to room temperature for a bit, then combine and bake as directed, adding a few extra minutes to the cooking time since you’re starting from cold.
What’s a good non-alcoholic substitute for the bourbon?
For a non-alcoholic version, you can use apple juice or even a strong-brewed black tea. You’ll lose the distinct oaky bourbon note, but you’ll still get a sweet, flavorful base. A tablespoon of vanilla extract added to the apple juice can help mimic some of that complexity.
My sauce is too thin. How can I thicken it?
If your sauce is runny after baking, the easiest fix is to remove the chicken and place the skillet back on the stove over medium heat. Let the sauce simmer for 3-5 minutes until it reduces to your desired consistency. You can also create a quick slurry with a teaspoon of cornstarch and a tablespoon of cold water, whisk it in, and simmer for a minute until thickened.


Bourbon Chicken Thighs
Make the best Bourbon Chicken Thighs with this easy recipe. Juicy chicken in a sticky, savory-sweet bourbon sauce. Perfect for dinner tonight—get the recipe!
Ingredients
For the Ingredients
-
8 bone-in, skin-on chicken thighs (about 1.5–2 lbs)
-
1 tbsp olive oil
-
1 tsp kosher salt
-
1/2 tsp freshly ground black pepper
-
1/2 cup bourbon
-
1/3 cup low-sodium soy sauce
-
1/4 cup brown sugar (packed)
-
2 tbsp apple cider vinegar
-
1 tbsp Worcestershire sauce
-
3 cloves garlic (minced)
-
1 tsp fresh ginger (grated)
-
1/2 tsp smoked paprika
-
2 tbsp unsalted butter (cold)
-
2 green onions (thinly sliced (for garnish))
Instructions
-
Preheat your oven to 375°F (190°C). While it’s heating, take your chicken thighs and pat them aggressively dry with paper towels. This is the single most important step for crispy skin. Season both sides generously with the salt and pepper, making sure to get the seasoning under the skin as well.01
-
Place your large, oven-safe skillet over medium-high heat and add the olive oil. Once the oil is shimmering, carefully add the chicken thighs, skin-side down. You should hear a satisfying sizzle. Resist the urge to move them! Let them cook for 6-8 minutes, until the skin is deeply golden brown and crispy. Flip them and cook for another 2-3 minutes on the other side just to sear. Transfer the chicken to a clean plate; it won’t be cooked through yet.02
-
Reduce the heat to medium. It’s time to make the magic sauce. Carefully pour the bourbon into the hot skillet—it will sizzle and steam dramatically. Use your whisk to scrape up all the delicious browned bits from the bottom of the pan. Let the bourbon simmer and reduce for about a minute, cooking off the raw alcohol edge.03
-
Whisk in the soy sauce, brown sugar, apple cider vinegar, Worcestershire sauce, minced garlic, grated ginger, and smoked paprika. Keep whisking until the brown sugar has completely dissolved and the sauce is smooth. Let it simmer for 2-3 minutes until it thickens slightly and becomes fragrant. You’ll notice the sauce darkening and smelling incredible.04
-
Return the chicken thighs to the skillet, skin-side up, nestling them into the sauce. Spoon some of the sauce over the top of each piece. Carefully transfer the entire skillet to the preheated oven.05
-
Bake for 20-25 minutes, or until the chicken is cooked through and registers 165°F (74°C) on an instant-read thermometer inserted into the thickest part, avoiding the bone. The sauce should be bubbling around the edges and look glossy and thickened.06
-
Using oven mitts, remove the skillet from the oven. Transfer the chicken to a serving platter. Place the skillet back on the stovetop over low heat. Whisk the cold butter into the sauce, one tablespoon at a time, until it’s fully melted and incorporated. This final step makes the sauce incredibly rich, silky, and cohesive.07
-
Pour the finished sauce over the plated chicken thighs and garnish generously with the sliced green onions. Serve immediately while it’s hot and glorious.08
Not what you're looking for?


