Imagine taking the cozy, comforting essence of breakfast and wrapping it up in a crispy, golden-brown package. These Breakfast Arancini with Marinara deliver a handheld brunch experience with a creamy, cheesy rice exterior and a glorious runny egg center. Served with vibrant marinara, each bite is a textural dream.
Love Breakfast Arancini with Marinara? So do we! If you're into Savory Breakfast or curious about Burgers, you'll find plenty of inspiration below.


Why You’ll Love This Breakfast Arancini with Marinara
Total showstopper: Golden, crispy spheres guarantee “oohs” and “aahs.”
Texture is everything: Crispy outside, creamy rice, and liquid gold center.
Make-ahead friendly: Assemble a day ahead, fry when ready.
Endlessly customizable: Swap fillings like bacon, mushrooms, or spinach.
Ingredients & Tools
- 1 cup Arborio rice
- 3 cups chicken or vegetable broth, kept warm
- 1/2 cup grated Parmesan cheese
- 1/2 lb Italian sausage, casings removed
- 6 small, cold eggs (or quail eggs for a smaller version)
- 4 oz low-moisture mozzarella, cut into small cubes
- 1 small onion, finely diced
- 2 cloves garlic, minced
- 1/2 cup dry white wine (optional)
- 1 cup all-purpose flour
- 2 large eggs, beaten
- 2 cups panko breadcrumbs
- For the Marinara: 1 can (28 oz) crushed tomatoes, 2 cloves garlic, 1 tsp dried oregano, 1/4 cup fresh basil, salt, and pepper
- Neutral oil for frying (like canola or vegetable)
- Salt and black pepper to taste
Tools: A medium saucepan, a large skillet, a baking sheet, a Dutch oven or heavy-bottomed pot for frying, a slotted spoon, and a thermometer for checking oil temperature is highly recommended.
Notes: Using a high-starch rice like Arborio is non-negotiable here—it’s what gives the rice its signature creamy texture that binds together so well. And don’t skip the panko! Their flaky, light texture creates a much crispier, less dense crust than traditional breadcrumbs.
Nutrition (per serving)
| Calories: | 420 kcal |
| Protein: | 18 g |
| Fat: | 22 g |
| Carbs: | 35 g |
| Fiber: | 2 g |
Serves: 6 | Prep Time: 1 hour | Cook Time: 30 minutes | Total Time: 1 hour 30 minutes (plus chilling)
Before You Start: Tips & Ingredient Notes
- Why cold eggs? This is a crucial little trick. Using eggs straight from the fridge makes them much easier to handle when you’re wrapping the rice around them, and it helps ensure the yolk stays runny inside during the relatively quick frying process.
- Don’t rush the rice cooling. It might be tempting to start shaping the arancini while the rice is still warm, but you must let it cool completely. Warm rice is incredibly sticky and difficult to work with, and it won’t hold its shape around the filling.
- The importance of a “glue” layer. When you’re coating the arancini, make sure each one gets a thorough dredge in flour, then egg, then panko. The flour helps the egg adhere, and the egg acts as the glue for the panko. Any bald spots will lead to leaking.
- Keep your oil temperature steady. If the oil is too cool, the arancini will absorb too much oil and become greasy. If it’s too hot, the outside will burn before the inside is warm. A thermometer is your best friend here.
How to Make Breakfast Arancini with Marinara
Step 1: Cook the Risotto Base. Start by heating a tablespoon of oil in your saucepan over medium heat. Sauté the diced onion until it’s soft and translucent, about 5 minutes. Add the minced garlic and cook for another minute until fragrant. Stir in the Arborio rice and toast it for a minute, stirring constantly, until the edges look a little translucent. If using wine, pour it in now and let it bubble away until mostly absorbed. Then, begin adding the warm broth, one ladleful at a time, stirring frequently and waiting for the liquid to be absorbed before adding the next. This process should take about 18-20 minutes. The rice should be tender but still have a slight bite (al dente) and the overall mixture should be creamy. Off the heat, stir in the Parmesan cheese and season well with salt and pepper. Spread this rice out on a baking sheet to cool completely.
Step 2: Prepare the Fillings and Sauce. While the rice cools, cook your sausage in a skillet over medium-high heat, breaking it up with a spoon until it’s browned and cooked through. Drain off any excess fat and set it aside to cool. For the marinara, in a separate saucepan, sauté two minced garlic cloves in a bit of olive oil for 30 seconds, then pour in the crushed tomatoes and dried oregano. Let it simmer for about 15-20 minutes until slightly thickened. Stir in the fresh basil and season with salt and pepper. Keep it warm on a low heat.
Step 3: Assemble the Arancini. This is the fun, hands-on part. Set up your workstation: cooled rice, beaten eggs in one shallow bowl, flour in another, and panko in a third. Take about 1/4 cup of the cooled rice and flatten it in the palm of your hand. Create a small well in the center and place one cold whole egg (or a few mozzarella cubes and a little sausage if you’re nervous about the egg). Carefully cup your hand and wrap the rice around the filling, sealing it completely. You’ll notice the rice is quite sticky, which is good—it helps it seal. Roll it gently between your palms to form a neat ball. Repeat with the remaining rice and fillings.
Step 4: The Coating Station. Now, roll each assembled ball first in the flour, shaking off any excess. Then, dip it completely into the beaten egg, letting the excess drip off. Finally, roll it in the panko breadcrumbs, pressing gently to make sure they adhere well all over. Place each finished arancino on a clean baking sheet. At this point, you can cover them with plastic wrap and refrigerate for up to 24 hours, which actually helps the coating set and prevents them from falling apart in the oil.
Step 5: Fry to Perfection. Pour oil into your Dutch oven to a depth of about 3 inches and heat it to 350°F (175°C). Working in batches to avoid crowding the pot, carefully lower the arancini into the hot oil using a slotted spoon. Fry them for 4-5 minutes, turning occasionally, until they are a deep, uniform golden brown all over. The outside should be very crisp. Remove them with the slotted spoon and drain on a wire rack set over a baking sheet—this keeps them crispy on all sides. Let them rest for just a minute or two before serving; they will be extremely hot inside.
Storage & Freshness Guide
- Fridge: Store assembled, uncooked arancini covered for up to 24 hours before frying.
- Freezer: Freeze fully cooked, cooled arancini in a single layer, then transfer to a bag; reheat at 375°F for 15–20 minutes.
- Reviving: Reheat in oven to maintain crispness; avoid microwaving.
Serving Suggestions
Complementary Dishes
- A simple arugula salad — The peppery bite of fresh arugula dressed with just a squeeze of lemon juice and a drizzle of olive oil provides a bright, refreshing counterpoint to the rich, fried arancini.
- Sautéed garlicky mushrooms — Their earthy, savory flavor is a fantastic companion to the sausage and cheese inside the arancini, adding another layer of umami to your plate.
- Roasted asparagus with lemon zest — The vibrant, green flavor and slight crunch of asparagus cuts through the richness beautifully and makes the whole meal feel a bit more balanced.
Drinks
- A classic Mimosa — The bright, acidic bubbles of champagne and orange juice are a celebratory and palate-cleansing partner for this decadent breakfast dish.
- A Bloody Mary — If you’re going all out, the spicy, savory notes of a well-made Bloody Mary are a match made in heaven with the tomato-based marinara and the hearty arancini.
- Freshly squeezed orange juice — Sometimes simple is best. The sweet, citrusy freshness is a timeless and always-welcome addition to any brunch table.
Something Sweet
- Mini lemon ricotta muffins — After a savory, rich main course, something light, fluffy, and subtly sweet with a hint of citrus is the perfect way to finish the meal on a high note.
- Fresh fruit platter with mint — A platter of ripe berries, melon, and grapes is refreshing, simple, and provides a clean, sweet finish that everyone will appreciate.
- Almond biscotti for dipping — Offer these with coffee for a little crunchy, nutty sweetness that feels authentically Italian and isn’t too heavy.
Top Mistakes to Avoid
- Mistake: Using hot rice to form the balls. This is the number one reason arancini fall apart. The rice is too soft and sticky, and it won’t hold its shape around the filling. Patience is key—let it cool completely, or even chill it for a bit.
- Mistake: Overcrowding the frying pot. Adding too many arancini at once will cause the oil temperature to plummet, resulting in greasy, oily balls instead of crisp ones. Fry in small batches for the best results.
- Mistake: Not sealing the filling properly. If you leave a crack or a thin spot, the egg can leak out during frying, creating a mess and potentially causing the oil to splatter. Take your time to form a tight, sealed ball.
- Mistake: Frying at the wrong temperature. I’ve messed this up before too… without a thermometer, it’s guesswork. Too low and they’re greasy; too high and they’re burnt outside and cold inside. A $10 thermometer is a game-changer.
Expert Tips
- Tip: For a foolproof runny yolk, you can par-boil the eggs for exactly 6 minutes, then plunge them into an ice bath. Peel them carefully—they will be soft but set enough to handle. This gives you a bit more insurance against a fully cooked yolk.
- Tip: Add a tablespoon of semolina flour to your risotto as it finishes cooking. It adds an extra layer of starch that makes the cooled rice even more cohesive and easier to shape.
- Tip: For an extra flavor boost, season your panko breadcrumbs! Mix in a teaspoon of garlic powder, some dried Italian herbs, and a little more grated Parmesan before you start coating.
- Tip: If you don’t want to deep fry, you can bake these. Arrange them on a parchment-lined baking sheet, brush generously with oil, and bake at 400°F (200°C) for 20-25 minutes, turning halfway. The crust won’t be *quite* as crisp, but it’s a great lighter alternative.
FAQs
Can I make these entirely ahead of time?
You absolutely can! You have two great options. First, you can assemble and coat the arancini, then keep them covered in the fridge for up to 24 hours before frying. Second, you can fully fry them, let them cool completely, and then freeze them in a single layer on a baking sheet before transferring to a freezer bag. To serve, reheat them from frozen in a 375°F (190°C) oven for 15-20 minutes until hot and crispy again. The texture holds up surprisingly well.
What if I don’t have Arborio rice?
Arborio is definitely the best choice for its high starch content, which creates the necessary creaminess. In a real pinch, another short-grain rice like Carnaroli or Vialone Nano would work, as they are also starchy. I wouldn’t recommend long-grain rice like jasmine or basmati, as they stay too separate and fluffy and won’t bind together properly to form the ball.
My arancini are falling apart in the oil! What did I do wrong?
This is almost always due to one of three things: the rice was still warm when you shaped them, the coating wasn’t complete (a bald spot allowed oil in), or the oil temperature was too low. Make sure your rice is completely cool, be meticulous with your flour-egg-panko coating, and always check that your oil is a steady 350°F before adding the arancini.
Can I make a vegetarian version?
Of course! Simply omit the sausage. Fantastic vegetarian fillings include a mixture of sautéed spinach and mushrooms, sun-dried tomatoes, and roasted peppers. You could even add a little crumbled feta cheese along with the mozzarella for a salty, tangy kick. The method remains exactly the same.
Is there a way to tell if the egg inside is cooked properly?
It’s a bit of a leap of faith, but the timing is fairly reliable. A 4-5 minute fry in 350°F oil is the sweet spot for a cold, raw egg to become set but with a runny yolk. The rice and other fillings act as an insulator. If you’re too worried, using the par-boiled egg method mentioned in the tips is a great safety net to ensure a perfectly runny center every single time.


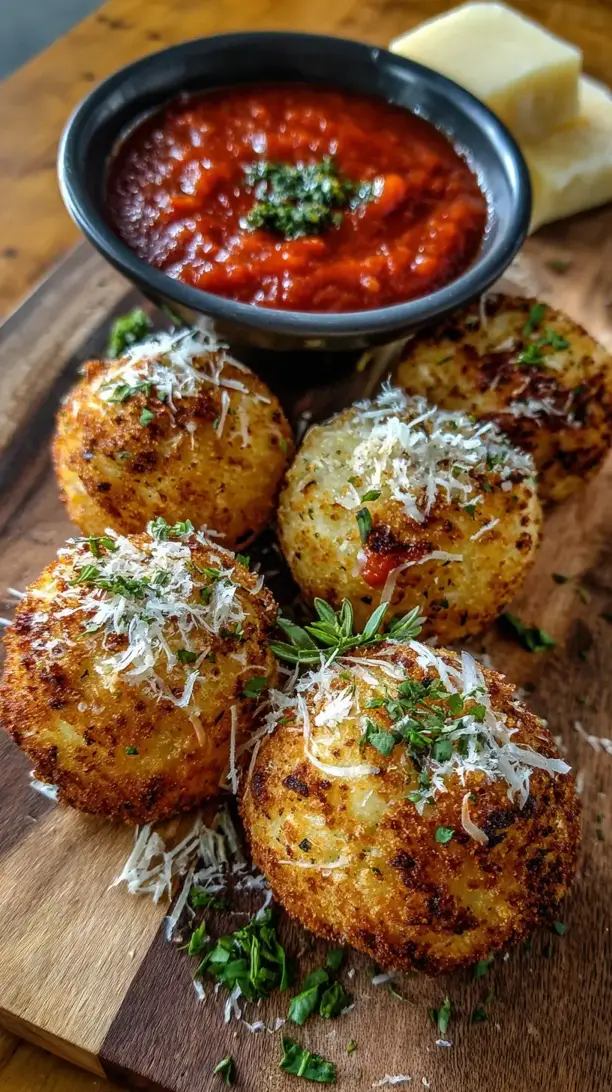
Breakfast Arancini With Marinara
Make showstopping Breakfast Arancini with Marinara! Crispy fried risotto balls with a runny egg center, perfect for brunch. Get the easy, step-by-step recipe here.
Ingredients
For the Arancini:
-
1 cup Arborio rice
-
3 cups chicken or vegetable broth (kept warm)
-
1/2 cup grated Parmesan cheese
-
1/2 lb Italian sausage (casings removed)
-
6 small, cold eggs (or quail eggs for a smaller version)
-
4 oz low-moisture mozzarella (cut into small cubes)
-
1 small onion (finely diced)
-
2 cloves garlic (minced)
-
1/2 cup dry white wine (optional)
-
1 cup all-purpose flour
-
2 large eggs (beaten)
-
2 cups panko breadcrumbs
-
Neutral oil (for frying (like canola or vegetable))
-
Salt and black pepper (to taste)
For the Marinara:
-
1 can crushed tomatoes (28 oz)
-
2 cloves garlic
-
1 tsp dried oregano
-
1/4 cup fresh basil
-
salt
-
pepper
Instructions
-
Start by heating a tablespoon of oil in your saucepan over medium heat. Sauté the diced onion until it’s soft and translucent, about 5 minutes. Add the minced garlic and cook for another minute until fragrant. Stir in the Arborio rice and toast it for a minute, stirring constantly, until the edges look a little translucent. If using wine, pour it in now and let it bubble away until mostly absorbed. Then, begin adding the warm broth, one ladleful at a time, stirring frequently and waiting for the liquid to be absorbed before adding the next. This process should take about 18-20 minutes. The rice should be tender but still have a slight bite (al dente) and the overall mixture should be creamy. Off the heat, stir in the Parmesan cheese and season well with salt and pepper. Spread this rice out on a baking sheet to cool completely.01
-
While the rice cools, cook your sausage in a skillet over medium-high heat, breaking it up with a spoon until it’s browned and cooked through. Drain off any excess fat and set it aside to cool. For the marinara, in a separate saucepan, sauté two minced garlic cloves in a bit of olive oil for 30 seconds, then pour in the crushed tomatoes and dried oregano. Let it simmer for about 15-20 minutes until slightly thickened. Stir in the fresh basil and season with salt and pepper. Keep it warm on a low heat.02
-
This is the fun, hands-on part. Set up your workstation: cooled rice, beaten eggs in one shallow bowl, flour in another, and panko in a third. Take about 1/4 cup of the cooled rice and flatten it in the palm of your hand. Create a small well in the center and place one cold whole egg (or a few mozzarella cubes and a little sausage if you're nervous about the egg). Carefully cup your hand and wrap the rice around the filling, sealing it completely. You’ll notice the rice is quite sticky, which is good—it helps it seal. Roll it gently between your palms to form a neat ball. Repeat with the remaining rice and fillings.03
-
Now, roll each assembled ball first in the flour, shaking off any excess. Then, dip it completely into the beaten egg, letting the excess drip off. Finally, roll it in the panko breadcrumbs, pressing gently to make sure they adhere well all over. Place each finished arancino on a clean baking sheet. At this point, you can cover them with plastic wrap and refrigerate for up to 24 hours, which actually helps the coating set and prevents them from falling apart in the oil.04
-
Pour oil into your Dutch oven to a depth of about 3 inches and heat it to 350°F (175°C). Working in batches to avoid crowding the pot, carefully lower the arancini into the hot oil using a slotted spoon. Fry them for 4-5 minutes, turning occasionally, until they are a deep, uniform golden brown all over. The outside should be very crisp. Remove them with the slotted spoon and drain on a wire rack set over a baking sheet—this keeps them crispy on all sides. Let them rest for just a minute or two before serving; they will be extremely hot inside.05
Not what you're looking for?


