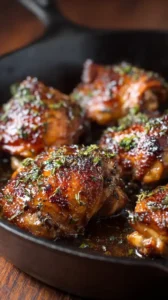
Brown butter chicken thighs transform a weeknight staple into a restaurant-worthy meal with minimal effort. The nutty, golden butter creates a rich sauce that clings to juicy, crispy-skinned chicken. It’s comfort food with a sophisticated twist, perfect for any occasion.
Craving a delicious Brown Butter Chicken Thighs? You've come to the right spot! From Chicken Thigh Recipes favorites to amazing Appetizers & Snacks recipes, there's something here for everyone.


Why You’ll Love This Brown Butter Chicken Thighs
- Insane flavor: Browning butter unlocks deep, nutty notes for maximum impact.
- Perfect texture: Crispy skin and juicy meat create a textural dream.
- Incredibly versatile: Pairs beautifully with almost any side dish.
- Fancy yet approachable: Simple technique that builds kitchen confidence.
Ingredients & Tools
- 4 bone-in, skin-on chicken thighs
- 115 g unsalted butter
- 3 cloves garlic, minced
- 2 sprigs fresh thyme
- 1 lemon, juiced
- 1 tsp kosher salt
- 1/2 tsp freshly cracked black pepper
- 1/4 tsp smoked paprika (optional, for a hint of warmth)
- 2 tbsp fresh parsley, chopped (for garnish)
Tools: A large, heavy-bottomed oven-safe skillet (like cast iron or stainless steel), tongs, and a small bowl for the browned butter.
Notes: Use European-style butter for a richer sauce, and don’t skip the fresh thyme—its earthy notes complement the nutty butter perfectly.
Nutrition (per serving)
| Calories: | 485 kcal |
| Protein: | 28 g |
| Fat: | 40 g |
| Carbs: | 2 g |
| Fiber: | 0.5 g |
Serves: 4 | Prep Time: 10 minutes | Cook Time: 30 minutes | Total Time: 40 minutes
Before You Start: Tips & Ingredient Notes
- Pat your chicken completely dry. This is the single most important step for achieving crispy skin. Any moisture on the surface will steam the skin instead of letting it fry to a perfect crisp in the hot butter.
- Why bone-in, skin-on thighs? They are far more forgiving than chicken breasts and stay incredibly moist during cooking. The bone adds flavor, and the skin protects the meat while rendering out delicious fat.
- Use unsalted butter. This gives you full control over the seasoning. As the butter browns and reduces, its flavor intensifies, and starting with unsalted butter prevents the final dish from becoming too salty.
- Have all your ingredients prepped and ready. The browning process happens quickly, and you don’t want to be frantically mincing garlic while your butter is on the verge of burning. A little mise en place goes a long way here.
How to Make Brown Butter Chicken Thighs
Step 1: Start by prepping your chicken. Use paper towels to pat the chicken thighs completely dry on both sides. This is non-negotiable for crispy skin! Season both sides generously with the kosher salt, black pepper, and the smoked paprika if you’re using it. Let the chicken sit at room temperature for about 15 minutes while you preheat your oven to 400°F (200°C). This brief rest helps the chicken cook more evenly.
Step 2: Now, let’s make the star of the show: the brown butter. Place your skillet over medium heat and add the unsalted butter. Let it melt, then swirl the pan occasionally. You’ll notice it will foam up, then the foam will subside. Keep a close eye—you’ll see little brown specks (the milk solids) forming at the bottom and it will smell wonderfully nutty. This whole process should take about 3-5 minutes. The second it smells nutty and looks amber-colored, immediately pour it into a heatproof bowl to stop the cooking. We’ll use this pan again, so no need to wash it!
Step 3: Return the skillet to medium-high heat. Add back about a tablespoon of the browned butter. Carefully place the chicken thighs in the pan, skin-side down. You should hear a confident sizzle. Resist the urge to move them! Let them cook undisturbed for 6-8 minutes, until the skin is deeply golden brown and crispy. Use your tongs to peek—if it releases easily, it’s ready to flip.
Step 4: Flip the chicken so it’s skin-side up. Add the minced garlic and thyme sprigs to the pan around the chicken. The residual fat will gently cook the garlic, infusing the entire dish. Now, carefully pour the remaining brown butter over the top of each chicken thigh, letting it cascade down into the pan. This bastes the chicken and creates our incredible sauce base.
Step 5: Transfer the entire skillet to your preheated oven. Roast for 15-18 minutes, or until the internal temperature of the chicken reaches 165°F (74°C) and the juices run clear. The high heat will finish cooking the chicken through while keeping the skin ultra-crispy.
Step 6: Carefully remove the hot skillet from the oven—remember that handle is scorching! Place it back on the stovetop. Transfer the cooked chicken thighs to a plate to rest. To the glorious, buttery juices left in the pan, add the fresh lemon juice. Use a whisk to scrape up all the browned bits from the bottom of the pan—that’s pure flavor! Let the sauce simmer for just a minute to meld together.
Step 7: To serve, place a chicken thigh on each plate. Spoon the warm brown butter pan sauce over the top, making sure to include some of the toasted garlic bits. Finish with a sprinkle of fresh, chopped parsley for a burst of color and freshness. Dive in while it’s hot!
Storage & Freshness Guide
- Fridge: Store chicken and sauce in an airtight container for up to 3 days.
- Freezer: Freeze cooked chicken (without sauce) for up to 2 months in a sealed bag.
- Reviving: Reheat in a 350°F oven for 10–15 minutes to restore crispiness.
Serving Suggestions
Complementary Dishes
- Creamy Parmesan Polenta — The soft, creamy texture is the perfect canvas for soaking up every last drop of that nutty brown butter sauce.
- Garlic Sautéed Green Beans — Their crisp-tender bite and sharp garlic flavor provide a fresh, vibrant contrast to the rich, savory chicken.
- Simple Arugula Salad with Lemon Vinaigrette — The peppery arugula and bright lemon dressing cut through the richness beautifully, cleansing the palate between bites.
Drinks
- A Crisp Chardonnay — Look for an unoaked or lightly oaked version; its bright acidity and notes of citrus will complement the brown butter without overpowering it.
- A Pale Ale or Belgian Witbier — The slight bitterness and citrusy notes in these beers are a fantastic match for the savory, nutty flavors of the dish.
Something Sweet
- Lemon Sorbet — It’s light, refreshing, and the intense citrus flavor is the perfect, palate-cleansing finish after a rich and savory meal.
- Dark Chocolate Pots de Crème — For a truly decadent end, the deep, bitter notes of dark chocolate provide a sophisticated counterpoint to the meal’s nutty, savory profile.
Top Mistakes to Avoid
- Mistake: Not drying the chicken skin thoroughly. This is the difference between crispy, rendered skin and a soft, rubbery, steamed texture. I’ve messed this up before too, and it’s a heartbreaking moment. Take the extra 30 seconds with those paper towels!
- Mistake: Moving the chicken too soon after placing it in the pan. If you try to move it before the skin has properly seared, it will tear and stick. Let the pan and the butter do their work—wait for that natural release.
- Mistake: Walking away while browning the butter. Butter goes from perfectly nutty to acrid and burnt in a matter of seconds. Stay put, swirl the pan, and watch it like a hawk. Your nose is your best tool here.
- Mistake: Skipping the rest for the chicken. Slicing into the chicken straight from the oven will cause all those precious, flavorful juices to run out onto the plate instead of staying in the meat. A 5-minute rest makes all the difference.
Expert Tips
- Tip: Brown the butter in a light-colored pan. It’s much easier to track the color change from yellow to golden amber against a light background, preventing you from accidentally burning it.
- Tip: Use a splatter screen. Frying chicken skin in butter can get a little messy. A splatter screen will save you from a stovetop cleanup nightmare while still allowing steam to escape.
- Tip: Add a splash of white wine. After you’ve removed the chicken, deglaze the pan with a quarter cup of dry white wine before adding the lemon juice. It adds a wonderful layer of acidity and complexity to the sauce.
- Tip: Infuse the butter with sage. For a classic twist, add a few fresh sage leaves to the butter as it browns. They’ll become crispy and make a beautiful, flavorful garnish.
FAQs
Can I use boneless, skinless chicken thighs?
You absolutely can, but the final dish will be different. You’ll miss out on the incredible textural contrast of the crispy skin, and the cooking time will be significantly shorter. If you do use boneless thighs, sear them for just 3-4 minutes per side and check for doneness earlier, as they can dry out more quickly without the bone and skin protecting them.
My butter burned! What do I do?
Oh no, it happens to the best of us! Unfortunately, once butter is burnt, it tastes bitter and there’s no saving it. You’ll have to wipe out the pan, let it cool slightly, and start over with a fresh batch. The trick is to keep the heat at a steady medium and remove it the moment you see brown specks and smell that nutty aroma.
Can I make this ahead of time?
You can prep components ahead to save time. You can brown the butter and keep it in a jar in the fridge for up to a week. You can also season the chicken and keep it covered in the fridge a day in advance. For the best texture, however, I recommend cooking it fresh and serving immediately.
What’s the best way to store and reheat leftovers?
Store any leftover chicken and sauce in an airtight container in the fridge for up to 3 days. To reheat, place the chicken on a baking sheet in a 350°F (175°C) oven for about 10-15 minutes until warmed through. Avoid the microwave, as it will make the skin soggy. Gently warm the sauce in a small saucepan.
Can I use dried thyme instead of fresh?
You can, but fresh is highly preferred for this recipe. The delicate, floral notes of fresh thyme complement the brown butter beautifully. If you must use dried, use only one-third the amount (so about ½ tsp), as dried herbs are much more potent. Add it when you season the raw chicken, not to the butter, as it can burn easily.


Brown Butter Chicken Thighs
Make restaurant-worthy Brown Butter Chicken Thighs at home with this easy recipe. Crispy skin, juicy meat & nutty sauce in 40 mins. Get the recipe now!
Ingredients
For the Ingredients
-
4 bone-in, skin-on chicken thighs
-
115 g unsalted butter
-
3 cloves garlic (minced)
-
2 sprigs fresh thyme
-
1 lemon (juiced)
-
1 tsp kosher salt
-
1/2 tsp freshly cracked black pepper
-
1/4 tsp smoked paprika (optional, for a hint of warmth)
-
2 tbsp fresh parsley (chopped, for garnish)
Instructions
-
Start by prepping your chicken. Use paper towels to pat the chicken thighs completely dry on both sides. This is non-negotiable for crispy skin! Season both sides generously with the kosher salt, black pepper, and the smoked paprika if you’re using it. Let the chicken sit at room temperature for about 15 minutes while you preheat your oven to 400°F (200°C). This brief rest helps the chicken cook more evenly.01
-
Now, let’s make the star of the show: the brown butter. Place your skillet over medium heat and add the unsalted butter. Let it melt, then swirl the pan occasionally. You’ll notice it will foam up, then the foam will subside. Keep a close eye—you’ll see little brown specks (the milk solids) forming at the bottom and it will smell wonderfully nutty. This whole process should take about 3-5 minutes. The second it smells nutty and looks amber-colored, immediately pour it into a heatproof bowl to stop the cooking. We’ll use this pan again, so no need to wash it!02
-
Return the skillet to medium-high heat. Add back about a tablespoon of the browned butter. Carefully place the chicken thighs in the pan, skin-side down. You should hear a confident sizzle. Resist the urge to move them! Let them cook undisturbed for 6-8 minutes, until the skin is deeply golden brown and crispy. Use your tongs to peek—if it releases easily, it’s ready to flip.03
-
Flip the chicken so it’s skin-side up. Add the minced garlic and thyme sprigs to the pan around the chicken. The residual fat will gently cook the garlic, infusing the entire dish. Now, carefully pour the remaining brown butter over the top of each chicken thigh, letting it cascade down into the pan. This bastes the chicken and creates our incredible sauce base.04
-
Transfer the entire skillet to your preheated oven. Roast for 15-18 minutes, or until the internal temperature of the chicken reaches 165°F (74°C) and the juices run clear. The high heat will finish cooking the chicken through while keeping the skin ultra-crispy.05
-
Carefully remove the hot skillet from the oven—remember that handle is scorching! Place it back on the stovetop. Transfer the cooked chicken thighs to a plate to rest. To the glorious, buttery juices left in the pan, add the fresh lemon juice. Use a whisk to scrape up all the browned bits from the bottom of the pan—that’s pure flavor! Let the sauce simmer for just a minute to meld together.06
-
To serve, place a chicken thigh on each plate. Spoon the warm brown butter pan sauce over the top, making sure to include some of the toasted garlic bits. Finish with a sprinkle of fresh, chopped parsley for a burst of color and freshness. Dive in while it’s hot!07
Not what you're looking for?


