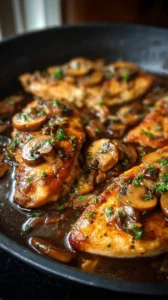
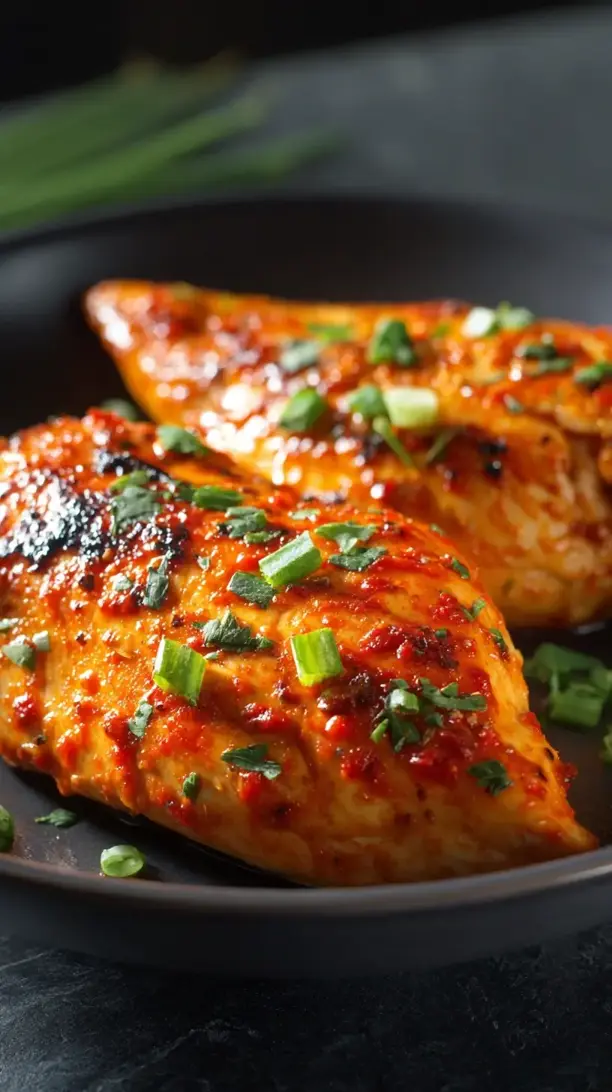
This Buffalo Chicken Breast recipe delivers spicy, tangy flavor in a healthier, weeknight-friendly package. We use a simple spice rub and a glossy buttery hot sauce glaze for juicy, perfectly cooked chicken. It’s a crowd-pleasing buffalo chicken breast that’s anything but boring.
Love Buffalo Chicken Breast? So do we! If you're into Chicken Breast Recipes or curious about Appetizers & Snacks, you'll find plenty of inspiration below.


Why You’ll Love This Buffalo Chicken Breast
- Crowd-pleasing flavor: Classic Buffalo taste everyone recognizes and loves.
- Quick & simple: Restaurant-worthy main course in under 30 minutes.
- Healthier than takeout: Baked, not fried, but just as crispy and saucy.
- Endlessly versatile: Perfect for salads, wraps, or classic sides.
Ingredients & Tools
- 2 large boneless, skinless chicken breasts (about 1.5 lbs total)
- 1 tbsp olive oil
- 1 tsp garlic powder
- 1 tsp smoked paprika
- 1/2 tsp onion powder
- 1/2 tsp salt
- 1/4 tsp black pepper
- 1/2 cup Frank’s RedHot Original Cayenne Pepper Sauce
- 2 tbsp unsalted butter
- 1 tbsp honey or maple syrup (optional, for a touch of sweetness)
- 1 tsp Worcestershire sauce
Tools: A large, oven-safe skillet (cast iron is perfect), small saucepan, tongs, instant-read thermometer.
Notes: Don’t skip the smoked paprika—it adds smoky depth. Frank’s is the classic for its vinegar-forward profile. Honey rounds out the heat for a more complex sauce.
Nutrition (per serving)
| Calories: | 290 kcal |
| Protein: | 35 g |
| Fat: | 14 g |
| Carbs: | 5 g |
| Fiber: | 0.5 g |
Serves: 2 | Prep Time: 10 minutes | Cook Time: 20 minutes | Total Time: 30 minutes
Before You Start: Tips & Ingredient Notes
- Pound your chicken breasts. This is the single best trick for perfectly cooked chicken. Place them between plastic wrap and gently pound the thicker end until they’re an even ¾-inch thickness. This ensures they cook through at the same rate without drying out.
- Why an oven-safe skillet? Starting the chicken on the stovetop gives it a gorgeous, flavorful sear. Finishing it in the same skillet in the oven promotes gentle, even cooking from all sides, resulting in incredibly juicy meat.
- Don’t shy away from the fat. The butter in the sauce isn’t just for richness; it’s crucial for emulsification. It helps the sauce become glossy and cling to the chicken instead of sliding right off. A little goes a long way!
- Get your sauce ready early. Have your Buffalo sauce mixture simmering and ready to go before the chicken even goes in the oven. This way, you can glaze the hot chicken immediately when it comes out, and the sauce will soak in beautifully.
How to Make Buffalo Chicken Breast
Step 1: First, prep your chicken. If your breasts are very plump, place them one at a time between two sheets of plastic wrap and gently pound the thicker end with a rolling pin or meat mallet until they’re a uniform thickness—about ¾-inch is perfect. Pat them completely dry with paper towels; this is non-negotiable for getting a good sear. Now, drizzle them with the olive oil and rub it all over. In a small bowl, mix together the garlic powder, smoked paprika, onion powder, salt, and pepper. Sprinkle this spice rub evenly over both sides of the chicken, massaging it in gently. You’ll notice the color transform immediately with that beautiful red hue from the paprika.
Step 2: Preheat your oven to 400°F (200°C). Now, place your oven-safe skillet over medium-high heat and let it get properly hot—you should see a slight shimmer in the pan. Carefully place the seasoned chicken breasts in the hot, dry skillet. You should hear a confident sizzle the moment they touch the surface. Let them cook undisturbed for about 5-6 minutes, until a golden-brown crust has formed on the bottom. Don’t be tempted to move them around; letting them sear is key for flavor.
Step 3: While the chicken sears, make your signature Buffalo glaze. In your small saucepan, combine the Frank’s RedHot sauce, butter, honey (if using), and Worcestershire sauce. Warm it over low heat, stirring occasionally, until the butter is fully melted and the mixture is smooth and unified. Give it a little taste—you can adjust the heat or sweetness here if you like. Keep it on the lowest setting to stay warm.
Step 4: Once the first side of the chicken is beautifully seared, use tongs to flip each breast. Immediately transfer the entire skillet to your preheated oven. This is where the magic happens. The oven will cook the chicken through gently and evenly from all sides. Bake for 10-15 minutes, or until the internal temperature at the thickest part reads 165°F (74°C) on an instant-read thermometer.
Step 5: Carefully remove the hot skillet from the oven—remember, the handle will be extremely hot! Place it on a trivet or your stovetop. Now, pour about half of your warm Buffalo sauce right over the sizzling chicken breasts. Use a spoon or brush to coat them evenly. Let the chicken rest in the skillet for 5 minutes. This rest is crucial; it allows the juices to redistribute throughout the meat, ensuring every single bite is moist and tender. The sauce will continue to soak in during this time.
Step 6: To serve, you can either slice the chicken breasts and drizzle them with the remaining sauce from the pan and the extra sauce you held back, or serve them whole with the extra sauce on the side for dipping. The final product should be glistening, fragrant, and impossibly inviting.
Storage & Freshness Guide
- Fridge: Store in an airtight container for up to 3 days.
- Freezer: Freeze cooked chicken (without extra sauce) for up to 2 months.
- Reviving: Reheat gently in a 300°F oven or microwave with a splash of water or sauce.
Serving Suggestions
Complementary Dishes
- Crispy Roasted Potatoes — Their salty, starchy exterior is the perfect neutral canvas to balance the spicy, tangy chicken.
- Classic Creamy Coleslaw — The cool, crunchy, and slightly sweet slaw provides a refreshing contrast that cuts through the heat beautifully.
- Simple Celery Sticks & Carrot Sticks — It’s the traditional wing accompaniment for a reason! Their fresh, watery crunch is a perfect palate cleanser.
Drinks
- A Very Cold Lager — The crisp, clean, and slightly bitter notes of a good lager are the ultimate fire extinguisher for spicy food.
- Sparkling Water with Lemon — The bubbles and citrus help reset your taste buds between bites, making each mouthful of chicken taste as vibrant as the first.
- A Creamy Milkshake — If you’re going all-in, the rich, cold, dairy-based drink is famously effective at coating the mouth and neutralizing capsaicin.
Something Sweet
- Warm Brownie Sundaes — The rich, dark chocolate and cold ice cream are a decadent and soothing finish after a spicy meal.
- Chilled Fruit Salad — The natural sweetness and high water content of melon and berries are incredibly refreshing and light.
- Simple Vanilla Bean Panna Cotta — Its delicate, creamy, and cool texture is the perfect elegant counterpoint to the bold, fiery main course.
Top Mistakes to Avoid
- Mistake: Skipping the pound-and


Buffalo Chicken Breast
Make juicy, flavorful Buffalo Chicken Breast at home in 30 minutes! This easy, baked recipe is healthier than takeout. Get the simple recipe now!
Ingredients
For the Chicken and Spice Rub
-
2 large boneless, skinless chicken breasts (about 1.5 lbs total)
-
1 tbsp olive oil
-
1 tsp garlic powder
-
1 tsp smoked paprika
-
1/2 tsp onion powder
-
1/2 tsp salt
-
1/4 tsp black pepper
For the Buffalo Glaze
-
1/2 cup Frank's RedHot Original Cayenne Pepper Sauce
-
2 tbsp unsalted butter
-
1 tbsp honey or maple syrup (optional, for a touch of sweetness)
-
1 tsp Worcestershire sauce
Instructions
-
First, prep your chicken. If your breasts are very plump, place them one at a time between two sheets of plastic wrap and gently pound the thicker end with a rolling pin or meat mallet until they’re a uniform thickness—about ¾-inch is perfect. Pat them completely dry with paper towels; this is non-negotiable for getting a good sear. Now, drizzle them with the olive oil and rub it all over. In a small bowl, mix together the garlic powder, smoked paprika, onion powder, salt, and pepper. Sprinkle this spice rub evenly over both sides of the chicken, massaging it in gently. You’ll notice the color transform immediately with that beautiful red hue from the paprika.01
-
Preheat your oven to 400°F (200°C). Now, place your oven-safe skillet over medium-high heat and let it get properly hot—you should see a slight shimmer in the pan. Carefully place the seasoned chicken breasts in the hot, dry skillet. You should hear a confident sizzle the moment they touch the surface. Let them cook undisturbed for about 5-6 minutes, until a golden-brown crust has formed on the bottom. Don’t be tempted to move them around; letting them sear is key for flavor.02
-
While the chicken sears, make your signature Buffalo glaze. In your small saucepan, combine the Frank's RedHot sauce, butter, honey (if using), and Worcestershire sauce. Warm it over low heat, stirring occasionally, until the butter is fully melted and the mixture is smooth and unified. Give it a little taste—you can adjust the heat or sweetness here if you like. Keep it on the lowest setting to stay warm.03
-
Once the first side of the chicken is beautifully seared, use tongs to flip each breast. Immediately transfer the entire skillet to your preheated oven. This is where the magic happens. The oven will cook the chicken through gently and evenly from all sides. Bake for 10-15 minutes, or until the internal temperature at the thickest part reads 165°F (74°C) on an instant-read thermometer.04
-
Carefully remove the hot skillet from the oven—remember, the handle will be extremely hot! Place it on a trivet or your stovetop. Now, pour about half of your warm Buffalo sauce right over the sizzling chicken breasts. Use a spoon or brush to coat them evenly. Let the chicken rest in the skillet for 5 minutes. This rest is crucial; it allows the juices to redistribute throughout the meat, ensuring every single bite is moist and tender. The sauce will continue to soak in during this time.05
-
To serve, you can either slice the chicken breasts and drizzle them with the remaining sauce from the pan and the extra sauce you held back, or serve them whole with the extra sauce on the side for dipping. The final product should be glistening, fragrant, and impossibly inviting.06
Not what you're looking for?


