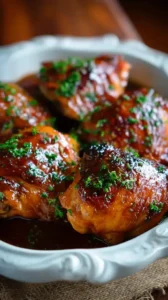
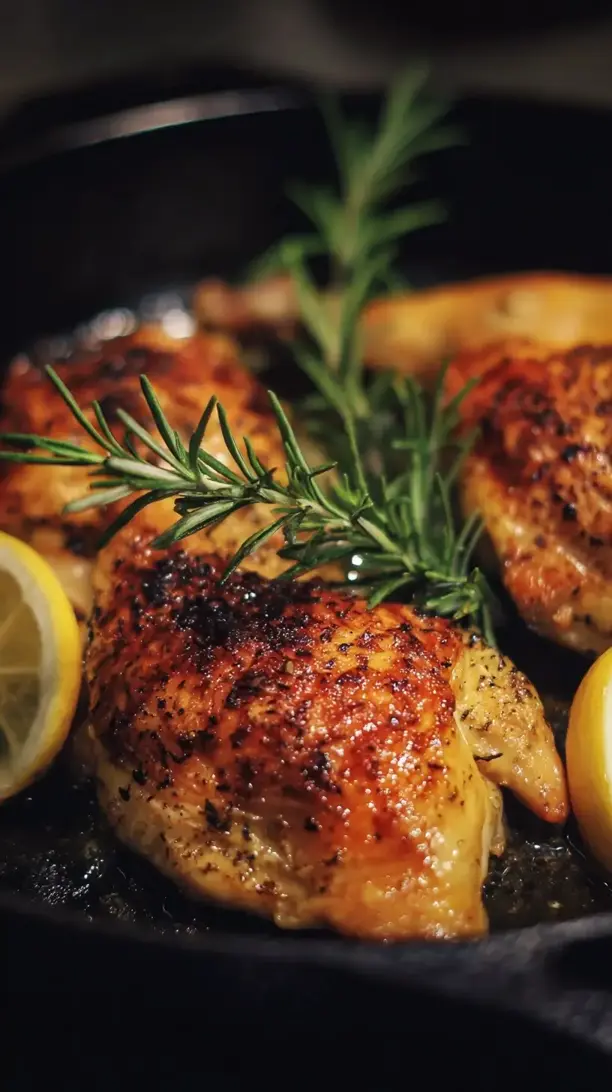
Cooking Cast Iron Chicken in a hot skillet delivers incredible sear and juicy, flavorful meat. This technique uses a spatchcocked whole chicken with an herb-garlic rub under the skin for maximum flavor. It’s a straightforward, rewarding method perfect for any dinner.
Looking for Cast Iron Chicken inspiration? You'll love what we have! Explore more Chicken Breast Recipes recipes or discover our Chicken Thigh Recipes favorites.


Why You’ll Love This Cast Iron Chicken
- Crispy Skin: The cast iron creates golden, shatteringly crisp skin from edge to edge.
- Juicy Meat: Spatchcocking ensures even cooking and perfectly moist breast meat.
- One-Pan Wonder: Everything cooks in one skillet for easy cleanup and built-in pan sauce.
- Deep Flavor: Rubbing herb butter under the skin infuses every bite with savory goodness.
Ingredients & Tools
- 1 whole chicken (about 1.5 kg / 3-4 lbs)
- 3 tbsp unsalted butter, softened
- 4 cloves garlic, minced
- 1 tbsp fresh rosemary, finely chopped
- 1 tbsp fresh thyme leaves
- 1 tsp fine sea salt
- 1/2 tsp freshly ground black pepper
- 1 lemon, halved
- 1 small onion, roughly chopped
Tools: A well-seasoned 12-inch cast iron skillet, kitchen shears, and an instant-read thermometer are essential.
Notes: Fresh herbs are recommended for brighter flavor. Softened butter is key for easy spreading under the skin.
Nutrition (per serving)
| Calories: | 320 kcal |
| Protein: | 35 g |
| Fat: | 19 g |
| Carbs: | 2 g |
| Fiber: | 0.5 g |
Serves: 4 | Prep Time: 20 minutes | Cook Time: 45 minutes | Total Time: 1 hour 5 minutes
Before You Start: Tips & Ingredient Notes
- Dry the Skin Thoroughly. This is the single most important step for crispy skin. Pat the chicken skin completely dry inside and out with paper towels. Any moisture will steam the skin instead of letting it crisp up beautifully.
- Why Spatchcock? Butterflying the chicken by removing the backbone allows it to lie flat. This exposes more surface area to the hot pan, leading to that incredible skin, and ensures the thigh and breast cook at the same rate. It’s a game-changer.
- Let the Chicken Come to Room Temp. Take the chicken out of the fridge about 30 minutes before cooking. A cold chicken going into a hot pan will seize up and cook unevenly, while a room-temp bird will cook more gently and evenly throughout.
- Don’t Skip the Aromatics. That chopped onion and halved lemon in the pan aren’t just for show. As the chicken roasts, they release their juices and steam, perfuming the meat from below and preventing the drippings from burning too quickly.
How to Make Cast Iron Chicken
Step 1: Prep the Chicken. Place your chicken breast-side down on a cutting board. Using kitchen shears, cut along one side of the backbone, then the other, and remove it entirely (you can save it for stock!). Flip the chicken over and press down firmly on the breastbone until you hear a slight crack and the bird lies flat. Now, pat it completely dry with paper towels—this is non-negotiable for crispiness.
Step 2: Make the Herb Butter. In a small bowl, mix the softened butter, minced garlic, chopped rosemary, thyme, salt, and pepper. Mash it all together until it forms a fragrant, homogenous paste. The smell at this point is just… incredible. This is the flavor bomb that’s going to make your chicken legendary.
Step 3: Get Under the Skin. This is the fun part. Gently slide your fingers under the skin of the chicken breast and thighs, loosening it from the meat. Be careful not to tear the skin. Take spoonfuls of the herb butter and spread it evenly underneath the skin, directly onto the meat. Massage the skin from the outside to distribute the butter as much as possible. Rub any remaining butter on the outside of the skin and legs.
Step 4: Preheat and Arrange. Place your cast iron skillet in the oven and preheat it to 230°C (450°F). You want that skillet screaming hot. While it heats, scatter the chopped onion in the bottom of a separate plate or board and place the spatchcocked chicken on top, skin-side up. This little onion platform makes transferring the hot chicken into the hot pan much safer.
Step 5: The Sizzling Start. Very carefully, using oven mitts, remove the hot skillet from the oven and place it on the stove. Drizzle in a tiny bit of oil. Now, lift the chicken (with the onions stuck to the bottom) and place it skin-side down into the hot skillet. It should sizzle aggressively—that’s the sound of crispness being born. Tuck the lemon halves around the sides.
Step 6: Sear and Roast. Let the chicken sear on the stovetop over medium-high heat for about 5 minutes. This initial blast of direct heat will render the fat and set that gorgeous golden color. Then, carefully transfer the entire skillet to the preheated oven to roast for 35-40 minutes.
Step 7: Check for Doneness. The chicken is done when the skin is deep golden brown and an instant-read thermometer inserted into the thickest part of the thigh (without touching bone) reads 74°C (165°F). The juices should also run clear. You’ll notice the aroma in your kitchen is absolutely intoxicating at this point.
Step 8: Rest is Best. This might be the hardest step, but it’s crucial. Transfer the chicken to a cutting board, tent it loosely with foil, and let it rest for a full 10-15 minutes. This allows the juices to redistribute throughout the meat, ensuring every single slice is moist and flavorful.
Storage & Freshness Guide
- Fridge: Store leftover chicken in an airtight container for up to 3–4 days.
- Freezer: Freeze portions in freezer bags for up to 3 months. Thaw in fridge before reheating.
- Reviving: Reheat in a 350°F oven until warm to restore crispness; avoid microwaving.
Serving Suggestions
Complementary Dishes
- Garlic Mashed Potatoes — The ultimate comfort food pairing. The creamy, fluffy potatoes are the perfect vehicle for sopping up all the delicious juices from the chicken pan.
- Simple Roasted Asparagus — You can even roast them in the same oven during the last 15 minutes of the chicken’s cook time. Their slight bitterness and tender-crisp texture balance the rich chicken beautifully.
- Crusty Bread or Rolls — Non-negotiable for wiping the skillet clean of every last bit of herby, buttery goodness. It’s the cook’s treat.
Drinks
- A Light-Bodied Red Wine — Like a Pinot Noir or Gamay. Their bright acidity and red fruit notes cut through the richness of the chicken without overpowering the delicate herbs.
- A Crisp Chardonnay — An unoaked or lightly oaked Chardonnay complements the buttery notes in the dish while its acidity cleanses the palate.
- Sparkling Water with Lemon — For a non-alcoholic option, the bubbles and citrus are incredibly refreshing and reset your taste buds between bites.
Something Sweet
- Lemon Sorbet — The bright, clean, and tart finish of a lemon sorbet is the perfect palate-cleanser after a rich, savory meal. It feels light and refreshing.
- Simple Berry Crumble — The warm, jammy berries and buttery oat topping continue the homey, comforting vibe of the meal without being too heavy.
- Dark Chocolate Pots de Crème — For a truly decadent end, these rich, silky chocolate custards are surprisingly easy to make ahead and feel incredibly special.
Top Mistakes to Avoid
- Mistake: Not Drying the Chicken Skin. I’ve messed this up before too, and you end up with rubbery, pale skin instead of that golden crackle. Moisture is the enemy of crispness, so pat, pat, pat until it’s bone-dry.
- Mistake: Using a Cold Skillet. If you don’t preheat your cast iron, you’ll miss out on that initial explosive sear that locks in juices and creates texture. A hot pan is non-negotiable for the perfect start.
- Mistake: Overcrowding the Pan. We’re using a whole chicken here, so a 12-inch skillet is the minimum size. If the chicken is crammed in, it will steam instead of roast and the skin will be soggy.
- Mistake: Skipping the Resting Time. I know it’s tempting to dig right in, but if you cut into the chicken straight from the oven, all those precious juices will run out onto the cutting board, leaving you with drier meat. Be patient!
Expert Tips
- Tip: Use the Backbone for Stock. Don’t throw away that backbone you cut out! Toss it in a freezer bag with other veggie scraps. Once you have a bagful, you can make an incredibly flavorful homemade chicken stock.
- Tip: Let the Pan Do the Work. When you first place the chicken in the hot skillet, resist the urge to move it or peek for the first 5 minutes. This allows a proper crust to form. If you lift it too early, the skin might stick and tear.
- Tip: Make a Quick Pan Sauce. After removing the chicken, place the skillet back on the stove over medium heat. Add a splash of white wine or chicken broth, scrape up all the browned bits, and let it reduce slightly. Stir in a knob of cold butter at the end for a glossy, incredible sauce.
- Tip: Brine for Extra Insurance. For the absolute juiciest chicken imaginable, brine it in a solution of salt and water for a few hours before you start the recipe. This helps the meat retain even more moisture during the high-heat cooking.
FAQs
Can I use chicken pieces instead of a whole chicken?
Absolutely! This method works wonderfully with bone-in, skin-on chicken thighs or drumsticks. Just reduce the oven time significantly—you’ll only need to roast them for about 20-25 minutes after the initial sear. The key is still that hot cast iron start and the herb butter under the skin for maximum flavor and crispiness.
My skin isn’t getting crispy. What did I do wrong?
The most common culprit is moisture on the skin. Next time, be religious about patting it dry. Also, ensure your skillet is properly preheated—you should hear a loud, immediate sizzle when the chicken hits the pan. Finally, don’t baste the chicken during cooking; you’ll just be adding moisture back onto the skin you’re trying to crisp up.
Can I make this ahead of time?
You can do the prep ahead! You can spatchcock the chicken and make the herb butter up to a day in advance. Keep the chicken and butter separate in the fridge. About 30 minutes before cooking, spread the butter under the skin and let the chicken come to room temperature. This makes for a very quick and impressive weeknight meal.
Do I have to use fresh herbs?
Fresh herbs are highly recommended for their vibrant flavor, but in a pinch, you can use dried. The general rule is 1 teaspoon of dried herbs for every 1 tablespoon of fresh. So, you’d use 1 tsp dried rosemary and 1 tsp dried thyme. The flavor will be earthier but still delicious.
How do I clean my cast iron skillet after this?
Let the pan cool down until it’s warm, but not scorching hot. Pour in some hot water and use a stiff brush or a chainmail scrubber to loosen the stuck-on bits. Avoid using soap, as it can strip the pan’s seasoning. Dry it thoroughly over low heat on the stovetop, then wipe the inside with a very thin layer of oil to maintain its non-stick surface.


Cast Iron Chicken
Learn how to make perfect Cast Iron Chicken with crispy skin and juicy meat. This one-pan recipe is foolproof for any dinner. Get the easy recipe now!
Ingredients
For the Ingredients
-
1 whole chicken (about 1.5 kg / 3-4 lbs)
-
3 tbsp unsalted butter (softened)
-
4 cloves garlic (minced)
-
1 tbsp fresh rosemary (finely chopped)
-
1 tbsp fresh thyme leaves
-
1 tsp fine sea salt
-
1/2 tsp freshly ground black pepper
-
1 lemon (halved)
-
1 small onion (roughly chopped)
Instructions
-
Place your chicken breast-side down on a cutting board. Using kitchen shears, cut along one side of the backbone, then the other, and remove it entirely (you can save it for stock!). Flip the chicken over and press down firmly on the breastbone until you hear a slight crack and the bird lies flat. Now, pat it completely dry with paper towels—this is non-negotiable for crispiness.01
-
In a small bowl, mix the softened butter, minced garlic, chopped rosemary, thyme, salt, and pepper. Mash it all together until it forms a fragrant, homogenous paste. The smell at this point is just… incredible. This is the flavor bomb that’s going to make your chicken legendary.02
-
Gently slide your fingers under the skin of the chicken breast and thighs, loosening it from the meat. Be careful not to tear the skin. Take spoonfuls of the herb butter and spread it evenly underneath the skin, directly onto the meat. Massage the skin from the outside to distribute the butter as much as possible. Rub any remaining butter on the outside of the skin and legs.03
-
Place your cast iron skillet in the oven and preheat it to 230°C (450°F). You want that skillet screaming hot. While it heats, scatter the chopped onion in the bottom of a separate plate or board and place the spatchcocked chicken on top, skin-side up. This little onion platform makes transferring the hot chicken into the hot pan much safer.04
-
Very carefully, using oven mitts, remove the hot skillet from the oven and place it on the stove. Drizzle in a tiny bit of oil. Now, lift the chicken (with the onions stuck to the bottom) and place it skin-side down into the hot skillet. It should sizzle aggressively—that’s the sound of crispness being born. Tuck the lemon halves around the sides.05
-
Let the chicken sear on the stovetop over medium-high heat for about 5 minutes. This initial blast of direct heat will render the fat and set that gorgeous golden color. Then, carefully transfer the entire skillet to the preheated oven to roast for 35-40 minutes.06
-
The chicken is done when the skin is deep golden brown and an instant-read thermometer inserted into the thickest part of the thigh (without touching bone) reads 74°C (165°F). The juices should also run clear. You’ll notice the aroma in your kitchen is absolutely intoxicating at this point.07
-
Transfer the chicken to a cutting board, tent it loosely with foil, and let it rest for a full 10-15 minutes. This allows the juices to redistribute throughout the meat, ensuring every single slice is moist and flavorful.08
Not what you're looking for?


