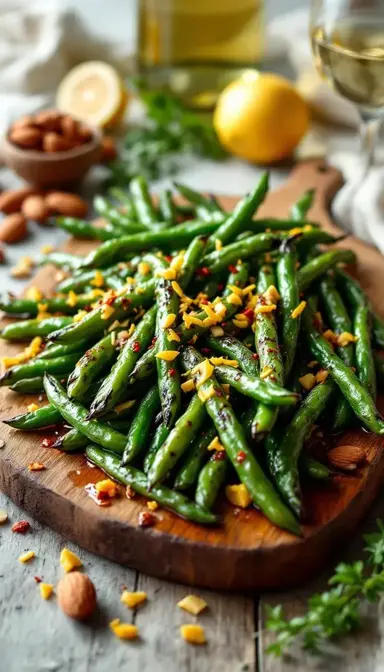
There’s something magical about green beans when they hit a scorching hot pan. That sizzle, the deep char, the way they snap with just the right amount of bite—it’s a side dish that steals the show every time. I’ve spent years perfecting this method, and today, I’m sharing all my secrets so you can nail restaurant-quality charred green beans at home.
Love Charred Green Beans? So do we! If you're into Sides Recipes or curious about Breakfast & Brunch, you'll find plenty of inspiration below.


Essential Ingredients & Tools
Ingredients
- 1 lb fresh green beans (look for firm, bright green pods—no floppy beans allowed!)
- 2 tbsp olive oil (or any neutral oil like avocado or grapeseed)
- ½ tsp kosher salt (or sea salt; table salt is finer, so use slightly less)
- ¼ tsp black pepper (freshly cracked for that extra punch)
- 2 minced garlic cloves (because everything’s better with garlic)
- 1 tsp lemon zest (optional, but it adds a bright kick)
- ½ tsp red pepper flakes (or substitute with smoked paprika for milder heat)
- 1 tbsp browned butter (or regular butter for a simpler finish)
Tools
- A heavy-duty cast-iron skillet (a stainless steel pan or even a non-stick skillet works in a pinch)
- A sharp knife (or kitchen shears for quick trimming)
- A kitchen towel (paper towels work too, but they may leave lint)
- Tongs (a fork or spatula can substitute, but tongs give better control)
Serves: 4 | Prep: 10 min | Cook: 10 min
How to Make Charred Green Beans
1. Trim & Dry Like Your Life Depends on It
First, line up those green beans and give them a quick haircut—slice off the tough stem ends. (Nobody wants to chew through stringy bits.) Rinse them under cold water to wash away any dirt, then pat them bone-dry with a kitchen towel. And I mean dry. Any lingering water will steam the beans instead of letting them char. For extra insurance, spread them on a wire rack and let them air-dry in the fridge for 20–30 minutes. Crisp beans start here.
Why it matters: Moisture is the enemy of charring. Even a little water lowers the pan’s temperature, causing the beans to steam instead of sear. The air-drying step ensures maximum crispness by evaporating residual moisture.
2. Season with Purpose
Toss those dried beans in a bowl with 2 tbsp olive oil—enough to coat every inch without drowning them. The oil isn’t just for non-stick purposes; it helps conduct heat evenly so you get that gorgeous, blistered crust. Sprinkle with ½ tsp kosher salt (it draws out natural sugars for better browning) and ¼ tsp black pepper. Then, add 2 minced garlic cloves—they’ll mellow into something sweet and nutty under high heat. Feeling fancy? Throw in 1 tsp lemon zest and ½ tsp red pepper flakes for a flavor boost.
Why it matters: Salt pulls out moisture through osmosis, creating a drier surface for better browning. Oil acts as a heat conductor, ensuring even charring.
3. Get That Pan Screaming Hot
Heat a dry cast-iron skillet over high heat for 3–5 minutes until it’s smoking. And I mean smoking. This isn’t the time for hesitation—charring is all about high heat and confidence. If you’re using the oven, crank it to 450°F and preheat a sheet pan inside. Test the pan’s readiness by flicking a drop of water onto it—if it evaporates instantly, you’re golden.
Why it matters: A scorching-hot pan triggers the Maillard reaction, creating complex, savory flavors. A lukewarm pan will steam the beans instead of charring them.
4. Char with Conviction
Lay the beans in a single, uncrowded layer—no overlapping, or they’ll steam instead of sear. Let them sit undisturbed for 2–3 minutes until the bottoms are blistered and blackened. (Resist the urge to poke at them! Patience is key.) Flip with tongs and repeat on the other side. If you’re grilling, a perforated pan keeps them from falling through the grates while still letting smoke work its magic.
Why it matters: Overcrowding lowers the pan’s temperature and traps steam, leading to soggy beans. Letting them sit undisturbed ensures a proper sear.
5. Finish with Flair
The second they’re charred but still crisp-tender (they should bend slightly without snapping), transfer them to a plate. While they’re still piping hot, hit them with 1 tsp lemon zest and ½ tsp red pepper flakes—the heat wakes up their aromas. For the ultimate indulgence, drizzle with 1 tbsp browned butter (it adds a deep, nutty richness) or a pinch of flaky sea salt. Serve immediately—this is one dish that doesn’t wait.
Why it matters: Residual heat intensifies the flavors of added seasonings. Serving right away preserves the contrast between the charred exterior and tender interior.
Pro Technique
The Dry Bean Rule
Charring is all about zero moisture. After washing, pat them dry twice—once with a towel, then air-dry on a rack. For extra crispness, toss them with oil and salt 10 minutes before cooking; the salt pulls out excess water, ensuring maximum crunch.
The Perfect Char
True char isn’t burnt—it’s controlled blistering. Look for blackened spots with a smoky aroma, not all-over blackness. If your pan smokes too much, lower the heat slightly—burnt oil tastes bitter.
Blanching for Tender-Crisp Beans
If you prefer a softer bite, blanch the beans first: boil for 1 minute, then shock in ice water. This pre-cooks them so charring happens faster without overcooking.
Acid & Herbs for Brightness
A splash of sherry vinegar or lemon juice after cooking balances the richness. Fresh herbs (like tarragon or parsley) should go on at the end to keep their flavor vibrant.
Perfect Pairings
Complementary Dishes
- Grilled salmon—The beans’ smokiness mirrors the fish’s charred crust, while their acidity cuts through the salmon’s richness.
- Herbed couscous—Fluffy grains soak up all those savory pan juices, creating a textural contrast.
- Roasted chicken thighs—The beans’ crispness complements the juicy, tender meat.
Drinks
- Sauvignon Blanc—Its citrus notes amplify the lemon zest in the beans.
- Smoky Mezcal—Echoes the charred flavors for a bold pairing.
- Sparkling Water with Lime—A refreshing, non-alcoholic option that cleanses the palate.
Something Sweet
- Lemon Sorbet—Cleanses the palate after the dish’s smoky intensity.
- Honey-Drizzled Figs—Their natural sweetness contrasts the beans’ savoriness.
- Dark Chocolate Truffles—A rich, bittersweet finish to the meal.
Storage & Freshness Guide
- Leftovers? Store in an airtight container for up to 3 days. Reheat in a dry skillet over medium heat for 2–3 minutes to restore crispness—microwaving turns them soggy.
- Raw Beans Keep unwashed in a perforated bag in the fridge for up to 5 days.
Chef’s Wisdom
Charred green beans are proof that the simplest ingredients can become extraordinary with the right technique. Once you master that blistering-hot pan and the art of restraint (no stirring too soon!), you’ll never look at green beans the same way again. Happy charring!


Charred Green Beans: The Ultimate Guide to Crispy, Smoky Perfection
Learn how to make perfectly Charred Green Beans with my easy, pro-level method. Crispy, smoky, and full of flavor—get the recipe now!
Ingredients
Main
-
1 lb fresh green beans
-
2 tbsp olive oil
-
½ tsp kosher salt
-
¼ tsp black pepper
-
2 minced garlic cloves
-
1 tsp lemon zest (optional)
-
½ tsp red pepper flakes (optional)
-
1 tbsp browned butter (optional)
Instructions
-
Trim the stem ends of the green beans and rinse under cold water. Pat dry thoroughly.01
-
Toss the beans with olive oil, salt, pepper, and minced garlic.02
-
Heat a dry cast-iron skillet over high heat until smoking.03
-
Add the beans in a single layer and cook undisturbed for 2–3 minutes until charred.04
-
Flip and cook for another 2–3 minutes.05
-
Transfer to a plate and finish with lemon zest, red pepper flakes, or browned butter.06
Not what you're looking for?