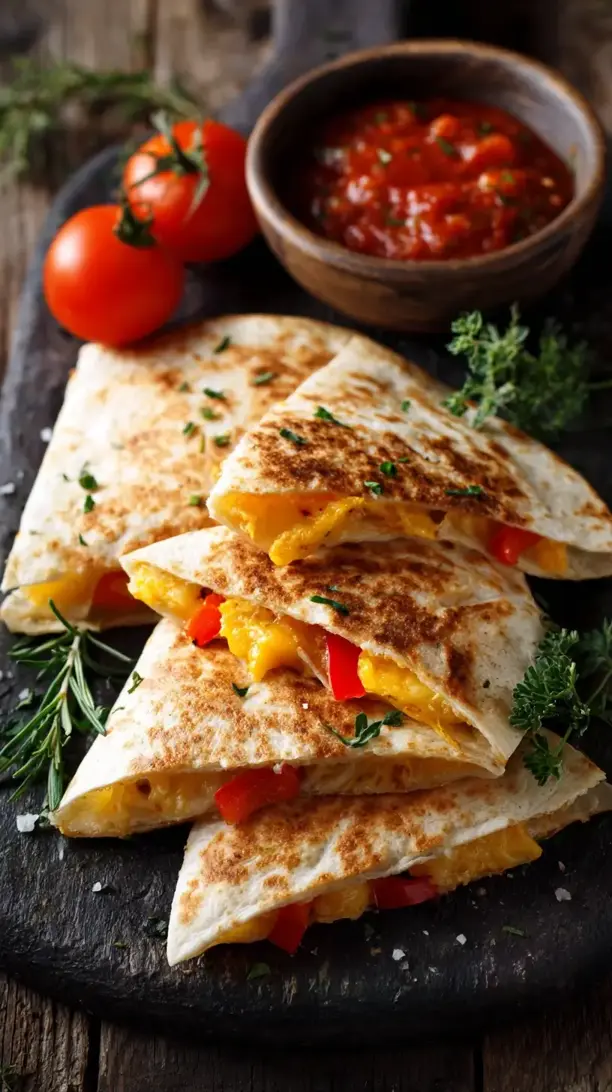
These Cheese Quesadilla Triangles are the ultimate quick and satisfying comfort food. With a crispy exterior and gloriously melty cheese filling, they transform simple ingredients into a crowd-pleasing snack or meal. You can have these delicious Cheese Quesadilla Triangles ready to dip and devour in under 20 minutes.
Love Cheese Quesadilla Triangles? So do we! If you're into Savory Snacks or curious about Crockpot Recipes, you'll find plenty of inspiration below.


Why You’ll Love This Cheese Quesadilla Triangles
Maximum Crisp & Cheese: Toasted tortilla and a generous cheese filling create incredible texture and stretch.
Endlessly Customizable: A perfect canvas for your favorite add-ins like chicken, beans, or veggies.
Seriously Fast: Ready from fridge to plate in under 15 minutes for sudden hunger.
Perfect for Dipping: The triangular shape is ideal for scooping up salsa, guac, or sour cream.
Ingredients & Tools
- 4 large (10-inch) flour tortillas
- 2 cups shredded cheese (a mix of Monterey Jack and sharp cheddar is perfect)
- 1/2 bell pepper, finely diced (any color you like)
- 1/4 cup finely chopped red onion
- 1 jalapeño, seeds removed and finely minced (optional, for heat)
- 2 tbsp chopped fresh cilantro
- 1/2 tsp ground cumin
- 1/4 tsp garlic powder
- 1 tbsp neutral oil (like canola or avocado), for brushing
- Salt to taste
Tools: A large non-stick or cast-iron skillet, a sharp knife or pizza cutter, a pastry brush.
Notes: The type of cheese you use is key here—you want something that melts beautifully. Pre-shredded bags are convenient, but shredding a block yourself gives you a much creamier melt without the anti-caking agents. And don’t skip the fresh ingredients; that little bit of crisp bell pepper and onion makes all the difference.
Nutrition (per serving)
| Calories: | 320 kcal |
| Protein: | 14 g |
| Fat: | 18 g |
| Carbs: | 26 g |
| Fiber: | 2 g |
Serves: 4 | Prep Time: 8 minutes | Cook Time: 10 minutes | Total Time: 18 minutes
Before You Start: Tips & Ingredient Notes
- Get your mise en place ready. Quesadillas cook quickly, so have all your fillings measured, shredded, and within arm’s reach. The moment the tortilla hits the pan, you’ll need to move fast to assemble before it over-crisps.
- Why fresh-shredded cheese matters. Pre-shredded cheese is coated with potato starch or cellulose to prevent clumping, which can make your quesadilla filling a bit grainy and less melty. Taking one minute to shred a block of cheese yourself results in a dramatically smoother, gooier melt.
- Don’t overstuff! It’s tempting to load up that tortilla, but a little goes a long way. Too much filling and the cheese won’t act as a proper “glue,” causing the quesadilla to fall apart when you try to flip it. A single, even layer is all you need.
- Let the pan do the work. A common mistake is adding oil directly to the pan. We’re brushing the tortilla itself with just a whisper of oil, which gives us direct control and ensures an perfectly even, crisp, and non-greasy finish.
How to Make Cheese Quesadilla Triangles
Step 1: In a medium bowl, combine your shredded cheeses, diced bell pepper, red onion, jalapeño (if using), cilantro, cumin, and garlic powder. Give it a good mix with a fork until everything is evenly distributed. You’ll notice the colors start to mingle beautifully. Taste a tiny pinch (it’s safe, it’s all raw veggies and cheese!) and add a little salt if you think it needs it—remember, the cheese is already salty.
Step 2: Place your large skillet over medium heat. Let it get properly warm—this is crucial for that initial sear. While it heats, lay one tortilla on a clean surface and lightly brush one side with a thin layer of oil. This will be the glorious, golden-brown exterior.
Step 3: Carefully place the tortilla, oiled-side down, into the preheated skillet. Immediately sprinkle a generous handful of the cheese mixture evenly over one half of the tortilla, leaving a small border around the edge. The heat will already be working on crisping the bottom, and you’ll hear a gentle sizzle.
Step 4: Using a spatula, fold the bare half of the tortilla over the filled half, pressing down gently. You’ve now got a perfect half-moon shape. Let it cook for 2-3 minutes, until the bottom is golden brown with some darker, toasty spots. Don’t rush this—let the cheese fully melt and bind everything together.
Step 5: This is the moment of truth: the flip. Slide your spatula underneath and confidently flip the entire quesadilla over. It should feel sturdy. Cook for another 2-3 minutes on the second side until it’s equally golden and crisp. You can press down lightly with the spatula to ensure even contact with the pan.
Step 6: Transfer the cooked quesadilla to a cutting board. Repeat the process with the remaining tortillas and filling. Let each quesadilla rest for just a minute before cutting—this allows the molten cheese to set slightly so it doesn’t all ooze out.
Step 7: Using a sharp chef’s knife or a pizza cutter, slice each quesadilla into three triangles. The classic method is to make one cut straight down the middle, then two angled cuts from the center outwards. You’ll hear that satisfying crunch as you cut through the crispy shell.
Storage & Freshness Guide
- Fridge: Store cooled quesadilla triangles in an airtight container for up to 3 days.
- Freezer: Freeze in a single layer on a baking sheet, then transfer to a freezer bag for up to 2 months.
- Reviving: Reheat in a 375°F oven or air fryer for 5-7 minutes until hot and crisp.
Serving Suggestions
Complementary Dishes
- A simple black bean salad — The cool, citrusy flavors of beans tossed with lime juice and cilantro provide a refreshing contrast to the warm, cheesy triangles.
- Mexican street corn salad (Esquites) — The creamy, tangy, and slightly spicy flavors of this classic corn dish are an absolute dream pairing with the straightforward cheesiness.
- A crisp green salad with a lime vinaigrette — The sharp acidity from the lime in the dressing cuts through the richness of the cheese beautifully, balancing the whole meal.
Drinks
- A classic margarita (or a mocktail version) — The bright, sharp tang of lime and tequila is the ultimate palate-cleanser that resets your taste buds for the next delicious cheesy bite.
- An ice-cold Mexican lager — The light, crisp, and slightly bitter notes of a cold beer are a timeless and perfect partner for anything cheesy and slightly spicy.
- Sparkling water with a squeeze of lime — Sometimes you just need the clean, effervescent bubbles to contrast the rich, gooey texture, and it’s a wonderfully refreshing non-alcoholic option.
Something Sweet
- Churros with a chocolate dipping sauce — Stay with the theme! The warm, cinnamon-sugary crunch of a churro dipped in rich chocolate is the perfect happy ending.
- Mango sorbet — The intense, fruity sweetness and icy texture of a good mango sorbet is a light and vibrant way to finish the meal without feeling too heavy.
- Tres leches cake — If you’re going all out, this supremely moist, milky cake is a celebratory dessert that feels special and indulgent.
Top Mistakes to Avoid
- Mistake: Using too high heat. It’s tempting to crank the stove to get a faster result, but you’ll end up with a burnt, blackened tortilla and cold, unmelted cheese in the center. Medium heat is your friend—it gives the cheese time to melt while the tortilla crisps up perfectly.
- Mistake: Overfilling the quesadilla. I’ve messed this up before too… more is not always better. An overstuffed quesadilla is impossible to flip neatly and the filling will spill out, making a mess in your pan and creating a structural disaster.
- Mistake: Cutting immediately. If you slice into that quesadilla the second it leaves the pan, a river of molten cheese will flow out, leaving you with empty pockets. Let it rest for a minute or two on the cutting board—the cheese will thicken up just enough.
- Mistake: Using a dull knife. A dull blade will drag and tear through your beautifully crisp tortilla instead of giving you a clean cut. A sharp chef’s knife or a rolling pizza cutter is essential for perfect triangles.
Expert Tips
- Tip: Grate your cheese against the large holes of the box grater. This creates lovely, substantial shreds that melt into distinct, stringy pockets rather than a homogenous, thin layer. You get much better cheese pulls and texture.
- Tip: Keep finished quesadillas warm in a low oven. If you’re cooking for a crowd, place a baking sheet in a 250°F (120°C) oven. As each quesadilla is done, transfer it to the sheet to keep warm and crisp while you finish the rest.
- Tip: Add a thin layer of “glue”. Before adding your main cheese filling, sprinkle a very light layer of plain, shredded cheese directly onto the tortilla in the pan. As it melts, it acts as a delicious adhesive, sealing in the larger fillings and preventing them from falling out.
- Tip: Repurpose leftovers brilliantly. Any leftover filling? Don’t toss it! The next day, scramble it into eggs, stuff it into an omelet, or use it as a topping for a baked potato. It’s too good to waste.
FAQs
Can I make these ahead of time?
You can absolutely prep the filling ahead of time! Store the mixed cheese and veggie filling in an airtight container in the fridge for up to 2 days. I don’t recommend assembling and cooking them in advance, as they are best served fresh and crisp. However, you can cook them and then re-crisp them in a 350°F (175°C) oven or air fryer for a few minutes to bring back the texture.
What’s the best way to reheat leftover quesadilla triangles?
The oven or an air fryer is your best bet to avoid sogginess. Skip the microwave—it will make the tortilla soft and rubbery. Spread the triangles on a baking sheet and heat at 375°F (190°C) for 5-7 minutes, or in an air fryer for 3-4 minutes, until hot and crisp again. They won’t be *quite* as perfect as fresh, but they’ll be pretty close.
Can I use corn tortillas instead of flour?
You can, but it requires a slight adjustment. Corn tortillas are smaller and more fragile, so they crack easily when folded. A better method is to make two-layer “quesadilla sandwiches” using two corn tortillas as the top and bottom. You’ll also want to warm the corn tortillas first to make them pliable, and be extra gentle when flipping.
My cheese keeps leaking out while cooking. What am I doing wrong?
This usually means a) the pan is too hot, causing the tortilla to cook too fast before the cheese can melt and seal the edges, or b) you’re overfilling. Try reducing the heat to a solid medium and using just a scant cup of filling per large tortilla. That little border you leave around the edge is also crucial for creating a sealed pocket.
What other fillings can I add?
Oh, the possibilities are endless! For protein, try shredded rotisserie chicken, seasoned ground beef, or black beans. For veggies, sautéed mushrooms, spinach, or corn are fantastic. For a flavor boost, a smear of refried beans on the tortilla before adding cheese, or some sliced pickled jalapeños add a wonderful punch. Just remember the golden rule: don’t overfill!


Cheese Quesadilla Triangles
Make perfect, crispy Cheese Quesadilla Triangles in under 20 minutes. This easy recipe is ideal for a quick snack or meal. Get the step-by-step guide now!
Ingredients
For the Ingredients
-
4 large (10-inch) flour tortillas
-
2 cups shredded cheese (a mix of Monterey Jack and sharp cheddar is perfect)
-
1/2 bell pepper (finely diced (any color you like))
-
1/4 cup finely chopped red onion
-
1 jalapeño (seeds removed and finely minced (optional, for heat))
-
2 tbsp chopped fresh cilantro
-
1/2 tsp ground cumin
-
1/4 tsp garlic powder
-
1 tbsp neutral oil (like canola or avocado, for brushing)
-
Salt (to taste)
Instructions
-
In a medium bowl, combine your shredded cheeses, diced bell pepper, red onion, jalapeño (if using), cilantro, cumin, and garlic powder. Give it a good mix with a fork until everything is evenly distributed. You’ll notice the colors start to mingle beautifully. Taste a tiny pinch (it's safe, it's all raw veggies and cheese!) and add a little salt if you think it needs it—remember, the cheese is already salty.01
-
Place your large skillet over medium heat. Let it get properly warm—this is crucial for that initial sear. While it heats, lay one tortilla on a clean surface and lightly brush one side with a thin layer of oil. This will be the glorious, golden-brown exterior.02
-
Carefully place the tortilla, oiled-side down, into the preheated skillet. Immediately sprinkle a generous handful of the cheese mixture evenly over one half of the tortilla, leaving a small border around the edge. The heat will already be working on crisping the bottom, and you’ll hear a gentle sizzle.03
-
Using a spatula, fold the bare half of the tortilla over the filled half, pressing down gently. You’ve now got a perfect half-moon shape. Let it cook for 2-3 minutes, until the bottom is golden brown with some darker, toasty spots. Don’t rush this—let the cheese fully melt and bind everything together.04
-
This is the moment of truth: the flip. Slide your spatula underneath and confidently flip the entire quesadilla over. It should feel sturdy. Cook for another 2-3 minutes on the second side until it’s equally golden and crisp. You can press down lightly with the spatula to ensure even contact with the pan.05
-
Transfer the cooked quesadilla to a cutting board. Repeat the process with the remaining tortillas and filling. Let each quesadilla rest for just a minute before cutting—this allows the molten cheese to set slightly so it doesn’t all ooze out.06
-
Using a sharp chef’s knife or a pizza cutter, slice each quesadilla into three triangles. The classic method is to make one cut straight down the middle, then two angled cuts from the center outwards. You’ll hear that satisfying crunch as you cut through the crispy shell.07
Not what you're looking for?


