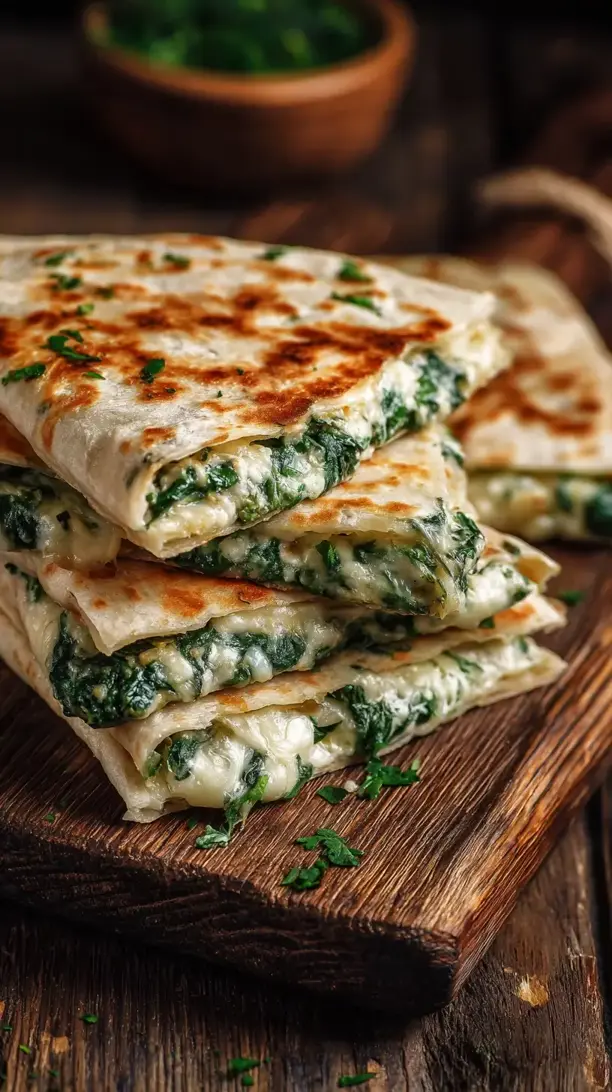
These cheese quesadillas are the ultimate comfort food—simple, quick, and incredibly satisfying. You’ll love the golden, crispy tortillas with a molten, stretchy cheese center every time. Master a few easy tricks for irresistible cheese quesadillas.
Craving a delicious Cheese Quesadillas? You've come to the right spot! From Snacks favorites to amazing Burgers recipes, there's something here for everyone.


Why You’ll Love This Cheese Quesadillas
- Quick & Easy: Ready in about 15 minutes, perfect for hungry moments.
- Perfect Texture: Crisp, golden exterior with a gloriously gooey cheese interior.
- Endlessly Customizable: A fantastic base for adding beans, veggies, or chicken.
- Minimal Cleanup: Just one skillet and a spatula for easy weeknights.
Ingredients & Tools
- 4 large (10-inch) flour tortillas
- 2 cups shredded cheese (I use a blend of Monterey Jack and sharp cheddar)
- 1 tablespoon unsalted butter or olive oil
- Optional: pinch of garlic powder, pinch of smoked paprika
- For serving: salsa, sour cream, guacamole
Tools: A large non-stick or cast-iron skillet, spatula, and a grater if you’re shredding your own cheese.
Notes: A blend of cheeses melts beautifully for complex flavor. Shredding your own cheese from a block gives a smoother, creamier melt than pre-shredded.
Nutrition (per serving)
| Calories: | 420 kcal |
| Protein: | 18 g |
| Fat: | 24 g |
| Carbs: | 32 g |
| Fiber: | 2 g |
Serves: 2 | Prep Time: 5 minutes | Cook Time: 10 minutes | Total Time: 15 minutes
Before You Start: Tips & Ingredient Notes
- Shred your own cheese, seriously. It might seem like a small extra step, but it makes a world of difference. Pre-shredded cheese is coated to prevent clumping, which also prevents it from melting into that dreamy, seamless pool we’re after.
- Don’t skip the fat in the pan. Whether you use butter for its rich flavor or oil for a higher smoke point, this is what gives you that beautifully crisp and golden-brown tortilla instead of a dry, tough one.
- Get your skillet to the right temperature. Medium heat is your sweet spot. Too hot, and the tortilla will burn before the cheese melts; too low, and you’ll end up with a soggy, greasy quesadilla. A little patience here pays off.
- Have your toppings ready. Since the quesadillas cook so quickly, you’ll want your salsa, sour cream, and guacamole prepped and on the table so you can dive in the moment they’re ready.
How to Make Cheese Quesadillas
Step 1: First, get your cheese ready. If you’re shredding it from a block, now’s the time. Combine your Monterey Jack and cheddar in a bowl. The Jack gives you that fantastic meltiness, while the cheddar brings a sharp, tangy flavor. You can even add a tiny pinch of garlic powder or smoked paprika to the cheese mix now for an extra flavor boost—it’s a little trick that goes a long way.
Step 2: Place your skillet over medium heat and let it get properly warm. This usually takes about 2-3 minutes. You can test it by flicking a tiny drop of water into the pan—if it sizzles and evaporates quickly, you’re good to go. Add half of your butter or oil and swirl it around to coat the bottom of the pan evenly.
Step 3: Lay one tortilla flat in the skillet. Quickly sprinkle about a half cup of the cheese blend evenly over one half of the tortilla, leaving a small border around the edge. Then, use your spatula to fold the other, bare half over the cheesy half, creating a half-moon shape. You’ll hear a gentle sizzle—that’s the sound of success.
Step 4: Let it cook for 2-3 minutes. Don’t be tempted to move it around too much. You’re waiting for the bottom to become a deep golden brown and for the cheese to start melting. You can gently lift a corner with your spatula to peek and check the color. It should be spotted with beautiful brown patches.
Step 5: Now, for the flip. This is the moment of truth! Slide your spatula completely under the folded quesadilla and confidently, but gently, flip it over. If a little cheese leaks out, don’t worry—that crispy, fried cheese is a cook’s treat. Cook for another 2-3 minutes on the second side until it’s equally golden and crisp.
Step 6: Once it’s perfectly cooked, transfer the quesadilla to a cutting board. I like to let it rest for just a minute before slicing—this allows the cheese to set slightly so it doesn’t all gush out when you cut into it. Repeat the entire process with the remaining tortillas, cheese, and fat.
Step 7: To serve, use a sharp knife or a pizza cutter to slice each quesadilla into 2 or 3 wedges. Arrange them on a plate with the crispy edges facing up. You’ll notice the steam rising from the cheesy interior and that incredible aroma… it’s honestly hard to resist eating them straight from the cutting board.
Storage & Freshness Guide
- Fridge: Store cooled quesadillas in an airtight container for up to 3 days.
- Freezer: Wrap individually in foil and freeze for up to 1 month.
- Reviving: Reheat in a dry skillet over medium heat until crisp and warm.
Serving Suggestions
Complementary Dishes
- A simple black bean salad — The bright, acidic flavors of corn, red onion, and lime juice in the salad cut through the rich cheesiness beautifully.
- Mexican-style street corn (Esquites) — The creamy, chili-powder-dusted corn is a fantastic textural and flavor contrast served on the side.
- A crisp green salad with a lime vinaigrette — This adds a fresh, light element to the meal, balancing out the indulgence.
Drinks
- A classic Margarita or a Michelada — The citrusy, refreshing bite of these classic drinks is a perfect partner for the savory, cheesy quesadilla.
- An icy cold Mexican lager — The light, crisp beer doesn’t overpower the food and helps cleanse the palate between bites.
- Sparkling water with a lime wedge — For a non-alcoholic option, the bubbles and citrus are incredibly refreshing and simple.
Something Sweet
- Churros with a chocolate dipping sauce — The warm, cinnamon-sugary crunch is the ultimate sweet finish after a savory meal.
- Mango sorbet — Its bright, tropical flavor is light and palate-cleansing, making it a perfect, not-too-heavy dessert.
- Tres Leches cake — If you’re feeling decadent, this moist, milky cake is a celebratory and classic ending.
Top Mistakes to Avoid
- Overfilling the quesadilla. It’s so tempting to add more and more cheese, but this will backfire. Too much filling prevents the tortilla from sealing properly, and the cheese will spill out and burn in the pan before the inside gets a chance to melt.
- Using too high heat. I’ve messed this up before too… impatience leads to a burnt exterior and a cold, unmelted center. Medium heat is key for allowing the heat to penetrate and melt the cheese while slowly crisping the tortilla.
- Not letting the pan preheat. If you add the tortilla to a cold pan, it will soak up the oil and become soggy rather than crisp. That initial


Cheese Quesadillas
Learn how to make perfect Cheese Quesadillas with a crispy exterior and gooey cheese filling. Ready in 15 minutes for an easy meal. Get the recipe now!
Ingredients
For the Quesadillas
-
4 large (10-inch) flour tortillas
-
2 cups shredded cheese (I use a blend of Monterey Jack and sharp cheddar)
-
1 tablespoon unsalted butter or olive oil
-
pinch garlic powder
-
pinch smoked paprika
-
salsa, sour cream, guacamole
Instructions
-
First, get your cheese ready. If you’re shredding it from a block, now’s the time. Combine your Monterey Jack and cheddar in a bowl. The Jack gives you that fantastic meltiness, while the cheddar brings a sharp, tangy flavor. You can even add a tiny pinch of garlic powder or smoked paprika to the cheese mix now for an extra flavor boost—it’s a little trick that goes a long way.01
-
Place your skillet over medium heat and let it get properly warm. This usually takes about 2-3 minutes. You can test it by flicking a tiny drop of water into the pan—if it sizzles and evaporates quickly, you’re good to go. Add half of your butter or oil and swirl it around to coat the bottom of the pan evenly.02
-
Lay one tortilla flat in the skillet. Quickly sprinkle about a half cup of the cheese blend evenly over one half of the tortilla, leaving a small border around the edge. Then, use your spatula to fold the other, bare half over the cheesy half, creating a half-moon shape. You’ll hear a gentle sizzle—that’s the sound of success.03
-
Let it cook for 2-3 minutes. Don’t be tempted to move it around too much. You’re waiting for the bottom to become a deep golden brown and for the cheese to start melting. You can gently lift a corner with your spatula to peek and check the color. It should be spotted with beautiful brown patches.04
-
Now, for the flip. This is the moment of truth! Slide your spatula completely under the folded quesadilla and confidently, but gently, flip it over. If a little cheese leaks out, don’t worry—that crispy, fried cheese is a cook’s treat. Cook for another 2-3 minutes on the second side until it’s equally golden and crisp.05
-
Once it’s perfectly cooked, transfer the quesadilla to a cutting board. I like to let it rest for just a minute before slicing—this allows the cheese to set slightly so it doesn’t all gush out when you cut into it. Repeat the entire process with the remaining tortillas, cheese, and fat.06
-
To serve, use a sharp knife or a pizza cutter to slice each quesadilla into 2 or 3 wedges. Arrange them on a plate with the crispy edges facing up. You’ll notice the steam rising from the cheesy interior and that incredible aroma… it’s honestly hard to resist eating them straight from the cutting board.07
Not what you're looking for?


