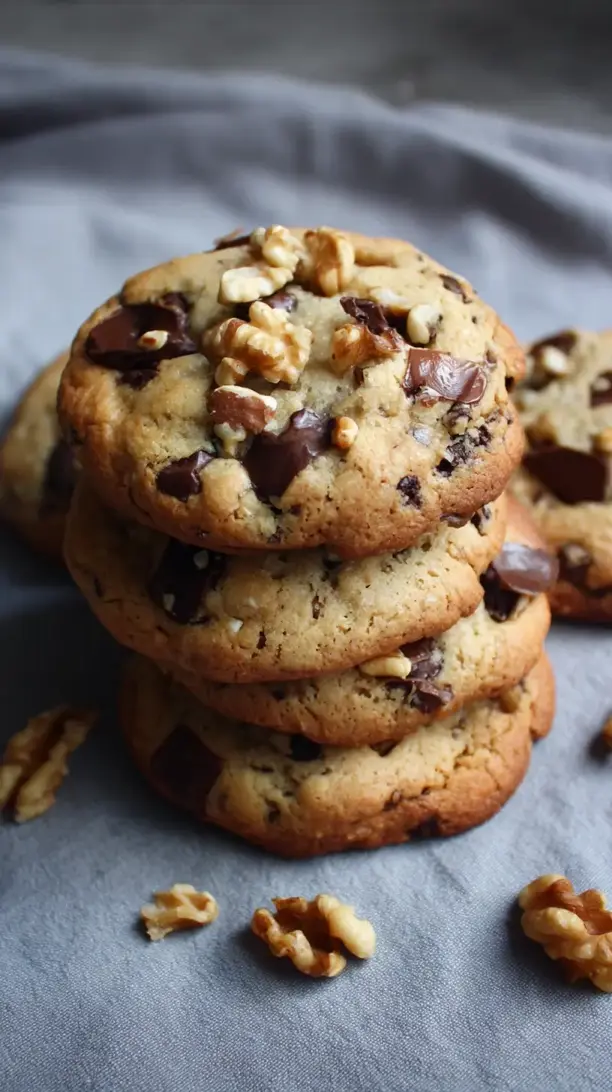
There’s something magical about pulling a tray of Chewy Chocolate Chip Cookies with Walnuts from the oven. That moment when you break one open—still warm—to reveal a soft, chewy center, crisp edges, and the rich, nutty crunch of toasted walnuts… it feels like a hug in dessert form. To me, this is the ultimate comfort food recipe, and I’m so excited to share it with you.
As the season turns, my kitchen fills with the scent of holiday baking. If you’re like me, searching for the perfect Christmas cookies recipes to share with loved ones, let this be your starting point. These cookies are more than just delicious holiday treats; they’re a wonderful addition to your list of Christmas dessert ideas. Among all the Christmas sweets you might prepare, these hold a special place for their homemade heart and satisfying texture.
When planning your lineup of holiday cookies for Christmas celebrations, I hope you’ll include this recipe. It’s one of my favorite, foolproof Christmas baking ideas. One simple tip I always follow: give the dough a little time to chill. It makes all the difference, ensuring every batch turns out perfectly and becomes a beloved holiday cookies Christmas delight for everyone at your table.
Love Chewy Chocolate Chip Cookies with Walnuts? So do we! If you're into Christmas Cookie or curious about Chicken Breast Recipes, you'll find plenty of inspiration below.


Why You’ll Love This Chewy Chocolate Chip Cookies with Walnuts
- Perfect texture: Chewy center with crisp edges from precise chilling.
- Flavor & crunch: Toasted walnuts add nutty depth and contrast.
- Simple to master: Straightforward technique with no fancy tools.
- Crowd-pleasing classic: A universally adored treat for any occasion.
Ingredients & Tools
- 225 g unsalted butter, softened
- 150 g granulated sugar
- 165 g light brown sugar, packed
- 2 large eggs, at room temperature
- 2 tsp pure vanilla extract
- 315 g all-purpose flour
- 1 tsp baking soda
- 1 tsp fine sea salt
- 340 g semi-sweet chocolate chips or chunks
- 120 g walnuts, toasted and roughly chopped
Tools: Stand mixer or electric hand mixer, mixing bowls, baking sheets, parchment paper or silicone baking mats, wire cooling rack.
Notes: Using a kitchen scale is recommended for consistency. Light brown sugar is key for moisture and chew; toasted walnuts add essential flavor depth.
Nutrition (per serving)
| Calories: | 280 kcal |
| Protein: | 4 g |
| Fat: | 16 g |
| Carbs: | 33 g |
| Fiber: | 2 g |
Serves: 24 cookies | Prep Time: 20 minutes | Cook Time: 10-12 minutes | Total Time: 1 hour 45 minutes (includes chilling)
Before You Start: Tips & Ingredient Notes
- Butter Temperature is Everything. Your butter should be “softened,” meaning it’s pliable but still cool to the touch. If it’s melted or greasy, your cookies will spread too much. A quick test: you should be able to press a finger into it and leave an indent without it sinking all the way through.
- Don’t Skip Toasting the Walnuts. Toasting isn’t just an optional step—it’s essential. It wakes up the oils in the nuts, deepening their flavor and making them wonderfully crisp. Just spread them on a baking sheet and toast at 175°C for 8-10 minutes until fragrant.
- The Power of Brown Sugar. The molasses in light brown sugar is our secret weapon for chewiness. Make sure you pack it firmly into your measuring cup to get the correct amount. This moisture is what gives the cookie its soft, tender heart.
- Chilling is Non-Negotiable. I know, it’s the hardest part—waiting. But chilling the dough solidifies the fat, which prevents the cookies from spreading into thin puddles in the oven. It also allows the flour to fully hydrate, resulting in a richer, more complex flavor.
How to Make Chewy Chocolate Chip Cookies with Walnuts
Step 1: Cream the Butter and Sugars. In the bowl of your stand mixer fitted with the paddle attachment, beat the softened butter, granulated sugar, and packed brown sugar together on medium speed for a full 2-3 minutes. You’re not just mixing; you’re aerating. The mixture should become noticeably lighter in color and fluffy. This step is crucial for creating a cookie with the right structure.
Step 2: Incorporate the Eggs and Vanilla. Add the eggs one at a time, beating well after each addition until fully incorporated. Scrape down the sides of the bowl. Then, mix in the vanilla extract. The dough might look a little curdled at this point—that’s perfectly normal, so don’t worry! It will all come together once you add the dry ingredients.
Step 3: Combine the Dry Ingredients. In a separate bowl, whisk together the flour, baking soda, and salt. This isn’t just mixing; you’re ensuring the leavening agent and salt are evenly distributed throughout the flour, which prevents bitter pockets of baking soda in your finished cookies.
Step 4: Bring the Dough Together. With the mixer on low speed, gradually add the dry ingredients to the wet ingredients. Mix only until the last streaks of flour disappear. It’s vital not to overmix at this stage, as overworking the gluten can lead to tough cookies. The dough will be quite thick.
Step 5: Fold in the Goodies. Switch to a sturdy spatula or wooden spoon. Gently fold in the chocolate chips and the toasted, chopped walnuts until they are evenly distributed throughout the dough. You’ll notice the dough is very stiff, which is exactly what we want for a thick, chewy cookie.
Step 6: The All-Important Chill. Cover the bowl with plastic wrap and refrigerate the dough for at least 1 hour, or ideally up to 24 hours. This is the step that transforms good cookies into great ones. The chilled dough will be firmer and easier to scoop.
Step 7: Portion and Bake. Preheat your oven to 190°C (375°F) and line baking sheets with parchment paper. Using a cookie scoop or two spoons, portion the dough into 3-tablespoon-sized balls. Place them about 2 inches apart on the prepared sheets. You can bake them as neat balls for a more rustic look, or gently press the tops down slightly for a more even spread.
Step 8: Bake to Perfection. Bake for 10-12 minutes. The trick is to pull them out when the edges are set and golden brown, but the centers still look soft, puffy, and slightly underdone. They will continue to cook on the hot baking sheet out of the oven. For that classic bakery-style look, you can bang the pan on the counter right when they come out to deflate them slightly and create those beautiful wrinkles.
Step 9: The Final Cool Down. Let the cookies cool on the baking sheet for at least 5-10 minutes before transferring them to a wire rack to cool completely. This resting period on the pan is the final stage of cooking and helps them set up with that perfect chewy texture.
Storage & Freshness Guide
- Fridge: Store dough up to 72 hours; baked cookies in airtight container at room temperature.
- Freezer: Freeze dough balls up to 3 months; bake from frozen, adding a few extra minutes.
- Reviving: Add a bread slice to cookie container to maintain softness for days.
Serving Suggestions
Complementary Dishes
- A scoop of vanilla bean ice cream — The classic pairing, the cold, creamy ice cream melting into the warm, chewy cookie is a textural dream come true.
- A small glass of cold milk — It’s a cliché for a reason! The richness of the cookie is perfectly cut by the clean, refreshing taste of milk.
Drinks
- Dark roast coffee — The bitterness of a strong brew provides a fantastic counterpoint to the sweetness of the chocolate and the richness of the butter.
- A glass of tawny port — For a more adult treat, the nutty, caramel notes in a tawny port echo the flavors of the toasted walnuts beautifully.
Something Sweet
- A simple fruit salad — A medley of fresh berries or orange segments offers a bright, acidic contrast that cleanses the palate between bites of rich cookie.
- Dark chocolate-dipped strawberries — Double down on the chocolate theme with an elegant, fruity dessert that feels celebratory.
Top Mistakes to Avoid
- Mistake: Using melted butter. This is the number one reason cookies spread too much. Melted butter heats up too quickly in the oven, causing the dough to slump before it has a chance to set. Softened, cool butter is the goal.
- Mistake: Skipping the chill time. I’ve been tempted too, but warm dough equals flat cookies. Chilling solidifies the fat, ensuring your cookies bake up thick and chewy instead of thin and crispy.
- Mistake: Overmixing the dough after adding flour. Once the flour is incorporated, stop mixing! Overworking the dough develops gluten, which can make your cookies tough and cakey instead of tender.
- Mistake: Overbaking. Cookies continue to cook on the hot tray after you take them out of the oven. Pull them out when the centers still look a little soft and underdone for the ultimate chewy texture.
Expert Tips
- Tip: Weigh your flour. Scooping flour directly from the bag can pack it down, leading to over-measuring and dry, cakey cookies. For the most accurate results, fluff your flour, spoon it into your measuring cup, and level it off, or better yet, use a kitchen scale.
- Tip: Use a cookie scoop. Not only is it less messy, but it ensures all your cookies are the same size, which means they will bake evenly. No more half-burnt, half-underdone batches!
- Tip: Make the dough ahead. This dough actually benefits from a longer rest. You can refrigerate it for up to 72 hours, which allows the flavors to deepen and meld for an even more complex-tasting cookie. You can also freeze scooped dough balls for up to 3 months and bake from frozen, adding a couple of extra minutes to the bake time.
- Tip: Underbake slightly. For the chewiest results, err on the side of underbaking. The cookies should be golden around the edges but still look a bit pale and puffy in the middle when you pull them out.
FAQs
Can I make these cookies without nuts?
Absolutely! If you or your guests have a nut allergy or simply don’t care for walnuts, you can omit them entirely. The recipe will still yield a fantastic chocolate chip cookie. You could even replace the walnut quantity with more chocolate chips or a different mix-in like dried cranberries or shredded coconut for a fun variation.
Why did my cookies come out cakey and puffy?
A cakey texture is usually a sign of too much flour or overmixing. Make sure you’re measuring your flour correctly (using the spoon-and-level method or a scale) and that you stop mixing the moment the flour disappears. Using too much baking soda can also contribute to a cake-like rise, so double-check your measurements.
Can I use dark brown sugar instead of light?
You can, but it will change the character of the cookie. Dark brown sugar has more molasses, which will make the cookies slightly darker in color, with a deeper, almost caramel-like flavor and a marginally chewier texture. It’s a delicious variation if you love a richer, more molasses-forward taste.
How do I store these cookies to keep them soft?
The key to keeping them chewy is to lock in moisture. Once completely cool, store the cookies in an airtight container at room temperature. For an extra softness boost, you can add a piece of bread to the container—the cookies will absorb the moisture from the bread, staying soft for days (the bread will get hard, but your cookies will be perfect!).
My dough is very crumbly and dry, what happened?
This typically means there’s a bit too much flour in the mix. This can happen if you measured your flour by scooping directly from the bag, which packs it down. Next time, try the spoon-and-level method. For this batch, you can try gently kneading in a tablespoon of milk until the dough just comes together. Be careful not to overwork it!


Chewy Chocolate Chip Cookies With Walnuts: A Classic Dessert
Make the ultimate holiday treat with this easy chocolate chip cookie recipe. Chewy Chocolate Chip Cookies with Walnuts are a festive, nutty dessert perfect for Christmas baking.
Ingredients
For the Ingredients
-
225 g unsalted butter (softened)
-
150 g granulated sugar
-
165 g light brown sugar (packed)
-
2 large eggs (at room temperature)
-
2 tsp pure vanilla extract
-
315 g all-purpose flour
-
1 tsp baking soda
-
1 tsp fine sea salt
-
340 g semi-sweet chocolate chips or chunks
-
120 g walnuts (toasted and roughly chopped)
Instructions
-
In the bowl of your stand mixer fitted with the paddle attachment, beat the softened butter, granulated sugar, and packed brown sugar together on medium speed for a full 2-3 minutes. You’re not just mixing; you’re aerating. The mixture should become noticeably lighter in color and fluffy. This step is crucial for creating a cookie with the right structure.01
-
Add the eggs one at a time, beating well after each addition until fully incorporated. Scrape down the sides of the bowl. Then, mix in the vanilla extract. The dough might look a little curdled at this point—that’s perfectly normal, so don’t worry! It will all come together once you add the dry ingredients.02
-
In a separate bowl, whisk together the flour, baking soda, and salt. This isn't just mixing; you're ensuring the leavening agent and salt are evenly distributed throughout the flour, which prevents bitter pockets of baking soda in your finished cookies.03
-
With the mixer on low speed, gradually add the dry ingredients to the wet ingredients. Mix only until the last streaks of flour disappear. It’s vital not to overmix at this stage, as overworking the gluten can lead to tough cookies. The dough will be quite thick.04
-
Switch to a sturdy spatula or wooden spoon. Gently fold in the chocolate chips and the toasted, chopped walnuts until they are evenly distributed throughout the dough. You’ll notice the dough is very stiff, which is exactly what we want for a thick, chewy cookie.05
-
Cover the bowl with plastic wrap and refrigerate the dough for at least 1 hour, or ideally up to 24 hours. This is the step that transforms good cookies into great ones. The chilled dough will be firmer and easier to scoop.06
-
Preheat your oven to 190°C (375°F) and line baking sheets with parchment paper. Using a cookie scoop or two spoons, portion the dough into 3-tablespoon-sized balls. Place them about 2 inches apart on the prepared sheets. You can bake them as neat balls for a more rustic look, or gently press the tops down slightly for a more even spread.07
-
Bake for 10-12 minutes. The trick is to pull them out when the edges are set and golden brown, but the centers still look soft, puffy, and slightly underdone. They will continue to cook on the hot baking sheet out of the oven. For that classic bakery-style look, you can bang the pan on the counter right when they come out to deflate them slightly and create those beautiful wrinkles.08
-
Let the cookies cool on the baking sheet for at least 5-10 minutes before transferring them to a wire rack to cool completely. This resting period on the pan is the final stage of cooking and helps them set up with that perfect chewy texture.09
Not what you're looking for?


