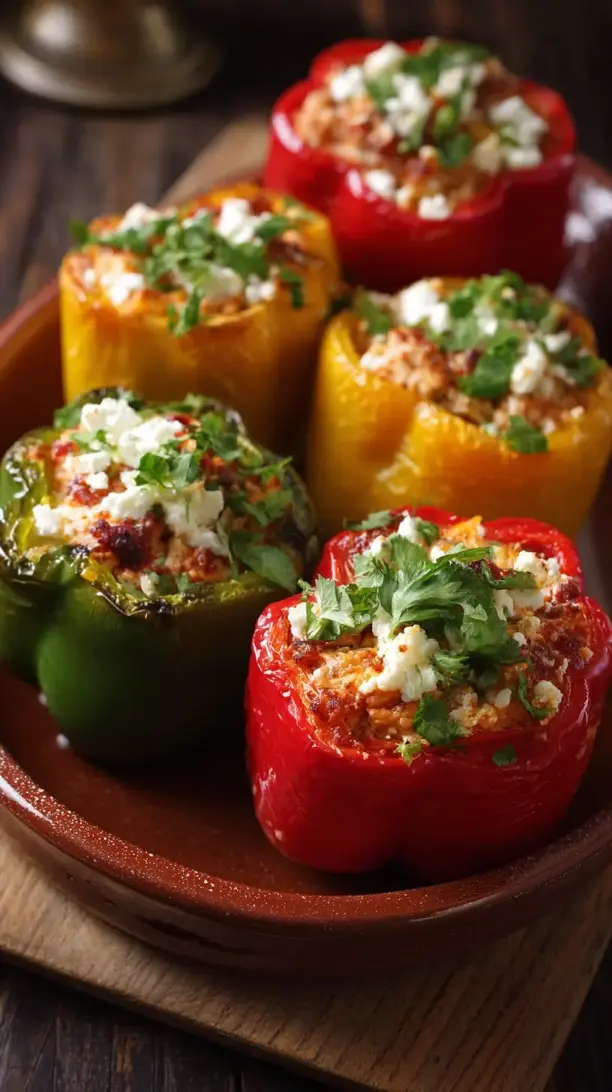
These Chicken and Feta Stuffed Peppers are a vibrant, Mediterranean-inspired meal that’s both comforting and elegant. The combination of seasoned ground chicken, salty feta, and sweet roasted peppers is a match made in heaven. Perfect for a simple weeknight dinner or for impressing guests with minimal stress.
Looking for Chicken and Feta Stuffed Peppers inspiration? You'll love what we have! Explore more Savory Combo Recipes recipes or discover our Appetizers & Snacks favorites.


Why You’ll Love This Chicken and Feta Stuffed Peppers
- All-in-one meal: Protein, veggies, and grains baked together beautifully.
- Special flavor combo: Salty feta and herby chicken contrast with sweet peppers.
- Versatile & forgiving: Easy ingredient swaps like quinoa or dried herbs work well.
- Great leftovers: Flavors meld overnight for an even tastier next-day lunch.
Ingredients & Tools
- 4 large bell peppers (a mix of red, yellow, and orange looks lovely)
- 1 tbsp olive oil
- 1 medium yellow onion, finely diced
- 2 cloves garlic, minced
- 450 g ground chicken (a mix of dark and light meat is ideal)
- 1 tsp dried oregano
- ½ tsp smoked paprika
- 150 g cooked brown rice (about ¾ cup uncooked)
- 100 g fresh spinach, roughly chopped
- 200 g feta cheese, crumbled
- 1 large tomato, diced
- 2 tbsp fresh parsley, chopped
- Salt and black pepper to taste
- 120 ml chicken broth or water (about ½ cup)
Tools: A sharp knife, a cutting board, a large skillet, a 9×13 inch baking dish
Notes: Use block feta in brine for best flavor and texture. Don’t skip the fresh parsley—it adds a fresh lift.
Nutrition (per serving)
| Calories: | 385 kcal |
| Protein: | 28 g |
| Fat: | 18 g |
| Carbs: | 28 g |
| Fiber: | 5 g |
Serves: 4 | Prep Time: 20 minutes | Cook Time: 40 minutes | Total Time: 60 minutes
Before You Start: Tips & Ingredient Notes
- Choosing your peppers. Look for peppers that are symmetrical and can stand upright on their own. This makes them much easier to handle and ensures they cook evenly in the baking dish.
- Why precook the rice? Using already-cooked rice is non-negotiable here. If you try to use uncooked rice, it will steal all the moisture from your filling and the chicken, leaving you with a dry, crunchy texture. Nobody wants that.
- Don’t be shy with seasoning. Ground chicken can be quite mild, so make sure you taste your filling mixture before stuffing the peppers. It should be well-seasoned, as the peppers themselves won’t add much salt.
- The feta factor. As mentioned, a good block of feta in brine is your best friend here. It’s creamier and less chalky than the pre-crumbled kind, and it melts into the filling so beautifully.
How to Make Chicken and Feta Stuffed Peppers
Step 1: First, let’s get the oven preheated to 375°F (190°C). This gives it plenty of time to come to the right temperature while you prep. Now, take your bell peppers and carefully slice them in half from top to bottom. Use a small, sharp knife to cut out the inner white membranes and remove all the seeds. You want to create a nice, clean hollow boat for our filling. Try to keep the stems intact—it just looks prettier that way.
Step 2: Place your pepper halves cut-side up in your baking dish. If any of them are wobbly, you can shave a tiny, thin slice off the bottom to help them sit flat—just be careful not to cut through and create a hole. A little stability goes a long way to prevent a filling spillage disaster in the oven.
Step 3: Time for the filling! Heat the olive oil in your large skillet over medium heat. Add the diced onion and cook for about 4-5 minutes, until it becomes soft and translucent. You’ll notice a lovely sweet aroma starting to develop. Now, add the minced garlic and cook for just one more minute until it’s fragrant—be careful not to let it burn.
Step 4: Add the ground chicken to the skillet, breaking it up with your spoon as it cooks. Sprinkle over the dried oregano and smoked paprika. Cook for about 6-8 minutes, until the chicken is no longer pink. The smoked paprika will give everything a beautiful color and a subtle, warm depth of flavor.
Step 5: Now, stir in your cooked brown rice and the chopped spinach. The spinach will seem like a lot at first, but it wilts down incredibly quickly. Cook for just another 2-3 minutes, until the spinach has fully wilted and everything is well-combined. Remove the skillet from the heat.
Step 6: This is the fun part. Let the chicken and rice mixture cool for just a minute or two—you don’t want it piping hot when you add the cheese. Then, fold in most of the crumbled feta (save a little for the top!), the diced tomato, and the fresh parsley. Season generously with salt and black pepper to your liking. Give it a final good stir.
Step 7: Spoon the filling mixture generously into each pepper half, pressing down lightly and mounding it up a bit. You want them to be really well-stuffed. Top each one with the remaining feta cheese. This will create a deliciously golden, cheesy crust.
Step 8: Carefully pour the chicken broth or water into the bottom of the baking dish, around the peppers, not over them. This creates a steamy environment in the oven that helps the peppers become beautifully tender without drying out the filling.
Step 9: Cover the baking dish tightly with foil and bake for 25 minutes. Then, remove the foil and bake for another 15-20 minutes, or until the peppers are soft enough to easily pierce with a fork and the feta on top is lightly golden and bubbly. Let them rest for 5 minutes before serving—they’ll be incredibly hot!
Storage & Freshness Guide
- Fridge: Cool completely, store in an airtight container for up to 4 days.
- Freezer: Freeze after baking and cooling; wrap individually in plastic then foil. Thaw in fridge overnight before reheating.
- Reviving: Reheat in oven at 350°F (175°C) for 10–15 minutes to maintain texture.
Serving Suggestions
Complementary Dishes
- A simple arugula salad with lemon vinaigrette — The peppery arugula and sharp lemon dressing cut through the richness of the feta and chicken perfectly, creating a wonderfully balanced plate.
- Roasted asparagus with a drizzle of balsamic glaze — The earthy, tender asparagus and the sweet-tangy balsamic are a classic pairing that complements the Mediterranean flavors in the peppers beautifully.
- Warm, crusty bread for dipping — You’ll want something to soak up every last bit of the delicious juices that collect at the bottom of the baking dish. A rustic baguette or some focaccia is ideal.
Drinks
- A crisp, dry white wine like Sauvignon Blanc — Its bright acidity and citrus notes are a fantastic counterpoint to the salty feta and herby chicken, cleansing the palate between bites.
- A chilled glass of mint-infused lemonade — For a non-alcoholic option, this is wonderfully refreshing. The mint echoes the herbal notes in the dish, making it a surprisingly sophisticated pairing.
Something Sweet
- Lemon yogurt cake — A slice of moist, tangy lemon cake feels light and refreshing after this savory meal, continuing the citrus theme in a delightful way.
- Baklava — Embrace the Greek theme fully with a piece of flaky, nutty, honey-soaked baklava. It’s a decadent and fitting end to the meal.
Top Mistakes to Avoid
- Mistake: Using uncooked rice. I’ve mentioned it before, but it’s the number one error. The relatively short baking time isn’t enough to cook raw rice, and it will absorb all the liquid, leaving you with a dry, gritty filling and undercooked rice.
- Mistake: Over-stuffing the peppers to the point of spillage. It’s tempting to pack in every last bit of filling, but if you mound it too high, it can topple over and burn on the baking dish. A generous mound is great; a precarious mountain is not.
- Mistake: Skipping the liquid in the baking dish. That bit of broth or water is crucial! It creates steam that gently cooks the peppers from the outside, ensuring they become tender and sweet instead of tough or leathery.
- Mistake: Not letting them rest. I know it’s hard to wait, but those five minutes out of the oven allow the filling to set slightly. If you cut into them immediately, all the delicious juices will just run out.
Expert Tips
- Tip: Par-cook wobbly peppers. If your peppers are particularly irregular and won’t sit flat, you can microwave them for 2-3 minutes before stuffing. This softens them just enough to mold to the bottom of the dish.
- Tip: Brown the chicken well. Don’t just steam it in the pan. Get a little bit of a sear on the ground chicken for extra flavor. That fond (the browned bits) at the bottom of the skillet is pure gold.
- Tip: Add a textural crunch. For a final flourish, sprinkle the top with some toasted pine nuts or slivered almonds right before serving. The contrast between the soft filling and the crunchy nuts is phenomenal.
- Tip: Make them ahead. You can assemble the stuffed peppers completely, cover them, and refrigerate them for up to 24 hours before baking. Just add a few extra minutes to the baking time since you’re starting from cold.
FAQs
Can I use a different type of meat?
Absolutely! Ground turkey is a fantastic and lean substitute that works with all the same flavors. You could also use a plant-based ground “meat” if you’re looking for a vegetarian version—just be sure to adjust the cooking time and seasoning according to the package directions, as they can vary.
How should I store and reheat leftovers?
Let any leftover peppers cool completely, then store them in an airtight container in the fridge for up to 4 days. To reheat, I find the oven or a toaster oven (at 350°F/175°C for 10-15 minutes) works best to keep the pepper’s texture. The microwave can make them a bit soggy, though it’s faster in a pinch.
Can I freeze stuffed peppers?
You can, but with a caveat. The texture of the pepper itself will become much softer upon thawing and reheating. For best results, freeze them after baking and cooling. Wrap each pepper half individually in plastic wrap and then foil. Thaw in the fridge overnight before reheating in the oven.
My peppers are still a bit firm. What happened?
This usually means they needed a little more time in the oven, or your peppers were particularly thick-walled. Next time, try covering them with foil for the first 30 minutes instead of 25 to trap more steam, which will help soften them. You can always pop them back in for another 5-10 minutes if needed!
Is there a way to make this lower in carbs?
For sure! You can replace the brown rice with cauliflower rice. The key is to use thawed, frozen cauliflower rice or to sauté fresh cauliflower rice first to remove as much moisture as possible. If you don’t, your filling can become a bit watery. The flavor is still wonderful.


Chicken And Feta Stuffed Peppers
Make delicious Chicken and Feta Stuffed Peppers with this easy recipe. Perfect for weeknight dinners or entertaining. Get the step-by-step guide now!
Ingredients
For the Stuffed Peppers
-
4 large bell peppers (a mix of red, yellow, and orange looks lovely)
-
1 tbsp olive oil
-
1 medium yellow onion (finely diced)
-
2 cloves garlic (minced)
-
450 g ground chicken (a mix of dark and light meat is ideal)
-
1 tsp dried oregano
-
½ tsp smoked paprika
-
150 g cooked brown rice (about ¾ cup uncooked)
-
100 g fresh spinach (roughly chopped)
-
200 g feta cheese (crumbled)
-
1 large tomato (diced)
-
2 tbsp fresh parsley (chopped)
-
Salt and black pepper (to taste)
-
120 ml chicken broth or water (about ½ cup)
Instructions
-
First, let's get the oven preheated to 375°F (190°C). This gives it plenty of time to come to the right temperature while you prep. Now, take your bell peppers and carefully slice them in half from top to bottom. Use a small, sharp knife to cut out the inner white membranes and remove all the seeds. You want to create a nice, clean hollow boat for our filling. Try to keep the stems intact—it just looks prettier that way.01
-
Place your pepper halves cut-side up in your baking dish. If any of them are wobbly, you can shave a tiny, thin slice off the bottom to help them sit flat—just be careful not to cut through and create a hole. A little stability goes a long way to prevent a filling spillage disaster in the oven.02
-
Time for the filling! Heat the olive oil in your large skillet over medium heat. Add the diced onion and cook for about 4-5 minutes, until it becomes soft and translucent. You’ll notice a lovely sweet aroma starting to develop. Now, add the minced garlic and cook for just one more minute until it’s fragrant—be careful not to let it burn.03
-
Add the ground chicken to the skillet, breaking it up with your spoon as it cooks. Sprinkle over the dried oregano and smoked paprika. Cook for about 6-8 minutes, until the chicken is no longer pink. The smoked paprika will give everything a beautiful color and a subtle, warm depth of flavor.04
-
Now, stir in your cooked brown rice and the chopped spinach. The spinach will seem like a lot at first, but it wilts down incredibly quickly. Cook for just another 2-3 minutes, until the spinach has fully wilted and everything is well-combined. Remove the skillet from the heat.05
-
This is the fun part. Let the chicken and rice mixture cool for just a minute or two—you don't want it piping hot when you add the cheese. Then, fold in most of the crumbled feta (save a little for the top!), the diced tomato, and the fresh parsley. Season generously with salt and black pepper to your liking. Give it a final good stir.06
-
Spoon the filling mixture generously into each pepper half, pressing down lightly and mounding it up a bit. You want them to be really well-stuffed. Top each one with the remaining feta cheese. This will create a deliciously golden, cheesy crust.07
-
Carefully pour the chicken broth or water into the bottom of the baking dish, around the peppers, not over them. This creates a steamy environment in the oven that helps the peppers become beautifully tender without drying out the filling.08
-
Cover the baking dish tightly with foil and bake for 25 minutes. Then, remove the foil and bake for another 15-20 minutes, or until the peppers are soft enough to easily pierce with a fork and the feta on top is lightly golden and bubbly. Let them rest for 5 minutes before serving—they’ll be incredibly hot!09
Not what you're looking for?