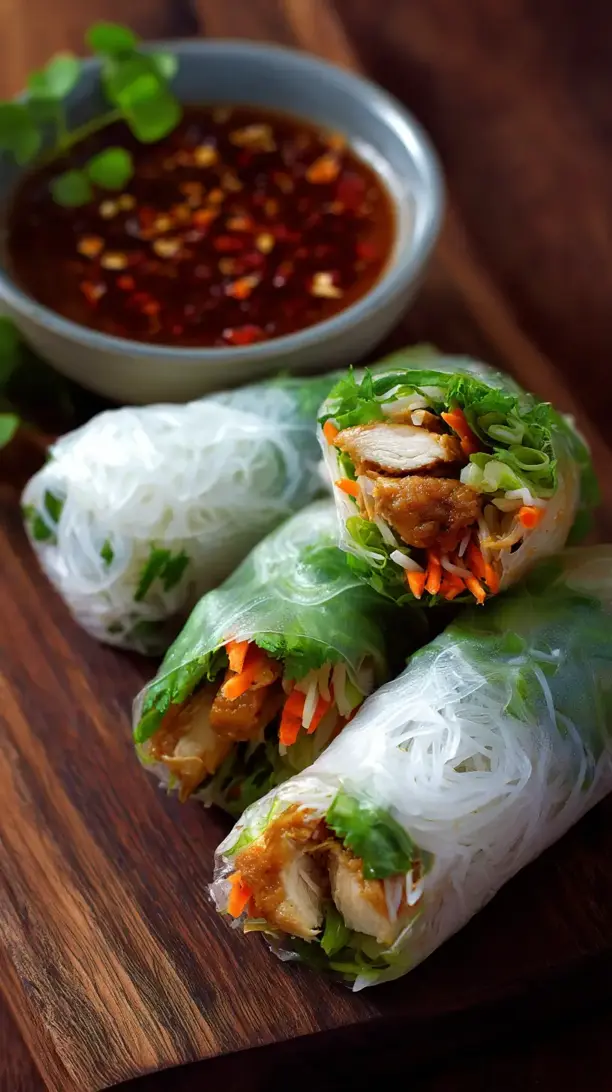
Making fresh Chicken Spring Rolls at home is a delightful kitchen experience. These translucent rolls are filled with crisp vegetables, tender chicken, and aromatic herbs for a light, satisfying meal. They’re endlessly customizable and perfect for a quick lunch or fun dinner activity.
Looking for Chicken Spring Rolls inspiration? You'll love what we have! Explore more Chicken Recipes recipes or discover our Christmas Cookie favorites.


Why You’ll Love This Chicken Spring Rolls
- Fresh & Customizable: Control your fillings and use up crisp veggies.
- Simple to Master: The rolling technique becomes easy and therapeutic.
- Textural Adventure: Enjoy soft wrapper, crunchy veggies, tender chicken, and fresh herbs.
- Light & Satisfying: Packed with lean protein and vegetables for an energizing meal.
Ingredients & Tools
- 8-10 rice paper wrappers (22 cm / 8.5-inch size)
- 2 cooked chicken breasts, shredded or thinly sliced
- 50 g rice vermicelli noodles
- 1 large carrot, julienned or grated
- 1 small cucumber, julienned (seeds removed)
- 1 red bell pepper, thinly sliced
- 1 avocado, sliced
- 1 big handful fresh mint leaves
- 1 big handful fresh cilantro
- Optional: Lettuce leaves (butter or romaine work well)
Tools: A large, shallow bowl or pie plate for warm water, a clean kitchen towel or cutting board for rolling.
Notes: Use fresh herbs and crisp vegetables. Don’t overstuff—rice paper is forgiving but tears if packed too full.
The quality of your ingredients really shines here, so use the freshest herbs and crispest vegetables you can find. The rice paper wrappers are the star of the show—they might seem intimidating, but they’re incredibly forgiving. A little goes a long way with the fillings; overstuffing is the only real enemy!
Nutrition (per serving)
| Calories: | 180 kcal |
| Protein: | 15 g |
| Fat: | 5 g |
| Carbs: | 20 g |
| Fiber: | 3 g |
Serves: 2-3 | Prep Time: 25 minutes | Cook Time: 0 minutes | Total Time: 25 minutes
Before You Start: Tips & Ingredient Notes
- Get Your Mise en Place. This is a recipe where organization is key. Have all your fillings prepped, sliced, and laid out in little bowls or sections on a tray before you even touch a rice paper wrapper. It makes the assembly line so much smoother.
- Water Temperature is Crucial. Use warm water, not hot. Hot water can make the rice paper too soft and gummy, causing it to tear easily. Warm water softens it perfectly for a pliable, strong wrapper.
- Embrace Imperfect Rolls. Your first roll might not be a perfect, tight cylinder, and that’s totally okay! They still taste amazing. The skill comes with practice, and even the slightly messy ones have a charming, homemade look.
- Don’t Skip the Herbs. The mint and cilantro aren’t just a garnish; they provide an essential, bright, aromatic flavor that cuts through the other ingredients and makes the whole roll sing. They’re non-negotiable for that authentic, fresh taste.
How to Make Chicken Spring Rolls
Step 1: Prepare all your fillings. Start by cooking the rice vermicelli noodles according to package directions—this usually just involves pouring boiling water over them and letting them sit for a few minutes until tender. Once cooked, drain and rinse them under cold water to stop the cooking process. Shred your cooked chicken breast and julienne all your vegetables. You’ll want everything in long, thin strips for easier rolling. Arrange all your components within easy reach.
Step 2: Set up your rolling station. Place your large shallow bowl or pie plate and fill it with warm water. Lay a clean, damp kitchen towel or a flexible plastic cutting board flat on your work surface. The towel provides just enough friction to keep the rice paper from sticking, which is a game-changer.
Step 3: Soften the rice paper. Take one rice paper wrapper and submerge it completely in the warm water for about 5-10 seconds. You’ll feel it start to soften. Don’t leave it in too long—it will continue to soften on your work surface. The goal is pliable, not mushy.
Step 4: Transfer and fill. Carefully lay the softened wrapper flat on your damp towel. It might still have a few firm spots, but they’ll soften up in seconds. Now, working quickly but calmly, arrange a small pile of fillings on the bottom third of the wrapper, closer to you. Start with a few noodles, then add chicken, a few strips of each vegetable, a slice or two of avocado, and a generous pinch of herbs.
Step 5: The rolling technique. This is the fun part! Fold the bottom edge of the wrapper up and over the fillings, tucking it in snugly. Then, fold the left and right sides inward, like you’re making an envelope. Now, holding the folds in place, firmly but gently roll the whole bundle away from you until it’s sealed. The wrapper will stick to itself. You’ll notice a perfectly sealed, cylindrical spring roll.
Step 6: Rest and repeat. Place your finished roll on a plate, preferably one that isn’t touching other rolls (they can stick if they’re squished together). Continue with the remaining wrappers and fillings. If the water in your bowl gets too starchy, feel free to replace it with fresh warm water. You’ll be a pro by the time you finish the batch!
Storage & Freshness Guide
- Fridge: Store in single layer, not touching, covered with damp paper towel and plastic wrap up to 6-8 hours.
- Freezer: Not recommended—wrappers become brittle and texture suffers.
- Reviving: If rolls stiffen, lightly brush with water and cover; serve at room temperature.
Serving Suggestions
Complementary Dishes
- A simple Mango Salad — The sweet and tangy flavors of a fresh mango salad with a lime dressing provide a fantastic contrast to the savory, herbal notes of the spring rolls.
- Hot and Sour Soup — For a more substantial meal, a bowl of aromatic hot and sour soup on the side adds warmth and depth, creating a perfect balance of temperatures and textures.
- Sticky Coconut Rice — The subtle sweetness and creamy texture of coconut rice is a delightful, almost dessert-like companion that soaks up any extra dipping sauce beautifully.
Drinks
- Iced Jasmine Green Tea — Its floral, slightly sweet notes cleanse the palate between bites without overpowering the delicate flavors inside the roll.
- A Crisp Sauvignon Blanc — The bright acidity and citrusy profile of this wine cuts through the richness of the avocado and chicken, making each bite taste fresh again.
- Vietnamese Iced Coffee — The strong, sweet, and creamy coffee is a classic pairing that offers a bold, caffeinated counterpoint to the light, healthy feel of the meal.
Something Sweet
- Mango with Sticky Rice — You’re already in the Southeast Asian flavor profile, so why not continue? The combination of sweet, ripe mango and glutinous rice is a legendary finish.
- Lychee Sorbet — This is a wonderfully light and refreshing option. The floral, perfumed taste of lychee is a unique and elegant way to end the meal on a cool, sweet note.
- Coconut Panna Cotta — Silky, creamy, and not too sweet, a coconut panna cotta feels indulgent but still aligns with the fresh, tropical theme of your spring roll feast.
Top Mistakes to Avoid
- Over-soaking the rice paper. This is the number one cause of torn, gummy rolls. A quick dip in warm water is all you need; the wrapper will continue to soften on your work surface. I’ve messed this up before too, leading to a frustrating pile of filling and torn wrapper!
- Overstuffing the roll. It’s so tempting to pack in every filling you have, but less is more here. A modest amount of filling ensures you can roll it tightly without the wrapper bursting. Think of it as a delicate envelope, not a overstuffed suitcase.
- Using a slippery surface. Trying to roll on a bare countertop or a dry plate is a recipe for disaster. The damp towel or plastic mat provides essential grip, allowing you to tuck and roll with confidence.
- Skipping the side folds. Remember the envelope technique! Folding in the sides before you do the final roll is what contains the fillings and creates that classic, neat spring roll shape. Without it, ingredients can easily fall out the ends.
Expert Tips
- Tip: Double-wrap for extra durability. If you’re worried about tearing or are packing them for later, use two rice paper wrappers instead of one. Dip and layer them together before adding your fillings for a super-strong roll that holds up beautifully.
- Tip: Add a lettuce leaf barrier. Placing a whole, soft lettuce leaf (like butter lettuce) on the rice paper before you add the other fillings can act as a protective layer, preventing sharper ingredients like carrot sticks from poking through the delicate wrapper.
- Tip: Make a killer peanut dipping sauce. Whisk together 3 tbsp peanut butter, 1 tbsp soy sauce, 1 tbsp lime juice, 1 tsp maple syrup or honey, and a pinch of chili flakes. Thin it out with warm water until it’s a perfect dipping consistency. It’s a game-changer.
- Tip: Keep rolls from sticking. If you’re not serving them immediately, place the finished rolls on a plate and lightly brush or spray them with water, then cover them with a damp paper towel and plastic wrap. This prevents them from drying out and sticking together.
FAQs
Can I make these spring rolls ahead of time?
Yes, but there’s a trick to it. They are best eaten the day they are made, but you can prepare them a few hours in advance. Store them in a single layer on a plate, not touching, and cover them tightly with plastic wrap that has been lightly dampened. This creates a humid environment that keeps them from drying out and becoming tough. I wouldn’t recommend refrigerating them for more than 6-8 hours, as the wrappers can harden.
My rice paper keeps tearing. What am I doing wrong?
This almost always comes down to one of two things: the water is too hot, or you’re soaking the wrapper for too long. Remember, a quick 5-10 second dip in warm (not hot) water is all you need. The wrapper will continue to absorb water and soften on your work surface. If it’s still a bit stiff in spots when you lay it down, just wait 15 seconds—it will become perfectly pliable.
What’s a good vegetarian alternative to the chicken?
Tofu is a fantastic swap! Use extra-firm tofu, pressed to remove excess water, and then pan-fry it until golden and crisp on the edges. You can also use marinated baked tofu, or even just add more substantial vegetables like sautéed mushrooms or sliced avocado for creaminess. The method remains exactly the same.
Can I use different herbs?
Absolutely! While mint and cilantro are classic, feel free to experiment. Thai basil would be a wonderful addition, offering a lovely anise-like flavor. You could also use a little fresh dill or parsley, though the flavor profile will shift away from the traditional Southeast Asian taste.
Why are my spring rolls sticking to the plate?
This is a common issue! The rice paper is naturally sticky. The best solution is to not let them touch each other on the serving plate. You can also lightly brush them with a tiny bit of neutral oil (like avocado or grapeseed) to create a barrier. Another pro tip is to place them on a bed of lettuce leaves, which also looks beautiful for serving.


Chicken Spring Rolls
Learn how to make fresh Chicken Spring Rolls at home with this easy recipe. Perfect for a light meal or fun dinner activity. Get rolling today!
Ingredients
For the Ingredients
-
8-10 rice paper wrappers (22 cm / 8.5-inch size)
-
2 cooked chicken breasts (shredded or thinly sliced)
-
50 g rice vermicelli noodles
-
1 large carrot (julienned or grated)
-
1 small cucumber (julienned (seeds removed))
-
1 red bell pepper (thinly sliced)
-
1 avocado (sliced)
-
1 big handful fresh mint leaves
-
1 big handful fresh cilantro
-
1 Lettuce leaves (Optional: butter or romaine work well)
Instructions
-
Prepare all your fillings. Start by cooking the rice vermicelli noodles according to package directions—this usually just involves pouring boiling water over them and letting them sit for a few minutes until tender. Once cooked, drain and rinse them under cold water to stop the cooking process. Shred your cooked chicken breast and julienne all your vegetables. You’ll want everything in long, thin strips for easier rolling. Arrange all your components within easy reach.01
-
Set up your rolling station. Place your large shallow bowl or pie plate and fill it with warm water. Lay a clean, damp kitchen towel or a flexible plastic cutting board flat on your work surface. The towel provides just enough friction to keep the rice paper from sticking, which is a game-changer.02
-
Soften the rice paper. Take one rice paper wrapper and submerge it completely in the warm water for about 5-10 seconds. You’ll feel it start to soften. Don’t leave it in too long—it will continue to soften on your work surface. The goal is pliable, not mushy.03
-
Transfer and fill. Carefully lay the softened wrapper flat on your damp towel. It might still have a few firm spots, but they’ll soften up in seconds. Now, working quickly but calmly, arrange a small pile of fillings on the bottom third of the wrapper, closer to you. Start with a few noodles, then add chicken, a few strips of each vegetable, a slice or two of avocado, and a generous pinch of herbs.04
-
The rolling technique. This is the fun part! Fold the bottom edge of the wrapper up and over the fillings, tucking it in snugly. Then, fold the left and right sides inward, like you’re making an envelope. Now, holding the folds in place, firmly but gently roll the whole bundle away from you until it’s sealed. The wrapper will stick to itself. You’ll notice a perfectly sealed, cylindrical spring roll.05
-
Rest and repeat. Place your finished roll on a plate, preferably one that isn’t touching other rolls (they can stick if they’re squished together). Continue with the remaining wrappers and fillings. If the water in your bowl gets too starchy, feel free to replace it with fresh warm water. You’ll be a pro by the time you finish the batch!06
Not what you're looking for?


