Looking for Chicken Thighs and Peppers inspiration? You'll love what we have! Explore more Chicken Thigh Recipes recipes or discover our Crockpot Recipes favorites.

Why You’ll Love This Chicken Thighs and Peppers
- One-pan wonder: Everything cooks together for maximum flavor and minimal cleanup.
- Perfect texture: Juicy chicken thighs contrast with tender-crisp peppers.
- Endlessly adaptable: A fantastic template for whatever you have in your fridge.
- Crowd-pleasing flavor: Savory, slightly sweet, and aromatic notes please all palates.
Ingredients & Tools
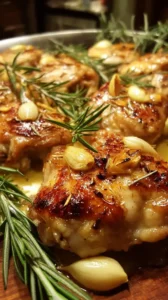
- 6 bone-in, skin-on chicken thighs
- 2 large bell peppers (1 red, 1 yellow), sliced
- 1 large yellow onion, sliced
- 4 cloves garlic, minced
- 2 tbsp olive oil
- 1 tsp smoked paprika
- 1 tsp dried oregano
- 1/2 tsp dried thyme
- 1/2 cup chicken broth
- 1 tbsp balsamic vinegar
- Salt and freshly ground black pepper, to taste
- Fresh parsley, chopped (for garnish)
Tools: A large, oven-safe skillet (like cast iron or stainless steel), tongs, a sharp knife, and a cutting board.
Notes: The quality of your chicken thighs really makes a difference here—look for ones with golden skin and a good layer of fat. And don’t skip the balsamic vinegar at the end; it adds a touch of acidity that brightens the entire dish.
Nutrition (per serving)
| Calories: | 420 kcal |
| Protein: | 35 g |
| Fat: | 28 g |
| Carbs: | 9 g |
| Fiber: | 2 g |
Serves: 4 | Prep Time: 15 minutes | Cook Time: 45 minutes | Total Time: 1 hour
Before You Start: Tips & Ingredient Notes
- Why bone-in, skin-on thighs? The bone keeps the meat incredibly moist and flavorful during the longer cooking time, while the skin becomes wonderfully crispy and protects the flesh underneath. It’s a texture game-changer.
- Can I use a different type of pepper? Absolutely! The classic red and yellow bells offer sweetness, but you could use poblano peppers for a mild kick or even throw in a jalapeño if you like a little heat. A mix of colors makes the final dish visually stunning.
- Is an oven-safe skillet really necessary? For the best results, yes. Starting on the stovetop and finishing in the oven gives you that perfect crispy skin and evenly cooked meat. If you don’t have one, you can transfer everything to a baking dish, but a skillet is ideal.
- What’s the deal with the balsamic vinegar? It’s not just for salad! A splash at the end deglazes the pan and adds a lovely, subtle tang that cuts through the richness of the chicken and peppers. You’ll notice the difference.
How to Make Chicken Thighs and Peppers
Step 1: First, preheat your oven to 400°F (200°C). While it’s heating, pat your chicken thighs completely dry with paper towels. This is the secret to getting that skin super crispy. Season both sides generously with salt and pepper, and don’t be shy—this is your main chance to season the meat itself.
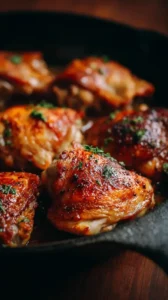
Step 2: Heat the olive oil in your large, oven-safe skillet over medium-high heat. Once the oil is shimmering, carefully place the chicken thighs in the pan, skin-side down. You should hear a satisfying sizzle. Let them cook without moving them for about 6-8 minutes, until the skin is golden brown and crispy. Use your tongs to flip them over and cook for another 3 minutes on the other side. Then, transfer the chicken to a clean plate.
Step 3: To the same skillet, add your sliced onions and bell peppers. There should be plenty of flavorful chicken fat and oil left in the pan. Sauté the vegetables for about 8-10 minutes, stirring occasionally, until they have softened and started to caramelize around the edges. You’ll notice their color deepening and their smell becoming wonderfully sweet.
Step 4: Now, stir in the minced garlic, smoked paprika, dried oregano, and thyme. Cook for just one minute until the garlic is fragrant—be careful not to burn it. This quick toast really wakes up the dried spices and unlocks their full potential.
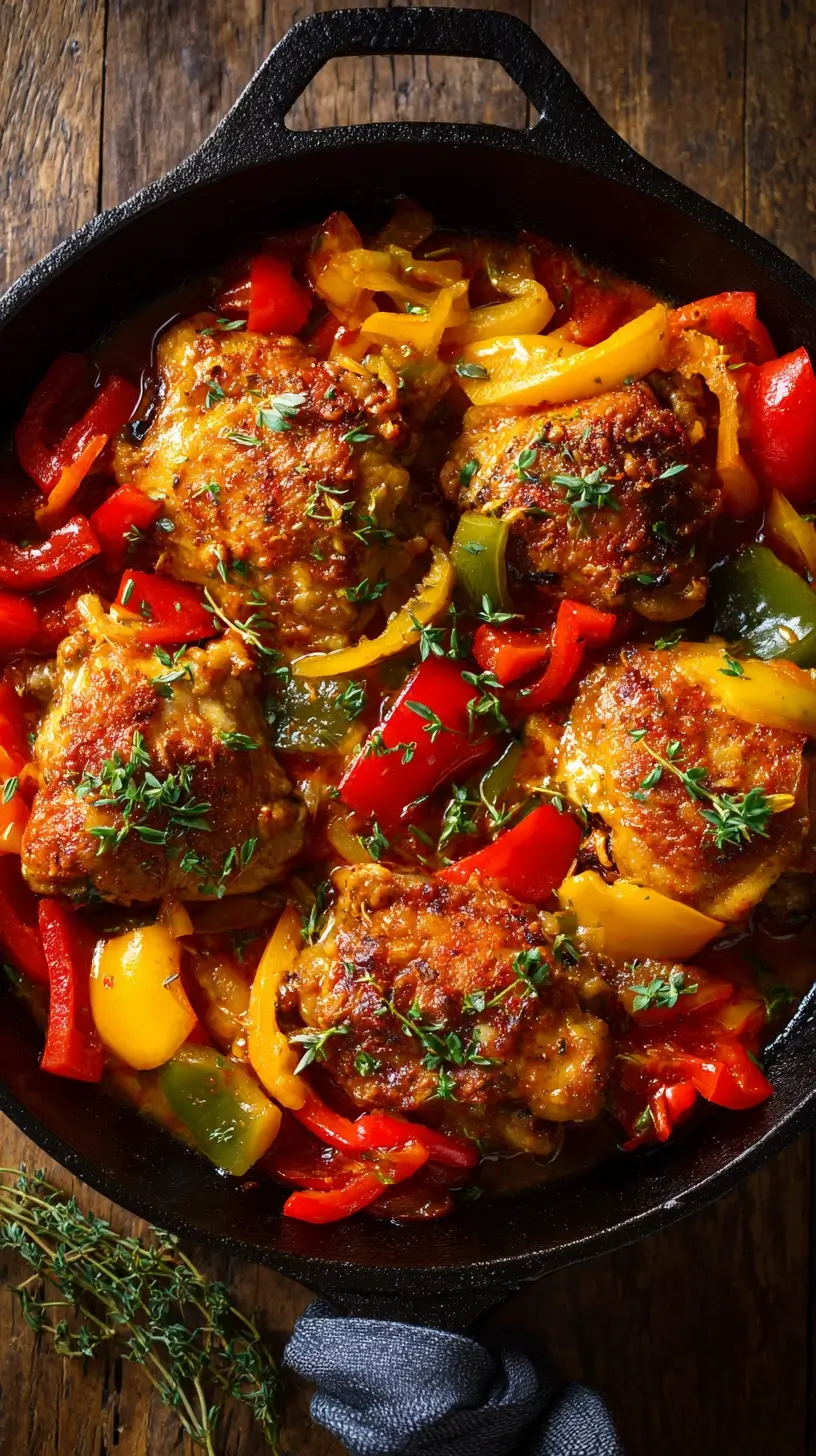
Step 5: Pour in the chicken broth and use a wooden spoon to scrape up all the browned, flavorful bits from the bottom of the pan. This is called deglazing, and it’s where a ton of your sauce’s flavor comes from. Nestle the seared chicken thighs back into the skillet, right on top of the bed of peppers and onions, skin-side up.
Step 6: Carefully transfer the entire skillet to your preheated oven. Roast for 20-25 minutes, or until the chicken is cooked through (the internal temperature should register 165°F / 74°C when checked with a meat thermometer) and the peppers are tender.
Step 7: Remove the skillet from the oven—remember, the handle will be extremely hot! Place it back on the stovetop. Using your tongs, transfer the chicken thighs to a serving platter. Drizzle the balsamic vinegar into the peppers and sauce left in the skillet, stirring to combine. Let it bubble for a minute to reduce slightly.
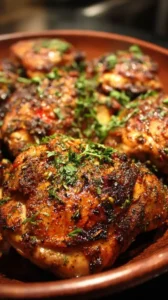
Step 8: To serve, spoon the saucy peppers and onions onto plates or a large platter, top with the crispy chicken thighs, and garnish generously with fresh chopped parsley. The final dish should be vibrant, juicy, and smell absolutely incredible.
Storage & Freshness Guide
- Fridge: Store in an airtight container for up to 3 days.
- Freezer: Freeze for up to 2 months, though peppers may soften upon thawing.
- Reviving: Reheat in a skillet with a splash of broth to maintain moisture.
Serving Suggestions
Complementary Dishes
- Creamy Polenta — The soft, creamy texture is the perfect vehicle for sopping up the delicious pan juices from the chicken and peppers.
- Garlic Mashed Potatoes — A classic, comforting base that makes the whole meal feel even more hearty and satisfying.
- Crusty Bread — Absolutely non-negotiable for wiping the skillet clean of every last bit of that savory sauce.
Drinks
- A Light-Bodied Red Wine — A Pinot Noir or Gamay has enough acidity to cut through the richness without overpowering the dish’s flavors.
- A Crisp Lager — The carbonation and clean finish provide a refreshing contrast to the savory, herby notes of the chicken.
- Sparkling Water with Lemon — For a non-alcoholic option, the bubbles and citrus are a simple, palate-cleansing choice.
Something Sweet
- Lemon Sorbet — Its bright, clean flavor is a perfect, light finish after a rich and savory main course.
- Dark Chocolate and Sea Salt — Just a square or two of high-quality dark chocolate provides a sophisticated, bittersweet ending.
- Almond Biscotti — They’re wonderfully crunchy and not too sweet, ideal for dipping into a final cup of coffee.
Top Mistakes to Avoid
- Mistake: Not drying the chicken skin. Any surface moisture will steam the skin instead of letting it crisp up. You’ll end up with rubbery, pale skin instead of that beautiful golden crackle.
- Mistake: Crowding the skillet when searing. If the thighs are too close together, they’ll steam instead of sear. Give them some space to ensure each one gets properly browned. I’ve messed this up before too, trying to rush—it’s worth doing in two batches if your skillet is small.
- Mistake: Skipping the deglazing step. Those browned bits at the bottom of the pan are pure flavor gold. If you don’t scrape them up with the broth, you’re leaving the best part of your sauce behind.
- Mistake: Overcooking the garlic. Garlic burns easily and becomes bitter. Add it with the other spices for just the last minute of sautéing the vegetables to keep its flavor sweet and aromatic.
Expert Tips
- Tip: Season the chicken ahead of time. If you have an extra 30 minutes, season the chicken thighs with salt and pepper and let them sit uncovered in the fridge. This helps the seasoning penetrate deeper and also dries the skin out further for ultimate crispiness.
- Tip: Use the broiler for a final crisp. If your chicken skin isn’t as crispy as you’d like after its time in the oven, pop the skillet under the broiler for the last 1-2 minutes. Watch it like a hawk—it can go from perfect to burnt in seconds!
- Tip: Let the chicken rest. After you take it out of the oven, let the chicken sit on the platter for 5 minutes before serving. This allows the juices to redistribute throughout the meat, ensuring every bite is moist and tender.
- Tip: Make it a complete sheet pan meal. For an even easier cleanup, you can roast everything on a sheet pan. Just sear the chicken first in a skillet for the crisp skin, then transfer it and the peppers to a baking sheet to finish in the oven.
FAQs
Can I use boneless, skinless chicken thighs?
You absolutely can, but the cooking method and result will be different. Boneless thighs will cook much faster, so you’ll need to reduce the oven time significantly—check for doneness after about 12-15 minutes. You’ll miss out on the crispy skin, but the meat will still be wonderfully flavorful and juicy. I’d recommend increasing the herbs and spices a bit to compensate for the lost flavor from the skin and bone.
How should I store and reheat leftovers?
Store any leftovers in an airtight container in the refrigerator for up to 3 days. The best way to reheat is in a skillet over medium-low heat with a splash of water or broth to keep the chicken from drying out. You can use the microwave, but the skin will lose its crispness. The peppers and onions actually taste even better the next day as the flavors continue to meld.
My sauce is too thin. How can I thicken it?
If you prefer a thicker sauce, you have a couple of easy options. After removing the chicken, you can simmer the peppers and liquid on the stovetop for a few extra minutes to reduce it. Alternatively, mix a teaspoon of cornstarch with a tablespoon of cold water to make a slurry, stir it into the sauce, and let it bubble for a minute until thickened.
Can I make this dish ahead of time?
You can do most of the prep ahead! You can slice the peppers and onions and store them in the fridge a day in advance. You can also season the chicken the night before. I don’t recommend fully cooking it ahead of time, as the chicken skin will soften upon storage. For the best texture, it’s really a dish best served right after cooking.
What can I use instead of balsamic vinegar?
If you don’t have balsamic, a squeeze of fresh lemon juice or a tablespoon of red wine vinegar will work beautifully. The goal is just a touch of acidity to balance the dish. You could even use a dash of Worcestershire sauce for a different, more savory kind of tang.


Chicken Thighs And Peppers
Make this easy, one-pan Chicken Thighs and Peppers for a flavorful and impressive weeknight dinner. Get the simple recipe for juicy chicken and tender peppers now!
Ingredients
For the Ingredients
-
6 bone-in, skin-on chicken thighs
-
2 large bell peppers (1 red, 1 yellow, sliced)
-
1 large yellow onion (sliced)
-
4 cloves garlic (minced)
-
2 tbsp olive oil
-
1 tsp smoked paprika
-
1 tsp dried oregano
-
0.5 tsp dried thyme
-
0.5 cup chicken broth
-
1 tbsp balsamic vinegar
-
Salt and freshly ground black pepper (to taste)
-
Fresh parsley (chopped, for garnish)
Instructions
-
First, preheat your oven to 400°F (200°C). While it’s heating, pat your chicken thighs completely dry with paper towels. This is the secret to getting that skin super crispy. Season both sides generously with salt and pepper, and don’t be shy—this is your main chance to season the meat itself.01
-
Heat the olive oil in your large, oven-safe skillet over medium-high heat. Once the oil is shimmering, carefully place the chicken thighs in the pan, skin-side down. You should hear a satisfying sizzle. Let them cook without moving them for about 6-8 minutes, until the skin is golden brown and crispy. Use your tongs to flip them over and cook for another 3 minutes on the other side. Then, transfer the chicken to a clean plate.02
-
To the same skillet, add your sliced onions and bell peppers. There should be plenty of flavorful chicken fat and oil left in the pan. Sauté the vegetables for about 8-10 minutes, stirring occasionally, until they have softened and started to caramelize around the edges. You’ll notice their color deepening and their smell becoming wonderfully sweet.03
-
Now, stir in the minced garlic, smoked paprika, dried oregano, and thyme. Cook for just one minute until the garlic is fragrant—be careful not to burn it. This quick toast really wakes up the dried spices and unlocks their full potential.04
-
Pour in the chicken broth and use a wooden spoon to scrape up all the browned, flavorful bits from the bottom of the pan. This is called deglazing, and it’s where a ton of your sauce’s flavor comes from. Nestle the seared chicken thighs back into the skillet, right on top of the bed of peppers and onions, skin-side up.05
-
Carefully transfer the entire skillet to your preheated oven. Roast for 20-25 minutes, or until the chicken is cooked through (the internal temperature should register 165°F / 74°C when checked with a meat thermometer) and the peppers are tender.06
-
Remove the skillet from the oven—remember, the handle will be extremely hot! Place it back on the stovetop. Using your tongs, transfer the chicken thighs to a serving platter. Drizzle the balsamic vinegar into the peppers and sauce left in the skillet, stirring to combine. Let it bubble for a minute to reduce slightly.07
-
To serve, spoon the saucy peppers and onions onto plates or a large platter, top with the crispy chicken thighs, and garnish generously with fresh chopped parsley. The final dish should be vibrant, juicy, and smell absolutely incredible.08
Not what you're looking for?


