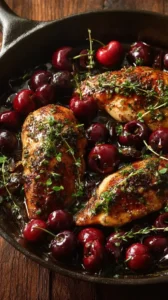
This Cider Braised Chicken is the perfect cozy autumn meal. Tender chicken simmers in a sweet-savory sauce of apple cider, thyme, and vegetables. It’s rustic, elegant, and deeply satisfying with minimal hands-on effort.
Nothing beats a great Cider Braised Chicken. Whether you're a fan of Chicken Breast Recipes or want to try something from our Chicken Thigh Recipes selection, keep scrolling!


Why You’ll Love This Cider Braised Chicken
- Rich & comforting: Sweet cider and savory herbs create a deeply satisfying dish.
- Easy to make: The oven does most of the work for you.
- Amazing aroma: Fills your kitchen with cozy autumn scents.
- Versatile & impressive: Perfect for family dinners or entertaining.
Ingredients & Tools
- 4 bone-in, skin-on chicken thighs
- 2 tbsp olive oil
- 1 large yellow onion, thinly sliced
- 2 medium carrots, chopped into ½-inch pieces
- 2 celery stalks, chopped
- 3 garlic cloves, minced
- 1 cup dry hard apple cider
- 1 ½ cups chicken stock
- 2 tbsp apple cider vinegar
- 1 tbsp whole grain mustard
- 2 tsp fresh thyme leaves
- 1 bay leaf
- Salt and black pepper to taste
Tools: A large, oven-safe Dutch oven or heavy-bottomed pot with a lid, tongs, and a wooden spoon.
Notes: Using a good, dry hard cider is key here—it adds depth without being too sweet. And don’t skip searing the chicken skin; that golden crispness adds so much flavor to the final dish.
Nutrition (per serving)
| Calories: | 420 kcal |
| Protein: | 28 g |
| Fat: | 22 g |
| Carbs: | 18 g |
| Fiber: | 3 g |
Serves: 4 | Prep Time: 15 minutes | Cook Time: 1 hour 15 minutes | Total Time: 1 hour 30 minutes
Before You Start: Tips & Ingredient Notes
- Why use hard apple cider instead of sweet cider? Dry hard cider provides a more complex, less sugary flavor base that reduces into a beautifully balanced sauce. Sweet cider can make the dish cloying.
- Do I really need bone-in, skin-on chicken? Yes, for the best results. The bones add incredible flavor to the braising liquid, and the skin, when seared, gives you that lovely crispy texture and rich fond in the pot.
- What’s the best pot to use? A heavy-bottomed, oven-safe Dutch oven is ideal. It distributes heat evenly for a perfect sear and maintains a steady temperature during braising.
- Can I prepare anything ahead? Absolutely—you can chop the vegetables and measure out your liquids ahead of time. This makes the actual cooking process smooth and relaxing.
How to Make Cider Braised Chicken
Step 1: Preheat your oven to 350°F (175°C). Pat the chicken thighs completely dry with paper towels—this is crucial for getting that beautifully crisp skin. Season both sides generously with salt and pepper. Heat the olive oil in your Dutch oven over medium-high heat until it shimmers. Carefully place the chicken thighs in, skin-side down, and sear for 5–7 minutes without moving them. You’re looking for a deep golden-brown crust. Flip and sear the other side for another 3–4 minutes, then transfer the chicken to a plate. You’ll notice those browned bits stuck to the pot—that’s flavor gold!
Step 2: Reduce the heat to medium. Add the sliced onion, carrots, and celery to the same pot. Sauté for about 6–8 minutes, stirring occasionally and scraping up those browned bits, until the vegetables have softened and the onions are translucent. Add the minced garlic and cook for another minute until fragrant—you don’t want it to burn. The aroma at this stage is just incredible, all savory and sweet.
Step 3: Pour in the hard apple cider to deglaze the pot, using your wooden spoon to scrape up any remaining fond. Let it bubble and reduce for about 2–3 minutes. This cooks off the sharp alcohol edge and concentrates the apple flavor. Stir in the chicken stock, apple cider vinegar, whole grain mustard, fresh thyme, and the bay leaf. Bring everything to a gentle simmer—you’ll see the liquid start to thicken slightly.
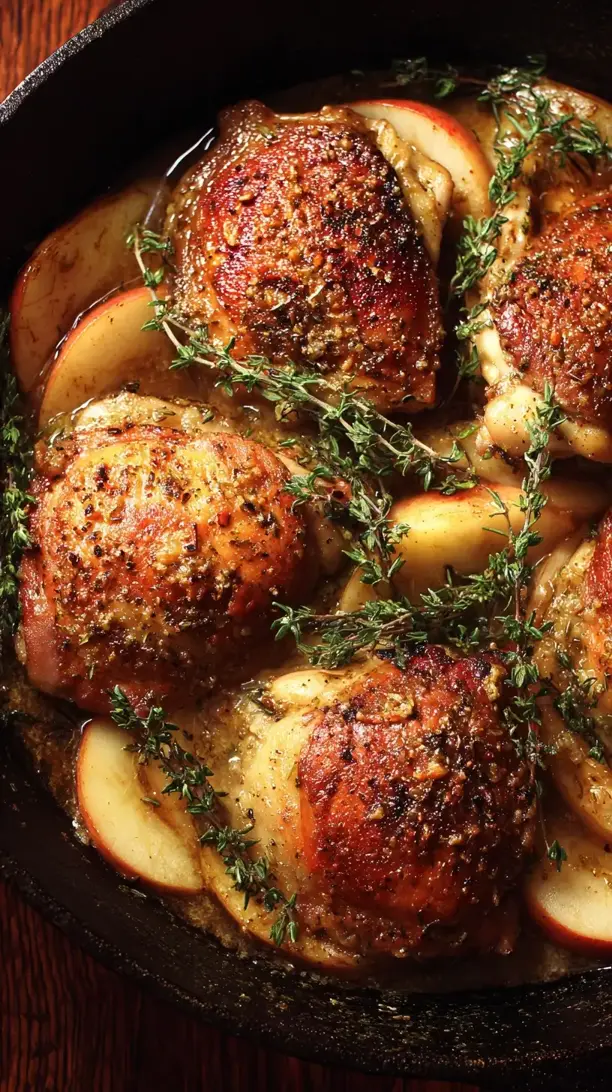
Step 4: Nestle the seared chicken thighs back into the pot, skin-side up, along with any accumulated juices from the plate. The liquid should come about halfway up the sides of the chicken. Bring it back to a simmer, then cover the pot with the lid and carefully transfer it to the preheated oven. Braise for 45–50 minutes. The chicken will become incredibly tender, and the sauce will reduce and intensify.
Step 5: Carefully remove the pot from the oven—remember, that handle is hot! The chicken should be fork-tender and pulling away from the bone. If you’d like a thicker sauce, you can place the pot back on the stove over medium heat and let it simmer uncovered for 5–10 minutes until it reaches your desired consistency. Taste the sauce and adjust seasoning with more salt, pepper, or a splash of cider vinegar if needed. Discard the bay leaf before serving.
Storage & Freshness Guide
- Fridge: Store in an airtight container for up to 3 days.
- Freezer: Freeze for up to 3 months in a sealed container.
- Reviving: Reheat gently on the stovetop with a splash of stock.
Serving Suggestions
Complementary Dishes
- Creamy mashed potatoes — The ultimate comfort pairing; the fluffy potatoes soak up the rich cider sauce beautifully.
- Buttery egg noodles or polenta — Both provide a lovely, neutral base that lets the chicken and its glorious sauce shine.
- Crusty bread — Absolutely non-negotiable for mopping up every last drop of that incredible sauce from your plate.
Drinks
- A dry hard cider — Echoing the flavors in the dish creates a wonderfully harmonious pairing that enhances the meal.
- A crisp, unoaked Chardonnay — Its bright acidity and subtle apple notes complement the savory-sweet profile of the chicken perfectly.
- Sparkling water with lemon — A simple, refreshing palate cleanser that cuts through the richness without competing for attention.
Something Sweet
- Warm apple crisp — It continues the apple theme in the most delightful, comforting way, especially with a scoop of vanilla ice cream.
- Dark chocolate pot de crème — Its rich, bittersweet depth provides a sophisticated and satisfying end to the meal.
- Simple shortbread cookies — Buttery and not too sweet, they’re a lovely, light finish that pairs wonderfully with coffee or tea.
Top Mistakes to Avoid
- Not patting the chicken dry before searing. Moisture is the enemy of a good sear. If the skin is wet, it will steam instead of crisping up, and you’ll miss out on that beautiful texture and flavor.
- Moving the chicken too soon during searing. Let it sit! This allows a proper crust to form. If you peek or shift it too early, the skin will tear and stick. I’ve messed this up before too—patience is key.
- Using a pot that’s not oven-safe. This seems obvious, but it’s an easy mistake to make. Plastic handles will melt, and transferring everything to another dish is just messy and can affect the cooking.
- Skimping on the braising time. Braising is a low-and-slow process. Rushing it means the chicken won’t become as fall-apart tender, and the flavors won’t have time to meld together properly.
Expert Tips
- Tip: For an extra layer of flavor, add a tablespoon of Calvados (apple brandy) when you deglaze the pot with the cider. It adds a wonderful, warm apple-brandy note that deepens the entire dish.
- Tip: If you want to make this ahead, you can braise the chicken completely, let it cool, and store it in the fridge for up to two days. The flavors actually improve! Reheat gently on the stovetop or in a low oven.
- Tip: Don’t toss out any leftovers! Shred the remaining chicken off the bone and mix it back into the sauce for an incredible filling for pot pies, pastries, or even a next-level sandwich.
- Tip: For a richer, silkier sauce, stir in a couple of tablespoons of cold butter right at the end, off the heat. This technique, called mounting with butter, gives the sauce a gorgeous sheen and a velvety texture.
FAQs
Can I use boneless, skinless chicken thighs?
You can, but the result will be different. You’ll lose the deep flavor from the bones and the crispy texture from the skin. If you do use them, reduce the braising time by about 10–15 minutes to prevent the meat from overcooking and becoming dry. The sauce will still be delicious, but the dish won’t have the same rustic, hearty character.
What can I use if I don’t have hard apple cider?
A good non-alcoholic substitute is a mix of 3/4 cup apple juice and 1/4 cup chicken stock, with an extra tablespoon of apple cider vinegar to mimic the acidity. The flavor profile will be slightly sweeter, so you might want to balance it with a bit more mustard or thyme to cut through the sweetness.
My sauce is too thin. How can I thicken it?
The easiest way is to simmer the braising liquid on the stovetop, uncovered, for an extra 5–10 minutes after the chicken is done. For a quicker, more controlled thickener, you can make a slurry by mixing a tablespoon of cornstarch with two tablespoons of cold water and stirring it into the simmering sauce until it thickens.
Can I add other vegetables to the braise?
Absolutely! Root vegetables like parsnips or small potatoes would be wonderful additions. Just chop them into even, bite-sized pieces so they cook through in the same amount of time. You could also toss in some mushrooms for an earthy, savory note—they’ll soak up the sauce beautifully.
How should I store and reheat leftovers?
Store any leftovers in an airtight container in the refrigerator for up to 3 days. To reheat, gently warm it in a saucepan over low heat on the stove, adding a splash of chicken stock or water if the sauce has thickened too much. The microwave can work, but it may heat unevenly and overcook the chicken.


Cider Braised Chicken
Make this easy Cider Braised Chicken for a cozy, impressive dinner. Tender chicken in a rich apple cider sauce. Get the simple, foolproof recipe now!
Ingredients
For the Ingredients
-
4 bone-in, skin-on chicken thighs
-
2 tbsp olive oil
-
1 large yellow onion (thinly sliced)
-
2 medium carrots (chopped into ½-inch pieces)
-
2 celery stalks (chopped)
-
3 garlic cloves (minced)
-
1 cup dry hard apple cider
-
1 ½ cups chicken stock
-
2 tbsp apple cider vinegar
-
1 tbsp whole grain mustard
-
2 tsp fresh thyme leaves
-
1 bay leaf
-
Salt and black pepper (to taste)
Instructions
-
Preheat your oven to 350°F (175°C). Pat the chicken thighs completely dry with paper towels—this is crucial for getting that beautifully crisp skin. Season both sides generously with salt and pepper. Heat the olive oil in your Dutch oven over medium-high heat until it shimmers. Carefully place the chicken thighs in, skin-side down, and sear for 5–7 minutes without moving them. You’re looking for a deep golden-brown crust. Flip and sear the other side for another 3–4 minutes, then transfer the chicken to a plate. You’ll notice those browned bits stuck to the pot—that’s flavor gold!01
-
Reduce the heat to medium. Add the sliced onion, carrots, and celery to the same pot. Sauté for about 6–8 minutes, stirring occasionally and scraping up those browned bits, until the vegetables have softened and the onions are translucent. Add the minced garlic and cook for another minute until fragrant—you don’t want it to burn. The aroma at this stage is just incredible, all savory and sweet.02
-
Pour in the hard apple cider to deglaze the pot, using your wooden spoon to scrape up any remaining fond. Let it bubble and reduce for about 2–3 minutes. This cooks off the sharp alcohol edge and concentrates the apple flavor. Stir in the chicken stock, apple cider vinegar, whole grain mustard, fresh thyme, and the bay leaf. Bring everything to a gentle simmer—you’ll see the liquid start to thicken slightly.03
-
Nestle the seared chicken thighs back into the pot, skin-side up, along with any accumulated juices from the plate. The liquid should come about halfway up the sides of the chicken. Bring it back to a simmer, then cover the pot with the lid and carefully transfer it to the preheated oven. Braise for 45–50 minutes. The chicken will become incredibly tender, and the sauce will reduce and intensify.04
-
Carefully remove the pot from the oven—remember, that handle is hot! The chicken should be fork-tender and pulling away from the bone. If you’d like a thicker sauce, you can place the pot back on the stove over medium heat and let it simmer uncovered for 5–10 minutes until it reaches your desired consistency. Taste the sauce and adjust seasoning with more salt, pepper, or a splash of cider vinegar if needed. Discard the bay leaf before serving.05
Not what you're looking for?


