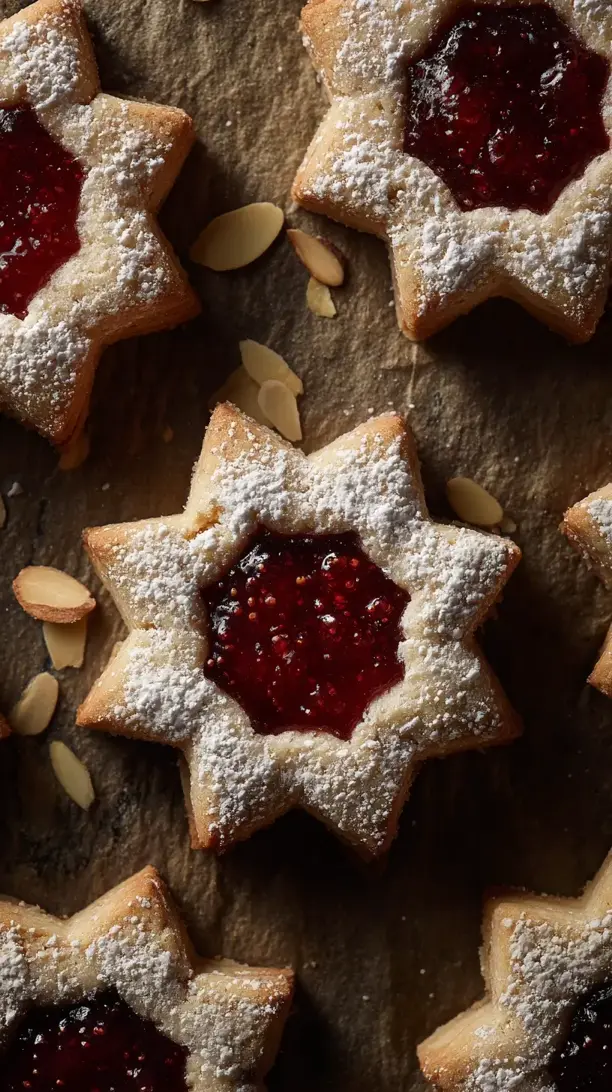
There’s something truly magical about pulling a tray of these Classic Linzer Cookies from the oven. To me, they are the heart of holiday baking—tender, nutty shortbread with a sweet-tart raspberry jam window that feels like a warm, heartfelt gift from your own kitchen. If you’re looking for Christmas dessert ideas that impress without stress, this easy recipe is a beautiful place to start. The scent of toasted almonds filling your home is pure comfort, and the process itself becomes a cherished ritual.
Whenever I put together my list of Christmas baking ideas, these cookies are always at the top. They are, without a doubt, one of my most cherished Christmas cookies recipes, perfect for gifting or stacking on a festive platter. Whether you know them as classic holiday cookies Christmas style or as galletas navideñas, their joyful appeal is universal. I love that a single batch can bring so much delight, making them a staple among my favorite galletas navidad.
Really, this is more than just another recipe; it’s a true comfort food recipe that connects us to tradition. The simple acts of cutting out the shapes, sandwiching them with jam, and that final snow-like dusting of sugar are so rewarding. Mastering how to make these linzer cookies unlocks a world of holiday magic, creating edible heirlooms your family will request year after year.
If you're looking for the perfect Classic Linzer Cookies, you're in the right place. Whether you love Christmas Cookie or want to explore our Chicken Thigh Recipes collection, we've got you covered.


Why You’ll Love This Classic Linzer Cookies
- Stunning appearance: They look professionally made with their red jam windows and snowy sugar dusting.
- Perfect texture: Tender, nutty shortbread contrasts with sticky, fruity jam.
- Forgiving process: The dough is workable and chillable, great for building baking confidence.
- Wonderful gift: Packaged beautifully, they feel special and personal.
Ingredients & Tools
- 225 g (2 sticks) unsalted butter, at cool room temperature
- 150 g granulated sugar
- 1 large egg, at room temperature
- 1 tsp pure vanilla extract
- 1/2 tsp almond extract
- 300 g all-purpose flour
- 100 g finely ground almonds (almond flour)
- 1/2 tsp baking powder
- 1/2 tsp salt
- 1/2 tsp ground cinnamon (optional, but lovely)
- 200 g seedless raspberry jam
- Powdered sugar, for dusting
Tools: Stand mixer or hand mixer, rolling pin, 2-inch round fluted cookie cutter, assorted smaller shaped cutters (hearts, stars, or simple circles work great), two baking sheets, parchment paper, a fine-mesh sieve for dusting.
Notes: Using European-style butter and not skipping the almond extract enhances flavor.
Nutrition (per serving)
| Calories: | 180 kcal |
| Protein: | 2 g |
| Fat: | 10 g |
| Carbs: | 22 g |
| Fiber: | 1 g |
Serves: Makes about 24 sandwiched cookies | Prep Time: 30 minutes (plus chilling) | Cook Time: 10-12 minutes | Total Time: 1 hour 30 minutes (with chilling)
Before You Start: Tips & Ingredient Notes
- Butter temperature is key. Your butter should be cool to the touch but soft enough that you can make an indentation with your finger. If it’s too warm, the dough will be greasy and spread too much; if it’s too cold, it won’t cream properly with the sugar.
- Don’t skip the chilling. This is the most crucial step for achieving the perfect shape. Chilling the dough solidifies the butter, which prevents the cookies from spreading into puddles in the oven and gives you those sharp, clean edges.
- Grind your own nuts for extra flavor. While pre-ground almond flour is convenient, toasting whole almonds and grinding them yourself in a food processor will give your cookies a much deeper, toastier flavor. Just be careful not to over-process them into almond butter!
- Choose your jam wisely. A thick, seedless raspberry jam is traditional for its brilliant color and smooth texture. If your jam is too runny, simmer it in a small saucepan for a few minutes to thicken it up and let it cool completely before using.
How to Make Classic Linzer Cookies
Step 1: In the bowl of a stand mixer fitted with the paddle attachment, cream together the softened butter and granulated sugar on medium speed for about 3-4 minutes. You’re looking for the mixture to become pale, light, and fluffy. This step is important for incorporating air into your dough, which contributes to a tender texture. Scrape down the sides of the bowl with a spatula to ensure everything is well combined.
Step 2: Add the room-temperature egg, vanilla extract, and almond extract to the butter mixture. Mix on medium speed until fully incorporated, scraping down the bowl again. The mixture might look a little curdled at this point—that’s perfectly fine and will come together once you add the dry ingredients. The aroma of the almond extract will start to fill your kitchen already.
Step 3: In a separate bowl, whisk together the all-purpose flour, ground almonds, baking powder, salt, and cinnamon (if using). This ensures the leavening and salt are evenly distributed throughout the flour. With the mixer on low speed, gradually add the dry ingredients to the wet ingredients. Mix just until the flour disappears and a soft dough forms. Be careful not to overmix, as this can develop the gluten and make the cookies tough.
Step 4: Divide the dough into two equal portions. Shape each portion into a flat disc, wrap tightly in plastic wrap, and refrigerate for at least 1 hour, or until firm. You can also chill it overnight if you’re preparing ahead. The dough needs to be firm enough to roll out without sticking excessively.
Step 5: Preheat your oven to 350°F (175°C) and line two baking sheets with parchment paper. On a lightly floured surface, roll out one disc of dough to about 1/4-inch thickness. Using your fluted round cutter, cut out as many circles as you can. Carefully transfer the full circles to one prepared baking sheet, spacing them about 1 inch apart. These will be your cookie bases.
Step 6: Now, for the tops! Re-roll the scraps and roll out the second disc of dough. Cut out an equal number of circles. Then, using a smaller cutter (a star, heart, or tiny circle), cut a window out of the center of each of these circles. Place these ring-shaped tops on the second baking sheet. You’ll notice the dough might soften as you work—if it becomes too sticky, just pop it back in the fridge for 10-15 minutes.
Step 7: Bake the cookies for 10-12 minutes, or until the edges are just barely starting to turn a light golden brown. The tops should still look fairly pale. Rotate the baking sheets halfway through for even baking. Let the cookies cool on the baking sheets for 5 minutes before transferring them to a wire rack to cool completely. They will firm up as they cool.
Step 8: Once the cookies are completely cool, it’s assembly time! Place all the solid bottom cookies on your work surface. Spoon about a teaspoon of the thickened raspberry jam onto the center of each one, spreading it slightly but leaving a small border around the edge. The trick is not to overfill, or the jam will squish out the sides when you sandwich them.
Step 9: Take your cut-out top cookies and, using a fine-mesh sieve, generously dust the tops with powdered sugar. This creates that beautiful snowy effect. Then, gently place a sugared top onto each jam-covered base, pressing down lightly to adhere. And there you have it—a tray of stunning, homemade Linzer cookies!
Storage & Freshness Guide
- Fridge: Not recommended; store assembled cookies at room temperature.
- Freezer: Freeze baked, unassembled bases and tops up to 3 months; thaw before assembling.
- Reviving: Warm in a 300°F oven 3–5 minutes to crisp, cool, then re-dust with sugar.
Serving Suggestions
Complementary Dishes
- A simple cheese board — The sharp, salty notes of a good aged cheddar or a creamy brie provide a wonderful savory counterpoint to the sweet, fruity cookies.
- Mulled wine or warm apple cider — The warm spices in these drinks echo the cinnamon in the cookies and create the ultimate cozy, festive experience.
- Vanilla bean ice cream — Crumble a cookie or two over a bowl of high-quality vanilla ice cream for an incredibly easy yet decadent dessert.
Drinks
- Earl Grey tea — The bergamot in the tea cuts through the richness of the butter and complements the fruitiness of the jam beautifully.
- A glass of Prosecco — The bubbles and slight acidity of a dry sparkling wine are a fantastic palate cleanser between bites of the rich cookie.
- Dark roast coffee — The bitterness of a strong coffee balances the sweetness perfectly, making for a classic and satisfying pairing.
Something Sweet
- Dark chocolate truffles — A few pieces of intense, dark chocolate provide a different kind of richness that doesn’t compete with the cookies but rather complements them.
- Lemon sorbet — The bright, clean, and tart flavor of a lemon sorbet is a refreshing way to end a meal after enjoying these nutty, jam-filled treats.
- Candied orange peel — The chewy, citrusy bite of candied peel offers a lovely textural and flavor contrast that feels very European and sophisticated.
Top Mistakes to Avoid
- Mistake: Using warm, soft dough. If your dough isn’t properly chilled, the cookies will lose their shape in the oven. The intricate cut-out windows can blur and the fluted edges will spread, resulting in a less defined, puffy cookie.
- Mistake: Overbaking the cookies. Linzer cookies should remain pale with just a hint of gold at the edges. Overbaking them will make them dry and hard, losing that delicate, melt-in-your-mouth quality that makes them so special.
- Mistake: Dusting with powdered sugar before assembly. If you dust the tops before placing them on the jam, the powdered sugar can dissolve into the jam and create a messy, sticky-looking finish instead of a clean, snowy one.
- Mistake: Spreading jam on warm cookies. The heat will melt the jam, making it seep into the cookie and creating a soggy base. Always, always wait until the cookies are completely cooled to room temperature.
Expert Tips
- Tip: Roll your dough between parchment paper. This eliminates the need for extra flour, which can dry out your dough, and makes transferring the delicate cut-out tops much easier. Simply peel back the top layer of parchment, cut your shapes, remove the scraps, and slide the parchment with the cookies directly onto your baking sheet.
- Tip: Use a offset spatula for the jam. A small offset spatula gives you so much more control than a spoon for spreading the jam into a neat, even layer right to the edges of the border.
- Tip: Freeze the shaped cookies before baking. For the absolute sharpest edges, after you’ve cut out your shapes and placed them on the baking sheet, pop the entire sheet into the freezer for 10 minutes before baking. This gives the butter one last chance to firm up completely.
- Tip: Revive soggy cookies. If your assembled cookies have been stored in an airtight container and the powdered sugar has been absorbed or they’ve gone a bit soft, you can refresh them. Place them on a baking sheet in a single layer and warm them in a 300°F (150°C) oven for 3-5 minutes. Let them cool completely and re-dust with powdered sugar.
FAQs
Can I make the dough ahead of time?
Absolutely! The dough discs can be wrapped tightly and refrigerated for up to 3 days. You can also freeze them for up to 3 months. Just let the frozen dough thaw in the refrigerator overnight before rolling it out. This makes them a fantastic make-ahead project for the holidays, as you can bake and assemble them the day you need them.
Can I use a different type of nut?
Yes, you can experiment with other nuts for a different flavor profile. Hazelnuts are a classic and delicious alternative—just toast and skin them before grinding. Pecans or walnuts would also work well, though the flavor will be less traditional. The key is to use the same weight of finely ground nuts as the recipe calls for to maintain the dough’s structure.
My dough is too crumbly and won’t roll out. What happened?
This usually means there’s a bit too much flour in the dough, either from measuring inaccurately or from using too much flour on your work surface. Don’t worry, it’s an easy fix! Try kneading a tablespoon of cold water or a single teaspoon of milk into the dough until it just comes together. Be gentle and don’t overwork it.
Can I use a different kind of jam?
Of course! While raspberry is the classic, feel free to get creative. Apricot, blackberry, or red currant jam are all wonderful choices. I’d recommend sticking with seedless varieties for a smooth texture and looking for a jam that’s not overly sweet to provide that lovely tart contrast. A little lemon zest stirred into the jam can also brighten things up nicely.
How should I store these cookies, and how long do they last?
Store the fully assembled cookies in a single layer in an airtight container at room temperature. They are best enjoyed within 3-4 days. If you need to store them longer, you can keep the baked and cooled cookie bases and tops separately in airtight containers for up to a week, and then assemble them with jam and a fresh dusting of sugar just before serving.


Classic Linzer Cookies: An Easy Holiday Baking Recipe
Make these Classic Linzer Cookies with our easy linzer cookie recipe. They're the perfect, elegant addition to your holiday baking with a sweet-tart raspberry jam filling.
Ingredients
For the Ingredients
-
225 g unsalted butter (at cool room temperature)
-
150 g granulated sugar
-
1 large egg (at room temperature)
-
1 tsp pure vanilla extract
-
1/2 tsp almond extract
-
300 g all-purpose flour
-
100 g finely ground almonds (almond flour)
-
1/2 tsp baking powder
-
1/2 tsp salt
-
1/2 tsp ground cinnamon (optional, but lovely)
-
200 g seedless raspberry jam
-
Powdered sugar (for dusting)
Instructions
-
In the bowl of a stand mixer fitted with the paddle attachment, cream together the softened butter and granulated sugar on medium speed for about 3-4 minutes. You’re looking for the mixture to become pale, light, and fluffy. This step is important for incorporating air into your dough, which contributes to a tender texture. Scrape down the sides of the bowl with a spatula to ensure everything is well combined.01
-
Add the room-temperature egg, vanilla extract, and almond extract to the butter mixture. Mix on medium speed until fully incorporated, scraping down the bowl again. The mixture might look a little curdled at this point—that’s perfectly fine and will come together once you add the dry ingredients. The aroma of the almond extract will start to fill your kitchen already.02
-
In a separate bowl, whisk together the all-purpose flour, ground almonds, baking powder, salt, and cinnamon (if using). This ensures the leavening and salt are evenly distributed throughout the flour. With the mixer on low speed, gradually add the dry ingredients to the wet ingredients. Mix just until the flour disappears and a soft dough forms. Be careful not to overmix, as this can develop the gluten and make the cookies tough.03
-
Divide the dough into two equal portions. Shape each portion into a flat disc, wrap tightly in plastic wrap, and refrigerate for at least 1 hour, or until firm. You can also chill it overnight if you’re preparing ahead. The dough needs to be firm enough to roll out without sticking excessively.04
-
Preheat your oven to 350°F (175°C) and line two baking sheets with parchment paper. On a lightly floured surface, roll out one disc of dough to about 1/4-inch thickness. Using your fluted round cutter, cut out as many circles as you can. Carefully transfer the full circles to one prepared baking sheet, spacing them about 1 inch apart. These will be your cookie bases.05
-
Now, for the tops! Re-roll the scraps and roll out the second disc of dough. Cut out an equal number of circles. Then, using a smaller cutter (a star, heart, or tiny circle), cut a window out of the center of each of these circles. Place these ring-shaped tops on the second baking sheet. You’ll notice the dough might soften as you work—if it becomes too sticky, just pop it back in the fridge for 10-15 minutes.06
-
Bake the cookies for 10-12 minutes, or until the edges are just barely starting to turn a light golden brown. The tops should still look fairly pale. Rotate the baking sheets halfway through for even baking. Let the cookies cool on the baking sheets for 5 minutes before transferring them to a wire rack to cool completely. They will firm up as they cool.07
-
Once the cookies are completely cool, it’s assembly time! Place all the solid bottom cookies on your work surface. Spoon about a teaspoon of the thickened raspberry jam onto the center of each one, spreading it slightly but leaving a small border around the edge. The trick is not to overfill, or the jam will squish out the sides when you sandwich them.08
-
Take your cut-out top cookies and, using a fine-mesh sieve, generously dust the tops with powdered sugar. This creates that beautiful snowy effect. Then, gently place a sugared top onto each jam-covered base, pressing down lightly to adhere. And there you have it—a tray of stunning, homemade Linzer cookies!09
Not what you're looking for?


