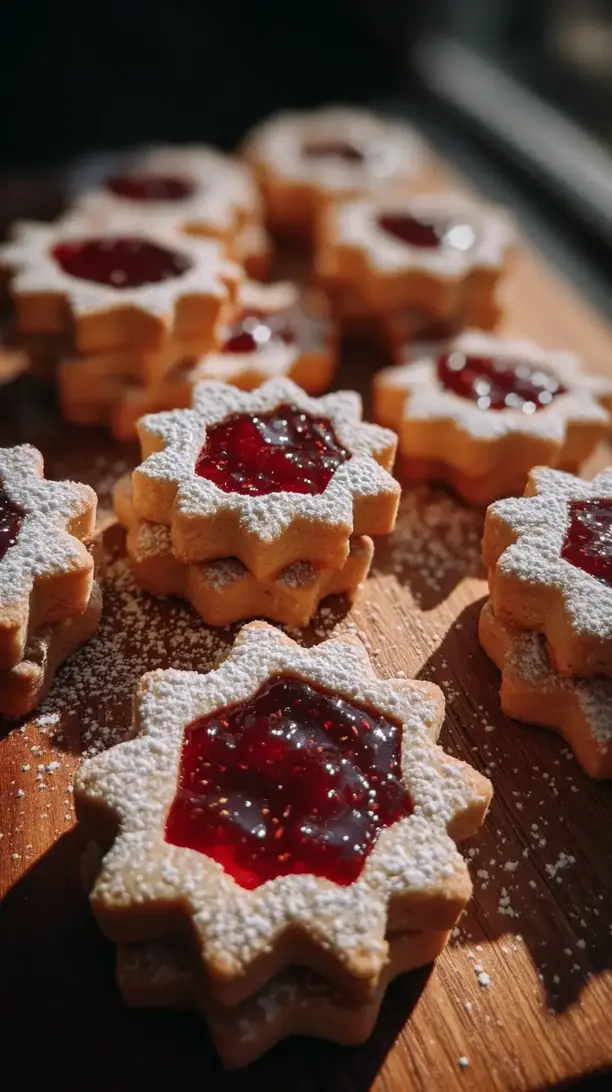
There’s something about the oven’s glow and the scent of toasted nuts that feels like a warm hug in the middle of a busy season. For me, that feeling is perfectly captured in these Classic Linzer Cookies with Raspberry Jam. With their delicate, nutty shortbread and a sweet-tart jam center peeking through a snowy dusting of sugar, they are my ultimate comfort food recipe, turning any afternoon of holiday baking into a special, cozy occasion.
If you’re searching through christmas cookies recipes for something that feels both timeless and special, you’ve found it. These are the standout holiday cookies Christmas deserves, and they always top my list of christmas dessert ideas. Truly some of the most beloved holiday treats, they offer a charming and delicious alternative, earning their place among any collection of unique Christmas cookies.
So, if you’re gathering christmas baking ideas this year, I can’t recommend this project enough. Making these linzer cookies fills your kitchen with the most wonderful aroma and creates little moments of pure, delicious joy—exactly what the season is all about.
Craving a delicious Classic Linzer Cookies with Raspberry Jam? You've come to the right spot! From Christmas Cookie favorites to amazing Drinks recipes, there's something here for everyone.


Why You’ll Love This Classic Linzer Cookies with Raspberry Jam
- Stunning appearance: The powdered sugar and red jam create a classic, beautiful look.
- Dreamy texture: Tender shortbread contrasts with a sticky, fruity jam burst.
- Festive & special: They turn any moment into a small celebration.
- Easy to customize: Use any jam or cutter shapes you love.
Ingredients & Tools
- 200 g all-purpose flour
- 100 g finely ground hazelnuts (or almonds)
- 150 g unsalted butter, at room temperature
- 80 g powdered sugar, plus more for dusting
- 1 large egg yolk
- 1 tsp vanilla extract
- ½ tsp ground cinnamon
- A pinch of salt
- 150 g good-quality raspberry jam
Tools: Stand mixer or hand mixer, two baking sheets, parchment paper, a sifter or fine-mesh strainer for the powdered sugar, and an assortment of cookie cutters (one large, one small for the window).
Notes: The quality of your ingredients really shines through here. Using real vanilla and freshly ground hazelnuts makes a world of difference in the aroma. And that raspberry jam? Don’t skimp—get one with a high fruit content for the best flavor.
Nutrition (per serving)
| Calories: | 180 kcal |
| Protein: | 2 g |
| Fat: | 10 g |
| Carbs: | 21 g |
| Fiber: | 1 g |
Serves: Makes about 20-24 cookies | Prep Time: 30 minutes (plus chilling) | Cook Time: 10-12 minutes | Total Time: 1 hour 30 minutes (with chilling)
Before You Start: Tips & Ingredient Notes
- Your butter must be properly softened. This is non-negotiable for a tender cookie. It should yield gently to pressure but not be oily or melted. Cold butter won’t cream properly, and melted butter will make the dough greasy.
- Take the time to chill the dough. I know, it’s the hardest part—waiting! But this step prevents the cookies from spreading too much in the oven, ensuring they hold their beautiful, sharp-cut shapes.
- Grind your nuts finely, but don’t turn them into paste. You want a fine, sandy texture that blends seamlessly into the dough. Pulse them in a food processor with a tablespoon of the flour from the recipe to prevent them from releasing their oils and becoming clumpy.
- Consider straining your jam. If your raspberry jam has large seeds, you might want to press it through a fine-mesh sieve. This creates a smoother filling that’s easier to spread and gives a more refined look.
How to Make Classic Linzer Cookies with Raspberry Jam
Step 1: In a medium bowl, whisk together the all-purpose flour, finely ground hazelnuts, cinnamon, and salt. This ensures the dry ingredients are evenly distributed, so every bite of your cookie is perfectly balanced. You’ll get a whiff of that beautiful, warm spice—it’s going to be amazing.
Step 2: In the bowl of a stand mixer fitted with the paddle attachment (or using a hand mixer), cream the softened butter and 80 grams of powdered sugar together on medium speed for about 2-3 minutes. You’re looking for it to become pale and fluffy. This step is key for incorporating air, which gives the cookies their lovely light texture.
Step 3: Beat in the egg yolk and vanilla extract until just combined. Scrape down the sides of the bowl to make sure everything is incorporated. The mixture might look a little curdled at this point—that’s perfectly normal, so don’t worry!
Step 4: With the mixer on low speed, gradually add the dry ingredient mixture to the wet ingredients. Mix only until the flour streaks have disappeared and a soft dough has formed. Overmixing at this stage can develop the gluten and make the cookies tough.
Step 5: Divide the dough in half, shape each half into a disc, and wrap them tightly in plastic wrap. Now, the crucial chilling step: refrigerate for at least 1 hour, or up to 2 days. The dough needs to be firm to the touch for easy rolling.
Step 6: Preheat your oven to 350°F (180°C) and line your baking sheets with parchment paper. Take one disc of dough out of the fridge and let it sit for 5-10 minutes to become just pliable enough to roll. On a lightly floured surface, roll the dough out to about a ¼-inch thickness.
Step 7: Using your larger cookie cutter, cut out as many shapes as you can. For half of these shapes, use your smaller cutter to stamp out a “window” from the center. Carefully transfer the solid bottoms and the windowed tops to the prepared baking sheets, leaving a little space between them.
Step 8: Re-roll the scraps and repeat with the second disc of dough. You might need to chill the re-rolled dough for 10-15 minutes if it’s become too soft. Bake for 10-12 minutes, or until the edges are just barely starting to turn a light golden brown.
Step 9: Let the cookies cool on the baking sheet for 5 minutes before transferring them to a wire rack to cool completely. They will be very fragile when warm, so handle them with care. Patience is a virtue here!
Step 10: Once completely cool, it’s assembly time! Place the solid bottom cookies on your work surface. Spoon about a teaspoon of raspberry jam onto the center of each one, spreading it slightly but leaving a small border around the edge.
Step 11: Gently place a windowed top cookie on each jam-covered base. Finally, using your sifter or a fine-mesh strainer, generously dust the tops with powdered sugar. The jam will glisten through the window, and the sugar will create that beautiful, snowy finish.
Storage & Freshness Guide
- Fridge: Not recommended—refrigeration can soften cookies and melt sugar.
- Freezer: Freeze baked, unassembled halves in a single layer for up to 3 months.
- Reviving: Thaw frozen halves at room temperature, then assemble with jam and dust with sugar just before serving.
Serving Suggestions
Complementary Dishes
- A simple cheese board — The sharp, salty notes of a good aged cheddar or a creamy brie provide a wonderful savory counterpoint to the sweet, fruity cookies.
- Vanilla bean panna cotta — The silky, cool texture of the panna cotta is a dream alongside the crumbly cookie, creating a delightful dessert duo.
- Spiced roasted nuts — A small bowl of warm, cinnamon-sugared almonds or pecans echoes the nutty flavor in the cookies and adds another textural element.
Drinks
- Earl Grey tea — The bergamot in the tea cuts through the richness of the butter and complements the raspberry jam beautifully.
- Hot chocolate with a cinnamon stick — For the ultimate cozy experience, a rich, dark hot chocolate is a decadent and perfect pairing.
- A glass of Prosecco or Champagne — For a truly celebratory feel, the bubbles and acidity of a sparkling wine cleanse the palate between each delicious, buttery bite.
Something Sweet
- Dark chocolate-dipped orange segments — The bittersweet chocolate and bright citrus offer a different kind of fruity flavor that doesn’t compete with the jam.
- Lemon sorbet — A small scoop of tangy, refreshing sorbet is the perfect palate-cleanser if you’re serving these as part of a larger dessert spread.
- Vanilla bean ice cream — Honestly, you can’t go wrong. A simple, high-quality vanilla ice cream sandwich between two Linzer cookies is next-level amazing.
Top Mistakes to Avoid
- Mistake: Using melted or too-cold butter. This is the foundation of your cookie dough. Improper butter temperature is the number one reason for texture issues, from greasy spread-out cookies to dense, tough ones.
- Mistake: Skipping the chill time. I’ve messed this up before too, in a rush to get cookies in the oven. Warm dough will spread excessively, and your beautiful cut-out shapes will blur and lose their definition.
- Mistake: Overbaking the cookies. You want them to be just set and barely golden at the edges. They continue to firm up as they cool. Overbaked Linzer cookies lose their delicate, melt-in-your-mouth quality and can taste dry.
- Mistake: Assembling with warm cookies. If you try to put jam on a warm cookie, it will melt and soak into the shortbread, making it soggy. And if you dust with powdered sugar on a warm cookie, it will just dissolve into a sticky glaze.
Expert Tips
- Tip: Roll your dough between two sheets of parchment paper. This eliminates the need for extra flour, which can dry out your dough, and makes transferring the delicate cut-outs to the baking sheet an absolute breeze.
- Tip: Bake the “window” cut-outs separately. Those little centers you punch out? Don’t throw them away! Bake them as mini cookies. They’re the chef’s treat and a great way to check your seasoning and bake time.
- Tip: Dust with powdered sugar right before serving. If you dust the cookies too far in advance, the sugar can start to dissolve and look wet, especially if your jam is very moist. For the prettiest presentation, do this final step just as you’re about to serve them.
- Tip: Use a piping bag for the jam. For the neatest, most professional-looking fill, spoon your jam into a small piping bag (or a zip-top bag with a corner snipped off) and pipe a circle onto the bottom cookie. This prevents jam from squishing out the sides.
FAQs
Can I make the dough ahead of time?
Absolutely, and it’s a great time-saver! The dough discs can be wrapped tightly and refrigerated for up to 2 days. You can also freeze them for up to 3 months. Just thaw overnight in the fridge before rolling. The flavor actually improves with a little rest, so this is a fantastic option for getting a head start on your baking.
My cookies spread too much. What happened?
This almost always comes down to dough temperature. Your butter was likely too soft, or you didn’t chill the dough long enough. The oven temperature could also be a culprit—make sure it’s fully preheated. Next time, after you’ve cut out your shapes, pop the entire baking sheet into the freezer for a quick 10-minute chill right before they go in the oven. This sets the butter and guarantees minimal spread.
Can I use a different type of nut or jam?
Of course! That’s the beauty of this recipe. Almonds are a classic and delicious alternative to hazelnuts. For the jam, apricot, blackberry, or even a sharp sour cherry are all wonderful. Just try to use a thicker, high-quality jam or preserve rather than a thin jelly, which can be too runny.
How should I store these cookies?
Store them in a single layer in an airtight container at room temperature for up to 5 days. If you stack them, place a sheet of parchment paper between the layers to prevent them from sticking together. I do not recommend refrigerating them, as it can cause the cookies to soften and the powdered sugar to melt.
Can I freeze the assembled cookies?
You can, but with a caveat. Freezing can cause the powdered sugar to become spotty and dissolve. It’s best to freeze the baked, *unassembled* cookie halves. Once completely cool, freeze them in a single layer, then transfer to an airtight container or bag. Thaw at room temperature, then assemble with jam and dust with sugar just before serving.


Classic Linzer Cookies With Raspberry Jam for Holiday Baking
Make these Classic Linzer Cookies with Raspberry Jam for your holiday baking! This easy linzer cookie recipe yields elegant, buttery treats perfect for Christmas dessert ideas.
Ingredients
For the Cookies:
-
200 g all-purpose flour
-
100 g finely ground hazelnuts (or almonds)
-
150 g unsalted butter (at room temperature)
-
80 g powdered sugar (plus more for dusting)
-
1 large egg yolk
-
1 tsp vanilla extract
-
½ tsp ground cinnamon
-
salt (A pinch)
-
150 g good-quality raspberry jam
Instructions
-
In a medium bowl, whisk together the all-purpose flour, finely ground hazelnuts, cinnamon, and salt.01
-
In the bowl of a stand mixer fitted with the paddle attachment (or using a hand mixer), cream the softened butter and 80 grams of powdered sugar together on medium speed for about 2-3 minutes.02
-
Beat in the egg yolk and vanilla extract until just combined.03
-
With the mixer on low speed, gradually add the dry ingredient mixture to the wet ingredients.04
-
Divide the dough in half, shape each half into a disc, and wrap them tightly in plastic wrap.05
-
Preheat your oven to 350°F (180°C) and line your baking sheets with parchment paper.06
-
Using your larger cookie cutter, cut out as many shapes as you can.07
-
Re-roll the scraps and repeat with the second disc of dough.08
-
Let the cookies cool on the baking sheet for 5 minutes before transferring them to a wire rack to cool completely.09
-
Place the solid bottom cookies on your work surface.10
-
Gently place a windowed top cookie on each jam-covered base.11
Not what you're looking for?


