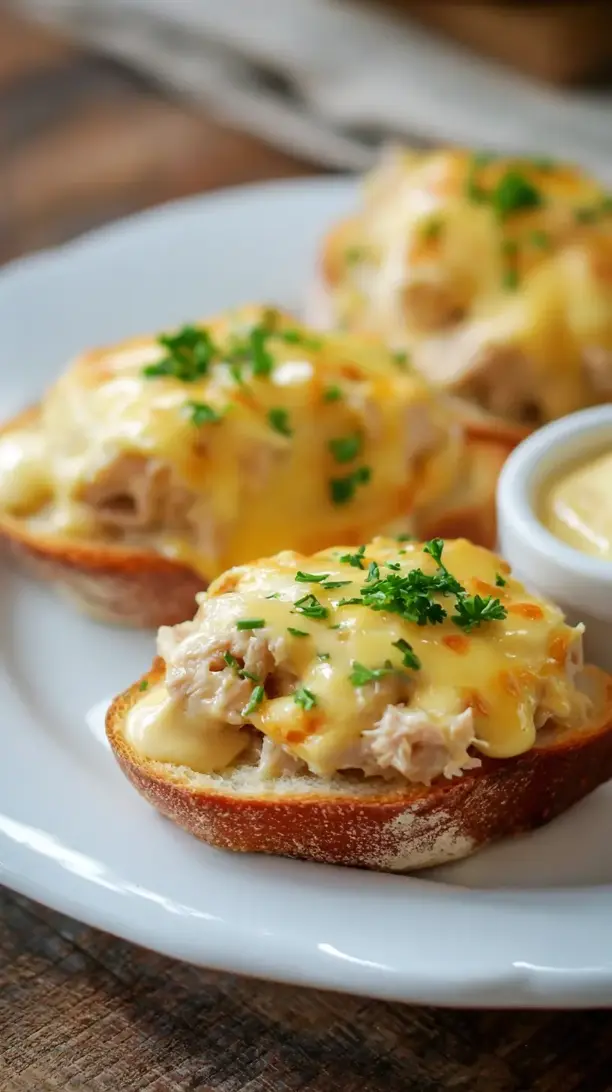
Sometimes, you just need that perfect, no-fuss comfort food. This Classic Tuna Melts recipe delivers the ultimate cozy lunch or easy dinner, transforming simple ingredients into something truly magical with creamy tuna salad, sharp cheese, and toasty bread.
Looking for Classic Tuna Melts inspiration? You'll love what we have! Explore more Dinner Ideas recipes or discover our Chicken Thigh Recipes favorites.


Why You’ll Love This Classic Tuna Melts
- Pure comfort: Warm, melty cheese and creamy tuna are nostalgic and satisfying.
- Quick & easy: Ready in about 15 minutes for a fast, delicious meal.
- Endlessly customizable: Easily adapt with your favorite add-ins and swaps.
- Perfect texture: Creamy tuna, melted cheese, and crisp bread create a dreamy contrast.
Ingredients & Tools
- 2 (5 oz / 140 g) cans solid white tuna in water, drained well
- 1/4 cup (60 g) mayonnaise
- 1 tbsp (15 g) Dijon mustard
- 1/4 cup (30 g) finely diced red onion
- 1/4 cup (30 g) finely diced celery
- 2 tbsp (15 g) sweet pickle relish
- 1 tsp fresh lemon juice
- 1/4 tsp garlic powder
- Salt and black pepper to taste
- 4 slices sturdy bread (sourdough or a hearty whole wheat work great)
- 2 tbsp (28 g) softened butter
- 4 slices sharp cheddar cheese (or American, provolone, or Swiss)
Tools: A medium mixing bowl, a fork, a skillet (cast iron is ideal), and a spatula.
Notes: The quality of your tuna and cheese really makes a difference here—splurge on the good stuff if you can. You’ll notice that a sturdy bread is key; it holds up to the hearty filling and gets wonderfully crisp without getting soggy.
Nutrition (per serving)
| Calories: | 485 kcal |
| Protein: | 31 g |
| Fat: | 28 g |
| Carbs: | 24 g |
| Fiber: | 2 g |
Serves: 2 | Prep Time: 10 mins | Cook Time: 5 mins | Total Time: 15 mins
Before You Start: Tips & Ingredient Notes
- Drain that tuna well. This is the single most important step for a non-watery tuna salad. After draining the cans, I like to press the tuna with a paper towel to get out every last bit of moisture. A dry start means a creamy finish.
- Don’t skip the acid. That little bit of lemon juice might seem insignificant, but it’s a game-changer. It brightens up the entire mixture and cuts through the richness of the mayo and cheese beautifully.
- Choose your bread wisely. Flimsy, pre-sliced sandwich bread can turn soggy and fall apart. A thick-cut, crusty sourdough or a dense whole grain will give you that structural integrity and fantastic crunch you’re looking for.
- Butter vs. Mayo for toasting. You can spread mayo on the outside of the bread for browning, but I’m a butter purist for this recipe. It gives a richer flavor and a more classic, diner-style golden crust.
How to Make Classic Tuna Melts
Step 1: First, let’s make the tuna salad. In your medium mixing bowl, add the well-drained tuna. Use a fork to flake it apart—you want a nice, loose texture, not big clumps. This is the foundation, so take a moment to break it up thoroughly.
Step 2: Now, add all your flavor agents. That’s the mayonnaise, Dijon mustard, diced red onion, celery, pickle relish, lemon juice, and garlic powder. Season generously with a good pinch of salt and a few cracks of black pepper. The trick is to taste it now, before it goes on the bread. It should be creamy, a little tangy, and perfectly seasoned. Adjust if needed—maybe a touch more mustard or salt.
Step 3: Gently fold everything together until it’s well combined. You’ll notice the mixture should hold together but not be gloppy. If it seems a bit dry, add another tablespoon of mayo. Cover the bowl and pop it in the fridge for just 5-10 minutes if you have time. This lets the flavors meld and the salad firm up a bit, making it easier to handle.
Step 4: While the tuna chills, get your bread ready. Lay out your four slices and butter one side of each slice. Be generous but even with the butter—this is what’s going to create that gorgeous, golden-brown, crispy exterior. Preheat your skillet over medium heat. You want it nice and hot before the bread hits the surface.
Step 5: Time to assemble. Place two slices of bread, buttered-side down, in the preheated skillet. Divide the tuna salad evenly between the two slices, spreading it right to the edges. Then, top each with two slices of cheese. Place the remaining slices of bread on top, buttered-side up. The un-buttered sides should be facing the filling, creating a buttery shield on the outside.
Step 6: Now for the magic. Cook for about 2-3 minutes, until the bottom bread is a deep golden brown. You should hear a gentle sizzle. Don’t rush this by cranking the heat—medium is perfect for melting the cheese through without burning the bread. Peek underneath with your spatula to check the color.
Step 7: Carefully flip the sandwiches. This can be a little precarious, but a confident flip with a wide spatula does the trick. Cook for another 2-3 minutes on the second side, pressing down gently. You’re looking for that same beautiful golden brown color and, most importantly, you should see the cheese oozing out the sides, fully melted and glorious.
Step 8: Transfer your perfect tuna melts to a cutting board. Let them rest for just a minute—this allows the cheese to set slightly so it doesn’t all gush out on the first bite. Then, slice diagonally (it just tastes better that way, right?) and serve immediately while they’re hot and crispy.
Storage & Freshness Guide
- Fridge: Store assembled but uncooked sandwiches in an airtight container for 1 day. Cooked tuna melts are best eaten immediately.
- Freezer: Freezing is not recommended as the tuna salad may become watery upon thawing.
- Reviving: Reheat cooked melts in a skillet over low heat to re-crisp the bread, or use a toaster oven.
Serving Suggestions
Complementary Dishes
- A simple side salad — A crisp mix of greens with a sharp vinaigrette cuts through the richness of the sandwich and adds a fresh, clean element to your plate.
- Tomato soup — This is the ultimate cozy pairing. The creamy, acidic soup is practically made for dipping those crispy, cheesy corners of your tuna melt into.
- Dill pickle spears — The briny, crunchy pickle provides a fantastic contrast in flavor and texture, making each bite of the melt feel new again.
Drinks
- Iced tea — A glass of unsweetened or lightly sweetened iced tea is refreshing and doesn’t compete with the savory, cheesy flavors of the sandwich.
- A crisp lager — If you’re in the mood, a light beer with its carbonation and mild bitterness cleanses the palate beautifully between bites.
- Sparkling water with lemon — The bubbles and citrus are incredibly refreshing and help balance the meal without adding any sweetness.
Something Sweet
- A few dark chocolate squares — Just a small piece of high-quality dark chocolate after this savory meal is a perfect, not-too-heavy finish.
- Fresh berries — A small bowl of raspberries or strawberries offers a natural, light sweetness that feels just right after a hearty sandwich.
- A small scoop of vanilla ice cream — For a real treat, the cool, creamy vanilla is a classic, simple dessert that always satisfies.
Top Mistakes to Avoid
- Mistake: Using watery tuna. This is the number one reason for a soggy sandwich. Excess liquid will make your bread mushy and dilute the flavor of your tuna salad. Always drain thoroughly and pat it dry.
- Mistake: Cooking on too high heat. Impatience leads to burnt bread and unmelted cheese. A steady medium heat gives the cheese time to get perfectly gooey while the bread toasts to a perfect golden brown. I’ve messed this up before too, rushing for a quick lunch.
- Mistake: Overfilling the sandwich. It’s tempting to pile on the tuna salad, but too much filling will spill out when you flip it and prevent the bread from sealing properly. A generous but manageable layer is key.
- Mistake: Not letting the pan preheat. A cold skillet means your bread will soak up the butter before it starts to cook, leading to a greasy, pale sandwich. Wait until the pan is properly hot for the best sear.
Expert Tips
- Tip: Grate your own cheese. Pre-shredded cheese contains anti-caking agents that can prevent it from melting as smoothly. A block of cheddar that you grate yourself will give you that iconic, stringy, perfect melt every single time.
- Tip: Add fresh herbs. Stir a tablespoon of chopped fresh dill or parsley into your tuna salad mixture. It adds a layer of bright, fresh flavor that really elevates the whole sandwich from simple to spectacular.
- Tip: Use your broiler for an open-face version. For a different twist, pile the tuna salad onto the bread, top with cheese, and broil for 2-3 minutes until bubbly and brown. It’s less messy and gives you maximum cheesy surface area.
- Tip: Make a big batch of tuna salad. The tuna mixture keeps beautifully in the fridge for 2-3 days. Make a double batch on Sunday, and you’ve got instant lunches ready to be assembled and grilled all week long.
FAQs
Can I make this recipe gluten-free?
Absolutely. This recipe is very adaptable. Just use your favorite gluten-free bread. Look for a sturdy, seedy, or sourdough-style GF loaf, as it will hold up best to the grilling process without crumbling. The rest of the ingredients are naturally gluten-free, so it’s a very easy swap that works perfectly.
What’s the best cheese for a tuna melt?
Honestly, it’s a matter of personal taste, but sharp cheddar is the classic for a reason—its bold flavor stands up to the tuna. American cheese gives you that ultimate diner-style melt, while provolone or Swiss offer a milder, nuttier profile. Don’t be afraid to mix and match, like one slice of cheddar and one of provolone.
Can I prepare the tuna salad ahead of time?
You sure can, and it might even taste better! The flavors have more time to meld together. Store it in an airtight container in the refrigerator for up to 3 days. When you’re ready to eat, just give it a quick stir, assemble your sandwiches, and grill them up. It’s the ultimate meal prep hack for a fast lunch.
My cheese isn’t melting before the bread burns. What am I doing wrong?
This almost always comes down to heat that’s too high. You need a gentle, steady heat to melt the cheese all the way through without scorching the bread. Try lowering your burner to a solid medium, and if needed, you can cover the skillet with a lid for the last minute of cooking to trap heat and help melt the cheese.
What can I use instead of mayonnaise?
If you’re not a mayo fan, Greek yogurt is a fantastic substitute that still provides creaminess and a slight tang. Avocado mashed until smooth also works, though it will impart its own mild flavor. For a dairy-free option, a vegan mayonnaise will yield a very similar texture and result.

Classic Tuna Melts
Make the perfect Classic Tuna Melts in just 15 minutes! Creamy tuna salad and melted cheese on toasted bread. Get the easy, delicious recipe now!
Ingredients
For the tuna salad:
-
2 can solid white tuna in water (5 oz / 140 g each, drained well)
-
1/4 cup mayonnaise (60 g)
-
1 tbsp Dijon mustard (15 g)
-
1/4 cup finely diced red onion (30 g)
-
1/4 cup finely diced celery (30 g)
-
2 tbsp sweet pickle relish (15 g)
-
1 tsp fresh lemon juice
-
1/4 tsp garlic powder
-
Salt and black pepper (to taste)
For assembly:
-
4 slice sturdy bread (sourdough or a hearty whole wheat work great)
-
2 tbsp softened butter (28 g)
-
4 slice sharp cheddar cheese (or American, provolone, or Swiss)
Instructions
-
First, let’s make the tuna salad. In your medium mixing bowl, add the well-drained tuna. Use a fork to flake it apart—you want a nice, loose texture, not big clumps. This is the foundation, so take a moment to break it up thoroughly.01
-
Now, add all your flavor agents. That’s the mayonnaise, Dijon mustard, diced red onion, celery, pickle relish, lemon juice, and garlic powder. Season generously with a good pinch of salt and a few cracks of black pepper. The trick is to taste it now, before it goes on the bread. It should be creamy, a little tangy, and perfectly seasoned. Adjust if needed—maybe a touch more mustard or salt.02
-
Gently fold everything together until it’s well combined. You’ll notice the mixture should hold together but not be gloppy. If it seems a bit dry, add another tablespoon of mayo. Cover the bowl and pop it in the fridge for just 5-10 minutes if you have time. This lets the flavors meld and the salad firm up a bit, making it easier to handle.03
-
While the tuna chills, get your bread ready. Lay out your four slices and butter one side of each slice. Be generous but even with the butter—this is what’s going to create that gorgeous, golden-brown, crispy exterior. Preheat your skillet over medium heat. You want it nice and hot before the bread hits the surface.04
-
Time to assemble. Place two slices of bread, buttered-side down, in the preheated skillet. Divide the tuna salad evenly between the two slices, spreading it right to the edges. Then, top each with two slices of cheese. Place the remaining slices of bread on top, buttered-side up. The un-buttered sides should be facing the filling, creating a buttery shield on the outside.05
-
Now for the magic. Cook for about 2-3 minutes, until the bottom bread is a deep golden brown. You should hear a gentle sizzle. Don’t rush this by cranking the heat—medium is perfect for melting the cheese through without burning the bread. Peek underneath with your spatula to check the color.06
-
Carefully flip the sandwiches. This can be a little precarious, but a confident flip with a wide spatula does the trick. Cook for another 2-3 minutes on the second side, pressing down gently. You’re looking for that same beautiful golden brown color and, most importantly, you should see the cheese oozing out the sides, fully melted and glorious.07
-
Transfer your perfect tuna melts to a cutting board. Let them rest for just a minute—this allows the cheese to set slightly so it doesn’t all gush out on the first bite. Then, slice diagonally (it just tastes better that way, right?) and serve immediately while they’re hot and crispy.08
Not what you're looking for?


