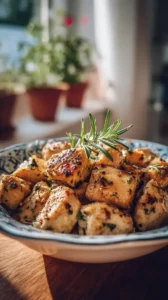
There’s something deeply satisfying about biting into a piece of chicken that’s perfectly cooked—juicy on the inside, with a crust that shatters audibly. That’s the magic of these Crispy Panko Chicken Breasts. This recipe delivers a restaurant-quality crunch using a simple pan-frying method that locks in the juices.
Love Crispy Panko Chicken Breasts? So do we! If you're into Dinner Ideas or curious about Crockpot Recipes, you'll find plenty of inspiration below.


Why You’ll Love This Crispy Panko Chicken Breasts
Unbeatable Crunch: Panko creates a shatteringly crisp crust that doesn’t get soggy.
Simple to Master: Straightforward dredge, dip, press, and pan-fry process.
Endlessly Customizable: Easily adapt the seasoning blend to your taste.
Juicy Chicken: Pounding ensures even cooking and a moist interior.
Ingredients & Tools
- 2 large boneless, skinless chicken breasts (about 1 lb or 450 g total)
- 1 cup (about 50 g) panko breadcrumbs
- 1/2 cup (about 50 g) grated Parmesan cheese
- 1/2 cup (about 60 g) almond flour
- 2 large eggs
- 1 tsp garlic powder
- 1 tsp onion powder
- 1 tsp dried parsley
- 1/2 tsp paprika (smoked or sweet)
- 1/2 tsp salt, plus more for seasoning
- 1/4 tsp freshly ground black pepper
- 1/4 cup (60 ml) avocado oil or light olive oil, for frying
- 1 lemon, cut into wedges for serving
Tools: A large skillet (non-stick or cast-iron works great), three shallow bowls, a meat mallet or rolling pin, and a wire rack set over a baking sheet.
Notes: Don’t skip the Parmesan—it adds a salty, savory depth. The wire rack keeps the bottom crispy after frying.
Nutrition (per serving)
| Calories: | 420 kcal |
| Protein: | 35 g |
| Fat: | 25 g |
| Carbs: | 12 g |
| Fiber: | 3 g |
Serves: 2 | Prep Time: 15 minutes | Cook Time: 12 minutes | Total Time: 27 minutes
Before You Start: Tips & Ingredient Notes
- Pound it right. Taking the extra two minutes to pound your chicken breasts to an even 1/2-inch thickness is non-negotiable. It’s the single biggest factor in achieving a perfectly cooked piece of chicken with a uniformly golden crust.
- Why panko? Panko breadcrumbs are made from crustless bread, resulting in a lighter, flakier, and crispier texture than the fine, sand-like consistency of traditional breadcrumbs. They don’t absorb as much oil, so your crust stays light and shattery.
- The oil temperature is key. You want your oil hot but not smoking. If it’s too cool, the chicken will absorb oil and become greasy. If it’s too hot, the crust will burn before the chicken cooks through. A flick of water should sizzle energetically.
- Get your station set. Before you even touch the chicken, set up your three bowls for the dredging station. This “mise en place” makes the entire process smooth and keeps your hands from becoming a complete breadcrumb disaster zone.
How to Make Crispy Panko Chicken Breasts
Step 1: Prepare the Chicken. Place one chicken breast between two sheets of plastic wrap or inside a large zip-top bag. Using the flat side of a meat mallet or a heavy rolling pin, gently but firmly pound the chicken until it’s an even 1/2-inch thickness all over. Repeat with the second breast. Pat them completely dry with paper towels—this is crucial for the coating to stick. Season both sides lightly with a pinch of salt and pepper.
Step 2: Create Your Dredging Station. Now, set up your three shallow bowls in an assembly line. In the first bowl, place the almond flour. In the second bowl, beat the two eggs until smooth and frothy. In the third and final bowl, combine the panko breadcrumbs, grated Parmesan cheese, garlic powder, onion powder, dried parsley, paprika, the 1/2 teaspoon of salt, and black pepper. Use a fork to mix everything together thoroughly, ensuring the seasonings are evenly distributed.
Step 3: Coat the Chicken. Working with one piece at a time, dredge a chicken breast in the almond flour, shaking off any excess. Next, dip it into the beaten egg, making sure it’s fully coated and letting any excess drip back into the bowl. Finally, place it into the panko mixture. Now, here’s the trick: press down firmly and scoop the panko mixture over the top, really adhering it to the chicken. You want a thick, craggy, even coating. Place the finished chicken on a clean plate and repeat with the second breast.
Step 4: Pan-Fry to Golden Perfection. Place your large skillet over medium heat and add the avocado oil. You’ll know the oil is ready when a few panko crumbs dropped in sizzle immediately. Carefully lay the chicken breasts in the hot oil—they should sizzle the moment they touch the pan. Don’t crowd the pan; cook them in two batches if your skillet is small. Fry for 5-6 minutes on the first side, without moving them, until the crust is a deep, golden brown. You’ll notice the edges starting to look cooked through.
Step 5: Flip and Finish Cooking. Using a pair of tongs, carefully flip the chicken breasts. They should release easily from the pan if a good crust has formed. Cook for another 5-6 minutes on the second side. To be absolutely sure it’s done, you can use an instant-read thermometer inserted into the thickest part of the breast—it should read 165°F (74°C). The crust should be uniformly golden and incredibly crisp.
Step 6: Rest and Serve. Immediately transfer the cooked chicken breasts to the wire rack set over the baking sheet. This is a pro-move—it allows air to circulate around the entire piece, keeping the bottom just as crispy as the top. Let them rest for 3-4 minutes. This allows the juices to redistribute throughout the meat, ensuring every bite is moist. Serve immediately with a generous wedge of fresh lemon for squeezing over the top.
Storage & Freshness Guide
- Fridge: Store in an airtight container for up to 3 days.
- Freezer: Freeze on a parchment-lined sheet, then transfer to a freezer bag for up to 2 months.
- Reviving: Reheat in a 375°F oven or air fryer for 5-8 minutes to restore crispiness.
Serving Suggestions
Complementary Dishes
- A Simple Arugula Salad — The peppery bite of arugula with a light lemon vinaigrette cuts through the richness of the fried chicken beautifully, creating a perfect balance on the plate.
- Garlicky Sautéed Green Beans — Tender-crisp green beans tossed with a bit of minced garlic and slivered almonds echo the savory, nutty flavors in the chicken’s crust.
- Cauliflower Mash — For a low-carb take on classic mashed potatoes, creamy cauliflower mash provides a soft, comforting base that soaks up all the delicious juices.
Drinks
- A Crisp Sauvignon Blanc — Its bright acidity and citrus notes act like a squeeze of lemon in a glass, cleansing the palate between each savory, crunchy bite.
- Sparkling Water with Lemon — Sometimes simplicity is best. The effervescence is refreshing, and it highlights the citrus element without adding any sweetness.
- An Ice-Cold Light Lager — The crisp, clean finish of a light beer is a classic pairing for fried foods, making the crunch of the chicken feel even more satisfying.
Something Sweet
- Mixed Berry Compote — A warm, slightly tart compote made from frozen berries (no sugar added) provides a lovely, bright finish that contrasts the savory main course.
- Dark Chocolate Square — Just a single square of high-quality, high-cocoa dark chocolate offers a rich, bittersweet end to the meal that doesn’t feel too heavy.
- Vanilla Chia Pudding — A cool, creamy, and lightly sweet pudding feels like a treat but keeps things firmly in the low-carb lane after your indulgent dinner.
Top Mistakes to Avoid
- Mistake: Not pounding the chicken. I’ve messed this up before too, thinking I could just cook it a bit longer. The result is always a burnt crust with an undercooked, or worse, a rubbery overcooked, center. Even thickness is everything.
- Mistake: Using wet chicken. If you don’t pat the chicken completely dry, the initial almond flour coating will turn into a pasty glue that doesn’t crisp up properly and can slide right off.
- Mistake: Moving the chicken too soon. As soon as it hits the pan, leave it alone! Let that beautiful crust form. If you try to peek or move it too early, you’ll tear the coating and it won’t be as crispy.
- Mistake: Crowding the pan. Adding too many pieces at once drops the oil temperature drastically, leading to steamed, oily chicken instead of fried, crispy chicken. Cook in batches for the best results.
Expert Tips
- Tip: Double-dip for extra crunch. For an even thicker, more substantial crust, after the first egg wash and panko press, give the chicken a quick second dip in the egg and then another press in the panko. It creates a phenomenal, shaggy texture.
- Tip: Bake for a hands-off option. If you prefer not to pan-fry, you can bake these. Place the breaded chicken on a wire rack set over a baking sheet, spray lightly with oil, and bake at 400°F (200°C) for 18-22 minutes, until golden and cooked through.
- Tip: Make it ahead. You can bread the chicken breasts up to a day in advance. Keep them in a single layer on a parchment-lined baking sheet, cover with plastic wrap, and store in the fridge. The cold crust actually fries up even crispier.
- Tip: Reheat like a pro. To maintain the crunch on leftovers, never microwave. Reheat in a 375°F (190°C) oven or air fryer for 5-8 minutes, until hot and re-crisped. It’s almost as good as new.
FAQs
Can I use regular breadcrumbs instead of panko?
You can, but you’ll lose that signature light, shattery crunch. Regular breadcrumbs are much finer and denser, creating a heavier, more compact crust that can sometimes taste a bit sandy. Panko’s unique flake-like structure is what gives this dish its incredible texture, so I really recommend sticking with it for the best results.
My coating is falling off. What did I do wrong?
This usually comes down to one of two things: the chicken wasn’t dry enough before dredging, or you didn’t press the panko on firmly enough. Make sure you pat the chicken thoroughly with paper towels and really press the panko mixture into the egg-washed surface. A good, firm press ensures adhesion.
Can I use chicken thighs for this recipe?
Absolutely! Boneless, skinless chicken thighs work wonderfully. They’re already a more uniform thickness, so you might not even need to pound them. Just be aware that they have a slightly higher fat content and a richer flavor, which pairs beautifully with the crispy crust. The cooking time should be roughly the same.
Is there a way to make this recipe gluten-free?
Yes, it’s very easy! Just ensure you use certified gluten-free panko breadcrumbs, which are widely available now. All the other main ingredients—almond flour, Parmesan, eggs—are naturally gluten-free, so it’s a simple one-to-one swap that works perfectly.
How do I know when the oil is hot enough without a thermometer?
The easiest way is the “wooden spoon” or “breadcrumb” test. Dip the handle of a wooden spoon into the oil; if bubbles form around it immediately, it’s ready. Alternatively, drop a single panko breadcrumb in—if it sizzles and floats to the top right away, your oil is at the perfect temperature for frying.


Crispy Panko Chicken Breasts
Make perfectly juicy Crispy Panko Chicken Breasts with a golden, shattery crust. This easy pan-fried recipe is a guaranteed crowd-pleaser. Get the recipe now!
Ingredients
For the Ingredients
-
2 large boneless, skinless chicken breasts (about 1 lb or 450 g total)
-
1 cup panko breadcrumbs (about 50 g)
-
1/2 cup grated Parmesan cheese (about 50 g)
-
1/2 cup almond flour (about 60 g)
-
2 large eggs
-
1 tsp garlic powder
-
1 tsp onion powder
-
1 tsp dried parsley
-
1/2 tsp paprika (smoked or sweet)
-
1/2 tsp salt (plus more for seasoning)
-
1/4 tsp freshly ground black pepper
-
1/4 cup avocado oil or light olive oil (for frying)
-
1 lemon (cut into wedges for serving)
Instructions
-
Place one chicken breast between two sheets of plastic wrap or inside a large zip-top bag. Using the flat side of a meat mallet or a heavy rolling pin, gently but firmly pound the chicken until it’s an even 1/2-inch thickness all over. Repeat with the second breast. Pat them completely dry with paper towels—this is crucial for the coating to stick. Season both sides lightly with a pinch of salt and pepper.01
-
Now, set up your three shallow bowls in an assembly line. In the first bowl, place the almond flour. In the second bowl, beat the two eggs until smooth and frothy. In the third and final bowl, combine the panko breadcrumbs, grated Parmesan cheese, garlic powder, onion powder, dried parsley, paprika, the 1/2 teaspoon of salt, and black pepper. Use a fork to mix everything together thoroughly, ensuring the seasonings are evenly distributed.02
-
Working with one piece at a time, dredge a chicken breast in the almond flour, shaking off any excess. Next, dip it into the beaten egg, making sure it’s fully coated and letting any excess drip back into the bowl. Finally, place it into the panko mixture. Now, here’s the trick: press down firmly and scoop the panko mixture over the top, really adhering it to the chicken. You want a thick, craggy, even coating. Place the finished chicken on a clean plate and repeat with the second breast.03
-
Place your large skillet over medium heat and add the avocado oil. You’ll know the oil is ready when a few panko crumbs dropped in sizzle immediately. Carefully lay the chicken breasts in the hot oil—they should sizzle the moment they touch the pan. Don’t crowd the pan; cook them in two batches if your skillet is small. Fry for 5-6 minutes on the first side, without moving them, until the crust is a deep, golden brown. You’ll notice the edges starting to look cooked through.04
-
Using a pair of tongs, carefully flip the chicken breasts. They should release easily from the pan if a good crust has formed. Cook for another 5-6 minutes on the second side. To be absolutely sure it’s done, you can use an instant-read thermometer inserted into the thickest part of the breast—it should read 165°F (74°C). The crust should be uniformly golden and incredibly crisp.05
-
Immediately transfer the cooked chicken breasts to the wire rack set over the baking sheet. This is a pro-move—it allows air to circulate around the entire piece, keeping the bottom just as crispy as the top. Let them rest for 3-4 minutes. This allows the juices to redistribute throughout the meat, ensuring every bite is moist. Serve immediately with a generous wedge of fresh lemon for squeezing over the top.06
Not what you're looking for?


