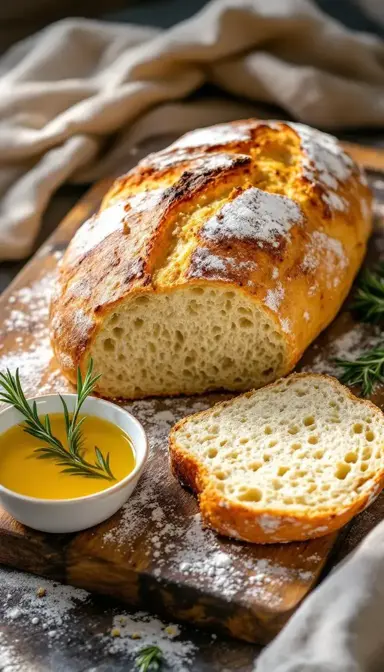
There’s something almost magical about pulling a loaf of crusty French bread from the oven—the way it crackles as it cools, the golden hue that promises perfection, and that first bite where the crisp exterior gives way to a tender, airy crumb. It’s the kind of bread that turns a simple meal into something extraordinary, whether you’re dunking it into a steaming bowl of soup, piling it high with your favorite sandwich fixings, or just slathering it with butter and letting it melt into every nook and cranny.
And here’s the best part: you don’t need a bakery or fancy equipment to make it. With a handful of pantry staples and a little patience, you can create a loaf that rivals anything you’d find in a Parisian boulangerie.
Love Crusty French bread? So do we! If you're into Sides Recipes or curious about Burgers, you'll find plenty of inspiration below.


Why This Recipe Works
- Simplicity at its finest: Flour, water, yeast, salt—that’s it. No complicated techniques or hard-to-find ingredients.
- Slow and steady wins the race: A little extra time for fermentation means deeper flavor and better texture. Cold fermentation (refrigerating the dough overnight) allows enzymes to break down starches into sugars, yielding richer flavor and better browning.
- Steam is your secret weapon: A steamy oven transforms the crust from merely crisp to gloriously crackly. When dough hits a humid oven, surface starch gelatinizes, creating that glossy, crackly exterior we all love.
- Budget-friendly: Skip the artisanal bakery prices—this loaf costs pennies to make.
- Endlessly versatile: From bruschetta to Garlic Bread to the perfect PB&J, it does it all.
- Pure and wholesome: No mystery additives, just real, honest ingredients.
Essential Ingredients & Tools
Ingredients for the Dough
- 3 cups (360g) bread flour: The higher protein content gives the bread its signature chew. All-purpose flour works in a pinch, but the crumb won’t be quite as robust.
- 1 ½ tsp (7g) salt: More than just seasoning, salt regulates the yeast and strengthens the dough.
- 1 tsp (4g) instant yeast: No proofing needed—just mix and go. (Active dry yeast works too, but you’ll need to wake it up in warm water first.)
- 1 ¼ cups (300ml) warm water: Around 105°F (40°C) is the sweet spot—warm enough to activate the yeast but not so hot it kills it.
Tools
- Stand mixer with dough hook: Makes kneading a breeze, though there’s something satisfying about doing it by hand.
- Dutch oven or baking stone: The key to that professional-grade crust. No Dutch oven? A metal pan filled with boiling water works in a pinch.
- Razor blade or sharp knife: For scoring the dough with confidence. A dull blade will drag and tear the dough.
- Kitchen scale: Because precision matters when it comes to baking. If you don’t have one, use the spoon-and-level method for flour.
Yield: 1 glorious loaf | Prep: 15 minutes | Bake: 25 minutes | Total Time: About 3 hours (including rising)
How to Make Crusty French Bread
- Mix the dough: In a large bowl, whisk together the 3 cups (360g) bread flour, 1 ½ tsp (7g) salt, and 1 tsp (4g) instant yeast. Pour in the 1 ¼ cups (300ml) warm water and stir with a wooden spoon until a shaggy dough forms. Don’t panic if it looks messy—this is exactly what you want. Resist the urge to add more flour; a slightly sticky dough means a lighter, airier crumb.
- Knead with purpose: Turn the dough out onto a lightly floured surface (or let your stand mixer do the work with the dough hook). Knead for 8–10 minutes by hand (or 6–8 minutes in the mixer) until the dough is smooth, elastic, and passes the windowpane test: stretch a small piece—if it forms a thin, translucent membrane without tearing, you’re golden.
- First rise (let it breathe): Place the dough in a lightly oiled bowl, cover it with a damp towel or plastic wrap, and let it rise at room temperature (around 70–75°F/21–24°C) for 1.5–2 hours, or until doubled in size. For an even deeper flavor, pop it in the fridge overnight—the slow fermentation works wonders.
- Shape with confidence: Gently deflate the dough and shape it into a traditional bâtard (oval) or boule (round). The key here is creating surface tension—fold the sides in, then roll tightly, sealing the seam. Place it on parchment paper for easy handling.
- Second rise (the final stretch): Cover the shaped dough and let it rest for 45–60 minutes. Meanwhile, preheat your oven to 450°F (230°C) with your Dutch oven inside—this mimics the intense, even heat of a professional bread oven.
- Score with flair: Just before baking, use a razor blade to make a shallow slash (about ¼-inch deep) at a 45-degree angle. This isn’t just for looks—it controls how the bread expands in the oven. Feeling fancy? Try a curved or crosshatch pattern.
- Bake to perfection: Carefully transfer the dough (parchment and all) into the preheated Dutch oven. Cover and bake for 20 minutes to trap steam, then uncover and bake another 5–10 minutes until the crust is a deep golden brown and sounds hollow when tapped. For an extra-crisp crust, crack the oven door open for the last 2 minutes to let any lingering moisture escape.
Pro Technique
Here’s the thing about steam: it’s the difference between a good crust and a great one. When the dough hits a humid oven, the surface starch gelatinizes, creating that glossy, crackly exterior we all love. A Dutch oven is the easiest way to achieve this, but if you don’t have one, place a metal pan on the oven’s lower rack while preheating, then pour in a cup of boiling water when you load the bread. The steam will work its magic.
Scoring Like a Pro
A sharp blade is non-negotiable—dull knives drag and tear. Hold the blade at a shallow angle (30–45 degrees) to create a “lip” that lifts beautifully as the bread bakes. If your dough is particularly sticky, a light coat of oil on the blade helps it glide smoothly.
Chef’s Wisdom
- Patience is a virtue: Rushing the rise is the quickest way to disappointment. Cold fermentation (overnight in the fridge) not only fits into a busy schedule but also develops deeper flavor. If your kitchen is chilly, give the dough extra time—yeast moves slower when it’s cold.
- Embrace the sticky: A wetter dough can feel intimidating, but it’s the secret to an open, airy crumb. Wet your hands or use a bench scraper to handle it, and work quickly—hesitation leads to deflation.
Storage & Freshness Guide
- Short-term storage: For maximum crispness, leave the loaf uncovered at room temperature for up to 8 hours, cut-side down on a wooden board. Plastic bags are the enemy—they turn the crust soft and sad.
- Freezing for later: Wrap the cooled loaf tightly in aluminum foil, then stash it in a zip-top bag. It’ll keep for up to 3 months. To revive, pop frozen slices straight into a 375°F (190°C) oven for 10 minutes—no thawing needed.
- Reviving stale bread: A quick spritz of water and a 5–7 minute bake at 350°F (175°C) brings it back to life. Or slice and toast it for crostini. Whatever you do, don’t refrigerate—it accelerates staling.
Nutrition Profile
This bread is all about simplicity, offering a satisfying chew with minimal fuss.
- Calories: 120 per slice
- Fat: 0.5g
- Protein: 4g
- Carbs: 25g
- Fiber: 1g
Ingredient Variations and Their Impact
- Whole wheat twist: Swap half the bread flour for whole wheat for a nuttier flavor. A tablespoon of honey balances the bitterness beautifully.
- Sourdough upgrade: Replace the yeast with ½ cup (120g) of active starter, reduce the water by 2 tbsp, and let it ferment for 12–18 hours for that signature tang.
- Herb-infused: Knead in 2 tbsp of chopped rosemary or thyme after the first rise. For extra aroma, brush the baked loaf with garlic-infused olive oil.
- Seeded crust: Roll the shaped dough in sesame or poppy seeds before proofing. Soak the seeds first to prevent burning.
- Rye blend: Use 1 cup (120g) rye flour mixed with 2 cups bread flour for earthy depth. A teaspoon of caraway seeds enhances the flavor even more.
Perfect Pairings
Complementary Dishes
- French Onion Soup: The bread’s crisp crust stands up to rich broth, while its crumb soaks up savory flavors. For a twist, toast slices with Gruyère for DIY croûtes.
- Ratatouille: The bread’s neutral profile balances the stew’s vibrant herbs and acidity. Serve warm to contrast the dish’s soft textures.
Drinks
- Chablis: This crisp, mineral-driven white wine mirrors the bread’s clean simplicity.
- Beaujolais: A light red with bright acidity cuts through butter or pâté toppings.
Something Sweet
- Honey Butter: Whip softened butter with local honey for a spread that melts into warm slices.
- Dark Chocolate: A square of 70% cocoa pairs surprisingly well with the bread’s salty crust.


The Irresistible Allure of Homemade Crusty French Bread
Learn how to bake perfect Crusty French bread at home with my simple recipe. Get that golden, crackly crust and soft interior every time. Start baking now!
Ingredients
Main
-
3 cups bread flour (360g)
-
1 ½ tsp salt (7g)
-
1 tsp instant yeast (4g)
-
1 ¼ cups warm water (300ml)
Instructions
-
In a large bowl, combine 3 cups (360g) bread flour, 1 ½ tsp (7g) salt, and 1 tsp (4g) instant yeast. Gradually add 1 ¼ cups (300ml) warm water, stirring until a shaggy dough forms.01
-
Knead dough for 8–10 minutes by hand (or 6–8 minutes in a stand mixer) until smooth and elastic.02
-
Place dough in a lightly oiled bowl, cover, and let rise at room temperature for 1.5–2 hours, or until doubled in size.03
-
Gently deflate dough and shape into a bâtard or boule. Place on parchment paper.04
-
Cover and let rise for 45–60 minutes. Preheat oven to 450°F (230°C) with Dutch oven inside.05
-
Score dough with a razor blade, then transfer to Dutch oven. Cover and bake for 20 minutes.06
-
Uncover and bake 5–10 minutes longer until deep golden brown.07
Not what you're looking for?