There’s something about a pan of Frosted Sugar Cookie Bars that feels like a hug. I love how they capture all the soft, buttery magic of my favorite rolled cookies, but without any of the fuss—just mix, spread, and bake. For me, this is the ultimate comfort food recipe, a one-bowl wonder topped with dreamy vanilla buttercream that turns any ordinary day into a sweet celebration.
While I make them year-round, they truly shine during the festive season. If your holiday baking list is calling for something simple and crowd-pleasing, these bars are the answer. They are, without a doubt, one of my top picks for easy Christmas treats. I love having a tray of these on hand for cookie swaps or as a last-minute dessert; they’re a wonderful addition to any lineup of Christmas cookies recipes.
So if you’re dreaming up Christmas dessert ideas or searching for unique Christmas cookies that will delight everyone, give these bars a try. They’re a perfect batch of Christmas sweets and such a joyful addition to your spread of holiday treats. Sometimes, the simplest recipes bring the most joy.
Nothing beats a great Frosted Sugar Cookie Bars. Whether you're a fan of Christmas Cookie or want to try something from our Chicken Thigh Recipes selection, keep scrolling!


Why You’ll Love This Frosted Sugar Cookie Bars
- Incredibly simple: One-bowl, no-chill dough ready in minutes.
- Perfect texture: Soft, cake-like bars that melt in your mouth.
- Endless customization: A blank canvas for colors, sprinkles, or extracts.
- Feeds a crowd: One pan yields many squares for parties or family.
Ingredients & Tools
- 226 g (1 cup) unsalted butter, softened
- 200 g (1 cup) granulated sugar
- 1 large egg + 1 large egg yolk, at room temperature
- 2 tsp pure vanilla extract
- 315 g (2 ½ cups) all-purpose flour
- ½ tsp baking powder
- ¼ tsp fine sea salt
- 120 ml (½ cup) whole milk, at room temperature
- 113 g (½ cup) unsalted butter, very soft
- 240 g (2 cups) powdered sugar, sifted
- 2 tbsp heavy cream or milk
- 1 tsp pure vanilla extract
- Pinch of fine sea salt
- Sprinkles for decorating (optional but highly encouraged!)
Tools: 9×13 inch baking pan, parchment paper, electric hand mixer or stand mixer, large mixing bowl, spatula
Notes: Using room temperature ingredients ensures smooth batter and even baking. The extra egg yolk adds tenderness.
Nutrition (per serving)
| Calories: | 380 kcal |
| Protein: | 3 g |
| Fat: | 18 g |
| Carbs: | 52 g |
| Fiber: | 0.5 g |
Serves: 16 | Prep Time: 15 minutes | Cook Time: 25 minutes | Total Time: 40 minutes (plus cooling)
Before You Start: Tips & Ingredient Notes
- Why room temperature matters so much. If your butter, eggs, and milk are cold, they won’t emulsify properly with the sugar, leading to a curdled-looking batter and dense bars. True room temperature butter should yield slightly to a gentle press.
- Don’t skip the sifting for the frosting. I know, it feels like an extra step, but sifting that powdered sugar is what gives you a flawlessly smooth, lump-free frosting. It’s the difference between a professional-looking finish and a gritty one.
- The power of a parchment paper sling. Lining your pan with parchment paper so that it overhangs on two sides is a game-changer. It creates little handles that let you lift the entire slab of bars out for easy, crumb-free slicing.
- Patience is a virtue with cooling. I know it’s tempting to frost them the second they’re out of the oven, but you must let the bars cool completely. If you don’t, that beautiful frosting will just melt into a sad, runny puddle.
How to Make Frosted Sugar Cookie Bars
Step 1: First, get your oven preheating to 350°F (175°C). This is key for an even bake from the get-go. Then, line your 9×13 inch pan with parchment paper, letting a bit hang over the long sides—this is your future lifeline for perfect, clean cuts. A quick light spray of baking spray on the exposed pan sides helps everything release nicely.
Step 2: In your large mixing bowl, combine the softened butter and granulated sugar. Using an electric mixer on medium speed, beat them together for a good 2-3 minutes. You’re not just mixing; you’re creaming. The mixture should become noticeably paler, light, and fluffy. This step incorporates air, which is what gives the bars their lovely cakey lift.
Step 3: Now, add the whole egg, the extra egg yolk, and the vanilla extract to the butter mixture. Beat on medium until everything is perfectly combined, scraping down the sides of the bowl as needed. You’ll notice the mixture might look a little curdled at this point—that’s totally normal and will fix itself once you add the dry ingredients.
Step 4: In a separate bowl, whisk together the flour, baking powder, and salt. This ensures the leavening is evenly distributed. Now, with your mixer on low, add about a third of the dry ingredients to the wet, mixing just until a few streaks remain. Then, pour in half of the milk. Continue alternating between the flour and milk, starting and ending with the flour. Mix only until the last bit of flour disappears—overmixing is the enemy of a tender bar!
Step 5: Transfer the thick, cohesive batter to your prepared pan. Use a spatula or your fingers (a little water on them helps!) to spread it into a smooth, even layer, pushing it into all the corners. The batter will be quite thick, so just take your time with it.
Step 6: Bake for 22-27 minutes. You’re looking for the edges to be a very light golden brown and the top to look set. A toothpick inserted into the center should come out with a few moist crumbs attached, not wet batter. Remember, they’ll continue to cook a bit as they cool in the pan.
Step 7: This is the hardest part: let the pan cool completely on a wire rack. I mean it—absolutely, 100% cool to the touch. This can take a good hour or two. Go put your feet up, you’ve earned it.
Step 8: While the bars cool, make the frosting. In a clean bowl, beat the very soft butter until it’s smooth and creamy. Gradually add the sifted powdered sugar on low speed until it’s incorporated, then bump the speed up to medium and beat for a minute. Add the vanilla, salt, and cream, then beat on medium-high for 2-3 minutes until it’s incredibly light, fluffy, and spreadable.
Step 9: Once the bars are completely cool, use the parchment paper handles to lift the entire slab onto a cutting board. Spread the frosting evenly over the top, all the way to the edges. Now, for the best part: shower it with sprinkles immediately, before the frosting sets! Then, using a sharp knife, slice into squares. Wiping the knife clean between cuts gives you the cleanest edges.
Storage & Freshness Guide
- Fridge: Store frosted bars in an airtight container for up to 5 days.
- Freezer: Freeze unfrosted bar slab wrapped tightly for up to 3 months; thaw before frosting.
- Reviving: Bring to room temperature before serving for soft texture.
Serving Suggestions
Complementary Dishes
- A scoop of vanilla bean ice cream — The warm bar (if you gently reheat a slice) and cold ice cream create a fantastic contrast in temperature and texture that is simply sublime.
- A fresh fruit salad with mint — The bright, acidic burst of berries or citrus cuts through the richness of the buttercream, balancing out each delightful bite.
Drinks
- A tall glass of cold milk — It’s a classic for a reason. The creaminess of the milk is the perfect partner to the sweet, soft cookie bar.
- A cup of black coffee or espresso — The bitterness of a good, strong brew provides a sophisticated counterpoint to the intense sweetness, making the whole experience feel more grown-up.
Something Sweet
- Rich, dark chocolate brownies — For the ultimate dessert spread, the deep chocolate flavor of a fudgy brownie complements the vanilla-forward bars beautifully, offering a choice for every palate.
Top Mistakes to Avoid
- Mistake: Using cold butter and eggs. This prevents proper creaming and emulsification, leading to a dense, greasy bar instead of a light and tender one. I’ve messed this up before too, and the texture difference is dramatic.
- Mistake: Overmixing the batter after adding the flour. Once the flour hits the liquid, gluten starts to develop. Mixing too much creates a tough, chewy bar. Stop as soon as you no longer see dry flour streaks.
- Mistake: Overbaking the bars. They continue to cook from residual heat as they cool. If you wait for a perfectly clean toothpick, you’ve gone too far—you want a few moist crumbs for the softest texture.
- Mistake: Frosting a warm bar. The heat will instantly melt the butter in the frosting, causing it to slide right off and soak into the bar, creating a soggy, messy disaster. Patience is everything.
Expert Tips
- Tip: For an extra layer of flavor, brown the butter for the bar base. Let it cool to room temperature before creaming it with the sugar. It adds a wonderful, nutty depth that takes these from great to unforgettable.
- Tip: If your frosting seems too thick, add more cream, one teaspoon at a time. If it’s too thin, add more sifted powdered sugar, a tablespoon at a time, until you reach the perfect spreading consistency.
- Tip: Get creative with food coloring! Divide the frosting into smaller bowls and tint them different colors for a fun, ombre, or marbled effect. Gel food coloring gives you vibrant colors without thinning out the frosting.
- Tip: For super clean cuts, pop the frosted bars (on the cutting board) into the fridge for 20-30 minutes to let the frosting firm up. Then use a large, sharp knife, wiping it clean with a hot, damp cloth between each cut.
FAQs
Can I make these bars ahead of time?
Absolutely! They are a fantastic make-ahead dessert. You can bake the bar base up to two days in advance; just let it cool completely, then wrap the whole pan tightly in plastic wrap and store it at room temperature. Frost them the day you plan to serve for the best texture. The frosted bars will keep in an airtight container at room temperature for about two days, or in the fridge for up to five.
Can I freeze Frosted Sugar Cookie Bars?
You can, but with a small caveat. The bar base itself freezes beautifully for up to 3 months. Wrap the unfrosted, cooled slab tightly in plastic wrap and then foil. Thaw at room temperature before frosting. I don’t recommend freezing them after they’re frosted, as the frosting can become weepy and the texture can change upon thawing.
My bars turned out dense. What happened?
A dense bar is usually the result of one of two things: your ingredients were too cold, preventing proper air incorporation during creaming, or you overmixed the batter after adding the flour. Gluten development is the enemy of tenderness. Next time, ensure everything is truly room temp and mix the flour in only until it just disappears.
Can I use a different type of extract?
Of course! Vanilla is the classic, but this is your playground. Almond extract is a wonderful substitute—use about ¾ teaspoon as it’s more potent. You could also try lemon, orange, or even a bit of coconut extract to completely change the flavor profile. A little goes a long way with these stronger extracts.
Why did my frosting turn out gritty?
This almost always means your powdered sugar wasn’t sifted. Even the best brands can have little lumps that don’t fully dissolve during mixing, leaving you with a less-than-smooth finish. Taking that one extra minute to sift it will guarantee a silky, professional-quality frosting every single time.


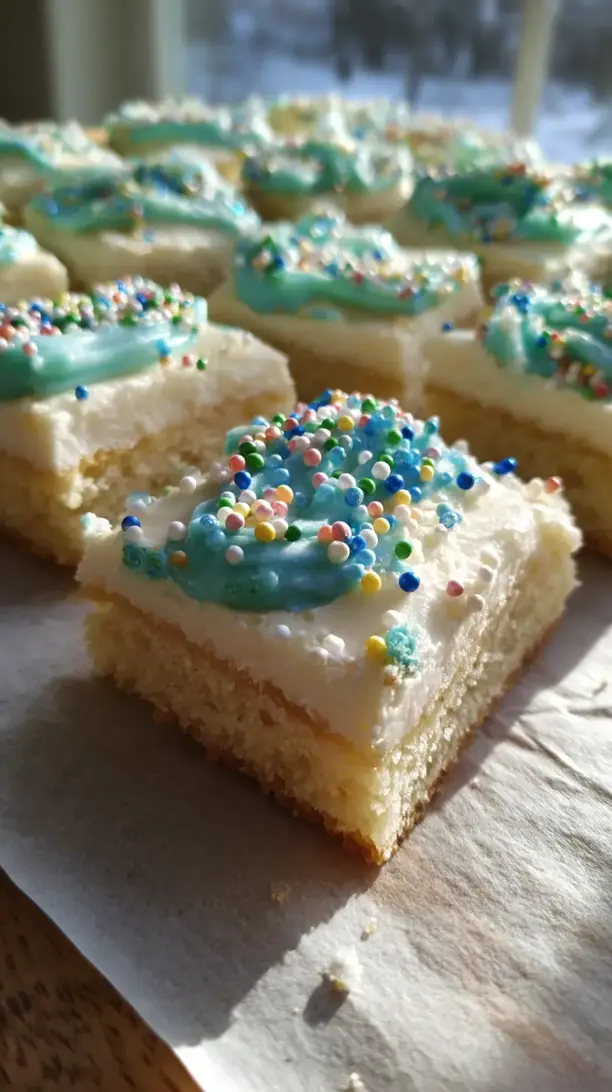
Frosted Sugar Cookie Bars: An Easy One-Bowl Dessert
Frosted Sugar Cookie Bars are the ultimate easy cookie bar recipe. This soft, buttery holiday treat is perfect for stress-free Christmas baking and sharing.
Ingredients
For the Cookie Bars:
-
226 g unsalted butter (softened)
-
200 g granulated sugar
-
1 large egg (at room temperature)
-
1 large egg yolk (at room temperature)
-
2 tsp pure vanilla extract
-
315 g all-purpose flour
-
½ tsp baking powder
-
¼ tsp fine sea salt
-
120 ml whole milk (at room temperature)
For the Frosting:
-
113 g unsalted butter (very soft)
-
240 g powdered sugar (sifted)
-
2 tbsp heavy cream or milk
-
1 tsp pure vanilla extract
-
fine sea salt (Pinch)
-
Sprinkles (for decorating (optional but highly encouraged!))
Instructions
-
First, get your oven preheating to 350°F (175°C). This is key for an even bake from the get-go. Then, line your 9x13 inch pan with parchment paper, letting a bit hang over the long sides—this is your future lifeline for perfect, clean cuts. A quick light spray of baking spray on the exposed pan sides helps everything release nicely.01
-
In your large mixing bowl, combine the softened butter and granulated sugar. Using an electric mixer on medium speed, beat them together for a good 2-3 minutes. You’re not just mixing; you’re creaming. The mixture should become noticeably paler, light, and fluffy. This step incorporates air, which is what gives the bars their lovely cakey lift.02
-
Now, add the whole egg, the extra egg yolk, and the vanilla extract to the butter mixture. Beat on medium until everything is perfectly combined, scraping down the sides of the bowl as needed. You’ll notice the mixture might look a little curdled at this point—that’s totally normal and will fix itself once you add the dry ingredients.03
-
In a separate bowl, whisk together the flour, baking powder, and salt. This ensures the leavening is evenly distributed. Now, with your mixer on low, add about a third of the dry ingredients to the wet, mixing just until a few streaks remain. Then, pour in half of the milk. Continue alternating between the flour and milk, starting and ending with the flour. Mix only until the last bit of flour disappears—overmixing is the enemy of a tender bar!04
-
Transfer the thick, cohesive batter to your prepared pan. Use a spatula or your fingers (a little water on them helps!) to spread it into a smooth, even layer, pushing it into all the corners. The batter will be quite thick, so just take your time with it.05
-
Bake for 22-27 minutes. You’re looking for the edges to be a very light golden brown and the top to look set. A toothpick inserted into the center should come out with a few moist crumbs attached, not wet batter. Remember, they’ll continue to cook a bit as they cool in the pan.06
-
This is the hardest part: let the pan cool completely on a wire rack. I mean it—absolutely, 100% cool to the touch. This can take a good hour or two. Go put your feet up, you’ve earned it.07
-
While the bars cool, make the frosting. In a clean bowl, beat the very soft butter until it’s smooth and creamy. Gradually add the sifted powdered sugar on low speed until it’s incorporated, then bump the speed up to medium and beat for a minute. Add the vanilla, salt, and cream, then beat on medium-high for 2-3 minutes until it’s incredibly light, fluffy, and spreadable.08
-
Once the bars are completely cool, use the parchment paper handles to lift the entire slab onto a cutting board. Spread the frosting evenly over the top, all the way to the edges. Now, for the best part: shower it with sprinkles immediately, before the frosting sets! Then, using a sharp knife, slice into squares. Wiping the knife clean between cuts gives you the cleanest edges.09
Not what you're looking for?


