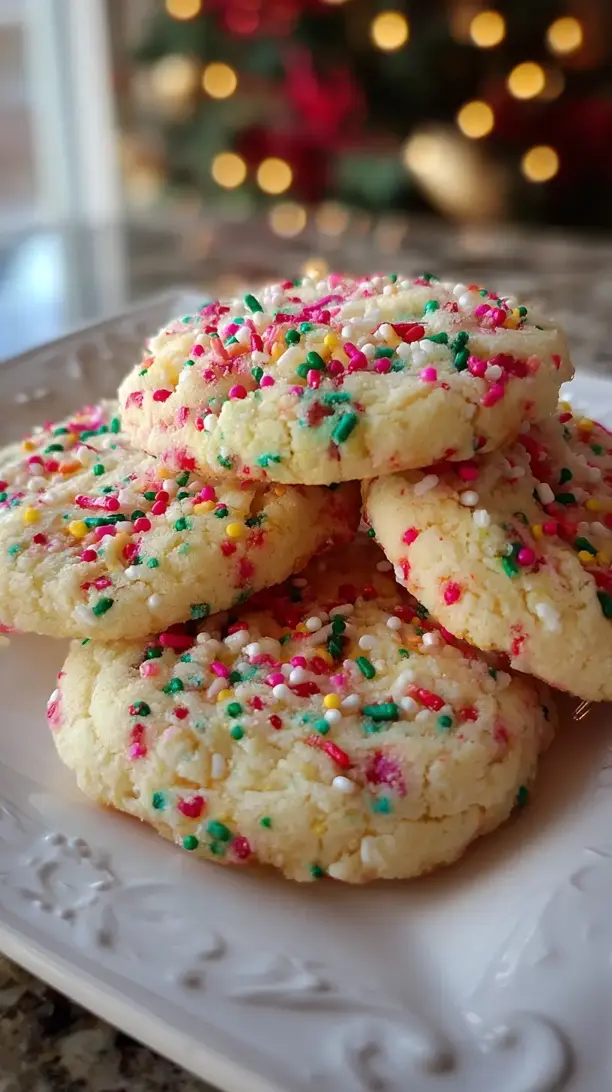
There’s something about the sparkle of sprinkles that just feels like the holidays. I think these Funfetti Christmas Cookies capture that feeling perfectly—they’re my go-to when I want to whip up some pure, edible joy. Soft-baked, chewy, and bursting with color, they’re like a little festive party in every bite and the ultimate comfort food recipe for the season. If you’re looking to add something special to your tray, these are truly some of the most unique Christmas cookies, a happy twist on traditional Christmas sweets.
I love this recipe because it’s such a friendly, welcoming start to holiday baking. Whether you’re a seasoned baker or just starting out, if you need easy Christmas treats or simple Christmas cookie ideas, this one comes together with minimal fuss for maximum cheer. It’s a staple in my collection of Christmas cookie recipes for a very good reason.
So, when you’re brainstorming Christmas baking ideas or simply want to make some memorable holiday treats, let these cheerful cookies be your project. They’re proof that the sweetest moments often come from the simplest, most joyful bakes.
Craving a delicious Funfetti Christmas Cookies? You've come to the right spot! From Christmas Cookie favorites to amazing Crockpot Recipes recipes, there's something here for everyone.

Why You’ll Love This Funfetti Christmas Cookies
- Visually Festive: Colorful sprinkles do all the decorating work.
- Perfect Texture: Crisp edges with a wonderfully soft, chewy center.
- Incredibly Simple: No chilling required—just mix and bake.
- Feels Like Celebration: Biting into a sprinkle-filled cookie is pure fun.
Ingredients & Tools
- 115 g unsalted butter, softened
- 100 g granulated sugar
- 110 g light brown sugar, packed
- 1 large egg, at room temperature
- 2 tsp pure vanilla extract
- 210 g all-purpose flour
- 1/2 tsp baking soda
- 1/2 tsp cornstarch
- 1/4 tsp salt
- 120 g Christmas sprinkles (jimmies or quins work best)
Tools: Stand mixer or hand mixer, baking sheets, parchment paper or silicone baking mats, a medium cookie scoop (about 1.5 tbsp), wire cooling rack.
Notes: Using a mix of sugars is key for chew and caramel notes. Cornstarch is the secret for an extra-soft, thick cookie.
Nutrition (per serving)
| Calories: | 180 kcal |
| Protein: | 2 g |
| Fat: | 7 g |
| Carbs: | 28 g |
| Fiber: | 0.5 g |
Serves: 18 | Prep Time: 15 minutes | Cook Time: 10 minutes | Total Time: 25 minutes
Before You Start: Tips & Ingredient Notes
- Butter Temperature is Everything. Your butter should be softened, not melted. You should be able to press a finger into it easily, leaving a slight indentation. If it’s greasy or shiny, it’s too warm and will cause your cookies to spread too much.
- Choose Your Sprinkles Wisely. For the best visual result, use “jimmies” or “quins.” Avoid nonpareils (the tiny round balls) if you can, as their color tends to bleed into the dough during baking, creating a murky, grayish cookie.
- Why Cornstarch? It might seem like an odd addition, but cornstarch is a game-changer. It tenderizes the gluten in the flour, giving you a cookie that’s soft and thick, not thin and crispy. It’s the baker’s secret to a perfect texture.
- Don’t Over-mix the Dough. Once you add the dry ingredients, mix only until the flour streaks disappear. Over-mixing develops more gluten, which can lead to a tougher, cakier cookie—the opposite of what we want here.
How to Make Funfetti Christmas Cookies
Step 1: First, preheat your oven to 350°F (175°C) and line your baking sheets with parchment paper or silicone mats. This is crucial for easy removal and prevents the bottoms from browning too quickly. Now, in the bowl of your stand mixer fitted with the paddle attachment (or a large bowl if using a hand mixer), cream together the softened butter, granulated sugar, and brown sugar. You’ll want to beat this on medium-high speed for a good 2-3 minutes until the mixture is light, pale, and fluffy. This step incorporates air, which helps with the cookie’s rise.
Step 2: Scrape down the sides of the bowl with a spatula to ensure everything is incorporated. Now, add the room-temperature egg and the vanilla extract. Beat on medium speed until everything is well combined, about another minute. The mixture might look a little curdled at first, but it will smooth out as it mixes. The rich aroma of vanilla and butter will start to fill your kitchen—it’s honestly one of the best parts.
Step 3: In a separate, medium-sized bowl, whisk together the all-purpose flour, baking soda, cornstarch, and salt. Whisking these dry ingredients first ensures the leavening agents and salt are evenly distributed throughout the flour, which prevents any bitter pockets in your finished cookies. This is a simple step that makes a big difference in the final product.
Step 4: With your mixer on low speed, gradually add the dry ingredients to the wet ingredients. Mix only until just combined—you should see no more streaks of flour. The dough will be quite thick, which is exactly what we want for a soft, puffy cookie. Now, for the fun part! Add almost all of your Christmas sprinkles, reserving about two tablespoons for later. Fold them in gently by hand with a spatula until they’re evenly distributed.
Step 5: Using your cookie scoop (this ensures they’re all the same size and bake evenly), portion out the dough onto your prepared baking sheets. Leave about 2 inches of space between each dough ball as they will spread. Now, take the reserved sprinkles and gently press a few more onto the top of each dough ball. This guarantees a super festive, colorful top once they’re baked.
Step 6: Bake for 9-11 minutes. The trick is to pull them out when the edges are just set and very lightly golden, but the centers still look soft and underdone. They will continue to cook on the hot baking sheet. Don’t wait for them to look fully baked in the center, or you’ll lose that wonderful soft texture. You’ll notice they puff up beautifully in the oven.
Step 7: As soon as you remove the baking sheets from the oven, give them a firm tap on the countertop. This helps deflate them slightly and creates those lovely crinkles on top. Let the cookies cool on the baking sheet for 5 full minutes before transferring them to a wire rack to cool completely. This resting time on the sheet is essential for them to set up properly.
Storage & Freshness Guide
- Fridge: Not recommended; store at room temperature.
- Freezer: Freeze baked cookies for up to 3 months, or freeze dough balls and bake from frozen.
- Reviving: Warm in a 300°F oven for 3-5 minutes to refresh.
Serving Suggestions
Complementary Dishes
- A scoop of vanilla ice cream — Sandwich a small, slightly warm cookie with a scoop of high-quality vanilla ice cream for an incredible festive ice cream sandwich. The cold, creamy ice cream against the soft, warm cookie is a textural dream.
- A warm mug of hot chocolate — The rich chocolate is a classic pairing that makes the vanilla and butter notes in the cookie sing even louder. It’s the ultimate cozy combination for a cold evening.
Drinks
- A cold glass of milk — It’s a cliché for a reason! The cold milk perfectly cuts through the sweetness and richness of the cookie, creating that timeless, nostalgic flavor combination we all love.
- Peppermint tea — The cool, refreshing mint provides a lovely contrast to the sweet, buttery cookie and enhances the overall holiday vibe of your snack time.
Something Sweet
- Classic fudge — A small square of rich, creamy chocolate or vanilla fudge alongside your cookie creates a decadent dessert platter. The dense, smooth fudge is a wonderful contrast to the soft, crumbly cookie.
- Candy cane bark — The crunchy, minty chocolate pairs beautifully with the soft vanilla cookie and adds another layer of Christmas flavor and texture to your dessert spread.
Top Mistakes to Avoid
- Mistake: Using melted butter. This is the number one reason cookies spread into sad, flat puddles. Softened butter creams with sugar to create structure; melted butter simply can’t hold that air, leading to excessive spread.
- Mistake: Over-baking. I’ve messed this up before too, waiting for the centers to look “done.” Remember, they continue to cook on the hot tray. Pull them out when the edges are just set and the centers look soft for the perfect chewy texture.
- Mistake: Using the wrong sprinkles. As mentioned, nonpareils (the little balls) will bleed their color. Stick with jimmies or quins for those bright, clean, festive colors that stay vibrant after baking.
- Mistake: Not measuring flour correctly. The most accurate way is to use a kitchen scale. If you’re using cups, fluff your flour with a spoon, spoon it into the measuring cup, and level it off. Scooping directly packs in too much flour, leading to dry, cakey cookies.
Expert Tips
- Tip: Weigh your ingredients. For truly consistent, bakery-quality results every time, a digital kitchen scale is your best friend. Cup measurements can vary wildly, but grams are always precise. This is the single biggest upgrade for a home baker.
- Tip: The “tap” is magic. Don’t skip the step of tapping the baking sheet on the counter right when the cookies come out of the oven. It deflates them just enough to create a denser, chewier crumb and those beautiful, craggy tops.
- Tip: Room temperature egg is non-negotiable. A cold egg won’t emulsify properly into the creamed butter and sugar, which can result in a curdled-looking mixture and can affect the texture of your final cookie. Just let it sit out for 30 minutes before you start.
- Tip: Make the dough ahead. You can scoop the dough balls onto a parchment-lined tray, freeze them solid, and then transfer them to a freezer bag. Bake straight from frozen, adding 1-2 minutes to the baking time. Fresh cookies anytime!
FAQs
Can I make these cookies ahead of time?
Absolutely! The baked cookies will stay soft and fresh in an airtight container at room temperature for up to 4 days. For longer storage, you can freeze the baked cookies for up to 3 months. Alternatively, you can freeze the unbaked dough balls as mentioned in the tips—this is my preferred method for having fresh, warm cookies on demand throughout the holiday season.
Why did my cookies turn out cakey?
A cakey texture usually points to a few things: over-mixing the dough after adding the flour (which develops gluten), using too much flour (always weigh it if you can!), or potentially an issue with your leavening agent. Make sure your baking soda is fresh and that you’re not accidentally using baking powder, which contains additional acids and can create more rise.
Can I use a different type of sprinkle?
You can, but be mindful of the type. Jimmies and quins hold their color and shape best. If you use nonpareils, expect some color bleeding, which will give your cookies a pretty, tie-dyed effect but won’t have the distinct colorful speckles. Sanding sugar can be mixed in or rolled on the outside for a sparkly, crunchy texture.
My cookies spread too much. What happened?
This is almost always a butter temperature issue. If your butter was too warm or melted, the cookies will spread. Another culprit could be your baking sheet being too warm when you put the dough on it. Always use a cool baking sheet for each batch. Also, check your oven temperature with a thermometer—an oven that runs cool can cause spreading as the cookies sit and melt before they set.
Can I add white chocolate chips to this recipe?
Yes, that’s a delicious addition! White chocolate and sprinkles are a fantastic combo. I would recommend reducing the sprinkles to about 80g and adding 100g of white chocolate chips. Fold them in at the same time as the sprinkles. The creamy sweetness of the white chocolate pairs beautifully with the vanilla base.


Funfetti Christmas Cookies: An Easy Holiday Baking Recipe
Funfetti Christmas Cookies are your new favorite easy Christmas cookies. This soft-baked, sprinkle-packed treat is the ultimate cheerful addition to your holiday baking lineup.
Ingredients
For the Ingredients
-
115 g unsalted butter (softened)
-
100 g granulated sugar
-
110 g light brown sugar (packed)
-
1 large egg (at room temperature)
-
2 tsp pure vanilla extract
-
210 g all-purpose flour
-
1/2 tsp baking soda
-
1/2 tsp cornstarch
-
1/4 tsp salt
-
120 g Christmas sprinkles (jimmies or quins work best)
Instructions
-
First, preheat your oven to 350°F (175°C) and line your baking sheets with parchment paper or silicone mats.01
-
In the bowl of your stand mixer fitted with the paddle attachment (or a large bowl if using a hand mixer), cream together the softened butter, granulated sugar, and brown sugar on medium-high speed for a good 2-3 minutes until the mixture is light, pale, and fluffy.02
-
Scrape down the sides of the bowl with a spatula to ensure everything is incorporated, then add the room-temperature egg and the vanilla extract and beat on medium speed until everything is well combined, about another minute.03
-
In a separate, medium-sized bowl, whisk together the all-purpose flour, baking soda, cornstarch, and salt.04
-
With your mixer on low speed, gradually add the dry ingredients to the wet ingredients and mix only until just combined—you should see no more streaks of flour.05
-
Add almost all of your Christmas sprinkles, reserving about two tablespoons for later, and fold them in gently by hand with a spatula until they’re evenly distributed.06
-
Using your cookie scoop, portion out the dough onto your prepared baking sheets, leaving about 2 inches of space between each dough ball.07
-
Take the reserved sprinkles and gently press a few more onto the top of each dough ball.08
-
Bake for 9-11 minutes, pulling them out when the edges are just set and very lightly golden, but the centers still look soft and underdone.09
-
As soon as you remove the baking sheets from the oven, give them a firm tap on the countertop.10
-
Let the cookies cool on the baking sheet for 5 full minutes before transferring them to a wire rack to cool completely.11
Not what you're looking for?


