These Garam Masala Chicken Thighs deliver a fragrant, deeply spiced meal with minimal effort. The bone-in, skin-on thighs stay incredibly juicy while the spice blend creates an earthy, aromatic crust. It’s a one-pan wonder that’s perfect for both weeknights and entertaining.
Looking for Garam Masala Chicken Thighs inspiration? You'll love what we have! Explore more Chicken Thigh Recipes recipes or discover our Burgers favorites.
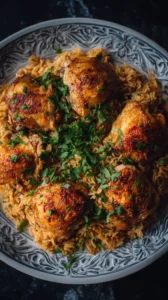


Why You’ll Love This Garam Masala Chicken Thighs
- Juicy & Flavorful: Bone-in, skin-on thighs stay moist with a crispy spice crust.
- Aromatic & Effortless: Garam masala delivers complex, warm flavors in one sprinkle.
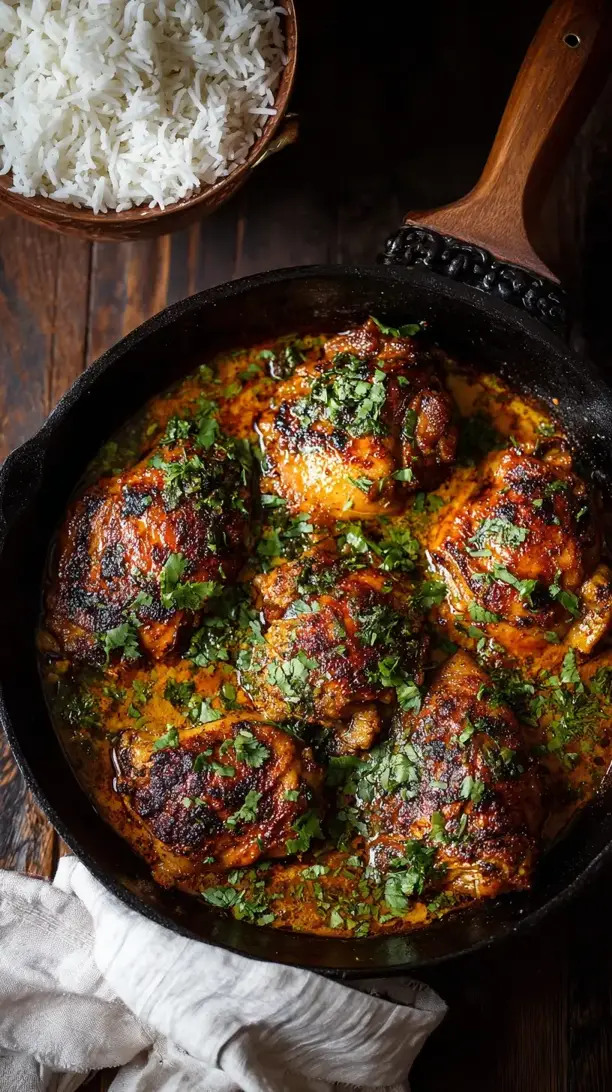
- Versatile Serving: Pairs beautifully with rice, naan, salads, or wraps.
- One-Pan Wonder: Cooks in a single skillet for maximum flavor and easy cleanup.
Ingredients & Tools
- 4-6 bone-in, skin-on chicken thighs (about 1.5 lbs / 680 g)
- 1 ½ tbsp garam masala, divided
- 1 tsp kosher salt
- ½ tsp freshly ground black pepper
- 2 tbsp olive oil or ghee
- 3 garlic cloves, minced
- 1 small yellow onion, finely chopped
- ½ cup chicken broth or stock
- ¼ cup plain full-fat yogurt or heavy cream
- 1 tbsp fresh lemon juice
- 2 tbsp fresh cilantro, chopped (for garnish)
Notes: Don’t skip the yogurt/cream—it makes the sauce creamy and balances the spices. Use fresh, good-quality garam masala for best aroma.
Tools: A large, heavy-bottomed oven-safe skillet (like cast iron or stainless steel), tongs, and an instant-read thermometer are key.
Nutrition (per serving)
| Calories: | 385 kcal |
| Protein: | 28 g |
| Fat: | 29 g |
| Carbs: | 5 g |
| Fiber: | 1 g |
Serves: 4 | Prep Time: 10 minutes | Cook Time: 30 minutes | Total Time: 40 minutes
Before You Start: Tips & Ingredient Notes
- Why bone-in, skin-on thighs? The bone acts as a heat conductor, cooking the meat evenly and keeping it incredibly juicy. The skin protects the meat from drying out and, when seared properly, becomes a wonderfully crispy, flavorful treat. You can use boneless, but you’ll miss some of that depth.
- Is your garam masala fresh? This spice blend is the heart of the dish. If your jar has been sitting in the cupboard for over a year, its magical aromatic oils have likely faded. For the best flavor, consider buying a new small batch from a store with high turnover or toasting and grinding your own.
- Pat that chicken dry! This might be the single most important step for achieving crispy skin. Use paper towels to thoroughly dry the skin side of the thighs. Any moisture will steam the skin instead of letting it sear and crisp up beautifully in the hot pan.
- Don’t crowd the pan. If you put too many thighs in the skillet at once, they’ll steam each other and you’ll end up with pale, rubbery skin. Cook in two batches if your pan isn’t large enough to fit them all with some space in between.
How to Make Garam Masala Chicken Thighs
Step 1: Season the Chicken. Pat the chicken thighs completely dry with paper towels. In a small bowl, mix together 1 tablespoon of the garam masala, the kosher salt, and black pepper. Rub this spice mixture evenly over both sides of the chicken thighs, making sure to get it under the skin a little bit if you can. Let them sit at room temperature for about 15-20 minutes while you prep your other ingredients. This brief rest allows the seasoning to penetrate and helps the chicken cook more evenly.
Step 2: Sear to Perfection. Preheat your oven to 375°F (190°C). Place your large oven-safe skillet over medium-high heat and add the olive oil or ghee. Once the oil is shimmering hot, carefully place the chicken thighs in the pan, skin-side down. You should hear a confident sizzle. Resist the urge to move them! Let them cook undisturbed for 6-8 minutes, until the skin is a deep golden brown and super crispy. Use tongs to flip them over and cook for another 2-3 minutes on the flesh side. Transfer the chicken to a clean plate; it won’t be fully cooked through yet.
Step 3: Sauté the Aromatics. Reduce the heat to medium. In the same skillet, with all those beautiful chicken drippings and browned bits, add the chopped onion. Sauté for 4-5 minutes until it becomes soft and translucent. Add the minced garlic and the remaining ½ tablespoon of garam masala. Stir constantly for about 60 seconds until the garlic is fragrant—you’ll notice the aroma of the spices blooming and becoming even more intense. Be careful not to burn the garlic.
Step 4: Create the Creamy Sauce. Pour the chicken broth into the skillet, using your spoon or spatula to scrape up all the flavorful fond from the bottom of the pan. Let it simmer for a minute to reduce slightly. Then, turn off the heat and stir in the yogurt or heavy cream. The sauce will instantly become creamy and take on a lovely pale tan color. Stir in the fresh lemon juice, which will brighten everything up.
Step 5: Bake to Finish. Nestle the seared chicken thighs back into the skillet, skin-side up, so they’re sitting in the sauce. Spoon a little bit of the sauce over the top of each piece. Carefully transfer the entire skillet to the preheated oven. Bake for 15-20 minutes, or until the chicken is cooked through and registers 165°F (74°C) on an instant-read thermometer inserted into the thickest part without touching the bone.
Step 6: Rest and Garnish. Remove the skillet from the oven—be careful, the handle will be extremely hot! Transfer the chicken to a serving platter and let it rest for 5 minutes. This allows the juices to redistribute throughout the meat, ensuring every bite is moist. Give the sauce in the pan a final stir, then pour it around the chicken. Garnish generously with the fresh chopped cilantro before serving.
Storage & Freshness Guide
- Fridge: Store in an airtight container for up to 3 days.
- Freezer: Freeze chicken and sauce separately for up to 2 months.
- Reviving: Reheat gently in a covered skillet with a splash of broth.
Serving Suggestions
Complementary Dishes
- Basmati Rice or Jeera Rice — The fluffy, slightly fragrant grains are the perfect vehicle for soaking up every last drop of that incredible creamy sauce. A classic pairing that never fails.
- Buttery Naan or Roti — There’s nothing quite like using a piece of warm, soft flatbread to scoop up bites of spiced chicken and sauce. It’s interactive, fun, and utterly delicious.
- Simple Cucumber Salad — A quick mix of sliced cucumbers, red onion, lemon juice, and a pinch of salt provides a cool, crisp, and refreshing contrast to the warm, rich chicken.
Drinks
- A Crisp, Cold Lager — The clean, effervescent quality of a lager cuts through the richness of the dish beautifully and cleanses the palate between bites.
- Mango Lassi — This creamy, sweet, and tangy yogurt-based drink is a traditional accompaniment that complements the warm spices in the garam masala perfectly.
- Gewürztraminer or an Off-Dry Riesling — A wine with a touch of sweetness and lychee or stone fruit notes stands up to the spice and enhances the dish’s aromatic qualities.
Something Sweet
- Gulab Jamun — These warm, syrup-soaked milk solids balls are a classic Indian dessert that provides a sweet, rose-scented finish that feels like a true celebration.
- Mango Sorbet — For a lighter option, a scoop of vibrant, tangy mango sorbet is incredibly refreshing and continues the tropical fruit theme that pairs so well with these flavors.
- Cardamom-Spiced Rice Pudding (Kheer) — A creamy, cold rice pudding subtly flavored with cardamom offers a comforting and familiar end to the meal that echoes the spices used in the main course.
Top Mistakes to Avoid
- Mistake: Not drying the chicken skin. This is the cardinal sin of crispy skin! Any surface moisture will create steam, preventing that gorgeous, crackling-crisp texture we’re after. Pat it relentlessly with paper towels.
- Mistake: Moving the chicken too soon. When you first place the thighs in the hot pan, you have to let them be. If you try to peek or move them too early, the skin will tear and stick to the pan. Trust the process and wait for that golden-brown color.
- Mistake: Adding the yogurt to boiling liquid. If the pan is too hot when you stir in the yogurt, it can curdle and separate, making the sauce look grainy. Always take the pan off the heat before incorporating the dairy for a smooth, creamy result.
- Mistake: Skipping the rest time. Slicing into the chicken straight from the oven will cause all those precious, flavorful juices to run out onto the cutting board instead of staying in the meat. A brief 5-minute rest makes for a much juicier bite.
Expert Tips
- Tip: Bloom your own spices. For an even deeper flavor, lightly toast whole spices like coriander seeds, cumin seeds, cardamom pods, and a cinnamon stick in a dry pan, then grind them into a powder. Mix this with pre-ground garam masala for a custom, ultra-fragrant blend.
- Tip: Use the broiler for extra crisp. If you feel the skin could be a bit crisper after baking, simply switch your oven to a high broil for the last 1-2 minutes. Watch it like a hawk—it can go from perfectly crisp to burnt in seconds!
- Tip: Make it ahead. You can sear the chicken and prepare the sauce base a few hours in advance. Let them cool separately, then combine and finish the baking step just before serving. This is a fantastic trick for easy entertaining.
- Tip: Add greens for a complete meal. Stir a few handfuls of fresh spinach or chopped kale into the warm sauce right after you take it out of the oven. The residual heat will wilt the greens perfectly, adding color and nutrients to your dish.
FAQs
Can I use boneless, skinless chicken thighs?
You absolutely can, but the cooking method and result will be different. Boneless thighs will cook much faster, so you’ll want to reduce the baking time to about 10-12 minutes. You’ll miss out on the incredible crispy skin, but you’ll still get all the wonderful flavor from the garam masala rub and the creamy sauce. Just be extra careful not to overcook them, as they can dry out more easily without the bone and skin protection.
My sauce broke/curdled. What happened and can I fix it?
This usually happens if the pan was too hot when you added the yogurt or cream. The proteins seize up and separate from the fats. To fix it, you can try taking the sauce off the heat and whisking in another tablespoon of cold yogurt or a splash of broth. If that doesn’t work, don’t worry—the flavor is still all there! You can also blend it briefly with an immersion blender to re-emulsify it into a smooth sauce.
How do I store and reheat leftovers?
Store any leftover chicken and sauce in an airtight container in the refrigerator for up to 3 days. The best way to reheat it is gently in a covered skillet over low heat, adding a tiny splash of water or broth to loosen the sauce. You can also use the microwave, but heat it in short bursts at 50% power to prevent the chicken from becoming tough and the sauce from separating.
What’s a good substitute for garam masala?
While nothing replicates its unique blend perfectly, in a pinch you can make a quick substitute. Try mixing equal parts ground cumin and coriander with a smaller amount of ground cardamom, black pepper, and a pinch of cinnamon and cloves. It won’t be identical, but it will provide a warm, spiced profile that works well in the recipe.
Can I make this dish spicier?
Of course! Garam masala is more about warmth and aroma than intense heat. To add a kick, you have a few options. Mix ½ to 1 teaspoon of Kashmiri red chili powder or cayenne pepper into the initial spice rub. Alternatively, you can add a finely chopped fresh chili (like a serrano or Thai bird’s eye chili) to the pan when you sauté the onions and garlic.


Garam Masala Chicken Thighs
Make juicy, flavorful Garam Masala Chicken Thighs in one pan! This easy recipe features crispy skin and a creamy, aromatic sauce. Get the full recipe now!
Ingredients
For the Ingredients
-
4-6 bone-in, skin-on chicken thighs (about 1.5 lbs / 680 g)
-
1 ½ tbsp garam masala (divided)
-
1 tsp kosher salt
-
½ tsp freshly ground black pepper
-
2 tbsp olive oil or ghee
-
3 garlic cloves (minced)
-
1 small yellow onion (finely chopped)
-
½ cup chicken broth or stock
-
¼ cup plain full-fat yogurt or heavy cream
-
1 tbsp fresh lemon juice
-
2 tbsp fresh cilantro (chopped (for garnish))
Instructions
-
Pat the chicken thighs completely dry with paper towels. In a small bowl, mix together 1 tablespoon of the garam masala, the kosher salt, and black pepper. Rub this spice mixture evenly over both sides of the chicken thighs, making sure to get it under the skin a little bit if you can. Let them sit at room temperature for about 15-20 minutes while you prep your other ingredients. This brief rest allows the seasoning to penetrate and helps the chicken cook more evenly.01
-
Preheat your oven to 375°F (190°C). Place your large oven-safe skillet over medium-high heat and add the olive oil or ghee. Once the oil is shimmering hot, carefully place the chicken thighs in the pan, skin-side down. You should hear a confident sizzle. Resist the urge to move them! Let them cook undisturbed for 6-8 minutes, until the skin is a deep golden brown and super crispy. Use tongs to flip them over and cook for another 2-3 minutes on the flesh side. Transfer the chicken to a clean plate; it won’t be fully cooked through yet.02
-
Reduce the heat to medium. In the same skillet, with all those beautiful chicken drippings and browned bits, add the chopped onion. Sauté for 4-5 minutes until it becomes soft and translucent. Add the minced garlic and the remaining ½ tablespoon of garam masala. Stir constantly for about 60 seconds until the garlic is fragrant—you’ll notice the aroma of the spices blooming and becoming even more intense. Be careful not to burn the garlic.03
-
Pour the chicken broth into the skillet, using your spoon or spatula to scrape up all the flavorful fond from the bottom of the pan. Let it simmer for a minute to reduce slightly. Then, turn off the heat and stir in the yogurt or heavy cream. The sauce will instantly become creamy and take on a lovely pale tan color. Stir in the fresh lemon juice, which will brighten everything up.04
-
Nestle the seared chicken thighs back into the skillet, skin-side up, so they’re sitting in the sauce. Spoon a little bit of the sauce over the top of each piece. Carefully transfer the entire skillet to the preheated oven. Bake for 15-20 minutes, or until the chicken is cooked through and registers 165°F (74°C) on an instant-read thermometer inserted into the thickest part without touching the bone.05
-
Remove the skillet from the oven—be careful, the handle will be extremely hot! Transfer the chicken to a serving platter and let it rest for 5 minutes. This allows the juices to redistribute throughout the meat, ensuring every bite is moist. Give the sauce in the pan a final stir, then pour it around the chicken. Garnish generously with the fresh chopped cilantro before serving.06
Not what you're looking for?


