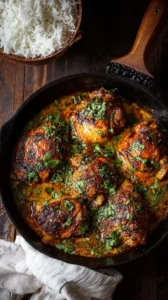
There’s something deeply comforting about the sizzle of chicken thighs hitting a hot pan. These Garlic Butter Chicken Thighs are a weeknight hero—juicy, crispy, and bathed in a fragrant garlic butter sauce. The aroma alone will have everyone hovering around the kitchen.
If you're looking for the perfect Garlic Butter Chicken Thighs, you're in the right place. Whether you love Chicken Thigh Recipes or want to explore our Appetizer Recipes collection, we've got you covered.


Why You’ll Love This Garlic Butter Chicken Thighs
- Juicy & flavorful: Bone-in, skin-on thighs stay moist and develop crispy skin.
- Magic garlic butter sauce: Rich, aromatic, and perfect for spooning over everything.
- Deceptively simple: Feels restaurant-quality with minimal fuss.
- Incredibly versatile: Pairs beautifully with pasta, rice, potatoes, or salad.
Ingredients & Tools
- 6 bone-in, skin-on chicken thighs (about 1.5 lbs / 680 g)
- 1 tsp kosher salt, plus more to taste
- 1/2 tsp freshly ground black pepper
- 1 tsp smoked paprika
- 2 tbsp olive oil
- 4 tbsp unsalted butter
- 8 large garlic cloves, minced
- 1/2 cup chicken broth
- 1 tbsp fresh lemon juice
- 2 tbsp fresh parsley, chopped
- 1 tsp fresh thyme leaves
Tools: A large, oven-safe skillet (like cast iron or stainless steel), tongs, and a microplane or garlic press are helpful.
Notes: Don’t use boneless, skinless thighs—the bone and skin are crucial. Fresh garlic is non-negotiable for the best flavor.
Nutrition (per serving)
| Calories: | 485 kcal |
| Protein: | 28 g |
| Fat: | 40 g |
| Carbs: | 3 g |
| Fiber: | 0.5 g |
Serves: 4 | Prep Time: 10 minutes | Cook Time: 25 minutes | Total Time: 35 minutes
Before You Start: Tips & Ingredient Notes
- Pat your chicken thighs completely dry. This is the single most important step for getting that beautifully crispy, golden-brown skin. Any moisture on the surface will steam the skin instead of searing it. Use paper towels and really press down to absorb all the moisture.
- Why bone-in, skin-on? The bone helps the meat cook more evenly and adds a ton of flavor to the pan sauce. The skin, when rendered properly, becomes a crispy, salty, irresistible treat and protects the meat from drying out. It’s worth the extra few minutes of cooking time.
- Don’t be shy with the seasoning. Season the chicken thighs generously on both sides, getting the salt and pepper under the skin as well if you can. This ensures the flavor penetrates the meat itself, not just the surface.
- Use a mix of butter and oil. The olive oil has a higher smoke point, which allows you to get a good sear on the chicken without the butter burning. Adding the fresh butter later, off the direct heat, lets it melt gently into the sauce with all its flavor intact.
How to Make Garlic Butter Chicken Thighs
Step 1: First, prep your chicken. Pat the thighs completely dry with paper towels—this is non-negotiable for crispy skin. In a small bowl, mix together the salt, black pepper, and smoked paprika. Season the chicken thighs generously on both sides, making sure to get the seasoning onto the skin and underneath it if possible. Let them sit at room temperature for about 10-15 minutes while you preheat your skillet. This helps them cook more evenly.
Step 2: Preheat your large, oven-safe skillet over medium-high heat for a good 2-3 minutes. You want it nice and hot. Add the olive oil. Once the oil is shimmering, carefully place the chicken thighs in the pan, skin-side down. You should hear a confident sizzle. Resist the urge to move them! Let them cook undisturbed for 6-8 minutes to develop that gorgeous, golden-brown crust.
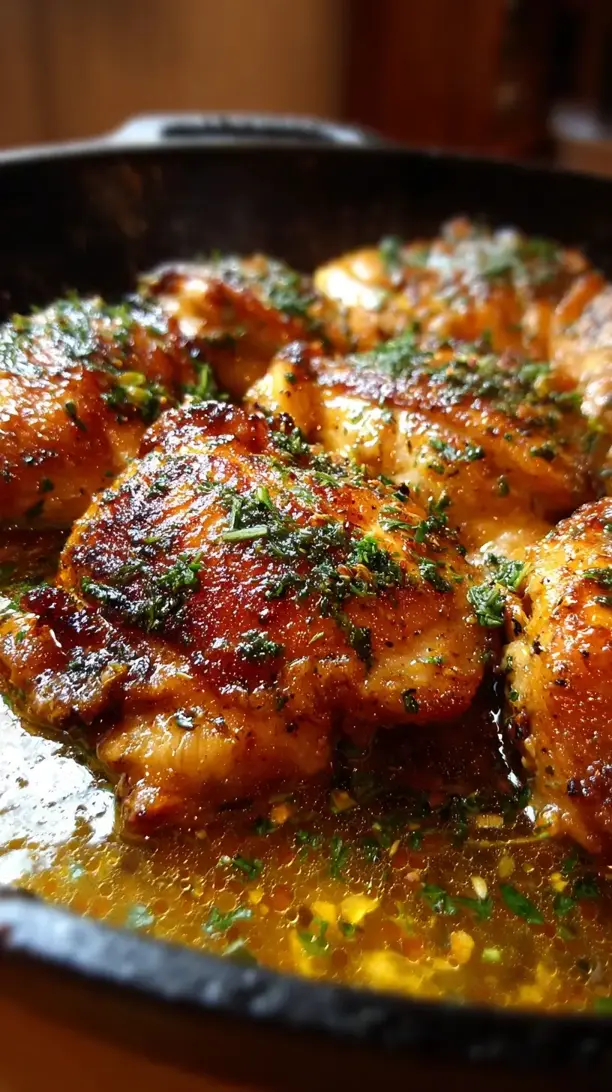
Step 3: After 6-8 minutes, peek under one thigh. The skin should be deeply golden and release easily from the pan. If it’s sticking, it needs a little more time. Once perfectly crisped, flip the thighs over and cook for another 5-6 minutes on the other side. The goal here is to cook them about 80% of the way through. You’ll notice the meat will be opaque around the edges but still a little pink near the bone.
Step 4: Transfer the partially cooked chicken thighs to a clean plate. It’s sauce time! Reduce the heat to medium-low. Drain off all but about one tablespoon of the rendered chicken fat from the skillet. Add the unsalted butter and let it melt. Once it’s foaming, add the minced garlic. Cook for just 60-90 seconds, stirring constantly, until it’s incredibly fragrant. You must watch it closely—burnt garlic is bitter and will ruin the sauce.
Step 5: Pour in the chicken broth to deglaze the pan, using a wooden spoon to scrape up all those delicious browned bits from the bottom. Those bits are pure flavor gold. Let the broth simmer for a minute to reduce slightly. Then, stir in the fresh lemon juice, parsley, and thyme. The sauce should look glossy and smell absolutely heavenly.
Step 6: Return the chicken thighs to the skillet, skin-side up, nestling them into the sauce. Spoon some of the sauce over the top. Let everything simmer together for another 4-5 minutes, or until the chicken is cooked through (an internal thermometer should read 165°F / 74°C at the thickest part, not touching the bone). The sauce will thicken slightly and cling to the chicken.
Step 7: For a final touch, you can pop the entire oven-safe skillet under a preheated broiler for 1-2 minutes to re-crisp the skin. Just keep a very close eye on it! Remove from the heat, let it rest for a couple of minutes, then serve immediately, spooning plenty of that glorious garlic butter sauce over the top.
Storage & Freshness Guide
- Fridge: Store leftovers in an airtight container for up to 3–4 days.
- Freezer: Freeze in a sealed container for up to 3 months. Thaw in fridge before reheating.
- Reviving: Reheat gently on the stovetop with a splash of broth to keep the chicken moist.
Serving Suggestions
Complementary Dishes
- Creamy mashed potatoes — The ultimate comfort food pairing. The fluffy potatoes act as the perfect vehicle for soaking up every last drop of that garlic butter sauce.
- Buttered egg noodles or orzo — A simple, starchy base that lets the chicken and its sauce be the star of the show. It’s a quick and satisfying option.
- A simple arugula salad with a lemon vinaigrette — The peppery arugula and bright, acidic dressing provide a refreshing contrast to the rich, savory chicken.
Drinks
- A crisp, unoaked Chardonnay — The wine’s bright acidity and citrus notes will cut through the richness of the butter and complement the garlic beautifully.
- A cold, hoppy IPA — The bitterness from the hops provides a fantastic counterpoint to the savory, fatty flavors of the dish, cleansing the palate between bites.
Something Sweet
- Lemon sorbet — A light, palate-cleansing dessert that echoes the citrus notes in the main course without feeling too heavy.
- Simple vanilla bean panna cotta — Its cool, creamy texture and subtle sweetness are the perfect, elegant finish after a savory, garlic-forward meal.
Top Mistakes to Avoid
- Mistake: Not drying the chicken skin. I’ve messed this up before too, and you end up with pale, rubbery skin instead of a crispy, golden crust. The paper towel step is your best friend here.
- Mistake: Moving the chicken too soon. When you first place the chicken in the pan, let it be! If you try to move it before the skin has seared and released naturally, it will tear and stick to the pan.
- Mistake: Burning the garlic. Garlic goes from golden and fragrant to burnt and bitter in seconds. Keep the heat low when you add it to the butter and stir constantly. If it burns, it’s better to start that part over.
- Mistake: Crowding the pan. If your skillet is too small, cook the chicken in two batches. Overcrowding will steam the chicken, preventing that essential crispy skin from forming.
Expert Tips
- Tip: Season under the skin. Gently lift the skin and sprinkle a little salt and pepper directly onto the meat. This simple trick ensures the seasoning penetrates deep, making every single bite perfectly seasoned.
- Tip: Use the residual heat. After you’ve made the sauce and returned the chicken to the pan, take it off the direct heat and let the residual warmth finish cooking the chicken through. This prevents the delicate breast meat from overcooking and becoming dry.
- Tip: Amp up the herb flavor. For an even more aromatic sauce, add a whole sprig of thyme and/or rosemary to the butter as it melts. Remove it before serving for a subtle, woody fragrance.
- Tip: Make it a complete pan meal. After removing the chicken, you can quickly sauté some chopped asparagus or cherry tomatoes in the same pan before making the sauce. It’s a fantastic way to get your veggies in and they’ll soak up all the delicious chicken flavors.
FAQs
Can I use boneless, skinless chicken thighs?
You can, but the result will be quite different. You’ll lose the incredible textural contrast of the crispy skin, and the meat may be slightly less juicy without the bone. If you do use them, reduce the initial searing time by a couple of minutes per side since they’ll cook through much faster. The sauce, however, will still be delicious.
How can I tell when the chicken is done?
The most reliable method is to use an instant-read thermometer. Insert it into the thickest part of the thigh, avoiding the bone. It should read 165°F (74°C). Visually, the juices should run clear when the meat is pierced. If you see any pink, give it another minute or two in the sauce.
My sauce broke and looks oily. What happened?
This usually happens if the heat was too high when you added the butter or if the sauce reduced too aggressively. Don’t worry! Remove the pan from the heat and whisk in a tablespoon of cold butter or a splash of cold broth. This can often help re-emulsify the sauce and bring it back together.
Can I make this ahead of time?
You can sear the chicken thighs ahead of time and keep them refrigerated for up to a day. When ready to serve, make the sauce and finish cooking the chicken in it. The flavor is best fresh, but leftovers will keep in the fridge for 3-4 days. Reheat gently on the stovetop to avoid overcooking.
What can I use instead of fresh herbs?
While fresh herbs provide the best flavor, in a pinch you can use dried. The general rule is 1 teaspoon dried for 1 tablespoon fresh. Add dried herbs to the pan when you cook the garlic so they have time to rehydrate and release their oils.


Garlic Butter Chicken Thighs
Make juicy, crispy Garlic Butter Chicken Thighs in just 35 minutes! This easy one-pan recipe delivers restaurant-quality flavor. Get the recipe now!
Ingredients
For the Ingredients
-
6 bone-in, skin-on chicken thighs (about 1.5 lbs / 680 g)
-
1 tsp kosher salt (plus more to taste)
-
1/2 tsp freshly ground black pepper
-
1 tsp smoked paprika
-
2 tbsp olive oil
-
4 tbsp unsalted butter
-
8 large garlic cloves (minced)
-
1/2 cup chicken broth
-
1 tbsp fresh lemon juice
-
2 tbsp fresh parsley (chopped)
-
1 tsp fresh thyme leaves
Instructions
-
First, prep your chicken. Pat the thighs completely dry with paper towels—this is non-negotiable for crispy skin. In a small bowl, mix together the salt, black pepper, and smoked paprika. Season the chicken thighs generously on both sides, making sure to get the seasoning onto the skin and underneath it if possible. Let them sit at room temperature for about 10-15 minutes while you preheat your skillet. This helps them cook more evenly.01
-
Preheat your large, oven-safe skillet over medium-high heat for a good 2-3 minutes. You want it nice and hot. Add the olive oil. Once the oil is shimmering, carefully place the chicken thighs in the pan, skin-side down. You should hear a confident sizzle. Resist the urge to move them! Let them cook undisturbed for 6-8 minutes to develop that gorgeous, golden-brown crust.02
-
After 6-8 minutes, peek under one thigh. The skin should be deeply golden and release easily from the pan. If it’s sticking, it needs a little more time. Once perfectly crisped, flip the thighs over and cook for another 5-6 minutes on the other side. The goal here is to cook them about 80% of the way through. You’ll notice the meat will be opaque around the edges but still a little pink near the bone.03
-
Transfer the partially cooked chicken thighs to a clean plate. It’s sauce time! Reduce the heat to medium-low. Drain off all but about one tablespoon of the rendered chicken fat from the skillet. Add the unsalted butter and let it melt. Once it’s foaming, add the minced garlic. Cook for just 60-90 seconds, stirring constantly, until it’s incredibly fragrant. You must watch it closely—burnt garlic is bitter and will ruin the sauce.04
-
Pour in the chicken broth to deglaze the pan, using a wooden spoon to scrape up all those delicious browned bits from the bottom. Those bits are pure flavor gold. Let the broth simmer for a minute to reduce slightly. Then, stir in the fresh lemon juice, parsley, and thyme. The sauce should look glossy and smell absolutely heavenly.05
-
Return the chicken thighs to the skillet, skin-side up, nestling them into the sauce. Spoon some of the sauce over the top. Let everything simmer together for another 4-5 minutes, or until the chicken is cooked through (an internal thermometer should read 165°F / 74°C at the thickest part, not touching the bone). The sauce will thicken slightly and cling to the chicken.06
-
For a final touch, you can pop the entire oven-safe skillet under a preheated broiler for 1-2 minutes to re-crisp the skin. Just keep a very close eye on it! Remove from the heat, let it rest for a couple of minutes, then serve immediately, spooning plenty of that glorious garlic butter sauce over the top.07
Not what you're looking for?


