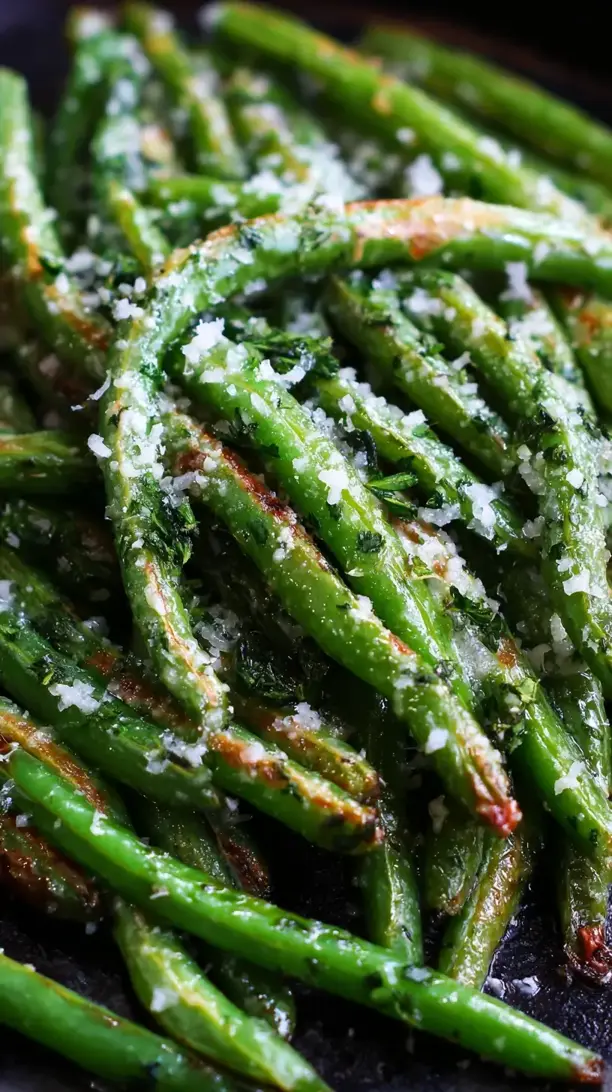
These Garlic Parmesan Roasted Green Beans are a crispy, savory side dish that steals the show. They transform in the oven into a golden, cheesy delight with minimal effort. This recipe is a secret weapon for turning simple green beans into a crowd-pleasing favorite.
Craving a delicious Garlic Parmesan Roasted Green Beans? You've come to the right spot! From Savory Snacks favorites to amazing Chicken Thigh Recipes recipes, there's something here for everyone.


Why You’ll Love This Garlic Parmesan Roasted Green Beans
- Effortless Elegance: Turns humble green beans into a restaurant-worthy side with minimal hands-on work.
- Textural Dream: Tender-crisp beans with crispy edges and a savory Parmesan crunch.
- Insanely Customizable: A perfect base for adding heat, herbs, or other flavors.
- Crowd-Pleasing: Universally adored by kids, vegetarians, and meat-lovers alike.
Ingredients & Tools
- 1 lb fresh green beans, ends trimmed
- 3 tablespoons olive oil
- 4 cloves garlic, minced
- 1/2 cup freshly grated Parmesan cheese
- 1/2 teaspoon kosher salt
- 1/4 teaspoon black pepper
- 1/4 teaspoon onion powder (optional, but recommended)
- 1 tablespoon fresh lemon juice (for serving)
Tools: A large baking sheet, parchment paper (for easy cleanup), a large mixing bowl
Notes: Freshly grated Parmesan melts better than pre-shredded. Don’t be shy with the garlic for maximum flavor.
Nutrition (per serving)
| Calories: | 145 kcal |
| Protein: | 6 g |
| Fat: | 10 g |
| Carbs: | 9 g |
| Fiber: | 3 g |
Serves: 4 | Prep Time: 10 minutes | Cook Time: 20 minutes | Total Time: 30 minutes
Before You Start: Tips & Ingredient Notes
- Dry those beans! After you wash your green beans, make sure you pat them completely dry with a kitchen towel or salad spinner. Any excess water will steam the beans in the oven instead of letting them roast and get beautifully crisp.
- Freshly grated is best. I know it’s tempting to grab a bag of pre-shredded cheese, but for this recipe, it’s worth the extra minute to grate a block of Parmesan yourself. The pre-shredded kind is coated to prevent clumping, which also prevents it from melting into a proper, cohesive crust.
- Don’t overcrowd the pan. This is the golden rule of roasting any vegetable. If you pile all the beans onto a small pan, they’ll steam and become soggy. You want a single, even layer with a little space between them for the hot air to circulate.
- Mince, don’t press the garlic. Using a garlic press can make the garlic too watery and pasty, causing it to burn more easily in the hot oven. Taking the time to mince it finely with a knife gives you better control and a more mellow, roasted garlic flavor.
How to Make Garlic Parmesan Roasted Green Beans
Step 1: First, get your oven nice and hot. Preheat it to 425°F (220°C). This high heat is crucial for getting those crispy, caramelized edges we’re after. While it’s heating, line a large, rimmed baking sheet with parchment paper. This isn’t just for easy cleanup—it also helps prevent any cheesy bits from sticking and burning onto the pan.
Step 2: Now, let’s get the beans ready. If you haven’t already, trim the stem ends off your green beans. I like to line up a small handful and slice off the ends all at once—it’s a real time-saver. Toss the trimmed and thoroughly dried beans into a large mixing bowl. You’ll want a bowl that gives you plenty of room to toss everything together without beans flying everywhere.
Step 3: It’s coating time! Drizzle the olive oil over the green beans. Then, add your minced garlic, salt, pepper, and that optional-but-wonderful onion powder. Now, use your hands (they’re the best tool for the job!) to toss everything together. Really get in there and massage the oil and seasonings onto every single bean. You’ll notice the beans will start to look glossy and smell amazing already.
Step 4: Arrange the seasoned green beans on your prepared baking sheet. This is where you must resist the urge to dump them all in a pile. Spread them out into a single, even layer. If they’re too crowded, they’ll steam. A little space between each bean is the secret to perfect roasting. It’s the difference between limp and gloriously crisp.
Step 5: Slide the pan into your preheated oven and roast for about 15 minutes. You’re looking for the beans to start becoming tender and for some of the thinner ones to get a few dark, blistered spots. That’s the flavor right there. The aroma filling your kitchen will be absolutely incredible at this point.
Step 6: Carefully remove the pan from the oven. It’s cheese time! Sprinkle the freshly grated Parmesan cheese evenly over the partially roasted green beans. Try to get a little on each bean for maximum cheesy coverage. The residual heat from the beans and the pan will start melting the cheese immediately.
Step 7: Return the pan to the oven for the final 5-7 minutes. You’re not looking to melt the cheese into a gooey pool, but rather to let it fuse with the beans and become lightly golden and crisp. Keep a close eye on it—the line between perfectly golden and burnt is thin!
Step 8: Once the cheese is crisp and the beans are tender-crisp, take the pan out for the last time. Let the beans rest for just a minute on the pan. Then, transfer them to a serving platter and immediately squeeze that fresh lemon juice over the top. The bright acidity of the lemon cuts through the richness of the cheese and oil perfectly, balancing the entire dish.
Storage & Freshness Guide
- Fridge: Store leftovers in an airtight container for up to 3 days.
- Freezer: Not recommended; texture becomes soft upon thawing.
- Reviving: Reheat on a baking sheet at 375°F for 5–10 minutes to restore crispness.
Serving Suggestions
Complementary Dishes
- Herb-Roasted Chicken — The simple, savory flavors of the chicken are a perfect backdrop, letting the crispy, cheesy beans truly shine as the star side dish.
- Creamy Mushroom Risotto — The earthy, umami depth of the risotto pairs beautifully with the sharp, salty notes of the Parmesan and the fresh green bean flavor.
- Pan-Seared Salmon — A rich, fatty piece of fish needs a bright, textured vegetable side, and these beans provide the perfect contrast in both flavor and mouthfeel.
Drinks
- A Crisp Sauvignon Blanc — The wine’s citrusy and herbal notes will mirror the fresh lemon juice and green vegetable character, creating a wonderfully harmonious pairing.
- Sparkling Water with Lemon — For a non-alcoholic option, the bubbles and citrus cleanse the palate between bites of the rich, cheesy coating, making each bite taste like the first.
- Light Italian Red like Chianti — The bright acidity and cherry notes in the wine can stand up to the garlic and Parmesan without overpowering the delicate green beans.
Something Sweet
- Lemon Sorbet — A scoop of this light, tart sorbet is the ultimate palate cleanser after a savory meal, continuing the lovely citrus thread from the dish itself.
- Classic Tiramisu — The coffee-soaked ladyfingers and mascarpone cream offer a rich, cool, and decadent contrast to the warm, savory notes of the main meal.
- Almond Biscotti — The nutty, crunchy cookies are a simple, not-too-sweet ending that complements the Italian-inspired flavors of the Parmesan and garlic beautifully.
Top Mistakes to Avoid
- Mistake: Using a wet baking sheet or skipping the parchment. This can lead to steaming instead of roasting, and the cheese will fuse itself to the metal pan, creating a nightmare to clean and potentially burnt bits.
- Mistake: Adding the cheese at the beginning. If you mix the Parmesan in with the raw beans, it will burn long before the beans are cooked through, resulting in a bitter, blackened mess instead of a golden, savory crust.
- Mistake: Skipping the lemon juice at the end. I know it seems like a small thing, but that splash of fresh acidity is what lifts the entire dish and balances the fat from the oil and cheese. Without it, the beans can taste a little one-dimensional and heavy.
- Mistake: Not trimming the beans. Those stem ends are tough and woody, and no amount of roasting will make them pleasant to eat. Taking that extra minute to trim them ensures every single bite is tender and enjoyable.
Expert Tips
- Tip: Toss with toasted breadcrumbs. For an extra layer of incredible crunch, mix a quarter cup of panko breadcrumbs with a tablespoon of olive oil and toast them in a skillet until golden. Toss them with the beans right after they come out of the oven, along with the Parmesan.
- Tip: Use a microplane for the garlic. If you want a more subtle, evenly distributed garlic flavor that really clings to the beans, use a microplane to grate the garlic cloves directly into the olive oil. It creates almost a garlic-infused oil right in the bowl.
- Tip: Make them ahead for a party. You can trim and wash the beans a day in advance. Just store them wrapped in a paper towel inside a zip-top bag in the fridge. The paper towel absorbs any excess moisture, keeping them perfectly dry and ready for roasting.
- Tip: Finish with fresh herbs. Right before serving, sprinkle with a tablespoon of freshly chopped parsley or chives. The pop of green color and fresh flavor makes the dish look and taste even more gourmet.
FAQs
Can I use frozen green beans?
You can, but the results will be different. Frozen green beans have a much higher water content, so they will release a lot of liquid as they roast. This often prevents them from getting truly crisp and can make them a bit mushy. For the best texture, fresh is definitely the way to go. If you must use frozen, do not thaw them first, and pat them as dry as humanly possible. You may need to extend the roasting time by 5-10 minutes to drive off the extra moisture.
Why are my green beans soggy?
Sogginess is almost always a result of overcrowding the pan or not having a hot enough oven. If the beans are piled on top of each other, they steam in their own moisture. Make sure they’re in a single layer with a little space between them. Also, ensure your oven is fully preheated to 425°F—an oven thermometer can help verify the temperature is accurate, as home ovens can often be off by 25 degrees or more.
Can I make this dairy-free or vegan?
Absolutely! For a vegan version, simply omit the Parmesan cheese. The roasted garlic green beans are still delicious on their own. To mimic the salty, umami flavor, you could toss the roasted beans with a sprinkle of nutritional yeast after they come out of the oven, or a drizzle of vegan pesto for added richness and flavor.
How do I store and reheat leftovers?
Store any leftovers in an airtight container in the refrigerator for up to 3 days. To reheat, avoid the microwave, as it will make them very soft. Instead, spread them on a baking sheet and warm them in a 375°F oven for 5-10 minutes until heated through. This will help restore some of their crispness. They won’t be quite as perfect as fresh-out-of-the-oven, but they’ll still be very tasty.
Can I add other vegetables to this recipe?
You sure can! This method works wonderfully with other sturdy vegetables. Try adding halved cherry tomatoes (add them for the last 10 minutes of cooking), thin slices of red onion, or even some broccoli florets. Just be mindful of the different cooking times—you may need to add quicker-cooking veggies partway through the roasting process so everything finishes at the same time.


Garlic Parmesan Roasted Green Beans
Make the best Garlic Parmesan Roasted Green Beans with this easy recipe. Crispy, cheesy, and ready in 30 minutes. Get the foolproof method now!
Ingredients
For the Ingredients
-
1 lb fresh green beans (ends trimmed)
-
3 tablespoons olive oil
-
4 cloves garlic (minced)
-
1/2 cup freshly grated Parmesan cheese
-
1/2 teaspoon kosher salt
-
1/4 teaspoon black pepper
-
1/4 teaspoon onion powder (optional, but recommended)
-
1 tablespoon fresh lemon juice (for serving)
Instructions
-
First, get your oven nice and hot. Preheat it to 425°F (220°C). This high heat is crucial for getting those crispy, caramelized edges we’re after. While it’s heating, line a large, rimmed baking sheet with parchment paper. This isn’t just for easy cleanup—it also helps prevent any cheesy bits from sticking and burning onto the pan.01
-
Now, let’s get the beans ready. If you haven’t already, trim the stem ends off your green beans. I like to line up a small handful and slice off the ends all at once—it’s a real time-saver. Toss the trimmed and thoroughly dried beans into a large mixing bowl. You’ll want a bowl that gives you plenty of room to toss everything together without beans flying everywhere.02
-
It’s coating time! Drizzle the olive oil over the green beans. Then, add your minced garlic, salt, pepper, and that optional-but-wonderful onion powder. Now, use your hands (they’re the best tool for the job!) to toss everything together. Really get in there and massage the oil and seasonings onto every single bean. You’ll notice the beans will start to look glossy and smell amazing already.03
-
Arrange the seasoned green beans on your prepared baking sheet. This is where you must resist the urge to dump them all in a pile. Spread them out into a single, even layer. If they’re too crowded, they’ll steam. A little space between each bean is the secret to perfect roasting. It’s the difference between limp and gloriously crisp.04
-
Slide the pan into your preheated oven and roast for about 15 minutes. You’re looking for the beans to start becoming tender and for some of the thinner ones to get a few dark, blistered spots. That’s the flavor right there. The aroma filling your kitchen will be absolutely incredible at this point.05
-
Carefully remove the pan from the oven. It’s cheese time! Sprinkle the freshly grated Parmesan cheese evenly over the partially roasted green beans. Try to get a little on each bean for maximum cheesy coverage. The residual heat from the beans and the pan will start melting the cheese immediately.06
-
Return the pan to the oven for the final 5-7 minutes. You’re not looking to melt the cheese into a gooey pool, but rather to let it fuse with the beans and become lightly golden and crisp. Keep a close eye on it—the line between perfectly golden and burnt is thin!07
-
Once the cheese is crisp and the beans are tender-crisp, take the pan out for the last time. Let the beans rest for just a minute on the pan. Then, transfer them to a serving platter and immediately squeeze that fresh lemon juice over the top. The bright acidity of the lemon cuts through the richness of the cheese and oil perfectly, balancing the entire dish.08
Not what you're looking for?


