This homemade General Tso’s Chicken delivers the iconic sweet-and-spicy sauce and crispy coating you crave. It’s fresher and more customizable than takeout, with a surprisingly straightforward method. The aroma and flavor are absolutely worth the effort.
Nothing beats a great General Tso’s Chicken. Whether you're a fan of Dinner Ideas or want to try something from our Appetizer Recipes selection, keep scrolling!


Why You’ll Love This General Tso’s Chicken
- Better than takeout: Achieve a crispiness delivery can’t maintain.
- Versatile sauce: Perfect for tofu, cauliflower, or roasted veggies.
- Total control: Easily adjust spice and sweetness to taste.
- Impressive dish: A surefire crowd-pleaser for any occasion.
Ingredients & Tools
For the Chicken & Marinade:
- 600 g boneless, skinless chicken thighs, cut into 1-inch pieces
- 2 tbsp tamari or coconut aminos
- 1 tbsp rice vinegar
- 1 large egg white
- 60 g almond flour
- 30 g unflavored whey protein isolate or pork rind crumbs
- 1/2 tsp baking soda
For the Sauce:
- 120 ml chicken broth
- 3 tbsp tamari or coconut aminos
- 2 tbsp rice vinegar
- 1-2 tbsp granulated erythritol or allulose, to taste
- 1 tbsp sesame oil
- 2 tsp chili garlic sauce or sambal oelek
- 1 tsp grated fresh ginger
- 2 cloves garlic, minced
- 1 tbsp toasted sesame seeds
- 2 dried red chilies, optional for heat
For Frying & Garnish:
- Avocado or peanut oil for frying
- 2 sliced spring onions
Tools: A large skillet or wok, a wire rack set over a baking sheet, a whisk, and a slotted spoon or spider strainer.
Notes: The combination of almond flour and a protein-based binder creates an incredibly crisp, golden crust. Chicken thighs stay juicier and more flavorful through frying.
Nutrition (per serving)
| Calories: | 420 kcal |
| Protein: | 38 g |
| Fat: | 28 g |
| Carbs: | 6 g |
| Fiber: | 2 g |
Serves: 4 | Prep Time: 25 minutes | Cook Time: 20 minutes | Total Time: 45 minutes
Storage & Freshness Guide
- Fridge: Store leftover chicken and sauce separately in airtight containers for up to 3 days.
- Freezer: Freeze fried (unsauced) chicken on a tray, then transfer to a bag for up to 2 months.
- Reviving: Re-crisp chicken in a 400°F oven for 5–10 minutes; heat sauce separately and combine just before serving.
Serving Suggestions
Complementary Dishes
- Cauliflower Rice — The ultimate low-carb vehicle for soaking up every last drop of that incredible sauce. Its mild flavor is the perfect backdrop.
- Quick-Pickled Cucumber Salad — The bright, acidic crunch provides a refreshing contrast to the rich, savory chicken and cleanses the palate.
- Stir-Fried Green Beans — Tossed in a little sesame oil and garlic, they add a different texture and a vibrant green pop to the plate.
Drinks
- Jasmine Iced Tea — Its delicate floral notes are a wonderful, calming balance to the spice and umami in the dish.
- Dry Riesling — A slightly off-dry white wine with its crisp acidity and stone fruit notes can beautifully cut through the sweetness and heat.
- Light Lager — The effervescence and clean finish of a cold lager is a classic pairing for anything fried and saucy.
Something Sweet
- Keto-Friendly Dark Chocolate Mousse — A few bites of something rich, cool, and slightly bitter is the perfect way to end the meal on a high note.
- Berry Chia Pudding — The fresh, tart flavor of berries provides a light and refreshing finish that doesn’t feel heavy.
- Cheese Plate — A few slices of sharp cheddar or a creamy blue cheese can be a surprisingly satisfying, low-effort way to finish.
Before You Start: Tips & Ingredient Notes
- Chicken thighs are non-negotiable. Breast meat can easily dry out during frying. Thighs have more fat, which means they stay incredibly tender and juicy inside that crispy shell.
- Don’t skip the egg white. It’s the secret weapon in the marinade. It tenderizes the chicken and helps the coating mixture adhere perfectly for maximum crunch.
- Get your mise en place ready. This dish comes together fast once you start cooking. Have your sauce mixed, your garnishes sliced, and your chicken coated before you even turn on the stove.
- The right oil temperature is everything. If the oil isn’t hot enough, the chicken will absorb it and become greasy. Too hot, and the outside burns before the inside cooks. A thermometer is your best friend here.
How to Make General Tso’s Chicken
Step 1: Marinate the Chicken. In a medium bowl, combine the cubed chicken thighs, tamari, and rice vinegar. Toss well to coat every piece. Let this sit for about 10-15 minutes—this is a quick flavor boost. Then, add the single egg white and mix vigorously until the chicken is slick and coated. You’ll notice the texture change slightly; that’s what we want.
Step 2: Create the Crispy Coating. In a separate shallow dish or a large zip-top bag, whisk together the almond flour, whey protein isolate (or pork rind crumbs), and baking soda. The baking soda is a little trick that encourages extra browning and crispiness. Add your marinated chicken pieces to this dry mixture and toss or shake until every piece is thoroughly and evenly coated. Let it sit for a few minutes to allow the coating to set.
Step 3: Fry to Golden Perfection. Pour your chosen frying oil into a large, heavy-bottomed skillet or wok until it’s about an inch deep. Heat it over medium-high heat until it reaches 175°C (350°F). Working in batches to avoid crowding the pan, carefully add the coated chicken pieces. Fry for 4-5 minutes, turning occasionally, until they are deeply golden brown and crisp. Use your slotted spoon to transfer them to the wire rack—this keeps them crispy all over instead of getting steamy on a plate lined with paper towels.
Step 4: Whip Up the Signature Sauce. While the chicken rests, pour off all but about a tablespoon of the frying oil from the skillet. Reduce the heat to medium. If using, add the dried chilies and toast for 30 seconds until fragrant. Then, add the minced garlic and grated ginger, stirring constantly for just 20-30 seconds until you get that incredible aroma—be careful not to burn it.
Step 5: Combine and Glaze. Give your pre-mixed sauce ingredients (broth, tamari, vinegar, sweetener, sesame oil, chili garlic sauce) a quick stir and pour it into the skillet. Let it come to a simmer. You’ll notice it will start to thicken slightly after 2-3 minutes. The trick is to let it reduce until it coats the back of a spoon. Now, add all your crispy chicken back into the skillet and toss quickly and confidently to glaze each piece with that glossy, beautiful sauce.
Step 6: The Final Touch. As soon as the chicken is evenly coated, turn off the heat. Stir in most of your sliced spring onions and the toasted sesame seeds, saving a little for garnish. Give it one final toss and immediately transfer to a serving platter. The goal is to get it from pan to plate while the chicken is still supremely crisp under its sticky sauce jacket.
Top Mistakes to Avoid
- Overcrowding the pan while frying. This is the number one reason for soggy chicken. Adding too much chicken at once drops the oil temperature drastically, causing the coating to absorb oil instead of sealing and crisping. I’ve messed this up before too—patience is key!
- Letting the sauce reduce for too long. The sauce will continue to thicken even after you take it off the heat. If you reduce it until it’s super thick in the pan, it can become unpleasantly sticky and gummy on the chicken.
- Using bottled, pre-minced ginger and garlic. The flavor just isn’t as bright or potent. Taking the extra minute to freshly grate and mince makes a world of difference in the final aroma and taste of the sauce.
- Tossing the chicken in the sauce too early. Only add the chicken back in at the very last second, right before serving. Letting it sit in the sauce for more than a minute or two will compromise that hard-earned crispiness.
Expert Tips
- Tip: For an extra layer of flavor, toast your sesame seeds and dried chilies (if using) in the dry skillet for a minute before you add any oil. It wakes up their essential oils and makes the entire dish smell like a professional kitchen.
- Tip: If you want to prep ahead, you can coat the chicken and keep it on a parchment-lined tray in the fridge for a few hours before frying. This can actually help the coating set even better.
- Tip: If your sauce isn’t thickening to your liking, create a quick slurry by mixing a teaspoon of xanthan gum with a tablespoon of cold water. Whisk this into the simmering sauce, and it will thicken up almost instantly.
- Tip: For a baked alternative, arrange the coated chicken on a wire rack set over a baking sheet. Spray generously with oil and bake at 220°C (425°F) for 15-20 minutes, flipping halfway, until crisp. Then toss in the sauce as directed.
FAQs
Can I make this dish ahead of time?
You can prep the components ahead, but I don’t recommend assembling it until you’re ready to eat. The chicken can be fried and kept crispy on a wire rack at room temperature for a couple of hours. The sauce can be mixed and stored in the fridge. Re-crisp the chicken in a hot oven for a few minutes, heat the sauce, and combine just before serving to maintain the best texture.
What can I use instead of whey protein isolate for coating?
Pork rind crumbs are an excellent one-to-one substitute and will give you a super crisp result. If you need a plant-based option, you can try a bit more almond flour, though the crust may be slightly more delicate. Another great option is crushed-up keto-friendly crackers or breadcrumbs.
My sauce turned out too thin. How can I fix it?
Don’t worry, this happens! The easiest fix is to let it simmer a bit longer to reduce and concentrate. If you’re in a hurry, a tiny pinch of xanthan gum (mixed first with a little cold water to avoid clumps) will thicken it up almost instantly. Just add it gradually—a little goes a very long way.
Is there a way to make this less spicy?
Absolutely. The primary heat sources are the chili garlic sauce and the optional dried chilies. Simply omit the dried chilies entirely and reduce the amount of chili garlic sauce, or replace it with a dash of your favorite sugar-free hot sauce where you can better control the heat level. You can always add more heat at the table!
Can I use chicken breast instead of thighs?
You can, but you’ll need to be extra careful not to overcook it, as breast meat has less fat and can become dry and tough much more quickly. If you do use breast, cut the pieces slightly larger and reduce the frying time by about a minute per batch to ensure the inside stays juicy.


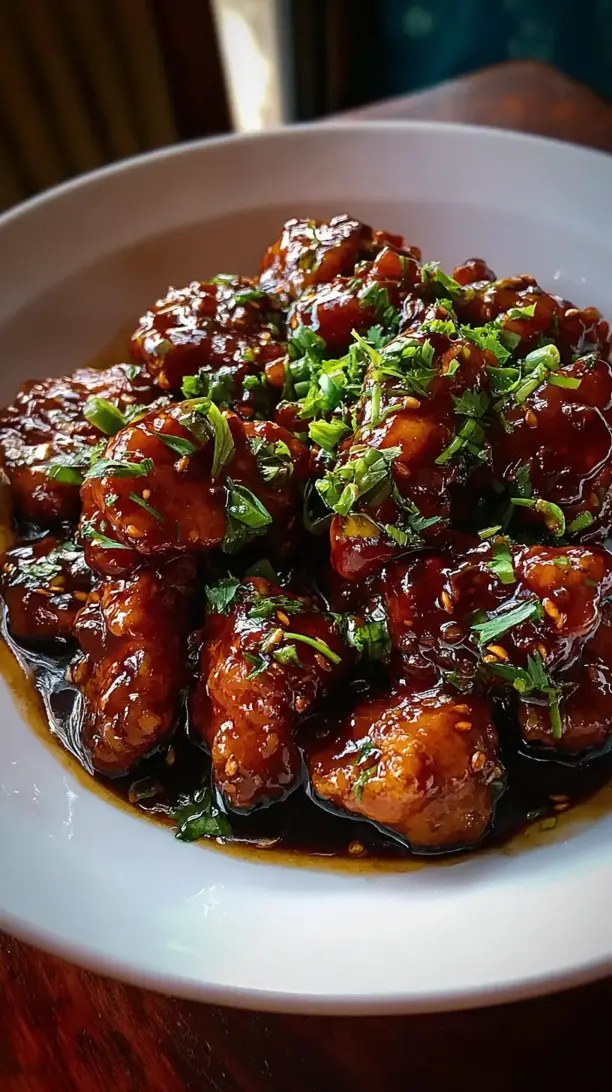
General Tso’S Chicken
Make better-than-takeout General Tso’s Chicken at home! Our easy recipe delivers a crispy, sweet, and spicy dish in under an hour. Get the recipe now!
Ingredients
For the Chicken & Marinade:
-
600 g boneless, skinless chicken thighs (cut into 1-inch pieces)
-
2 tbsp tamari or coconut aminos
-
1 tbsp rice vinegar
-
1 large egg white
-
60 g almond flour
-
30 g unflavored whey protein isolate or pork rind crumbs
-
0.5 tsp baking soda
For the Sauce:
-
120 ml chicken broth
-
3 tbsp tamari or coconut aminos
-
2 tbsp rice vinegar
-
1-2 tbsp granulated erythritol or allulose (to taste)
-
1 tbsp sesame oil
-
2 tsp chili garlic sauce or sambal oelek
-
1 tsp grated fresh ginger
-
2 cloves garlic (minced)
-
1 tbsp toasted sesame seeds
-
2 dried red chilies (optional for heat)
For Frying & Garnish:
-
Avocado or peanut oil (for frying)
-
2 spring onions (sliced)
Instructions
-
In a medium bowl, combine the cubed chicken thighs, tamari, and rice vinegar. Toss well to coat every piece. Let this sit for about 10-15 minutes—this is a quick flavor boost. Then, add the single egg white and mix vigorously until the chicken is slick and coated. You’ll notice the texture change slightly; that’s what we want.01
-
In a separate shallow dish or a large zip-top bag, whisk together the almond flour, whey protein isolate (or pork rind crumbs), and baking soda. The baking soda is a little trick that encourages extra browning and crispiness. Add your marinated chicken pieces to this dry mixture and toss or shake until every piece is thoroughly and evenly coated. Let it sit for a few minutes to allow the coating to set.02
-
Pour your chosen frying oil into a large, heavy-bottomed skillet or wok until it’s about an inch deep. Heat it over medium-high heat until it reaches 175°C (350°F). Working in batches to avoid crowding the pan, carefully add the coated chicken pieces. Fry for 4-5 minutes, turning occasionally, until they are deeply golden brown and crisp. Use your slotted spoon to transfer them to the wire rack—this keeps them crispy all over instead of getting steamy on a plate lined with paper towels.03
-
While the chicken rests, pour off all but about a tablespoon of the frying oil from the skillet. Reduce the heat to medium. If using, add the dried chilies and toast for 30 seconds until fragrant. Then, add the minced garlic and grated ginger, stirring constantly for just 20-30 seconds until you get that incredible aroma—be careful not to burn it.04
-
Give your pre-mixed sauce ingredients (broth, tamari, vinegar, sweetener, sesame oil, chili garlic sauce) a quick stir and pour it into the skillet. Let it come to a simmer. You’ll notice it will start to thicken slightly after 2-3 minutes. The trick is to let it reduce until it coats the back of a spoon. Now, add all your crispy chicken back into the skillet and toss quickly and confidently to glaze each piece with that glossy, beautiful sauce.05
-
As soon as the chicken is evenly coated, turn off the heat. Stir in most of your sliced spring onions and the toasted sesame seeds, saving a little for garnish. Give it one final toss and immediately transfer to a serving platter. The goal is to get it from pan to plate while the chicken is still supremely crisp under its sticky sauce jacket.06
Not what you're looking for?


