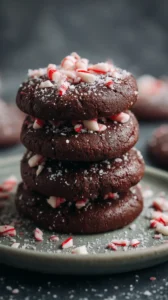
There’s a certain magic that happens in the kitchen during the holidays, isn’t there? For me, it’s that moment when the scent of something sweet and festive fills the air, promising comfort and shared joy. I created these Gluten-Free Peppermint Cookies to be a part of that magic. They’re a soft, chewy dream of rich dark chocolate and cool peppermint, designed to stand out among your holiday treats and offer a truly unique Christmas cookies experience. I think they make for the perfect, cozy project for holiday baking.
If you’re searching for wonderful Christmas dessert ideas or simple Christmas baking ideas, let this be your new go-to. These almond flour cookies are naturally gluten-free and wonderfully simple, fitting right into your plans for easy Christmas treats. They are, in my opinion, the epitome of delightful Christmas sweets—indulgent yet approachable.
More than anything, this recipe is a comfort food recipe for the season. It’s about creating those moments of pure happiness, one batch of these festive cookies at a time. I hope they bring as much light and joy to your table as they do to mine.
Craving a delicious Gluten-Free Peppermint Cookies? You've come to the right spot! From Christmas Cookie favorites to amazing Appetizers & Snacks recipes, there's something here for everyone.


Why You’ll Love These Gluten-Free Peppermint Cookies
- Soft & Chewy: Almond and oat flours create a tender, brownie-like texture.
- Festive Flavor: Peppermint complements dark chocolate without overpowering.
- Simple to Make: One-bowl dough with straightforward steps and easy chilling.
- Gluten-Free & Adaptable: Naturally gluten-free and open to chocolate swaps.
Ingredients & Tools
- 200 g blanched almond flour
- 60 g gluten-free oat flour
- 1/2 tsp baking soda
- 1/4 tsp fine sea salt
- 115 g unsalted butter, softened
- 100 g light brown sugar
- 50 g granulated sugar
- 1 large egg, at room temperature
- 1 tsp pure vanilla extract
- 1/2 tsp peppermint extract (not mint extract!)
- 150 g dark chocolate chunks or chips
- 2 candy canes, crushed, for topping
Tools: A medium mixing bowl, a hand mixer or stand mixer, a baking sheet, parchment paper, and a cooling rack.
Notes: Using a blend of almond and oat flour gives structure without density. Use pure peppermint extract (not “mint”) for a clean, crisp flavor.
Nutrition (per serving)
| Calories: | 185 kcal |
| Protein: | 3 g |
| Fat: | 12 g |
| Carbs: | 17 g |
| Fiber: | 2 g |
Serves: 18 | Prep Time: 15 mins | Cook Time: 10 mins | Total Time: 1 hour 25 mins (includes chilling)
Before You Start: Tips & Ingredient Notes
- Room Temperature is Non-Negotiable. Your egg and butter need to be truly at room temperature. If the butter is too cold, it won’t cream properly with the sugar, leading to a denser cookie. If it’s melted, the cookies will spread too much.
- Weigh Your Flours. Gluten-free baking is a science, and for the most consistent results, I highly recommend using a kitchen scale. If you must use cups, fluff your flour with a spoon, spoon it into the measuring cup, and level it off—don’t scoop!
- Don’t Skip the Chill. I know, I know, you want cookies now. But chilling the dough is what prevents them from spreading into sad, flat puddles in the oven. It allows the flours to hydrate and the fats to firm up, guaranteeing a thick, chewy cookie.
- The Right Kind of Mint. This is so important! You want pure peppermint extract, which has a clean, crisp flavor. Imitation mint extract often has a sharper, more medicinal taste that can dominate the entire cookie.
How to Make Gluten-Free Peppermint Cookies
Step 1: First, let’s get our dry ingredients ready. In your medium mixing bowl, whisk together the almond flour, oat flour, baking soda, and salt. You’ll want to whisk this for a good 30 seconds to make sure the baking soda is evenly distributed—this is our leavening, and we want every cookie to rise perfectly. Set this bowl aside for now.
Step 2: Now, for the creaming. In a separate, larger bowl, add your softened butter, brown sugar, and granulated sugar. Using your hand mixer or stand mixer fitted with the paddle attachment, beat this on medium-high speed for about 2-3 minutes. You’re looking for the mixture to become noticeably paler in color and beautifully fluffy. This step is key for incorporating air, which helps with the texture.
Step 3: It’s time for the wet ingredients. Scrape down the sides of the bowl with a spatula. Add the room-temperature egg, vanilla extract, and that all-important peppermint extract. Mix on medium speed just until everything is combined. The mixture might look a little curdled at first, but it will come together—just keep mixing for another 30 seconds or so.
Step 4: Let’s bring it all together. With your mixer on low speed, gradually add the dry flour mixture to the wet ingredients. Mix only until the last traces of flour disappear. You’ll notice the dough is quite soft and a bit sticky—that’s exactly what we want. Now, switch to a spatula and fold in the dark chocolate chunks.
Step 5: The most crucial step: chilling. Cover the bowl with plastic wrap and press it directly onto the surface of the dough. Pop it into the refrigerator for at least 1 hour. This firms up the butter and allows the flours to fully absorb the moisture, which is the secret to a cookie that doesn’t spread too thin.
Step 6: Preheat and prepare. About 10 minutes before your dough is done chilling, preheat your oven to 175°C (350°F) and line a baking sheet with parchment paper. This ensures your baking sheet isn’t cold when the cookies go on, promoting even baking.
Step 7: Scoop and top. Using a cookie scoop or a tablespoon, portion out mounds of dough (about 1.5 tablespoons each) onto your prepared baking sheet, leaving about 2 inches between them as they will spread. Gently press a few of the crushed candy cane pieces onto the top of each dough ball—this gives them that festive, sparkly look.
Step 8: Bake to perfection. Bake for 9-11 minutes. The trick is to pull them out when the edges are set and just starting to turn golden, but the centers still look soft and slightly underdone. They will continue to cook on the hot baking sheet out of the oven, resulting in the ultimate chewy texture.
Step 9: The final patience test. Let the cookies cool on the baking sheet for a full 10 minutes before you even think about moving them. They are extremely fragile when hot. After 10 minutes, transfer them to a wire rack to cool completely. The wait is worth it, I promise!
Storage & Freshness Guide
- Fridge: Store in an airtight container for up to 5 days.
- Freezer: Freeze baked cookies layered with parchment for up to 3 months.
- Reviving: Warm in microwave for 10 seconds or briefly in a 300°F oven.
Serving Suggestions
Complementary Dishes
- A simple cheese board — The salty, savory notes of a sharp cheddar or creamy brie provide a wonderful contrast to the sweet, minty cookies and make for a sophisticated snack spread.
- Vanilla bean ice cream — For the ultimate indulgence, sandwich a scoop of high-quality vanilla ice cream between two slightly warm cookies. The hot-cold, chewy-creamy contrast is absolutely divine.
Drinks
- A rich hot chocolate — Double down on the chocolatey goodness. The warmth of the drink and the cool hint of peppermint in the cookie create a cozy, layered flavor experience.
- Peppermint tea or a cold glass of milk — You can’t go wrong with the classics. The milk mellows the sweetness perfectly, while peppermint tea amplifies the festive mint notes.
Something Sweet
- Dark chocolate-dipped orange segments — The bright, citrusy flavor of orange cuts through the richness of the cookies and offers a different, yet complementary, fruit-and-chocolate pairing.
- A simple gingerbread loaf — The warm spices of gingerbread are a fantastic friend to the cool peppermint, making your dessert table feel complete and wonderfully holiday-themed.
Top Mistakes to Avoid
- Mistake: Using melted butter. If your butter is liquid, it won’t trap any air during creaming and your cookies will spread excessively in the oven, turning thin and greasy. Softened butter should hold a thumbprint but not be shiny or oily.
- Mistake: Overmixing the dough after adding the flours. Once the flours are incorporated, stop mixing! Overworking the dough can develop the starches in the oat flour, leading to a tougher, more cake-like cookie instead of a tender, chewy one.
- Mistake> Baking until the centers look fully set. This is the most common error. The cookies are done when the edges are golden but the centers still look a bit wet and puffy. They will set up as they cool. If you wait for the centers to look dry, you’ll have overbaked, crunchy cookies.
- Mistake: Skipping the candy cane crush on top. It’s not just for looks! Adding the candy cane pieces before baking allows them to melt slightly and adhere, giving you that signature peppermint crunch in every single bite.
Expert Tips
- Tip: Brown your butter for a nutty twist. Let the butter cool completely and re-solidify after browning. This adds an incredible, deep, toffee-like flavor that pairs amazingly with both the chocolate and the peppermint.
- Tip: Make the dough ahead. You can chill the cookie dough for up to 72 hours. The flavor actually deepens and improves! This is a fantastic make-ahead strategy for holiday parties—just scoop and bake when needed.
- Tip: Use a cookie scoop for perfect portions. Not only is it faster and less messy, but it ensures all your cookies are the same size, which means they will bake evenly and you won’t have some burnt while others are raw.
- Tip: Add a pinch of flaky salt right after baking. As soon as the cookies come out of the oven, sprinkle a tiny bit of flaky sea salt over the top. It enhances the chocolate flavor and balances the sweetness beautifully.
FAQs
Can I make these cookies dairy-free as well?
Absolutely! The butter can be swapped 1:1 with a high-quality vegan butter stick (not the tub kind, as the water content is different). Just make sure your chocolate chunks are also dairy-free. The texture might be slightly different, but they will still be deliciously soft and chewy.
My cookies didn’t spread much. What happened?
This usually points to the dough being too cold. If you chilled it for much longer than an hour, or even overnight, let it sit on the counter for 10-15 minutes to slightly soften before scooping and baking. Also, double-check that your baking soda is fresh—old leavening agents lose their power.
Can I freeze the baked cookies?
You sure can! Once the cookies are completely cooled, layer them between sheets of parchment paper in an airtight container. They’ll freeze beautifully for up to 3 months. Let them thaw at room temperature, or pop a frozen one in the microwave for 10 seconds for a warm, fresh-from-the-oven treat.
What can I use instead of oat flour?
If you need to avoid oats, you can use an additional 60g of almond flour, but be aware the cookies will be denser and more fragile. For a better result, try substituting with 50g of gluten-free 1:1 baking flour blend, which will help maintain the structure.
Why are my cookies cakey?
A cakey texture often comes from overmixing the dough after the eggs are added, which incorporates too much air. It can also happen if you used too much flour—another great reason to weigh your ingredients! Mix just until combined for the best, chewiest texture.


Gluten-Free Peppermint Cookies: An Easy Holiday Dessert
Gluten-Free Peppermint Cookies are a soft, chewy holiday treat. This easy Christmas dessert combines rich dark chocolate and cool peppermint for festive indulgence.
Ingredients
For the Ingredients
-
200 g blanched almond flour
-
60 g gluten-free oat flour
-
1/2 tsp baking soda
-
1/4 tsp fine sea salt
-
115 g unsalted butter (softened)
-
100 g light brown sugar
-
50 g granulated sugar
-
1 large egg (at room temperature)
-
1 tsp pure vanilla extract
-
1/2 tsp peppermint extract (not mint extract!)
-
150 g dark chocolate chunks or chips
-
2 candy canes (crushed, for topping)
Instructions
-
First, let's get our dry ingredients ready. In your medium mixing bowl, whisk together the almond flour, oat flour, baking soda, and salt. You’ll want to whisk this for a good 30 seconds to make sure the baking soda is evenly distributed—this is our leavening, and we want every cookie to rise perfectly. Set this bowl aside for now.01
-
Now, for the creaming. In a separate, larger bowl, add your softened butter, brown sugar, and granulated sugar. Using your hand mixer or stand mixer fitted with the paddle attachment, beat this on medium-high speed for about 2-3 minutes. You’re looking for the mixture to become noticeably paler in color and beautifully fluffy. This step is key for incorporating air, which helps with the texture.02
-
It's time for the wet ingredients. Scrape down the sides of the bowl with a spatula. Add the room-temperature egg, vanilla extract, and that all-important peppermint extract. Mix on medium speed just until everything is combined. The mixture might look a little curdled at first, but it will come together—just keep mixing for another 30 seconds or so.03
-
Let's bring it all together. With your mixer on low speed, gradually add the dry flour mixture to the wet ingredients. Mix only until the last traces of flour disappear. You’ll notice the dough is quite soft and a bit sticky—that’s exactly what we want. Now, switch to a spatula and fold in the dark chocolate chunks.04
-
The most crucial step: chilling. Cover the bowl with plastic wrap and press it directly onto the surface of the dough. Pop it into the refrigerator for at least 1 hour. This firms up the butter and allows the flours to fully absorb the moisture, which is the secret to a cookie that doesn't spread too thin.05
-
Preheat and prepare. About 10 minutes before your dough is done chilling, preheat your oven to 175°C (350°F) and line a baking sheet with parchment paper. This ensures your baking sheet isn't cold when the cookies go on, promoting even baking.06
-
Scoop and top. Using a cookie scoop or a tablespoon, portion out mounds of dough (about 1.5 tablespoons each) onto your prepared baking sheet, leaving about 2 inches between them as they will spread. Gently press a few of the crushed candy cane pieces onto the top of each dough ball—this gives them that festive, sparkly look.07
-
Bake to perfection. Bake for 9-11 minutes. The trick is to pull them out when the edges are set and just starting to turn golden, but the centers still look soft and slightly underdone. They will continue to cook on the hot baking sheet out of the oven, resulting in the ultimate chewy texture.08
-
The final patience test. Let the cookies cool on the baking sheet for a full 10 minutes before you even think about moving them. They are extremely fragile when hot. After 10 minutes, transfer them to a wire rack to cool completely. The wait is worth it, I promise!09
Not what you're looking for?


