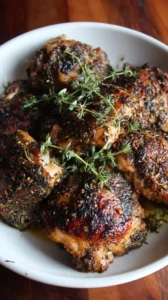
Perfectly grilled chicken breast is juicy inside with beautiful char marks and smoky aroma. This grilled chicken breast recipe delivers consistent, fantastic results every time. It’s a simple staple that becomes the star of any meal.
Nothing beats a great Grilled Chicken Breast. Whether you're a fan of Chicken Recipes or want to try something from our Crockpot Recipes selection, keep scrolling!

Why You’ll Love This Grilled Chicken Breast
- Never dry: Simple brine and temperature control lock in moisture.
- Restaurant-quality char: Gorgeous grill marks make it look and taste pro.
- Amazingly versatile: Serve as-is, slice for salads, sandwiches, or tacos.
- Deep flavor: Marinade and optional glaze add sweet-savory depth.
Ingredients & Tools
- 4 boneless, skinless chicken breasts (about 150-180 g each)
- 2 tbsp olive oil
- 2 cloves garlic, minced
- 1 tbsp fresh lemon juice
- 1 tsp smoked paprika
- 1 tsp dried oregano
- 1/2 tsp onion powder
- 1/4 tsp black pepper, freshly ground
- For the brine: 4 cups cold water and 3 tbsp kosher salt
- For the optional glaze: 2 tbsp honey or maple syrup mixed with 1 tbsp Dijon mustard
Tools: A gas or charcoal grill, instant-read meat thermometer, tongs, a small bowl for mixing, and a brush for glazing.
Notes: Don’t skip the brine—it’s the biggest game-changer for preventing dry chicken. An instant-read thermometer guarantees perfect doneness.
Nutrition (per serving)
| Calories: | 196 kcal |
| Protein: | 31 g |
| Fat: | 7 g |
| Carbs: | 2 g |
| Fiber: | 0 g |
Serves: 4 | Prep Time: 15 minutes (plus 30 minutes brining) | Cook Time: 12-15 minutes | Total Time: About 1 hour
Before You Start: Tips & Ingredient Notes
- Why brine the chicken? Brining in a saltwater solution helps the muscle fibers retain more moisture during the high-heat cooking process. It’s like giving your chicken a little insurance policy against drying out, resulting in a much more succulent final product.
- What if my chicken breasts are different sizes? This is super common! If one breast is much thicker than another, you can gently pound the thicker parts with a rolling pin or meat mallet to create a more uniform thickness. This ensures everything cooks at the same rate.
- Can I use frozen chicken? You can, but for the best results, thaw it completely in the refrigerator first. Grilling frozen or partially frozen chicken will lead to an overcooked exterior and a raw, dangerous interior. Pat it very dry after thawing.
- Is the glaze necessary? Not strictly, but it adds a wonderful caramelized, sweet-and-tangy layer that really elevates the chicken. A little goes a long way, and you just brush it on during the last few minutes of grilling.
How to Make Grilled Chicken Breast
Step 1: Brine the Chicken. In a large bowl, dissolve the kosher salt in the cold water. Submerge the chicken breasts completely, cover the bowl, and refrigerate for 30 minutes. Don’t go longer than 45-60 minutes, or the texture can become a little ham-like. This step is all about moisture retention.
Step 2: Prepare the Marinade and Chicken. While the chicken is brining, whisk together the olive oil, minced garlic, lemon juice, smoked paprika, oregano, onion powder, and black pepper in a separate bowl. After brining, remove the chicken from the saltwater and pat it thoroughly dry with paper towels. This is crucial—a dry surface gives you a better sear. Place the chicken in a dish or zip-top bag and pour the marinade over it, rubbing it into all sides. Let it sit at room temperature for 15-20 minutes as you preheat the grill.
Step 3: Preheat the Grill. Preheat your grill to medium-high heat (around 200-220°C / 400-425°F). You want a good, hot surface to get those initial grill marks. For a gas grill, close the lid to let it heat up. For charcoal, wait until the coals are covered with white-gray ash and are glowing red.
Step 4: Grill the First Side. Place the chicken breasts on the hot grill grates, angling them at a 10 o’clock position if you want picture-perfect crosshatch marks. Close the lid and let them cook, undisturbed, for 5-7 minutes. You’ll notice the edges starting to turn opaque. When you can lift a breast without it sticking, you’re ready to flip.
Step 5: Flip and Finish Cooking. Flip the chicken breasts. If you’re using the honey-mustard glaze, now is the time to brush a thin layer onto the cooked side. Close the lid again and cook for another 5-7 minutes. The total cooking time will depend on thickness, but the only way to know for sure is to use a thermometer.
Step 6: Check for Doneness and Rest. Insert an instant-read thermometer into the thickest part of a breast. You’re aiming for 74°C / 165°F. The chicken will continue to cook a little after it’s off the heat (carryover cooking). Once it hits temperature, immediately transfer the chicken to a clean plate or cutting board. Let it rest for at least 5-7 minutes. This allows the juices to redistribute throughout the meat—if you cut into it right away, all those precious juices will run out onto the plate.
Storage & Freshness Guide
- Fridge: Store in an airtight container for 3–4 days.
- Freezer: Freeze sliced or shredded for up to 3 months.
- Reviving: Reheat gently with a splash of broth to keep moist.
Serving Suggestions
Complementary Dishes
- Grilled Corn on the Cob — The sweet, smoky char of the corn is a classic partner that echoes the grill flavors beautifully.
- A Fresh Quinoa Salad with Herbs — A light, fluffy quinoa salad packed with parsley, mint, and a lemony vinaigrette provides a refreshing, textural contrast.
- Garlic Herb Roasted Potatoes — Crispy, golden potatoes with rosemary and garlic offer a hearty, comforting element that soaks up any extra juices.
Drinks
- A Crisp Sauvignon Blanc — Its bright acidity and citrus notes cut through the richness of the chicken and cleanse the palate perfectly.
- Sparkling Water with Lemon and Mint — A non-alcoholic option that’s incredibly refreshing, with the mint complementing the herbal notes in the chicken.
- A Light Pale Ale — The slight bitterness and carbonation of a pale ale contrast nicely with the savory, slightly sweet glaze on the chicken.
Something Sweet
- Grilled Peaches with Vanilla Ice Cream — Using the grill’s residual heat, you can caramelize peaches for a warm, simple dessert that feels decadent but is easy to pull off.
- Lemon Sorbet — A scoop of sharp, clean lemon sorbet is the perfect palate-cleanser after a savory meal and feels light and refreshing.
- Classic Berry Shortcake — Sweet biscuits, fresh whipped cream, and juicy seasonal berries provide a sweet, creamy, and fruity finish that everyone loves.
Top Mistakes to Avoid
- Mistake: Skipping the rest period. I know it’s tempting to dig right in, but cutting into the chicken immediately after grilling causes all the internal juices to spill out, leaving you with a drier result. Patience is a virtue here.
- Mistake: Pressing down on the chicken with your spatula. This is a common habit, but it squeezes out the precious moisture and juices you worked so hard to keep in. Use tongs and let it be.
- Mistake: Flipping the chicken too often. Let it cook undisturbed to develop a good sear and those iconic grill marks. Constant flipping prevents proper browning and can make the cooking process take longer.
- Mistake: Guessing the doneness. Relying on color or time alone is unreliable. An instant-read thermometer is a small investment that guarantees perfectly cooked, safe-to-eat chicken every single time.
Expert Tips
- Tip: Bring the chicken to room temperature before grilling. Taking the chill off the meat for 15-20 minutes helps it cook more evenly, preventing a raw center and overcooked edges.
- Tip: Create different heat zones on your grill. If you’re using charcoal, pile the coals on one side for a hot direct heat zone and leave the other side with fewer coals for a cooler indirect zone. This gives you a safety net to move the chicken if it’s browning too quickly.
- Tip: Let the marinade do its job. While a long marinade isn’t necessary for flavor penetration, even 20 minutes makes a difference. The acid in the lemon juice helps tenderize the surface slightly.
- Tip: Use the “finger test” as a backup. If you don’t have a thermometer, press on the cooked chicken. It should feel firm and spring back readily. If it feels soft and squishy, it needs more time.
FAQs
How long can I store leftover grilled chicken?
Leftover grilled chicken will keep in an airtight container in the refrigerator for 3-4 days. You can also freeze it for up to 3 months. I find it’s best to slice or shred it before freezing for easy use in future recipes like soups, casseroles, or quick stir-fries. Reheat it gently to prevent it from drying out again—a splash of broth in a covered pan works wonders.
Can I make this recipe indoors on a grill pan?
Absolutely! A grill pan on the stovetop is a great alternative. Preheat it over medium-high heat until it’s very hot, then cook the chicken following the same timing guidelines. You might not get quite as much smoky flavor, but you’ll still achieve those beautiful sear marks. Just be sure your kitchen is well-ventilated, as it can get a bit smoky.
My chicken is always bland. How can I add more flavor?
Beyond the marinade, don’t be shy with seasoning. Make sure you’re using enough salt (the brine helps with this internally) and consider adding a dry rub in addition to the wet marinade. Finishing the chicken with a sprinkle of flaky sea salt and a squeeze of fresh lemon right before serving can also wake up all the flavors dramatically.
Why did my chicken burn on the outside before it was cooked inside?
This usually means your grill was too hot. The exterior sears and chars too quickly, while the inside remains undercooked. The fix is to create a two-zone fire. Sear the chicken over direct high heat for a minute or two on each side to get the marks, then move it to the cooler, indirect heat side of the grill, close the lid, and let it finish cooking through more gently.
Is it safe to eat chicken that’s slightly pink?
Color is not a reliable indicator of safety for poultry. The only way to be sure chicken is safe to eat is by checking that the internal temperature has reached 74°C / 165°F. Sometimes, even fully cooked chicken can retain a slight pink hue, especially if it’s been brined or smoked. Always trust your thermometer, not your eyes.


Grilled Chicken Breast
Learn how to make perfectly juicy Grilled Chicken Breast every time with our easy recipe and pro tips. Get the secret to no-dry chicken and great flavor now!
Ingredients
For the main ingredients:
-
4 boneless, skinless chicken breasts (about 150-180 g each)
-
2 tbsp olive oil
-
2 cloves garlic (minced)
-
1 tbsp fresh lemon juice
-
1 tsp smoked paprika
-
1 tsp dried oregano
-
1/2 tsp onion powder
-
1/4 tsp black pepper (freshly ground)
For the brine:
-
4 cups cold water
-
3 tbsp kosher salt
For the optional glaze:
-
2 tbsp honey or maple syrup
-
1 tbsp Dijon mustard
Instructions
-
Brine the Chicken. In a large bowl, dissolve the kosher salt in the cold water. Submerge the chicken breasts completely, cover the bowl, and refrigerate for 30 minutes. Don’t go longer than 45-60 minutes, or the texture can become a little ham-like. This step is all about moisture retention.01
-
Prepare the Marinade and Chicken. While the chicken is brining, whisk together the olive oil, minced garlic, lemon juice, smoked paprika, oregano, onion powder, and black pepper in a separate bowl. After brining, remove the chicken from the saltwater and pat it thoroughly dry with paper towels. This is crucial—a dry surface gives you a better sear. Place the chicken in a dish or zip-top bag and pour the marinade over it, rubbing it into all sides. Let it sit at room temperature for 15-20 minutes as you preheat the grill.02
-
Preheat the Grill. Preheat your grill to medium-high heat (around 200-220°C / 400-425°F). You want a good, hot surface to get those initial grill marks. For a gas grill, close the lid to let it heat up. For charcoal, wait until the coals are covered with white-gray ash and are glowing red.03
-
Grill the First Side. Place the chicken breasts on the hot grill grates, angling them at a 10 o'clock position if you want picture-perfect crosshatch marks. Close the lid and let them cook, undisturbed, for 5-7 minutes. You’ll notice the edges starting to turn opaque. When you can lift a breast without it sticking, you’re ready to flip.04
-
Flip and Finish Cooking. Flip the chicken breasts. If you're using the honey-mustard glaze, now is the time to brush a thin layer onto the cooked side. Close the lid again and cook for another 5-7 minutes. The total cooking time will depend on thickness, but the only way to know for sure is to use a thermometer.05
-
Check for Doneness and Rest. Insert an instant-read thermometer into the thickest part of a breast. You’re aiming for 74°C / 165°F. The chicken will continue to cook a little after it's off the heat (carryover cooking). Once it hits temperature, immediately transfer the chicken to a clean plate or cutting board. Let it rest for at least 5-7 minutes. This allows the juices to redistribute throughout the meat—if you cut into it right away, all those precious juices will run out onto the plate.06
Not what you're looking for?


