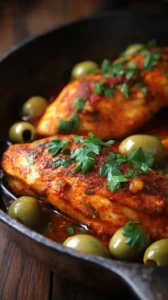
Hawaiian Chicken Breast brings a taste of the tropics to your table with its sweet-savory harmony. This easy skillet dish features juicy chicken glazed in a sticky pineapple-soy sauce. It’s a vacation on a plate that’s perfect for both weeknights and entertaining.
Craving a delicious Hawaiian Chicken Breast? You've come to the right spot! From Chicken Breast Recipes favorites to amazing Dessert Recipes recipes, there's something here for everyone.


Why You’ll Love This Hawaiian Chicken Breast
- Perfect Flavor Harmony: Sweet pineapple, savory soy, and zesty ginger create a balanced, complex taste.
- Surprisingly Simple: Sear, simmer, and glaze—all in one pan for maximum flavor and easy cleanup.
- Meal Prep & Crowd Pleaser: Reheats beautifully for lunches and impresses guests with little effort.
- Customizable to Taste: Easily adjust sweetness or add heat to make it your own.
Ingredients & Tools
- 4 boneless, skinless chicken breasts (about 1.5 lbs / 680 g)
- 1 tbsp neutral oil (like avocado or canola)
- 1 tsp kosher salt
- 1/2 tsp black pepper
- 2 cups fresh pineapple chunks (about 1/2 a medium pineapple)
- 1 large red bell pepper, cut into 1-inch pieces
- 1/2 medium red onion, cut into chunks
- 3 cloves garlic, minced
- 1 tbsp freshly grated ginger
- 1/2 cup low-sodium soy sauce
- 1/3 cup packed light brown sugar
- 2 tbsp rice vinegar
- 1 tbsp cornstarch
- 2 tbsp water
- 2 green onions, thinly sliced (for garnish)
- 1 tbsp toasted sesame seeds (for garnish)
Tools: A large skillet (oven-safe is a bonus, but not essential), a microplane or fine grater for the ginger, and a small whisk or fork for the cornstarch slurry.
Notes: Using fresh pineapple really does make a difference here—the canned stuff can be too soft and overly sweet. And don’t skip the fresh ginger and garlic; they provide the aromatic backbone that keeps the sauce from being cloying.
Nutrition (per serving)
| Calories: | 380 kcal |
| Protein: | 35 g |
| Fat: | 8 g |
| Carbs: | 40 g |
| Fiber: | 3 g |
Serves: 4 | Prep Time: 15 minutes | Cook Time: 20 minutes | Total Time: 35 minutes
Before You Start: Tips & Ingredient Notes
- Pound your chicken breasts. This is my number one tip for perfect, evenly cooked chicken. Place the breasts between two pieces of plastic wrap and gently pound them to an even ¾-inch thickness. This prevents the thin ends from drying out while the thick center cooks through.
- Why fresh pineapple? Canned pineapple will work in a pinch, but it’s often packed in syrup which can make the final dish overly sweet. Fresh pineapple has a brighter, more complex acidity that cuts through the richness of the sauce beautifully.
- Don’t skip the cornstarch slurry. This is our ticket to a glossy, restaurant-quality sauce that clings to the chicken and veggies instead of pooling at the bottom of the plate. A little goes a long way in transforming the liquid into a proper glaze.
- Get your pan nice and hot. A proper sear on the chicken is non-negotiable for flavor. You want that golden-brown crust to develop before you add the sauce. If the pan isn’t hot enough, the chicken will steam and turn gray instead of searing.
How to Make Hawaiian Chicken Breast
Step 1: Start by prepping your chicken. Pat the breasts completely dry with paper towels—this is crucial for getting a good sear. Season both sides generously with the salt and pepper. If you haven’t already, pound them to an even thickness. This little bit of prep work ensures every bite is tender and juicy.
Step 2: Heat the oil in your large skillet over medium-high heat. Once the oil is shimmering, carefully add the chicken breasts. You should hear a satisfying sizzle. Sear them for 5-7 minutes on the first side, without moving them, until you have a beautiful golden-brown crust. Flip them over and cook for another 2 minutes on the second side, then transfer them to a clean plate. They won’t be cooked through yet, and that’s perfectly fine—they’ll finish cooking in the sauce.
Step 3: Reduce the heat to medium and add the red bell pepper and red onion to the same skillet. Sauté for about 3-4 minutes, just until they start to soften and get a little color. You’ll notice all those delicious browned bits from the chicken starting to mix in with the veggies. Now, add the garlic and ginger and cook for just 30 seconds until incredibly fragrant—be careful not to burn them.
Step 4: It’s sauce time! Pour in the soy sauce, then add the brown sugar and rice vinegar. Stir everything together, scraping the bottom of the pan with your spoon to lift up all those flavorful browned bits (this is called deglazing, and it’s where a ton of flavor lives). Add the fresh pineapple chunks and stir to combine.
Step 5: Return the seared chicken breasts and any accumulated juices from the plate back into the skillet, nestling them into the sauce and pineapple mixture. Bring the sauce to a gentle simmer, then reduce the heat to low, cover the skillet, and let it cook for 8-10 minutes. The chicken will finish cooking through, becoming incredibly tender.
Step 6: While the chicken is simmering, make your cornstarch slurry. In a small bowl, whisk the cornstarch and water together until it’s completely smooth with no lumps. This is the key to a lump-free, glossy sauce.
Step 7: Once the chicken is cooked through (an internal temperature of 165°F / 74°C), transfer it back to the plate. Increase the heat under the skillet to medium and bring the sauce to a boil. Give the cornstarch slurry one last stir and then slowly drizzle it into the bubbling sauce, whisking constantly. You’ll see the sauce thicken almost immediately into a gorgeous, shiny glaze.
Step 8: Return the chicken to the skillet one last time, turning it to coat thoroughly in the thickened glaze. Let it heat through for a minute. Garnish with the sliced green onions and a sprinkle of toasted sesame seeds for a final touch of color and nutty flavor. Serve immediately over a bed of fluffy rice to soak up every last drop of that incredible sauce.
Storage & Freshness Guide
- Fridge: Cool completely, then store in an airtight container for up to 4 days.
- Freezer: Freeze in a sealed container for up to 3 months. Thaw in fridge before reheating.
- Reviving: Reheat gently in a skillet with a splash of water to refresh the sauce.
Serving Suggestions
Complementary Dishes
- Steamed Jasmine Rice — The fluffy, slightly sticky grains are the perfect canvas for that rich, glossy sauce. It soaks everything up beautifully and makes the meal feel complete.
- Simple Cucumber Salad — A quick mix of sliced cucumbers, a splash of rice vinegar, and a pinch of salt provides a crisp, refreshing contrast that cuts through the sweetness of the main dish.
- Garlic Sautéed Greens — Bok choy or spinach quickly wilted with a bit of garlic adds a vibrant, savory element and makes the whole plate feel a bit more balanced and nutritious.
Drinks
- A Crisp Pinot Grigio — Its bright acidity and citrus notes are a fantastic partner for the sweet and savory flavors of the chicken, cleansing the palate between bites.
- Classic Mai Tai — For a true tropical theme night, this rum-based cocktail with its notes of lime and almond complements the pineapple and ginger in the dish wonderfully.
- Sparkling Ginger Ale — A non-alcoholic option that echoes the ginger in the recipe. The bubbles are refreshing and help balance the richness of the meal.
Something Sweet
- Coconut Panna Cotta — The creamy, delicate coconut flavor is a dreamy follow-up to the bold Hawaiian chicken. It’s light, cool, and continues the tropical vibe without being too heavy.
- Grilled Pineapple Rings — Take the theme full circle! A quick grill on a hot pan caramelizes the natural sugars, creating a simple, warm dessert that feels both rustic and elegant.
- Macadamia Nut Cookies — Buttery, crunchy, and nutty, these cookies offer a lovely textural contrast and a taste that feels authentically Hawaiian, providing a satisfying end to the meal.
Top Mistakes to Avoid
- Mistake: Overcrowding the pan when searing the chicken. If you put all the chicken in at once, the pan temperature will plummet, and the chicken will steam instead of sear. You’ll miss out on that deep, caramelized flavor and beautiful color. Cook in batches if your skillet is small.
- Mistake: Adding the cornstarch directly to the hot sauce. This is a surefire way to end up with a lumpy, gloppy mess. Always mix cornstarch with a cold liquid (like water) first to create a smooth slurry before introducing it to the heat.
- Mistake: Using pre-minced garlic from a jar. I know it’s convenient, but it often has a dull, slightly bitter flavor compared to fresh. Taking the minute to mince fresh garlic cloves makes a world of difference in the aroma and taste of the final dish.
- Mistake: Skipping the resting step for the chicken. Letting the chicken rest on the plate after its initial sear allows the juices to redistribute. If you cut into it immediately, all those precious juices will run out, leaving you with drier meat.
Expert Tips
- Tip: Use an oven-safe skillet for a finishing touch. If you have one, after you’ve glazed the chicken, pop the whole skillet under a preheated broiler for 1-2 minutes. This gives the top of the chicken and pineapple an incredible, caramelized finish that’s just next-level.
- Tip: Make a double batch of the sauce. The sauce is so good you’ll wish you had more. Simply double the soy sauce, brown sugar, vinegar, and cornstarch. You can use the extra to drizzle over rice or even as a glaze for grilled shrimp later in the week.
- Tip: Grate your ginger frozen. Ginger is fibrous and can be tricky to grate. Keep a knob of ginger in your freezer and just pull it out when you need it. It grates effortlessly into a fine pulp, skin and all, with no stringy bits.
- Tip: Let the sauce reduce naturally first. Before you add the cornstarch slurry, let the sauce bubble and reduce for a minute or two after you’ve simmered the chicken. This concentrates the flavors, meaning you’ll need less cornstarch to achieve a beautifully thick consistency.
FAQs
Can I use chicken thighs instead of breasts?
Absolutely! Bone-in, skin-on thighs would be fantastic and add even more flavor. Just be aware that they will take a bit longer to cook through. Sear them skin-side down first to render the fat and get the skin super crispy, then proceed with the recipe, adjusting the simmering time to 15-20 minutes until the meat is tender and reaches 165°F internally.
How do I store and reheat leftovers?
Let the chicken and sauce cool completely before transferring it to an airtight container. It will keep in the refrigerator for up to 4 days. The best way to reheat it is gently in a skillet over low heat with a tiny splash of water to loosen the sauce. Microwaving can work but may make the chicken a bit rubbery.
Is there a way to make this recipe less sweet?
For sure! You have a couple of options. You can reduce the brown sugar by half, or you can substitute it with a tablespoon or two of honey for a different kind of sweetness. Another great trick is to add a tablespoon of fresh lime juice at the end to brighten everything up and balance the sweetness.
Can I make this dish ahead of time?
You can do most of the prep ahead. You can chop the veggies and pineapple and make the sauce mixture (soy, brown sugar, vinegar) a day in advance. Store them separately in the fridge. When you’re ready to cook, just sear the chicken and bring it all together. I don’t recommend cooking it fully ahead of time as the chicken can dry out upon reheating.
My sauce didn’t thicken, what happened?
This usually means the cornstarch slurry wasn’t activated properly. The sauce needs to be at a full boil when you add the slurry, and you need to whisk it in constantly. If it’s not bubbling, the cornstarch won’t “kick in.” If it’s still thin, just mix another half-tablespoon of cornstarch with a tablespoon of water and repeat the process.


Hawaiian Chicken Breast
Make easy Hawaiian Chicken Breast with a sweet pineapple-soy glaze in one skillet. Perfect for a quick weeknight dinner. Get the simple recipe now!
Ingredients
For the Chicken & Veggies:
-
4 boneless, skinless chicken breasts (about 1.5 lbs / 680 g)
-
1 tbsp neutral oil (like avocado or canola)
-
1 tsp kosher salt
-
1/2 tsp black pepper
-
2 cups fresh pineapple chunks (about 1/2 a medium pineapple)
-
1 large red bell pepper (cut into 1-inch pieces)
-
1/2 medium red onion (cut into chunks)
-
3 cloves garlic (minced)
-
1 tbsp freshly grated ginger
For the Sauce:
-
1/2 cup low-sodium soy sauce
-
1/3 cup packed light brown sugar
-
2 tbsp rice vinegar
-
1 tbsp cornstarch
-
2 tbsp water
For the Garnish:
-
2 green onions (thinly sliced (for garnish))
-
1 tbsp toasted sesame seeds (for garnish)
Instructions
-
Start by prepping your chicken. Pat the breasts completely dry with paper towels—this is crucial for getting a good sear. Season both sides generously with the salt and pepper. If you haven't already, pound them to an even thickness. This little bit of prep work ensures every bite is tender and juicy.01
-
Heat the oil in your large skillet over medium-high heat. Once the oil is shimmering, carefully add the chicken breasts. You should hear a satisfying sizzle. Sear them for 5-7 minutes on the first side, without moving them, until you have a beautiful golden-brown crust. Flip them over and cook for another 2 minutes on the second side, then transfer them to a clean plate. They won't be cooked through yet, and that's perfectly fine—they’ll finish cooking in the sauce.02
-
Reduce the heat to medium and add the red bell pepper and red onion to the same skillet. Sauté for about 3-4 minutes, just until they start to soften and get a little color. You’ll notice all those delicious browned bits from the chicken starting to mix in with the veggies. Now, add the garlic and ginger and cook for just 30 seconds until incredibly fragrant—be careful not to burn them.03
-
It's sauce time! Pour in the soy sauce, then add the brown sugar and rice vinegar. Stir everything together, scraping the bottom of the pan with your spoon to lift up all those flavorful browned bits (this is called deglazing, and it’s where a ton of flavor lives). Add the fresh pineapple chunks and stir to combine.04
-
Return the seared chicken breasts and any accumulated juices from the plate back into the skillet, nestling them into the sauce and pineapple mixture. Bring the sauce to a gentle simmer, then reduce the heat to low, cover the skillet, and let it cook for 8-10 minutes. The chicken will finish cooking through, becoming incredibly tender.05
-
While the chicken is simmering, make your cornstarch slurry. In a small bowl, whisk the cornstarch and water together until it's completely smooth with no lumps. This is the key to a lump-free, glossy sauce.06
-
Once the chicken is cooked through (an internal temperature of 165°F / 74°C), transfer it back to the plate. Increase the heat under the skillet to medium and bring the sauce to a boil. Give the cornstarch slurry one last stir and then slowly drizzle it into the bubbling sauce, whisking constantly. You'll see the sauce thicken almost immediately into a gorgeous, shiny glaze.07
-
Return the chicken to the skillet one last time, turning it to coat thoroughly in the thickened glaze. Let it heat through for a minute. Garnish with the sliced green onions and a sprinkle of toasted sesame seeds for a final touch of color and nutty flavor. Serve immediately over a bed of fluffy rice to soak up every last drop of that incredible sauce.08
Not what you're looking for?


