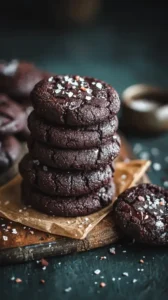
There’s something about a classic cookie that feels like a warm hug, especially during the festive season. I love how these healthy vegan peanut butter blossoms capture that cozy feeling—they’re my go-to comfort food, offering the timeless magic of peanut butter and chocolate in a soft, chewy bite made with simple, wholesome ingredients. To me, they’re a perfect example of how a beloved treat can be reimagined so you can feel genuinely good about every delicious mouthful.
If your kitchen becomes the heart of the home during the holidays like mine does, you’re probably always looking for standout Christmas dessert ideas. That’s where these cookies shine. They are a wonderful, one-bowl addition to your holiday baking plans, and they truly stand out as unique Christmas cookies that welcome everyone to the table. Whether you’re browsing Christmas cookies recipes for a crowd or need simple, easy Christmas treats for a last-minute gathering, this recipe is a reliable delight.
So, as you gather your Christmas baking ideas this year, consider adding these to your list. They are, without a doubt, some of my favorite holiday treats to make and share—a little piece of homemade, healthy happiness that spreads so much festive joy.
Nothing beats a great Healthy Vegan Peanut Butter Blossoms. Whether you're a fan of Christmas Cookie or want to try something from our Chicken Thigh Recipes selection, keep scrolling!


Why You’ll Love This Healthy Vegan Peanut Butter Blossoms
Secretly wholesome: Made with almond and oat flour for a gluten-free, fiber-rich treat.
Perfect texture: Soft and chewy with a melt-in-your-mouth quality.
Satisfying sweetness: No refined sugar, just maple syrup and dark chocolate.
Incredibly simple: One bowl, no chilling, ready in 20 minutes.
Ingredients & Tools
- 1 cup creamy, natural peanut butter (just peanuts and salt)
- 1/2 cup pure maple syrup, at room temperature
- 1 tsp vanilla extract
- 1 1/4 cups fine almond flour
- 1/2 cup oat flour (you can make your own by blending rolled oats)
- 1/2 tsp baking soda
- 1/4 tsp sea salt
- 24 vegan dark chocolate squares or chunks (about 1/2 oz each)
- 2-3 tbsp coconut sugar or granulated sugar, for rolling (optional)
Tools: A medium mixing bowl, a baking sheet, parchment paper, a small cookie scoop (about 1 tbsp capacity) is helpful but not essential.
Notes: Using a natural, drippy peanut butter is key—it acts as our fat and binder. Don’t skip the oat flour; it gives the cookies structure and prevents greasiness.
Nutrition (per serving)
| Calories: | 148 kcal |
| Protein: | 5 g |
| Fat: | 10 g |
| Carbs: | 12 g |
| Fiber: | 2 g |
Serves: 24 | Prep Time: 10 mins | Cook Time: 8-10 mins | Total Time: 20 mins
Before You Start: Tips & Ingredient Notes
- Your peanut butter matters most. You really need the natural, stir-well kind for this recipe. The oil separation is normal and actually helps create the perfect dough consistency. Avoid using peanut butter with added stabilizers or hydrogenated oils, as it will make the dough too stiff and dry.
- Don’t swap the maple syrup. Liquid sweeteners behave very differently from granulated ones in baking. Maple syrup provides the necessary moisture and helps create that chewy texture. Agave nectar can work in a pinch, but the flavor will be slightly different.
- Measure your flours correctly. The best way is to spoon the flour into your measuring cup and level it off with a knife. Scooping directly from the bag can pack in too much flour, leading to a dry, crumbly cookie. A little attention here goes a long way!
- Let your dough be a little sticky. This isn’t a firm, rollable sugar cookie dough. It will be slightly sticky to the touch, and that’s exactly what we want. This moisture is what gives us that wonderfully soft and chewy final product.
How to Make Healthy Vegan Peanut Butter Blossoms
Step 1: First, preheat your oven to 350°F (175°C) and line a baking sheet with parchment paper. This is a quick-baking cookie, so you want that oven fully preheated and ready to go. In your medium mixing bowl, combine the peanut butter, maple syrup, and vanilla extract. Stir them together until you have a smooth, glossy, and well-combined mixture. You’ll notice it might look a little separated at first, but just keep stirring—it will come together beautifully.
Step 2: Now, add your dry ingredients directly to the same bowl. That’s the almond flour, oat flour, baking soda, and sea salt. Use a spatula to fold everything together. At first, it will seem dry and crumbly, but as you persist, it will transform into a cohesive, slightly sticky dough. The trick is to mix just until no dry streaks remain; overmixing isn’t our friend here.
Step 3: If you’re opting to roll your cookies in sugar, now’s the time. Place your coconut or granulated sugar in a small bowl. Using a small cookie scoop or a rounded tablespoon, portion out the dough. Roll each portion between your palms to form a smooth ball. The dough is sticky, but a light, quick roll is all you need. Then, roll each ball in the sugar until lightly coated. This step is optional, but it gives the cookies a lovely, classic sparkle and a subtle crunch.
Step 4: Place the dough balls on your prepared baking sheet, spacing them about 2 inches apart. They don’t spread a huge amount, but they need a little room to breathe. Now, it’s time for the signature criss-cross pattern! Dip the tines of a fork in a little extra sugar or flour and gently press down on each dough ball, first in one direction, then again perpendicular to it, to create that classic grid.
Step 5: Bake for 8 to 10 minutes. You’re looking for the edges to be just lightly golden and the centers to look soft and slightly puffed. They will look underdone, and that is perfect—they firm up as they cool. Do not overbake them, or you’ll lose that wonderful soft, chewy texture. The aroma in your kitchen will be absolutely irresistible at this point.
Step 6: As soon as you pull the baking sheet from the oven, it’s chocolate time! Immediately press a dark chocolate square firmly into the center of each warm cookie. The warmth will soften the chocolate just enough to make it look like it’s melting into the cookie. Let the cookies cool on the baking sheet for at least 10 minutes before attempting to move them. They are very fragile when hot but will set up perfectly as they cool.
Storage & Freshness Guide
- Fridge: Store in an airtight container for up to 1 week.
- Freezer: Freeze baked cookies for up to 3 months, or freeze dough balls and bake from frozen, adding 1-2 minutes.
- Reviving: Briefly warm in the microwave or a 300°F oven for 5 minutes to restore softness.
Serving Suggestions
Complementary Dishes
- A warm mug of chai tea — The spices in the chai, like cardamom and cinnamon, create a beautiful warmth that complements the nutty peanut butter and rich chocolate perfectly.
- A scoop of vanilla bean coconut ice cream — For the ultimate indulgence, sandwich a slightly warm cookie around a scoop of cool, creamy vegan ice cream. The contrast in temperatures and textures is sublime.
- A fresh fruit platter with berries and oranges — The bright, acidic burst of fresh fruit cuts through the richness of the cookies, making the whole experience feel balanced and refreshing.
Drinks
- Oat milk latte — The creamy, slightly sweet notes of oat milk in a coffee or matcha latte are a dream pairing with the peanut butter and chocolate, turning your snack into a cozy café moment.
- Cold glass of almond milk — Sometimes, the classic pairing is the best. A simple, cold glass of unsweetened almond milk is the perfect, clean companion to let the cookie flavors shine.
- Sparkling water with a lemon twist — The effervescence and citrus zing cleanse the palate beautifully between bites, ensuring each one tastes as amazing as the first.
Something Sweet
- Vegan chocolate-dipped strawberries — Double down on the chocolate theme with these elegant, fruity bites. They feel fancy but are incredibly easy to make, rounding out a dessert spread.
- A small square of dark chocolate peppermint bark — The cool hint of peppermint provides a refreshing counterpoint to the rich, nutty cookies, creating a delightful flavor dance.
- Simple coconut date rolls — For a less processed sweet option, these no-bake bites made from dates and coconut offer a chewy, caramel-like flavor that harmonizes wonderfully with our blossoms.
Top Mistakes to Avoid
- Mistake: Using the wrong peanut butter. I’ve messed this up before too… using a thick, stabilized peanut butter will result in a dry, crumbly dough that’s impossible to work with and bakes up tough. Always go for the natural, oily kind.
- Mistake: Overbaking the cookies. These cookies continue to cook on the hot baking sheet after you take them out of the oven. If you wait for them to look “done” in the oven, they will be dry and hard once cooled. Pull them out when the centers still look soft.
- Mistake: Pressing the chocolate in after cooling. The warmth of the cookie is what slightly melts the chocolate and makes it adhere. If you wait until they are cool, the chocolate will just sit on top and likely fall off.
- Mistake: Skipping the criss-cross pattern. This isn’t just for looks! Flattening the dough balls ensures they bake evenly. Without it, you might end up with undercooked centers and overcooked edges.
Expert Tips
- Tip: Weigh your flours for ultimate precision. If you have a kitchen scale, use it! 120 grams of almond flour and 60 grams of oat flour will give you perfectly consistent results every single time, taking the guesswork out of measuring.
- Tip: Slightly warm your peanut butter if it’s too stiff. If your natural peanut butter has been in a cool pantry and is too solid, pop the jar (without the lid) in the microwave for 15-20 seconds to loosen it up. This makes it much easier to mix.
- Tip: Make your own oat flour in a blender. It’s cheaper and fresher! Just add rolled oats (ensure they’re gluten-free if needed) to a high-speed blender and blitz until they form a fine powder. Give it a good shake halfway through to ensure even blending.
- Tip: Let the cookies cool completely on the pan. I know it’s tempting to move them, but they need this time to set. They’re very delicate when warm and will fall apart if you try to transfer them too soon. Patience is key for the perfect texture.
FAQs
Can I use a different nut butter?
Absolutely! Almond butter or cashew butter would work wonderfully here. Just make sure it’s the natural, runny kind. The flavor profile will change, of course—almond butter will be a bit milder, while cashew butter is very creamy and neutral. Sunflower seed butter is a great nut-free option, though it may give the cookies a slightly greener tint (a harmless reaction with the baking soda).
My dough is too crumbly and won’t come together. What do I do?
This usually happens if your peanut butter was too thick or if you packed your flours. Don’t worry, it’s an easy fix! Add a tablespoon of plant-based milk (almond or oat work well) or even a teaspoon of maple syrup at a time, mixing after each addition, until the dough becomes cohesive and slightly sticky. You really only need a tiny bit of extra liquid to bring it all together.
Can I make these cookies ahead of time?
You sure can! The baked cookies store beautifully in an airtight container at room temperature for up to 4 days. You can also freeze the baked and cooled cookies for up to 3 months. For a make-ahead option, you can portion and roll the dough balls and freeze them on a baking sheet before transferring to a bag. Bake from frozen, adding 1-2 minutes to the baking time.
Why did my cookies turn out cakey instead of chewy?
A cakey texture is often the result of over-measuring the flour. When you scoop directly from the bag, you can unintentionally pack in 20-30% more flour, which absorbs too much moisture. Next time, try the spoon-and-level method. Also, ensure your baking soda is fresh, as old leavening agents can behave unpredictably.
Are these cookies gluten-free?
Yes, as long as you use certified gluten-free oat flour (or make your own from certified gluten-free oats), these cookies are completely gluten-free. Both almond flour and oat flour are naturally free from gluten, making this a great treat for those with sensitivities or celiac disease.


Healthy Vegan Peanut Butter Blossoms: An Easy Vegan Dessert
Healthy Vegan Peanut Butter Blossoms are the perfect easy Christmas treat. These soft, vegan peanut butter cookies are a wholesome, guilt-free holiday dessert everyone will love.
Ingredients
For the Ingredients
-
1 cup creamy, natural peanut butter (just peanuts and salt)
-
1/2 cup pure maple syrup (at room temperature)
-
1 tsp vanilla extract
-
1 1/4 cups fine almond flour
-
1/2 cup oat flour (you can make your own by blending rolled oats)
-
1/2 tsp baking soda
-
1/4 tsp sea salt
-
24 vegan dark chocolate squares or chunks (about 1/2 oz each)
-
2-3 tbsp coconut sugar or granulated sugar (for rolling (optional))
Instructions
-
First, preheat your oven to 350°F (175°C) and line a baking sheet with parchment paper. In your medium mixing bowl, combine the peanut butter, maple syrup, and vanilla extract. Stir them together until you have a smooth, glossy, and well-combined mixture.01
-
Now, add your dry ingredients directly to the same bowl. That’s the almond flour, oat flour, baking soda, and sea salt. Use a spatula to fold everything together until it transforms into a cohesive, slightly sticky dough.02
-
If you're opting to roll your cookies in sugar, now's the time. Place your coconut or granulated sugar in a small bowl. Using a small cookie scoop or a rounded tablespoon, portion out the dough. Roll each portion between your palms to form a smooth ball. Then, roll each ball in the sugar until lightly coated.03
-
Place the dough balls on your prepared baking sheet, spacing them about 2 inches apart. Dip the tines of a fork in a little extra sugar or flour and gently press down on each dough ball, first in one direction, then again perpendicular to it, to create that classic grid.04
-
Bake for 8 to 10 minutes. You’re looking for the edges to be just lightly golden and the centers to look soft and slightly puffed.05
-
As soon as you pull the baking sheet from the oven, it's chocolate time! Immediately press a dark chocolate square firmly into the center of each warm cookie. Let the cookies cool on the baking sheet for at least 10 minutes before attempting to move them.06
Not what you're looking for?


