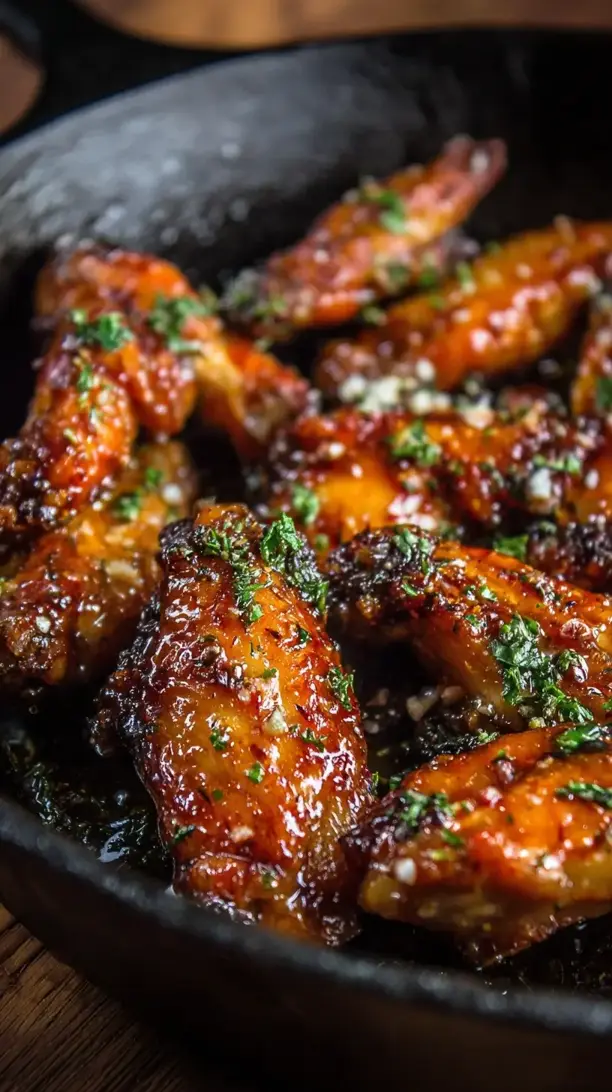
Honey garlic chicken wings deliver a magical sweet-savory glaze over crispy, juicy wings. This recipe balances sticky honey, pungent garlic, and savory soy for a crowd-pleasing favorite. They’re surprisingly simple to make but deliver huge flavor payoff for any occasion.
Craving a delicious Honey Garlic Chicken Wings? You've come to the right spot! From Dinner Ideas favorites to amazing Chicken Recipes recipes, there's something here for everyone.


Why You’ll Love This Honey Garlic Chicken Wings
- Perfect sweet-savory-sticky trifecta: Honey caramelizes while garlic and soy add deep savory backbone.
- Incredible texture in every bite: Crispy outside, tender inside with sauce clinging to the skin.
- Surprisingly simple to master: No fancy techniques or hard-to-find ingredients needed.
- Ultimate crowd-pleaser: Universally loved and always the first to disappear.
Ingredients & Tools
- 2 lbs chicken wings, split into drumettes and flats, tips removed
- 1 tbsp baking powder (NOT baking soda!)
- 1 tsp kosher salt
- 1/2 tsp black pepper
- 1/2 cup honey
- 1/3 cup soy sauce (or tamari for gluten-free)
- 4-5 cloves garlic, minced
- 1 tbsp fresh ginger, grated
- 1 tbsp rice vinegar
- 1 tbsp sesame oil
- 2 tsp cornstarch
- 1 tbsp water
- 2 tbsp sliced green onions and sesame seeds for garnish
Tools: A large baking sheet with a wire rack, a large mixing bowl, a medium saucepan, and some tongs.
Notes: Baking powder is our secret weapon for ultra-crispy skin. Fresh garlic and ginger make a world of difference in the sauce’s aroma and depth.
Nutrition (per serving)
| Calories: | 420 kcal |
| Protein: | 28 g |
| Fat: | 22 g |
| Carbs: | 28 g |
| Fiber: | 0.5 g |
Serves: 4 | Prep Time: 15 minutes | Cook Time: 45 minutes | Total Time: 1 hour
Before You Start: Tips & Ingredient Notes
- Pat those wings DRY. This is the single most important step for crispy skin. Any excess moisture on the skin will steam the wings instead of letting them roast and crisp up. Take a few minutes with some paper towels—it’s worth it.
- Baking powder is the key, not baking soda. They are not interchangeable here! Baking powder gives us the crispiness without a metallic or soapy taste. Double-check your container before you start.
- Don’t skip the wire rack. Elevating the wings on a rack set over your baking sheet allows hot air to circulate all around them, ensuring they cook evenly and get crispy on all sides, not just the bottom.
- Fresh aromatics make all the difference. Pre-minced garlic in a jar and powdered ginger just won’t deliver the same bright, pungent kick that fresh garlic and ginger will. It only takes a minute to grate and mince, and the flavor payoff is immense.
How to Make Honey Garlic Chicken Wings
Step 1: First, get your oven nice and hot—preheat it to 425°F (220°C). While it’s heating, grab your chicken wings and pat them relentlessly dry with paper towels. You’ll be amazed at how much moisture comes off. Place the bone-dry wings in a large mixing bowl.
Step 2: Sprinkle the baking powder, salt, and black pepper over the wings. Now, get in there with your hands and toss everything together until every single wing piece is evenly and lightly coated. The baking powder mixture will look a little chalky on the skin—that’s exactly what you want to see.
Step 3: Arrange the coated wings in a single layer on the wire rack that’s set inside your baking sheet. This setup is crucial for airflow! Pop the tray into the preheated oven and let them bake for 35-40 minutes. You’re looking for a deep golden brown color and wonderfully crispy skin.
Step 4: While the wings are working their magic in the oven, let’s make that glorious sauce. In a medium saucepan, combine the honey, soy sauce, minced garlic, grated ginger, rice vinegar, and sesame oil. Give it a good whisk and bring it to a simmer over medium heat.
Step 5: Let the sauce simmer for about 3-4 minutes, stirring occasionally. You’ll notice the smell transforming from sharp and pungent to sweet, savory, and deeply aromatic. In a small separate bowl, make a slurry by stirring the cornstarch and water together until it’s smooth.
Step 6: While whisking the simmering sauce continuously, slowly drizzle in the cornstarch slurry. The sauce will begin to thicken almost immediately. Let it bubble for another minute until it’s nicely thickened and glossy. Then, take it off the heat.
Step 7: By now, your wings should be perfectly crispy. Carefully pull the baking sheet out of the oven. Using your tongs, transfer the hot wings directly into the large mixing bowl (you can use the same one—no need to wash it!).
Step 8: Pour about two-thirds of the honey garlic sauce over the hot wings in the bowl. Gently toss and fold the wings until they are all evenly coated in that sticky, shiny glaze. The heat from the wings will help the sauce cling beautifully.
Step 9: Transfer the sauced wings to a serving platter. Drizzle the remaining sauce over the top for an extra hit of flavor and a gorgeous presentation. Finish them off with a generous sprinkle of sliced green onions and sesame seeds. Serve immediately while they’re hot and crispy!
Storage & Freshness Guide
- Fridge: Store unsauced wings in an airtight container for up to 3 days. Sauce separately.
- Freezer: Freeze unsauced wings on a baking sheet, then transfer to a freezer bag for up to 3 months.
- Reviving: Reheat in a 400°F oven or air fryer until crispy, then toss with warmed sauce.
Serving Suggestions
Complementary Dishes
- A simple cucumber salad — The cool, crisp, and slightly acidic nature of a quick-pickled cucumber salad cuts through the richness of the sticky wings perfectly, cleansing the palate between bites.
- Steamed jasmine rice — It’s the ultimate sponge for any extra sauce that might be left on your plate. The fluffy, fragrant rice balances the strong flavors and makes the meal more substantial.
- Crispy roasted broccoli — The earthy, slightly charred flavor of roasted broccoli stands up well to the sweet and savory sauce, adding a nice vegetable component and a different texture.
Drinks
- A cold, crisp lager — The carbonation and mild bitterness of a good lager work wonders to cut through the sticky-sweet glaze and refresh your taste buds.
- Iced green tea — Its slight astringency and clean, grassy notes provide a lovely, non-alcoholic contrast to the garlicky, umami-rich flavors of the wings.
- A dry Riesling — The wine’s bright acidity and subtle stone fruit notes complement the honey’s sweetness while balancing the saltiness from the soy sauce beautifully.
Something Sweet
- Mango sorbet — The bright, tropical fruitiness is a fantastic, light finish that feels refreshing after the savory, garlicky main event.
- Fortune cookies — A fun, thematic, and light way to end the meal that keeps with the Asian-inspired flavor profile without being too heavy.
- Lychee jelly — These are cool, wobbly, and delicately sweet, offering a unique and refreshing textural experience that cleanses the palate completely.
Top Mistakes to Avoid
- Mistake: Skipping the step of patting the wings dry. I’ve rushed this before and ended up with steamed, rubbery skin instead of crispy, crackly skin. The moisture is the enemy of crispiness, so be thorough with those paper towels.
- Mistake: Using baking soda instead of baking powder. This is a common mix-up that can lead to a bitter, metallic aftertaste that will ruin your beautiful sauce. Baking powder is specifically formulated to avoid this.
- Mistake: Adding the sauce too early. If you toss the wings in the sauce before they go in the oven, the sugar in the honey will burn long before the chicken is cooked through. We sauce them after they’re already crispy.
- Mistake: Crowding the baking sheet. If the wings are too close together, they’ll steam each other. Giving them space on the wire rack is non-negotiable for that all-over crisp we’re after.
Expert Tips
- Tip: Let the wings rest after baking, before saucing. Let them sit on the rack for just 2-3 minutes after they come out of the oven. This allows the skin to “set” and become even crisper, so it holds up better when you toss it in the sauce.
- Tip: Make a double batch of the sauce. It’s so good, you’ll want extra for drizzling over rice or your roasted veggie side. Just simmer it a little longer if you need to thicken it up more.
- Tip: For extra garlic punch, add garlic two ways. Sauté a tablespoon of minced garlic in a little oil until fragrant before adding the other sauce ingredients. This cooked garlic base provides a deeper, sweeter flavor alongside the raw garlic’s bite.
- Tip: Get ahead on prep. You can mix the dry coating (baking powder, salt, pepper) and make the sauce a day in advance. Store them separately in the fridge, then just coat and bake the wings when you’re ready.
FAQs
Can I make these wings ahead of time?
You can absolutely get a head start! The best method is to bake the wings until they are crispy and then let them cool completely. Store them, unsauced, in the fridge for up to 2 days. When you’re ready to serve, re-crisp them in a 400°F (200°C) oven for about 10 minutes, then toss them in the freshly warmed sauce. This method works much better than saucing them beforehand, as sauced wings can get soggy upon reheating.
Can I use an air fryer instead of the oven?
Yes, the air fryer is a fantastic tool for this! The method is very similar. Pat your wings dry, toss them with the baking powder mixture, and then air fry at 400°F (200°C) for about 20-25 minutes, shaking the basket halfway through. They’ll get incredibly crispy. Just make the sauce on the stovetop as directed and toss the crispy air-fried wings in it at the end.
My sauce is too thin. How can I thicken it?
No worries, this happens! The easiest fix is to create another small cornstarch slurry (maybe 1 tsp cornstarch with 1 tbsp cold water) and whisk it into the simmering sauce. Let it bubble for another minute. If it’s still too thin, just let the sauce simmer a bit longer—the water will evaporate, naturally thickening the mixture. Be careful not to over-thicken it, as it will continue to cling and set a bit once it’s on the hot wings.
Is there a substitute for the baking powder?
For the crispiest skin, baking powder is really the best and most accessible method. If you absolutely cannot use it, you can try tossing the wings in a tablespoon or two of cornstarch instead. The result won’t be *quite* as crackly, but it will still help create a crisper exterior than using nothing at all. The chemical reaction from the baking powder is what makes it truly special.
How can I make this recipe less sweet?
If you prefer a more savory wing, you can easily reduce the honey. Start by cutting it down to 1/3 cup and see how you like the balance. You could also add a splash more soy sauce or a teaspoon of fish sauce to boost the savory, umami elements to compensate for the reduced sweetness. Taste the sauce as you go and adjust it to your personal preference.


Honey Garlic Chicken Wings
Make the best crispy Honey Garlic Chicken Wings with this easy recipe. Perfectly sticky, sweet, and savory—the ultimate crowd-pleaser. Get the recipe now!
Ingredients
For the chicken wings:
-
2 lbs chicken wings (split into drumettes and flats, tips removed)
-
1 tbsp baking powder (NOT baking soda!)
-
1 tsp kosher salt
-
1/2 tsp black pepper
For the sauce:
-
1/2 cup honey
-
1/3 cup soy sauce (or tamari for gluten-free)
-
4-5 cloves garlic (minced)
-
1 tbsp fresh ginger (grated)
-
1 tbsp rice vinegar
-
1 tbsp sesame oil
-
2 tsp cornstarch
-
1 tbsp water
For garnish:
-
2 tbsp sliced green onions
-
sesame seeds (for garnish)
Instructions
-
First, get your oven nice and hot—preheat it to 425°F (220°C). While it’s heating, grab your chicken wings and pat them relentlessly dry with paper towels. You’ll be amazed at how much moisture comes off. Place the bone-dry wings in a large mixing bowl.01
-
Sprinkle the baking powder, salt, and black pepper over the wings. Now, get in there with your hands and toss everything together until every single wing piece is evenly and lightly coated. The baking powder mixture will look a little chalky on the skin—that’s exactly what you want to see.02
-
Arrange the coated wings in a single layer on the wire rack that’s set inside your baking sheet. This setup is crucial for airflow! Pop the tray into the preheated oven and let them bake for 35-40 minutes. You’re looking for a deep golden brown color and wonderfully crispy skin.03
-
While the wings are working their magic in the oven, let’s make that glorious sauce. In a medium saucepan, combine the honey, soy sauce, minced garlic, grated ginger, rice vinegar, and sesame oil. Give it a good whisk and bring it to a simmer over medium heat.04
-
Let the sauce simmer for about 3-4 minutes, stirring occasionally. You’ll notice the smell transforming from sharp and pungent to sweet, savory, and deeply aromatic. In a small separate bowl, make a slurry by stirring the cornstarch and water together until it's smooth.05
-
While whisking the simmering sauce continuously, slowly drizzle in the cornstarch slurry. The sauce will begin to thicken almost immediately. Let it bubble for another minute until it’s nicely thickened and glossy. Then, take it off the heat.06
-
By now, your wings should be perfectly crispy. Carefully pull the baking sheet out of the oven. Using your tongs, transfer the hot wings directly into the large mixing bowl (you can use the same one—no need to wash it!).07
-
Pour about two-thirds of the honey garlic sauce over the hot wings in the bowl. Gently toss and fold the wings until they are all evenly coated in that sticky, shiny glaze. The heat from the wings will help the sauce cling beautifully.08
-
Transfer the sauced wings to a serving platter. Drizzle the remaining sauce over the top for an extra hit of flavor and a gorgeous presentation. Finish them off with a generous sprinkle of sliced green onions and sesame seeds. Serve immediately while they’re hot and crispy!09
Not what you're looking for?


