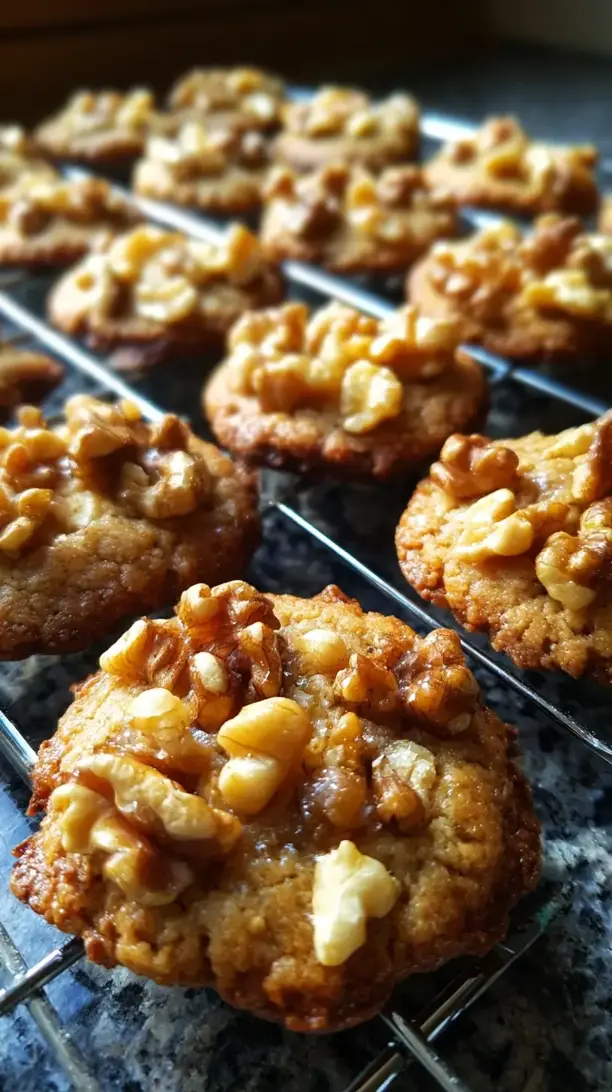
There’s a certain magic that happens in the kitchen during the holidays, isn’t there? For me, it’s the moment the scent of toasting walnuts and warm honey starts to drift through the air. These Honey Walnut Christmas Cookies capture that feeling perfectly—they’re soft, wonderfully chewy, and just brimming with cozy flavor. I love having a plate of them on the counter, a simple invitation for everyone to gather. If you’re looking for standout christmas dessert ideas, consider this recipe your new favorite. It truly creates the kind of memorable christmas sweets that become a happy tradition.
You’ll find this recipe is a joy to make, whether you’re deep into holiday baking or just want something simple and special. They are wonderfully unique christmas cookies, yet incredibly approachable. If your list of christmas baking ideas feels overwhelming, let these be your peaceful, rewarding project. They are genuinely easy christmas treats to whip up, even on a busy December afternoon.
So, as you plan your lineup of holiday treats this season, I hope you’ll give these cookies a try. They turn basic pantry staples into little bites of comfort and joy, perfect for sharing with family, friends, or a certain nighttime visitor with a fondness for cookies.
Love Honey Walnut Christmas Cookies? So do we! If you're into Christmas Cookie or curious about Chicken Thigh Recipes, you'll find plenty of inspiration below.


Why You’ll Love This Honey Walnut Christmas Cookies
- Perfect texture: Soft, chewy centers with delightfully crisp edges.
- Aromatic flavor: Rich honey and toasty walnuts create warm, complex taste.
- Holiday scent: Fills your kitchen with pure festive magic.
- Simple to make: Straightforward dough for bakers of all levels.
Ingredients & Tools
- 225 g (1 cup) unsalted butter, softened at room temperature
- 150 g (¾ cup) granulated sugar
- 120 ml (½ cup) good-quality honey
- 1 large egg, at room temperature
- 1 tsp pure vanilla extract
- 315 g (2 ½ cups) all-purpose flour
- ½ tsp baking soda
- ¼ tsp salt
- 150 g (1 ½ cups) walnuts, toasted and roughly chopped
- Optional: Coarse sugar for rolling
Tools: Stand mixer or hand mixer, baking sheets, parchment paper, a medium bowl for dry ingredients, a small skillet for toasting walnuts.
Notes: Use honey you enjoy the taste of on its own. Don’t skip toasting the walnuts—it unlocks their oils and makes their flavor richer and nuttier.
Nutrition (per serving)
| Calories: | 180 kcal |
| Protein: | 2.5 g |
| Fat: | 10 g |
| Carbs: | 22 g |
| Fiber: | 0.7 g |
Serves: 24 cookies | Prep Time: 20 minutes | Cook Time: 12 minutes | Total Time: 32 minutes (plus chilling)
Before You Start: Tips & Ingredient Notes
- Why toast the walnuts? Toasting is non-negotiable for maximum flavor. It transforms them from mildly nutty to deeply aromatic and crunchy, which prevents them from becoming soggy in the dough.
- What kind of honey is best? A darker, more robust honey like wildflower or buckwheat will give you the most flavor. A very light, mild clover honey will work but will result in a subtler taste.
- The importance of room temperature ingredients. Your butter and egg need to be truly at room temp. This allows the butter to cream properly with the sugar, trapping air and creating a lighter, less dense cookie texture.
- Don’t skip the chilling time. I know it’s tempting to bake them right away, but chilling the dough firms up the butter. This prevents the cookies from spreading too much in the oven, giving you that perfect thick-and-chewy center.
How to Make Honey Walnut Christmas Cookies
Step 1: Toast Your Walnuts. Start by spreading your walnuts in a single layer in a dry skillet over medium heat. Toast them for 3-5 minutes, stirring frequently, until they become fragrant and take on a slightly darker color. You’ll hear them sizzle a little and smell that wonderful, toasty aroma. Immediately transfer them to a cutting board to cool, then give them a rough chop. This prevents them from burning with their residual heat.
Step 2: Cream the Butter and Sugars. In the bowl of your stand mixer fitted with the paddle attachment, beat the softened butter, granulated sugar, and honey together on medium-high speed. You’re looking for a mixture that is pale, fluffy, and well-combined. This should take about 3-4 minutes. Scrape down the sides of the bowl halfway through to ensure everything is incorporated. This step is crucial for creating the cookie’s texture.
Step 3: Incorporate the Wet Ingredients. Beat in the room-temperature egg and the vanilla extract. Mix just until they are fully blended into the butter mixture. The mixture might look a little curdled at this point—that’s perfectly normal and is usually due to the liquid honey. It will all come together once you add the dry ingredients.
Step 4: Combine the Dry Ingredients. In a separate medium bowl, whisk together the flour, baking soda, and salt. This aerates the flour and ensures the leavening is evenly distributed, so you don’t get any bitter pockets of baking soda in your finished cookies.
Step 5: Bring the Dough Together. With the mixer on low speed, gradually add the dry ingredients to the wet ingredients. Mix only until the flour streaks have just disappeared. You’ll notice the dough will be quite soft. Now, switch to a spatula and fold in the toasted, chopped walnuts by hand. This prevents overmixing and ensures the walnuts stay in distinct pieces.
Step 6: Chill the Dough. This is the step that requires a little patience! Cover the bowl with plastic wrap and refrigerate the dough for at least 1 hour, or up to 2 days. The dough needs to be firm enough to handle without being overly sticky. This resting time also allows the flavors to meld together beautifully.
Step 7: Portion and Bake. Preheat your oven to 175°C (350°F) and line baking sheets with parchment paper. Scoop out tablespoon-sized portions of dough, roll them into balls, and if you like, roll them in coarse sugar for a sparkly, crunchy exterior. Place them about 2 inches apart on the baking sheets. Bake for 10-12 minutes, or until the edges are a light golden brown and the centers look just set.
Step 8: Cool and Enjoy. When you take them out of the oven, the centers might still look a little soft—that’s what you want! Let the cookies cool on the baking sheet for 5 minutes before transferring them to a wire rack to cool completely. This allows them to finish setting up without becoming too hard.
Storage & Freshness Guide
- Fridge: Store dough (wrapped) up to 3 days; baked cookies in airtight container up to 1 week.
- Freezer: Dough balls freeze well for 3 months; baked cookies freeze layered for 3 months.
- Reviving: Warm cookies briefly in oven or microwave to restore crispness.
Serving Suggestions
Complementary Dishes
- A simple cheese board — The salty, sharp notes of an aged cheddar or a creamy blue cheese create a fantastic sweet-and-savory contrast with the honey and nuts.
- Spiced pear salad — A light salad with thinly sliced pears, bitter greens, and a citrus vinaigrette cleanses the palate beautifully between bites of the rich cookie.
Drinks
- Earl Grey tea — The bergamot in the tea is a classic partner for honey and nuts, making each sip and bite feel incredibly sophisticated and cozy.
- Hot mulled cider — The warm spices of cinnamon and clove in the cider echo the warm, festive notes in the cookie, making for a truly comforting pairing.
Something Sweet
- Vanilla bean ice cream — Sandwich a small scoop between two slightly warm cookies for an epic, melty, and texturally divine ice cream sandwich.
- Dark chocolate truffles — A bite of intense, dark chocolate after the honey-sweet cookie provides a lovely, rich finish to your treat session.
Top Mistakes to Avoid
- Mistake: Using melted or cold butter. Softened butter is key for creaming. Melted butter will make the cookies greasy and flat, while cold butter won’t incorporate enough air, leading to a dense texture.
- Mistake: Skipping the walnut toasting. I’ve made this mistake before in a hurry, and the flavor difference is night and day. Raw walnuts taste bland and can have a slightly bitter skin, which will let your whole cookie down.
- Mistake: Overmixing the dough after adding the flour. Once the flour is in, mix only until it’s combined. Overmixing develops the gluten in the flour, which can make your cookies tough instead of tender.
- Mistake: Overbaking. These cookies continue to cook on the hot baking sheet after you take them out. Pull them when the edges are golden but the centers still look a bit soft and underdone for the perfect chewy texture.
Expert Tips
- Tip: For a more complex flavor, brown your butter. Melt the butter in a saucepan and cook it until it turns a nutty golden brown, then let it solidify again before creaming. It adds an incredible depth that pairs wonderfully with the walnuts.
- Tip: Use a cookie scoop for uniformity. This isn’t just for looks; it ensures all your cookies bake at the same rate, so you don’t end up with some burnt and some underbaked.
- Tip: Add a pinch of spice. A quarter teaspoon of cinnamon or a tiny pinch of cardamom mixed in with the dry ingredients can elevate the warm, holiday feel of these cookies without overpowering the honey.
- Tip: Make the dough ahead. This dough freezes beautifully. Portion it into balls, freeze them on a tray, then transfer to a bag. You can bake frozen cookies straight from the freezer, just adding 1-2 minutes to the bake time for a fresh-baked treat anytime.
FAQs
Can I use a different type of nut?
Absolutely! Pecans would be a fantastic substitute, offering a similar but slightly sweeter, buttery flavor. Almonds would also work well, though I’d recommend using sliced or slivered almonds for a different texture. Just make sure whatever nut you choose, you toast it first to maximize its flavor potential.
My dough is really sticky, even after chilling. What should I do?
Don’t worry, this can happen, especially on a humid day. You have a couple of options. You can chill it for another 15-30 minutes. Alternatively, lightly flour your hands when you’re rolling the dough into balls. A little bit of extra flour on your hands won’t throw off the recipe and will make the process much easier.
Can I make these cookies without a mixer?
You definitely can! Use a sturdy wooden spoon and a large bowl. It will take a bit of elbow grease to cream the butter and sugars properly—aim for about 5-7 minutes of vigorous mixing until it’s light and fluffy. Then switch to a spatula to fold in the dry ingredients and walnuts to avoid overworking the dough.
How should I store these cookies, and how long do they keep?
Store them in an airtight container at room temperature. They’ll stay fresh and delicious for up to 5 days. If you want to keep them longer, they freeze wonderfully for up to 3 months. Just layer them between sheets of parchment paper in a freezer-safe container to prevent them from sticking together.
Why did my cookies spread too much?
This is almost always a temperature issue. Your butter was likely too warm when you creamed it, or your dough wasn’t chilled sufficiently. The oven temperature could also be off—it’s a good idea to use an oven thermometer to check. Next time, ensure your ingredients are room temp (not warm) and don’t skip that crucial chilling step to firm up the butter.


Honey Walnut Christmas Cookies: A Festive Holiday Treat
Honey Walnut Christmas Cookies are the ultimate holiday treat. This easy Christmas cookie recipe yields soft, chewy cookies filled with toasty walnuts and warm honey, perfect for your festive baking.
Ingredients
For the Ingredients
-
225 g unsalted butter (softened at room temperature)
-
150 g granulated sugar
-
120 ml good-quality honey
-
1 large egg (at room temperature)
-
1 tsp pure vanilla extract
-
315 g all-purpose flour
-
0.5 tsp baking soda
-
0.25 tsp salt
-
150 g walnuts (toasted and roughly chopped)
-
Coarse sugar (Optional, for rolling)
Instructions
-
Toast Your Walnuts. Start by spreading your walnuts in a single layer in a dry skillet over medium heat. Toast them for 3-5 minutes, stirring frequently, until they become fragrant and take on a slightly darker color. You’ll hear them sizzle a little and smell that wonderful, toasty aroma. Immediately transfer them to a cutting board to cool, then give them a rough chop. This prevents them from burning with their residual heat.01
-
Cream the Butter and Sugars. In the bowl of your stand mixer fitted with the paddle attachment, beat the softened butter, granulated sugar, and honey together on medium-high speed. You’re looking for a mixture that is pale, fluffy, and well-combined. This should take about 3-4 minutes. Scrape down the sides of the bowl halfway through to ensure everything is incorporated. This step is crucial for creating the cookie's texture.02
-
Incorporate the Wet Ingredients. Beat in the room-temperature egg and the vanilla extract. Mix just until they are fully blended into the butter mixture. The mixture might look a little curdled at this point—that’s perfectly normal and is usually due to the liquid honey. It will all come together once you add the dry ingredients.03
-
Combine the Dry Ingredients. In a separate medium bowl, whisk together the flour, baking soda, and salt. This aerates the flour and ensures the leavening is evenly distributed, so you don’t get any bitter pockets of baking soda in your finished cookies.04
-
Bring the Dough Together. With the mixer on low speed, gradually add the dry ingredients to the wet ingredients. Mix only until the flour streaks have just disappeared. You’ll notice the dough will be quite soft. Now, switch to a spatula and fold in the toasted, chopped walnuts by hand. This prevents overmixing and ensures the walnuts stay in distinct pieces.05
-
Chill the Dough. This is the step that requires a little patience! Cover the bowl with plastic wrap and refrigerate the dough for at least 1 hour, or up to 2 days. The dough needs to be firm enough to handle without being overly sticky. This resting time also allows the flavors to meld together beautifully.06
-
Portion and Bake. Preheat your oven to 175°C (350°F) and line baking sheets with parchment paper. Scoop out tablespoon-sized portions of dough, roll them into balls, and if you like, roll them in coarse sugar for a sparkly, crunchy exterior. Place them about 2 inches apart on the baking sheets. Bake for 10-12 minutes, or until the edges are a light golden brown and the centers look just set.07
-
Cool and Enjoy. When you take them out of the oven, the centers might still look a little soft—that’s what you want! Let the cookies cool on the baking sheet for 5 minutes before transferring them to a wire rack to cool completely. This allows them to finish setting up without becoming too hard.08
Not what you're looking for?


